Every parent can make a beautiful holiday costume for a girl. It’s enough to familiarize yourself with the possible options and add a creative approach.
The question of choosing a children's costume usually arises on the eve of the New Year holidays or theme parties.
In any case, the most popular models for girls, as can be seen in the photo of a do-it-yourself costume for a girl, are fluffy dresses.
After all, this style is universal, a girl can be a snowflake, a princess, or another fairy-tale character.
Snowflake
You should consider the main steps of how to sew a costume for a girl with your own hands. This costume is popular because it is suitable for children of all ages.
To change the image or add variety, it is worth diluting it with various small-sized details. You can change the color composition of the suit.
The working process
So, we make a costume for a girl with our own hands from material such as tulle, wide elastic and additional tools. We are talking about scissors, a hot glue gun, cardboard.
When choosing tulle, give preference to blue or white. Remember that the more tulle you use, the fuller the final result will be.
Costume for a little sailor
The basis of the costume of the conqueror of the seas will be a white shirt and trousers.
There are quite a lot of shirt options. For a do-it-yourself sailor suit for a boy, take a white shirt from your wardrobe or use a ready-made shirt to make a pattern on light linen fabric. If you are going to sew the shirt yourself, then remove the line of buttons by making a v-neck.
Sew blue cuffs to the finished white shirt with a width equal to half the little artist’s wrist. The main attribute of the outerwear, of course, is the guy - a blue or blue collar with three white stripes.
Sailor's trousers
Making a New Year's sailor costume is not at all difficult. Take casual clothes as a basis: blue trousers, although you can use black and white trousers. And if there is nothing suitable in the children's closet, then check the adult wardrobe. Find clothes that you can sew for your child. The big problem will be the lack of free time. Young mothers, and even working ones, have almost no free minute, and sewing an outfit will require a lot more.
If we also take into account the time for purchasing the missing decorative elements and fabric, then there is absolutely no time left. Plan the time in advance to sew a New Year's suit so as not to sit the night before the matinee. Find a pattern, select fabric, buttons, appliqués, ribbons. You can sew the simplest trousers for your child yourself.
Find a pattern or trace the finished trousers, folded along the middle seam. Leave a 2 cm allowance. Just steam trousers made of blue fabric thoroughly; if they are made of white fabric, then sew blue cuffs along the bottom just like on a shirt. Carefully iron the creases on the trousers and pick up a black leather belt with a massive buckle.
Marine beret for cabin boy
A person unfamiliar with sewing can handle a simple version of a beret for a little sailor. You don't need a complicated pattern , it's so simple.
You need to cut out two circles of white fabric and a rectangle. The circle is the basis of the beret; select its size according to the circumference of the child’s head. The length of the rectangle is equal to the circumference of the head, plus 1 cm for the seams. The width of the rectangle is equal to double the height of the beret - 16 cm.
It’s worth breaking down the workflow step by step.
It is necessary to measure the girl's waist using an elastic band.
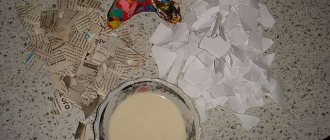
It is necessary to cut the fabric into strips, the width of each element will be approximately 15 - 20 cm.
The elastic must be folded with a pin, then put on the back of the chair. One part of the strip is folded in half and threaded under the tape. After this, it is passed through the loop.
Straighten the knot, this way it will look much more impressive. Tie all the strips around the elastic band.
After all the previous steps have been completed, you should try on the skirt. Often the elastic band has stretched by this time. In this case, you should sew a ribbon to it, then tie it with a bow. Next, one end should be carefully sewn to the other end.Then it’s the turn of the cardboard; you should draw snowflakes on it. Cover the outline with parchment paper, then trace with hot glue. Before the glue has time to harden, you should sprinkle the outline with glitter.
The next step is to attach the lace crafts to the front side of the skirt.
Folk costumes
The main association that arises when mentioning a DIY folk costume for a girl is a multi-colored, loose-fitting sundress with embroidered inserts.
Often this look is complemented by colorful ribbons. The sleeves in them are completely different, because once upon a time these elements had certain differences. The same applies to the style and color of the product.So, to start making a Russian costume for a girl with your own hands is to create a pattern.
Prepare materials and tools. The working tools you will need are scissors, needles, threads, and pins. When choosing dense fabrics, give preference to fine wool or linen.
First of all, you need to decide on the length of the suit, and then start cutting the pattern.
The next step is to transfer the pattern onto the fabric. To do this, use pins, carefully tracing the contour of the parts. After that, carefully cut them out.
Next, the parts are sewn together and the inserts are attached. It is necessary to properly process the hem of the dress. Sew the straps so that you can adjust the required length.
The main decoration of such a product is a bright ornament. It is made of patterned red chintz, it is possible to complement the same color with chintz.
Young sailor costume
Usually girls at matinees get the role of a princess or a snowflake , for which there is a white fluffy dress. But it may happen that your daughter will get to perform a sailor dance and will need a special naval costume.
Part of the costume can be selected from the children's wardrobe, for example, find a white blouse and a white or blue skirt. Sew cuffs onto the blouse using blue fabric. Using a white satin ribbon, make three stripes along the cuffs.
Wear a vest under the blouse or sew in a striped wedge, imitating the presence of a vest on the child’s body. White tights and dark shoes will complete the look.
Headdress
A sailor always has a lady of his heart, a girl waiting for him on the shore. For a sea dance at a matinee, girls will need a themed costume. The women's visor cap is made simply and differs from the men's cap. You will need a piece of blue fabric and white satin ribbons. A women's headdress will keep its shape even when made of soft material.
For the pattern, measure the circumference of the girl’s head and the height of the headdress. Mark on paper ¼ of the circumference and 20 cm of the height. Connect them with a line to form a wedge. Using scissors, cut out the pattern and transfer it to the fabric. Make four identical wedges of blue fabric and connect them together with a basting stitch, then sew them on a machine.
Cut out the dublerin and make a band the length of which is equal to the circumference of the baby’s head. Using an iron, glue the band blank to the fabric, fold it in half and sew on a white satin ribbon.
Using pins, pin the band to the cap, sweep and sew on a typewriter. Sew the ties on the sides so that the headdress, while sitting comfortably, does not fall off the head. Carefully press the crown inside the visor, forming a depression around the circumference. The sailor suit for the young sailor is ready.
Sailor skirt
To dress up a girl for a matinee, replace trousers, shorts and breeches with a skirt. DIY sailor costume
- sun, half sun;
- straight cut;
- with folds.
A straight skirt goes with a tunic, a pleated skirt goes with a T-shirt, sun and half-sun goes with a blouse . Manufacturing procedure:
- Straight skirt. To sew a straight-cut skirt yourself, take two measurements: waist circumference and product length. Calculate the width of the product by multiplying the waist circumference by 1.33. For example, the girth is 55 cm, multiply by 1.33, you get 71.5 cm. Round and measure 72 cm on the fabric. Make two rectangles. The first is the length and width of the skirt, the second is the length of the waist circumference and the width of 15 cm. Connect the rectangles into separate circles. Fold the blank for the belt in half so that the free edge is on top. Take a 2 cm wide elastic band, cut the length around your waist, and connect it into a circle. Insert the elastic into the waistband and sew the edges of the fabric using a sewing machine. Fold each piece in half four times, securing the bends with pins. Start attaching the waistband to the skirt, moving from pin to pin and stretching the waistband to the same mark on the skirt. Fold the bottom of the product and sew on a typewriter.
- Skirt with pleats. To create such a model, decide on the length of the product, taking into account seam allowances, and the width, taking into account the waist circumference and the size of the sweetie. They can be made towards each other or bent to one side. Secure the folds with pins or a basting stitch. At the end of working with folds, you will get a rectangular product with a length corresponding to the waist circumference and 2 cm for the seams. Sew the top and bottom of the skirt using a machine. Sew on the belt. Iron the folds thoroughly. Thread an elastic band into the waistband. If you are an inexperienced tailor, then control yourself when trying on a skirt for a child at different stages of making the product.
- Skirt sun. To cut out a circle skirt without calculating a formula, you can use a plate or pan lid, which will coincide in circumference with the circumference of the child’s waist. Fold the fabric right side inward. Place it on a flat table surface with the edge facing you. Along the fold of the fabric, measure the length of the skirt 25 cm and 2 cm allowance (to hem the skirt). Make a chalk mark at this location. Take a plate whose circumference corresponds to your measurements + 3 cm for the seam. Place the plate on the reference mark and outline it with chalk. This will create the top line of the skirt. From the top line, use a tailor's tape to set aside the selected length of the skirt (25 cm plus an allowance of 1.5 cm). Along the top line, draw an allowance of 1 cm to connect to the belt. Start cutting the skirt from the bottom edge. Then remove the top. Cut along the fold on one side only. The stitching will be at the back and will have a zipper sewn into it. Make the belt from a rectangle, with a length equal to the waist circumference plus 3 cm for the seam and a width of 6 cm plus 2 cm. You can insert an adhesive pad inside the belt for rigidity or simply insert an elastic band. Baste the seam on the skirt and sew in the zipper at the same time. Baste the belt to the top line of the skirt and try it on. Correct the flaws and sew all the seams using a machine, and process the cuts using an overlocker. Steam the seams well with an iron.
Cat
This is also quite a current costume.
To make a cat costume for a girl with your own hands, you need to follow step-by-step instructions.The first step is to make the tail, ears and paws. Prepare a hoop, paper, needle and thread, pencil, felt and start making decorative parts of the costume.
The final detail in the look is a skirt made of black tulle. The more material you take, the fuller the skirt will be.
In general, this image will look quite impressive and will be remembered for a long time. For an older girl, the same materials are used to make a costume. You just need to think through all the details of the image and complement it with suitable makeup.
Gloves with claws and interesting tights will become a bright accent. A bow attached to the neck is also often used for this look.
Today there are a huge number of variations of festive costumes.
You don’t have to spend money on buying a finished product; with a little effort and imagination you can make an original and attractive costume with your own hands.
All that's left to do is to collect the elements of the image and add decor to the outfit. It is important to harmoniously combine all the elements into a single whole, so that the girl’s costume is the best and unique among others.
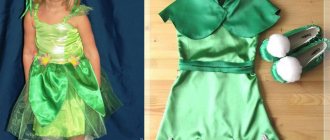
DIY frog costume
Very often, kindergartens and schools require a carnival frog costume for the New Year's holiday, but it is not always possible to find a really beautiful outfit on sale. The way out of this situation for parents is to sew a children's frog costume with their own hands, but they often do not know how to do this.
Master class: how to sew a frog costume for a girl
You will need:
- thick cardboard size 2mx1m;
- Whatman paper is green;
- yellow satin ribbon;
- 3m green tulle (hard);
- 1 foam ball;
- yellow paint;
- rubber band, red tape and red wire;
- glue, glue gun, scissors;
- yellow, green and black foam;
- yellow cardboard;
- green T-shirt;
- tools.
Draw an oval all over the cardboard, in the center - a circle, the length of which is equal to the length of the child’s waist + 5 cm. We put two points on the inner circle, 3 cm apart from each other, and draw straight lines from them on a large oval, as shown in the figure. Cut out the drawn part.
Using the resulting figure as a template, we cut out the same part from green Whatman paper.
We insert a green T-shirt into the circle and mark a line so that the cardboard circle is at the child’s waist. Glue the excess fabric to the underside of the cardboard. We glue a piece of green Whatman paper to the top of the cardboard. We make a pack from green tulle by cutting off a strip with a width equal to the radius of our oval and gathering it on one side onto a thread, the length of which will be equal to the child’s waist. Fold the yellow satin ribbon in half, insert the collected tulle inside and stitch them. The completed skirt will need to be placed on top of the cardboard circle at the child's waist.
We cut out two parts from green foam, arranged in a mirror image, for the hip, leg and paw. To form the thigh and leg, glue the resulting parts together letter by letter.
We glue a square of green tulle to the foot part, and then when the glue dries, we cut out the foot with membranes between the toes.
We insert the leg part into the thigh and glue them at the joint, then the paw to the leg. Let's start making the frog's head. Using the templates, we cut out parts from green and yellow foam.
Place the yellow piece on the green piece and glue them together only along the edge.
Fill the remaining beak space with napkins or cloth.
Glue an elastic band slightly less than the circumference of the child’s head to the two ends of the resulting beak.
Insert a piece for the eyes made of green foam, made according to the template, into the cuts made
We cut the ball painted yellow into two parts, and to each of them we glue a pupil cut out of black foam.
We glue an eyelid made of foam over the eye. And then we glue the frog’s head to the blank.
To make the tongue, you need to thread the wire along the entire length of the red ribbon and insert its end between the yellow and green parts of the frog's mouth. Thanks to the wire, the tongue can be given any shape.
We make a crown from yellow cardboard and our frog costume is ready!
There are other options for frog costume patterns for girls that you can make with your own hands.
New Year's frog costume for a boy - master class
You will need:
- foam;
- old cap;
- 2 m green fleece;
- ball;
- white felt;
- glue, tools: needles, threads, scissors, sewing machine.
To make the frog's head as a base, take an old child's cap and cut off its visor.
We cut out 2 wedges from foam rubber the length of the cap, and 2 more - 5 cm longer. We try them on to the cap, cut off the excess and sew the parts together like this: short ones in front, and long ones in the back.
To make the frog's mouth, cut out a strip of foam rubber 5-7 cm wide. Sew it to the protruding parts of the rear wedges so that between the cap and the strip there is space for the child's eyes and nose. For the convenience of sheathing with fleece, it is better to immediately sew it on one side and simply fasten it on the other.
Cut out 5-6 pieces from fleece. wedges, the same size as those made from foam rubber. We sew them on the wrong side, turn them inside out and put them on the hat. Cut off the excess fabric at the front.
At the front we sew the fabric to the cap with a hidden seam.
In the same way, we wrap the strip that acts as the mouth and sew it on the other side.
We cut the ball into two parts and cover it with white felt, bending the ends to the wrong side.
On the well-dried halves we glue the pupils cut out of black fabric.
Glue the resulting eyes exactly in the middle of the front wedges of the hat.
From felt we cut out a strip 25 cm long and 10 long triangles. We sew them together by placing the wide part of the triangle into a strip folded in half. This will be the collar of our frog.
We sew a long-sleeved jacket and straight pants according to the child’s existing clothes.
Our frog is ready!