Many beginning needlewomen confuse the tapestry stitch with the carpet technique. Tapestry weaving is created using a special tool, but embroidery involves performing several types of stitches using a needle.
The velvet stitch especially imitates “weaving”, where identical loops are created, secured in each row with crosses, and at the end of the work they are cut and trimmed. But some of the tapestry stitches resemble carpet techniques in appearance. Let's look at several varieties of this seam.
Tapestry seam: execution patterns
The tapestry stitch in appearance resembles a half-cross, but on the wrong side there will be a different design. The slant of the stitch can be made to the right, left or vertical, but is always created from right to left. Thanks to this technique and the use of thick threads (skein floss, wool, iris, cotton), the fabric becomes dense, without gaps in the fabric. Embroidered with a tapestry stitch on a rigid large fabric or plastic canvas when making paintings and voluminous souvenirs.
Tapestry stitch has several names:
- Oblique. This tapestry stitch resembles a half cross. The needle must be inserted into the same corner. That is, if you started embroidering from the bottom left corner to the right, then all subsequent stitches and rows go in the same direction.
- Oblique with spacer or pads. The thread is drawn onto the front side according to the number of cells, and then it is covered with a tapestry stitch. That is, the canvas becomes without gaps, and the stitches resemble convex beads. This technique uses all stitches in all colors.
Tapestry embroidery and cross stitch: similarities and differences
Tapestry technique has its own characteristics. They distinguish it from the half-cross that is familiar to most needlewomen.
Similarities
1. Both techniques are counting techniques - the process of creating a pattern requires counting the stitches on the canvas so that their number and position exactly correspond to those indicated on the embroidery pattern. The needlewoman is required to transfer onto the fabric everything indicated on the diagram without errors.
2. Identical materials for work. Special needles for embroidery with a rounded end and a wide eye, floss or wool for embroidery, as well as canvas or fabric of uniform weave of various counts, on which each stitch has its own square, are used.
3. Visual similarity of finished products. Embroideries made with ½ cross stitches and tapestry stitch have a fairly similar appearance. Because of this, a beginner may confuse them. Experienced needlewomen will not make such a mistake.
The tapestry embroidery technique, like the half-cross, is used to make paintings, decorative interior items and clothing decoration.
Do you see the difference between a tapestry stitch and a half-cross stitch?
Not really
Differences
1. Despite the fact that the half-cross is quite similar in appearance to the tapestry stitch, the latter is still done somewhat differently. The main and noticeable difference will be the appearance of the reverse side of the work . When making a half-cross from the inside out, short vertical stitches are obtained. The tapestry stitch on the front side is laid in the same way as a half-cross, and on the back side long diagonal stitches are formed, which occupy two squares of canvas or evenly sized fabric. Thanks to this filling of the reverse side, the front side looks very dense.
2. difficult and inconvenient to embroider with a half-cross stitch on a printed pattern . This kind of work requires a thick thread, and decorative pillows are most often made on this basis.
3. Embroidery using the tapestry technique involves filling the canvas completely , since otherwise the long purl stitches will be visible. When embroidering using the half-cross technique, the pattern may have empty areas.
The tapestry technique results in complete stitching of the reverse side of the work. Thanks to this, it is possible to hide all the ends of the threads under the stitches.
Step-by-step technique for embroidery with tapestry stitch
- When using an even number of threads, secure the floss with a loop, as in cross stitch. That is, insert both ends into the eye of the needle, forming a loop at the end. Insert the needle in the right place from the wrong side, make a half-cross and secure the thread through the loop on the wrong side. Make all other stitches from the same corner from which the first one started.
- If the thread is ordinary, then on the wrong side, where the row of the desired color begins, the floss is “tied” through the weaves of the fabric. On the front side, tapestry stitches will overlap this thread.
- You begin to embroider all rows from right to left.
- To tilt to the right, start inserting the needle into the upper right corner from the lower left corner. The second and subsequent stitches are performed in the same sequence. To tilt to the left, insert the thread from the lower right corner to the upper left.
Some craftswomen embroider without moving their hand to the wrong side, that is, on the face they immediately “grab” both corners of the diagonal of the cell with a needle. With this method, you can tighten the fabric if it is soft.
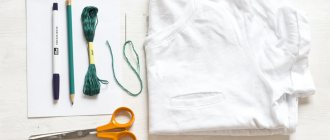
Required Tools
For work, almost the same tools are used as for cross stitch:
- base fabric (canvas or uniform);
- threads for embroidery (floss, wool, etc.);
- needle , the number of which will correspond to the size of the selected base;
- scissors;
- hoops - not used by all needlewomen, since many embroiderers, when working on a rigid base of stramine or starched canvas, prefer to do without them.
Editorial Voice
Matryona
Fan of embroidery and sewing
Ask a Question
If you have vision problems or the work is carried out on a very small basis, it is worth purchasing a special magnifying glass . It will allow you to embroider without straining your eyes.
Making rows and securing the thread
- Embroidering with a tapestry stitch from a new row can be done in two ways. In the first option, after the end of the row, the thread breaks and the work begins on the right side of the embroidery.
- The second method is expressed in a smooth transition to the second row and embroidering from left to right, but so that the direction of the stitches on the front and back is the same. That is, insert the needle in the second row into the upper right corner from the wrong side and bring it out in the opposite lower left corner. Next, perform all the stitches in the same sequence from the upper right to the lower left corner.
- The reverse side of a tapestry seam should be the same as the front side, that is, consist of solid half-crosses made in one direction.
- After finishing the work, the thread is hidden under the stitches and cut. There should be no knots or tails on the reverse side.
- If you need to change the thread to a different color, then all the rules remain the same as when you started working.
- When using soft fabric, use frames that can be turned over to work inside out.
Embroider! 12 types of embroidery and their amazing examples
A lot has already been said and written about embroidery!
Here's what Wikipedia writes about it: “Embroidery is a widespread type of decorative and applied art in which a pattern and image are made by hand or on a machine on various fabrics, leather, felt and other materials using linen, cotton, wool, silk threads, beads, precious stones, sparkles, coins, etc.” This art originated in ancient times in the East. The oldest embroideries are now considered to be from ancient China, created back in the 4th-5th centuries BC. This is what embroidery from an ancient Mongolian burial ground looks like:
And these are the surviving pages from the first book on embroidery, dated approximately 1527-29:
In this publication, I wanted to bring together different trends in this type of creativity: because recently, along with traditional and well-known types of embroidery, new, sometimes exotic and very unusual, are increasingly appearing.
Let's start with some of the traditional, most famous and common types of embroidery.
Cross-stitch
This type of embroidery has its roots in the era of primitive culture, when people began to decorate their clothes from skins. Cross stitch is a method of embroidering a design onto canvas using a needle and colored threads. In addition to the cross, other types of stitches are used: half-cross, petit (part of the cross) or backstitch (outline). Used to decorate various products and create embroidered paintings.
Satin embroidery
This type of embroidery is also one of the oldest. But unlike cross stitch, which is based on patterns, satin stitch embroidery gives unlimited freedom of action. In satin stitch embroidery, the stitches are applied to the canvas close to each other, leaving no gaps. In this technique, various seams and techniques are often combined, and the so-called artistic satin stitch is obtained.
Silk embroidery
This type of embroidery is one of the types of satin stitch that came to us from China. Silk fabric is taken as a basis and embroidered with silk threads, which have increased strength, shine and very bright shades. Silk embroidered paintings combine traditional embroidery and painting and retain their original appearance for decades.
Chenille embroidery
Chenille, which means “caterpillar” in French, is a velvet silk cord. This type of embroidery was used to decorate clothes and fabrics for wall upholstery back in the 18th century.
Embroidery with gimp or gold
Gimp is a thin metallized thread, golden or silver in color. Most often, such embroidery is used to create church vestments, icons, and women's clothing. Gold embroidery is considered the most labor-intensive, due to the strong curl of the threads.
Cutwork embroidery
This is the most famous type of openwork embroidery. The main details of the pattern are sewn in satin stitch, and the gaps are removed, forming a pattern similar to lace. If the slots are too large, special thread bridges are laid - brids. This technique appeared in Italy, and then moved to France, where Cardinal Richelieu was very fond of it, for which it received its name. This type of embroidery is used to create tablecloths, napkins and various items of clothing.
Embroidery-applique
This embroidery is a type of overlay sewing, when various pieces are sewn onto the main fabric in accordance with the selected pattern. The applique can be flat or convex, single-color or multi-colored.
The most popular trends in this type are patchwork (patchwork)
and quilting (creating ornaments and entire paintings).
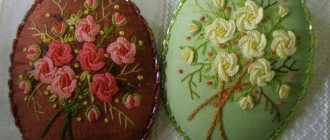
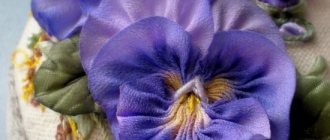
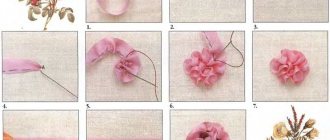
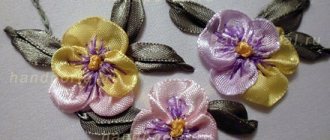
Embroidery ribbons
It is especially attractive because it allows you to add volume to the embroidery. Embroidery uses different types of stitches and techniques, as well as different types of ribbons. Very often this type of embroidery is used when decorating weddings and to create three-dimensional panels.
Embroidery with beads, bugles, sequins
It is believed that the name "beads" comes from the Arabic "buera", which means small drops of glass. Beads are not only used to embroider pictures, but they are also used to create many decorations.
Isographics
Otherwise, isothread, embroidery on cardboard, thread graphics. This is an embroidery pattern on a dense basis. This type of embroidery first appeared in England. Creating crafts in this way is often used for children's creativity.
Bargello
Antique Florentine embroidery. Used to create three-dimensional colorful patterns and ornaments. Bargello can easily be confused with smoothie. They differ in that bargello has stitches of the same direction and the same size. This technique is usually used to create various accessories used in the interior.
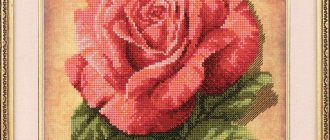
Tapestry embroidery
This embroidery on the front side resembles a half-cross. But the tapestry stitch differs from the half-cross stitch in that the stitches on the front and back sides are located in one strictly defined direction. Tapestry stitch is used to create panels, paintings, clothing items and carpets. Tapestry embroidery turns out smooth and embossed, looks rich and original.
Next time I will try to talk about new, modern, sometimes exotic types of embroidery.
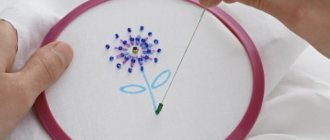
Step-by-step execution of pads
Now let's look at what the tapestry stitch embroidery technique looks like when laying the thread. This method is also called pads.
- The thread is secured in any way described for the usual tapestry stitch from the end of the row.
- The thread is brought out in the middle of the cell before the beginning of the row. That is, you lay a thread on the face of the length that corresponds to the number of cells of the desired color.
- Bring the needle from the inside out also from the left corner up to the right. Subsequent stitches are performed in the same sequence. That is, the half-crosses cover the thread.
- Do the same for the next row. First, bring the thread to the face in the middle of the cells. Then, in the same sequence, from right to left, embroider with a tapestry stitch.
- Fasten the thread after finishing the color or row in the same way as described for the classic tapestry stitch.
The rows are very voluminous and dense. Therefore, embroidering in “sections”, as in cross stitch, will not work. Do the work strictly in rows (horizontal, vertical, diagonal).
Materials for work
To perform the technique, you need to select the right materials. Due to the density of the seam, thin fabric is not suitable for needlework. Preference is given to dense fabric, rigid canvas.
Tools for work:
- a simple needle with a large eye;
- For a tapestry stitch with a velvet look, you will need a needle with a blunt tip and a wide eye. Thanks to it, you can make neat loops on fabric using threads;
- hoop for fixing the canvas;
- threads of dense structure. It is recommended to use wool, cotton yarn, floss, which is folded in 5-7 layers;
- scissors.
Beginners are recommended to purchase similar sets of tapestry embroidery techniques for beginners at any needlework store.
Vertical execution of tapestry stitches
Most often, craftswomen make a vertical tapestry seam (also called a straight stitch) with and without thread. The straight stitches of the paintings immediately attract people's attention due to their unusual design.
- Fasten the thread in the already familiar way.
- Bring the needle from bottom to top in each “hole” of the canvas cage. If you are using fabric, try to keep the stitches the same length and count the same number of weaves.
- Please note that on the back and front the stitches are vertical, only on the front side they are more convex.
- To move to the next line, drop from the top corner of the first row to the bottom of the second row.
- Next, do all the stitches in the same sequence from bottom to top. Try to avoid gaps between rows.
- If you need a seam with an inserted thread, then the execution is the same as with blocks, only you make the stitch straight, not inclined.
- When fastening the thread, all the rules remain the same as when simply performing a tapestry stitch.
What you need to create a tapestry masterpiece
In order for the finished tapestry embroidery to be of high quality and without defects, you need to stock up on the necessary tools in advance. You also need to select the necessary thread structure and thickness, and most importantly, choose the appropriate fabric.
For tapestry embroidery you will need the following items:
- the threads are dense in texture, you can use floss, which will have to be folded in several layers;
- needle;
- scissors;
- thick fabric or canvas;
- a diagram or drawing according to which the work will be carried out.
Note! You can purchase special kits in stores for embroidering tapestries at home yourself, which include an execution pattern and the items necessary for this.
You might be interested in How to embroider butterflies with cross stitch, satin stitch or beads
Making a catch seam
The catch stitch is used to smoothly transition similar shades when sewing large areas. Often this tapestry stitch embroidery is used to create abstract geometric shapes. It can be made with short and long, oblique and straight tapestry stitches. But when performing long half-crosses, the grip is better visible.
- Fastening the thread is the same as when making a simple oblique seam.
- Start working from right to left with elongated stitches, inserting the needle from the bottom left corner to the top right. Perform subsequent stitches in the same way.
- The new row begins in the opposite direction from the end of the stitch at a third of the previous row. That is, insert the needle from the bottom left corner of the second row into the right one, which is located between the two stitches of the first row. It looks like this: if the stitch is two cells in height, then the second row ends with half a cell of the previous row in the upper right corner. The rows seem to be holding each other.
Step-by-step instructions for embroidering tapestry stitches
When embroidering using the tapestry technique, the oblique stitch is used most often. The needle is brought out to the right side of the fabric at the top point of the stitch and pulled to the wrong side at the bottom. For the next stitch, the needle is also brought out onto the face in the upper corner.
Apply a few more stitches:
- Straight. It is usually used if you need to embroider a border. This technique is no different in complexity and is also performed on evenly woven fabric or canvas. With this technique, there will be oblique stitches on the back side, and straight stitches on the front side. To do this, the needle is brought to the front side of the fabric and, lowered vertically, is pulled to the wrong side through one or more cells, depending on the pattern. Then the needle is brought back to the top point of the next stitch.
- Breathtaking. It is used in complex landscapes, if it is necessary to give additional relief to any area. With this technique, the stitches are made slightly oblique, the lower part of the stitch is located through 1 thread of warp weaving. The next row, which is located below, will be in contact with the previous one, since its stitches will begin in the same row as the top ones of the previous one.
- Pads (mosaic). Such stitches allow you to achieve pronounced relief and expressiveness of individual elements in embroidery. The work must be done strictly in rows. Each subsequent row is pressed tightly against the previous one, so embroidering the work in pieces by color will not work. On the front side, the thread is brought out in the middle of the cage and laid on the fabric. Its length should be equal to the length of the row of this color. Next, embroidery is carried out using an oblique tapestry stitch. All rows are performed in the same way.
Additional types of stitches are used to create especially complex embroidery patterns, which are chosen by experienced needlewomen.
Mosaic tapestry weaving
There is also mosaic embroidery with tapestry stitch. It is used when creating ornaments or filling the background. This technique consists of three stitches: two short and one long. The embroidery is created in blocks, also from right to left.
- The length of one row corresponds to the height of the extended stitch. A “block” is a square of four cells.
- Start with a short seam from the bottom left corner to the top right corner. That is, if the height of the row is two cells, then the oblique stitch fills the bottom cell.
- Next, from the upper right corner of the short stitch, move to the lower left corner, making an elongated half-cross. That is, a stitch is equal to two cells.
- The next short half-cross is located in the first upper cell opposite the lower same stitch. That is, from the upper right corner of the elongated stitch, insert the needle into the lower left upper square.
- The next block begins with a short stitch in the same sequence. This means that the row is represented by alternating two short stitches with an extended seam.
- The new row also begins with a short tapestry half-cross.
Performing a checkerboard stitch
Original chess tapestry stitch. The technique is a little similar to mosaic block weaving, only it contains seven stitches rather than three. Each half-cross is extended by the same distance, and the longest one divides the square (block) in half. That is, from the midline there are three stitches of different lengths in each direction.
- Work begins on the left side of the square. All stitches are made in the same way from the left to the right corner. Each subsequent half-cross lengthens.
- The embroidery ends with the same short stitch located in the opposite corner of the square.
- The next block also begins diagonally with a short half-cross.
Such squares are embroidered with multi-colored threads. If you then sew triangles on the embroidered blocks in different directions, you will get a Scottish stitch. This technique is suitable for making rugs and pillows with thick threads. When combining various block and single stitches, you get beautiful embroidery with tapestry stitch (a master class of all stitches is described above).
Additional information for craftswomen
The length of the tapestry stitch can be one or two squares in height. In the first case, such a seam is called shortened, and in the second case, it is called elongated. Moreover, it can be oblique or straight. You can embroider works in horizontal, vertical or only diagonal rows.
With diagonal design, embroidery starts from the first upper corner. The next row starts from top to bottom and bottom to top. This type of stitching is also called a basket stitch, since the beginning of a new row covers the previous one.
A tapestry stitch with a laid thread is suitable for small projects, and if they are larger, then a “Renaissance” stitch is used. That is, the line in the rows is laid from right to left and from left to right, leaving small transitions on the sides. On the face you embroider vertical straight stitches.
There is a woven tapestry stitch. The tutorial for this stitch is very simple. To begin, make the first row of elongated tapestry stitches from right to left, and then start the second row from the lower left corner, which is perpendicular to the upper corner of the first row. And insert the needle into a third of the cells of the first row. That is, it turns out to be a kind of Christmas tree.
How to apply tapestry stitches?
When embroidering plastic canvas, pillows, panels, carpets, you can vary the seams in length, slope, direction. The masters have gone further and create entire paintings from photographs. For example, the boundaries of a landscape (grass, meadow, flowers, sky, cloud and other details) are transferred onto the fabric, then embroidered with a tapestry stitch. By changing the direction and length of the stitches, the master emphasizes the background and foreground.
Some craftswomen use tapestry stitch when creating simple paintings. Ordinary children's stories are suitable for this. You embroider the picture using horizontal or vertical lines, and the length of the stitches may be uneven and correspond to a certain color.
When creating paintings, ordinary oblique tapestry stitches are used. They are distinguished from a half-cross by the reverse side. That is, if in half-cross stitch there are short straight transitions on the reverse side, then tapestry stitches have long diagonal ones. When doing tapestry embroidery, creating volumes requires a lot of thread.
Tapestry or tapestry
From time immemorial people have been engaged in weaving. This mainly applies to clothing fabrics. However, carpets and tapestries also come off the loom. Strictly speaking, tapestries are lint-free wall hangings made using the technique of cross-weaving threads.
Making trellises, or tapestries, involves the use of a loom or a special frame on which the warp threads are stretched. Then a canvas is created, which is used for hems or as seam allowances of at least 1 cm wide using the same threads as the warp. A design is sewn or pinned to it, and then the pattern is made with colored threads.
Tapestries are also called paintings embroidered with tapestry stitches, which adds confusion to the minds of craftsmen and ordinary people.