Embroidery of lilacs with satin ribbons based on photos and videos MK
A very popular handicraft among craftswomen is cross stitch and bead embroidery. But not everyone dares to embroider with satin ribbons. And this is completely in vain, since ribbon embroidery is a creative and noble activity, with exquisite work.
The background of the picture, as well as its main elements, look like a museum exhibit that came to us from the last century. The finished work looks so colorful and mysterious.
This article will be no exception, in which the process of embroidering lilacs with satin ribbons will be discussed step by step.
Learn to embroider lilacs with ribbons from a photo master class
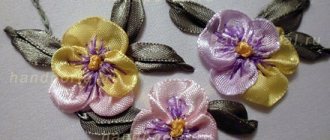
This creative exhibit looks just perfect due to the fact that it has not only embroidered lilacs with ribbons, but also a small wicker basket. The flowers are embroidered in different shades of the same color, perfectly harmonizing with each other. This picture is embroidered using a simple pattern. Therefore, let's take a closer look at how to make stitches for lilacs.
For your work, purchase satin ribbons of small width and different shades of the same color, which is characteristic of lilac. If there is none, you can take any other color. Lay the ribbon out in front of you, then thread a needle that will also match the color of the satin ribbon. Now you need to sew the entire piece of tape in a semicircle, following the formed dotted line, as shown in the presented photo.
Then you need to close the two edges of the ribbon into a circle to form a solid lilac bud. The edges of the base material should be brought to the wrong side, and then secured so that the satin ribbon does not unravel.
The formed lilac flower must be sewn in the right place according to your pattern.
Unopened lilac buds are embroidered using stitches on fabric. You need to make 2 stitches in one direction and then in the opposite direction. To create a copy of a real lilac branch, we recommend that you make as many small flowers as possible so that they cover the visible gaps on the canvas. Those places that remain unused can be decorated with embroidered green branches made from the same color satin ribbon.
In the photo you can see what a wonderful picture you will get in the end if you embroider lilacs according to this example. Although this is a painstaking and anxious task, the effect is incredible. By spending a little more time on embroidering small flowers, you are guaranteed to get a much better result and it will exceed all your expectations.
Ideas for inspiration
A lilac bouquet embroidered with ribbons will look even better if you combine it with other flowers, such as chic roses. Look at the proposed photo to see what indescribable beauty can result from this.
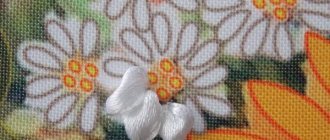
The following photo of the embroidery shows us the competent work of the craftswoman, who was able to work with halftones and achieve an incredible result by combining white and pink lilac buds. The light pink material helped to form a holistic image of the picture, shading the main color.
The following example shows us flowers densely spaced one next to the other. The tighter your stitches, the more voluminous your painting will look.
Of course, it is possible that you may not get such a masterpiece the first time. Or the lilac will not be perfect as desired. But, having honed your embroidery technique over time, you will be able to create a thick and lush bouquet on canvas with your own hands. The design of the finished product can be chosen depending on your preferences. This can be a wooden square frame or an oval mat in soft colors. In any case, you should definitely try this technique of embroidery with satin ribbons.
Lilac patterns for ribbon embroidery
Video: Lilac branch embroidered with ribbon
Source: https://handmadefrom.ru/vishiv/vyshivka_siren_lentami.php
The most gorgeous paintings: diagrams
Embroidery “Lilac” can be formed in other ways. Among many needlewomen, the “French knot” is considered a popular technique for forming buds on canvas. There are quite a lot of patterns for this type of embroidery.
French knot
In addition to choosing the appropriate embroidery option for the buds themselves, it is worth deciding on the scheme for forming the composition. Basically, they differ in the complexity of the pattern and schematic arrangement.
Original painting
The overall composition may include a basket, a vase, rain, an unusual background and much more. In most cases, you can show your imagination and create a unique pattern for embroidering blooming lilacs from ribbons.
You might be interested in this Traditional patterns of Russian folk embroidery
Embroidery lilacs with ribbons in a master class (photo and video)
The hands of a needlewoman can work wonders. They can turn even a simple satin ribbon into a beautiful flower. And you can see for yourself by taking this master class. Ribbon embroidery has been used for a long time, but today its popularity has not diminished.
Instead of admiring other people's work by looking at photos on the Internet, we suggest you create a masterpiece yourself that you will be proud of. To do this, you just need to stock up on satin ribbons and patience. We will tell you how to embroider lilac clusters with satin ribbons.
A spring flower made with your own hands will bring aesthetic pleasure and will never fade.
Materials and tools
Let's start the master class by listing all the parts and accessories necessary for the work. So, for embroidery you will need:
- fabric with a dense weave of threads as a basis for the composition;
- white and purple satin;
- green satin ribbons, width 0.6-0.7 cm for leaves;
- floss or satin threads to match the color of the fabric;
- scissors with sharpened tips;
- hoop or special frame;
- needles with a wide end;
- lilac embroidery pattern.
satin ribbons, width 0.5 cm, purple and white for flowers;
When all the materials have been prepared, the outline of the future lilac brush is drawn on satin fabric to match the ribbons. This diagram will serve as a guide so as not to get lost when composing a composition from individual elements.
Making lilac flowers
First we will make lilac flowers, which will then need to be collected on the canvas.
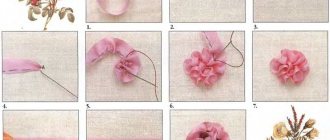
To do this, take a satin fabric that matches the satin ribbon and thread it into the hoop. Cut the satin ribbon into pieces. We take a piece of tape and make a ring out of it so that it overlaps. We secure our ring with a needle to make a bow.
From each ring of the bow you need to make flower petals, two on each edge. We stick a needle and thread into the middle of the bow and sew its corner to the middle. We also fold the second corner diagonally and carefully sew it to the center of the bow. This is how we got the first lilac flower.
Lilac brush embroidery
Next, we embroider the remaining lilac flowers in the same way. To do this, without cutting the thread, we bring the needle near our first flower and sew on the next piece of ribbon, folding it in the same way as the first. Similarly, we embroider the entire bunch with flowers, trying not to go beyond the intended outline. For naturalness, the flowers themselves must be placed in a checkerboard pattern.
When the entire bunch is embroidered, it will need to be cut out, leaving 2 cm along the edge. We get a canvas with lilac flowers sewn onto it. You can make it more voluminous and fluffy by tucking and hemming the edges of the fabric.
For the bouquet we need to create several of these brushes with flowers in purple and white shades. The shape of the brushes can vary from triangular to oval. The main thing is to place them on the base as naturally as possible.
Embroidery with lilac ribbons. Second way
Many experienced craftswomen use the second method. It requires a whole satin ribbon and two needles. The first one will have a thread, and a ribbon will be threaded into the other and both needles will be brought out to the front side.
Using a needle and thread, stitches are created alternately on the ribbon, then two along, then one across. Then you need to tighten the thread, gathering the tape. A lilac flower will form. The thread should be fastened on the wrong side by making a knot. This should be done after finishing embroidering each flower or leaf.
If you suddenly run out of ribbon or you decide to continue making flowers in a different color, then on the wrong side, in addition to the thread, a ribbon is also attached.
You can try this method, it allows you to get the job done a little faster. You might even find it easier. A video will help you learn the method better.
Embroidery of lilac leaves
Our lilac, like a real one, should have foliage, which we will make from green ribbon. If you looked at a leaf from a lilac bush, you saw that it seemed to be cut at an angle. It has a pointed corner and two identical halves.
Each leaf is made from a piece of satin ribbon 10 cm long. The ribbon is folded in half and the corner is folded, which then needs to be stitched along the fold line. Then the tape is straightened and the product is stitched in the widest area. The diagram proposed below will help you correctly fold the ribbon in the form of a leaf.
The edges of the tape are hidden under the leaf, securely sewing them there to the base. That's it, the lilac leaves are ready.
Alternatively, such parts can simply be cut out of satin, the edges treated with a lighter so that they do not fray, and sewn in the right places.
Creation of the painting and final work
After all the lilac tassels are ready, you can begin to attach them to the base fabric, thereby creating a picture embroidered with ribbons.
To make the lilacs look like real ones, you can make a backing made of padding polyester or other dense material under the cut out tassels.
Don't forget about the leaves. We sew them in random order to the canvas.
You can make the composition complete with the help of a vase or basket standing on the table in which the lilacs will be located. Lilac flowers that “accidentally flew off a branch and fell on the table” will look beautiful and natural.
The finished work is stretched onto a frame and hung on the wall.
Tips for embroidering pictures with ribbons
Following these recommendations, you can easily embroider any picture with ribbons, as in the photo on the Internet:
- For the first time, do not take a drawing that is too complex and large. Embroider just one branch of lilac;
- Find a drawing or sketch of the finished painting. A diagram on the Internet is also suitable if the location of all elements of the canvas is indicated there;
- You can easily transfer the selected design onto the canvas using carbon paper.
- It is best to start making a large painting on a large frame or hoop. This way you will avoid overstretching the fabric and distortions;
- The painted background of the picture is done first and only then lilac flowers are sewn onto it;
- For the base, prefer gabardine to all fabrics. It is easy to wash and is good for ribbon embroidery.
- The master class has come to an end. Our lilac is ready and pleases the eye with its lush tassels, and the needlewoman receives compliments for her skill.
If you are interested in embroidering lilacs with satin ribbons, use the following diagram, which clearly shows where each detail should be stitched.
Video: Learning to embroider lilacs with ribbons
Source: https://vishivashka.ru/vyshivka_nitkami/vyshivka_siren_lentami.php
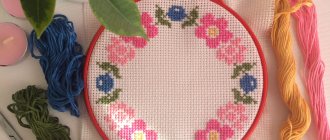
Cross-stitch
Cross stitch “Lilac” looks no less impressive if you choose a suitable pattern. In this case, it is advisable to select ready-made sets in which, in accordance with the artistic idea, the colors of the threads are selected, there is a diagram for the formation of each element, and the processed fabric has already been prepared.
You can also use free patterns for cross stitching lilacs, which are presented in specialized literature or on the Internet.
Cross stitch pattern
In terms of choosing ready-made kits, you can give preference to different manufacturers. You just need to decide on the size of the picture and the complexity of the design. An excellent option could be lilac embroidery “Alice”.
Alice set
Lilac cross stitch can have different interpretations in terms of composition, but such work will look original and beautiful. Using this embroidery technique, you can decorate decorative pillows, tablecloths, and napkins.
Embroidery with lilac ribbons: features, step-by-step description, master class and recommendations:
Creating three-dimensional paintings from satin ribbons is a popular trend in modern embroidery. Flowers are of particular interest to craftswomen: they turn out just like real ones. There are many techniques for decorating various inflorescences. When embroidering lilac ribbons, you can use different stitch options and create bouquets that are indistinguishable from natural ones.
Techniques for ribbon embroidery of lilac inflorescences
A lilac branch consists of many small buds collected in a cone-shaped panicle. Each individual flower of a regular variety can have 3-5 petals, while a double one can have 2 times more. In both cases, each flower is embroidered separately.
A lilac branch can be made in several ways: assemble an inflorescence from individual ready-made buds, use a ribbon stitch, colonial or French knot. The fabric gathering method is a common way to design the centerpiece of large flowers, such as sunflowers, and is also suitable for creating lilacs.
Tape stitch method for embroidering lilacs
For those new to the lilac ribbon embroidery technique, the easiest way to start is with a ribbon stitch: each flower petal is sewn separately, the ribbon is brought out from the center, and then the needle is placed next to the exit point. The tape is pulled through, giving it the desired shape from the wrong side.
Each flower consists of 4-5 petals made using this technique. Creating one lilac branch can take a long time, but this embroidery method is suitable for beginners. The upper part of the lilac inflorescence, with closed buds, is made using one stitch.
French and colonial knot
Small roses are most often made using the French and Colonial knot technique.
In the first case, the tape is brought out to the front side, straightened out, and a needle is placed on top, around which you need to make two turns. If the knot is made from floss threads, three or more turns of the ribbon are possible.
Then you need to insert the needle a couple of millimeters from the exit point and, holding it with your fingers, carefully tighten the loop.
The size of the bud depends on the number of wraps - the more there are, the more voluminous it will be. The difference between a colonial knot is that the ribbon is wound around the needle in a figure eight. When viewed closely, the inflorescences made using this technique are very similar to roses.
Fabric assembly method
Assembling fabric for embroidering lilacs with ribbons combines working with satin and floss. The needle end is brought out to the front side and assembled into an accordion with several stitches of thread of the same color using another needle.
Then you need to tighten the “wave” and bring the tape out from the wrong side at a short distance from the entry point, forming a flower. The petals are secured with threads.
The appearance of the product largely depends on the number of shades used in the work: the more there are, the more lively and interesting the embroidery will look.
Lilac from individual flowers
Lilac tassels can be assembled from individual buds that are sewn to fabric, but this method is quite labor-intensive and is more suitable for experienced needlewomen.
To create flowers using this technique, cut a 2.5 cm wide purple ribbon into pieces of 8-10 cm. Burn each piece on both sides.
Then take one piece and fold it in half twice: the folds in the material will show the size of the petals.
The bud is formed using an overcast stitch:
- Fasten the thread well to the upper corner of the tape, otherwise the knot may slip through during assembly.
- Then bring the seam down along the edge and run along the bottom to the first fold.
- Raise it again and then lower it - and so on 4 times.
- When the thread reaches the top edge on the opposite side of the ribbon, pull it and collect the flower.
- Sew the beginning and end together.
Having made the required number of flowers, sew them to the base.
Lilac branch: master class for beginners
Inexperienced craftswomen can try a method in which each petal is embroidered using a regular straight stitch. It’s better to practice on a small inflorescence first. If you are confident, you can immediately purchase a print for embroidery with lilac ribbons in a basket for beginners. The bouquets are very natural and will decorate any interior. Such paintings are often framed and given to friends.
To embroider lilac ribbons you will need:
- thick fabric;
- hoop;
- satin ribbons 5 mm wide in various shades of purple for the inflorescence;
- brown satin ribbon 5 mm wide for the handle;
- green satin ribbon 2.5 cm wide for leaves;
- needle;
- lighter;
- pencil;
- scissors.
At the first stage, stretch the material onto the hoop, and then outline the outline of the desired design. The shape of the inflorescence will resemble a sweet pepper on a stalk.
It is not necessary to transfer any specific drawing in detail - a few light strokes are enough to make it easier to work. If it's difficult to draw by hand, use a paper stencil.
If you are embroidering on printed material, you don’t need to mark anything. Immediately start embroidering lilacs with ribbons.
How to make a cutting from ribbons
The work begins with the design of the cuttings. Take a brown ribbon, thread it through a needle and secure it, leaving about 2 cm from the edge. Make a puncture.
Bring the ribbon to the front side at the base of the cutting and begin to rotate the needle, twisting the ribbon into a tube. Lay it according to the pattern and make a puncture directly into the tape. Now you need to create two cuttings for the leaves.
Using a broach, return to the middle of the tube and, having pierced it, make two stitches in the same way. Cut the ribbon and secure it to the back with a lighter.
Leaves for lilacs from ribbons
At the next stage of the master class “Embroidering lilacs with ribbons” we will create leaves. To do this, take a ribbon 2.5 cm wide. There is no need to secure it, leave a small tail on the wrong side.
Bring the needle close to the handle, straighten the front side out and, retreating 2-3 cm, make a puncture in the center of the tape and bring the needle to the wrong side. To make a sharp corner of the leaf, hold the central part with your finger, and from the inside, pull the tape to the right, then to the left, forming the edges.
Cut and secure the ribbon on the back side, hiding the ends under the embroidery, and then make a second leaf of the same type.
Lilac inflorescence made from ribbons
We continue the tutorial “Embroider lilacs with ribbons” and begin making the inflorescence. For convenience, draw a central point and petals on the fabric, stepping back from the edge of the outline by about 1.5 cm. Then take a tape of a suitable shade and draw it on the border of the applied point. To prevent it from spinning, hold the center with one hand and pull it from the inside with the other.
Each petal is embroidered with a separate stitch. Move around the circle, but do not sew up the center - there should be some space left there. Then move on to another flower. To do this, select any stitch and use it as the first petal of the next bud. Again, draw a central point nearby and, changing the shades of the tape, tightly fill the entire space with buds.
Try combining several techniques for creating flowers and enjoy the process. The work of embroidering lilac ribbons is painstaking, but the result is worth the time and effort.
Source: https://www.syl.ru/article/330488/vyishivka-lentami-sireni-osobennosti-poshagovoe-opisanie-master-klass-i-rekomendatsii
Tools and materials
Pictures embroidered with ribbons are sometimes expensive, but you should not spare money on purchasing high-quality materials. Required tools:
satin ribbons of lilac and green shades 5 mm and 3 cm wide, respectively;- embroidery threads in purple, green and yellow;
- fabric for the base - silk, crepe-satin or gabardine (on canvas, ribbon embroidery looks rough);
- embroidery and tapestry needles;
- hoop (their size depends on the size of the picture);
- awl, scissors and thimble;
- pencil for drawing;
- lighter.
After preparing all the materials, you can begin the embroidery itself.
Ribbon embroidery: lilac
Skillful hands can do anything, but in order for our hands to become skillful, they need to learn. I invite you to familiarize yourself with a master class on embroidering beautiful and delicate lilacs with ribbons.
This is both incredibly beautiful and will teach us how to work with products. With the help of our MK we will learn how to embroider a picture from a photo of a lilac, and also watch a video on embroidery with ribbons.
Once the embroidery is completed, it will decorate your home not only for spring and summer, but all year round.
We embroider lilacs with ribbons with diagrams and description of the work
For embroidery we will need:
- Canvas or thick fabric
- Hoop
- Ribbons of lilac, lilac and white colors 0.5 mm wide
- Satin white and lilac
- Green ribbons 0.6-0.7 mm wide for leaves
- Scissors
- Floss threads or satin ribbons in color
- Needles for embroidery threads
- Wide eye needles for ribbon embroidery
- Embroidery pattern
So, all the materials are ready, let's start embroidering. Take the atlas and start drawing a brush of lilac. We do this in order not to get lost when completing the painting.
https://www.youtube.com/watch?v=H8G2kYaZN2A
First we make lilac flowers, which we will then collect on the canvas. To do this, take the satin to match the satin ribbon and secure it in the hoop. You need to fasten it well so that the fabric does not dangle or sag, otherwise it will interfere with the entire embroidery. Cut the ribbon into pieces. We take a piece and make an overlapping ring out of it.
We secure the ring with a needle so that we get a bow. From each bow ring you need to make 2 flower petals, one on each edge. We thread a needle and thread into the middle of the bow and sew its corner to the middle. Fold the second corner diagonally and sew it to the middle of the bow. We received the first lilac flower.
Next, we embroider the remaining flowers in the same way. To do this, without cutting the thread after the first flower, we bring the thread next to it and sew it on, folding further flowers, just like the first ones. This is how we get the whole bunch. For naturalness, place the flowers themselves in a checkerboard pattern, trying not to go beyond the outlined contours.
When the entire bunch is embroidered, cut out the satin with the sewn bunch, leaving about 2 cm along the edge. To get a more magnificent picture, the edges of the satin can be folded and hemmed.
For the bouquet we will need to create several of these clusters in white and purple shades. Make the bunches on satin of a matching color, using threads of the same color.
Vary the shape of the bunches from oval to triangular, as you wish, as long as it looks natural.
We will embroider leaves from green ribbon. I prefer to combine 2 shades of green ribbon. When looking at a bunch of lilacs, you probably noticed that the leaves are slightly slanted. We will make each leaf from a piece of satin ribbon 10 cm long. The ribbon must be folded in half and the corner folded, making sure to stitch it along the fold line.
Then the tape is straightened and stitching is done in a wider area. We hide the edges under the leaf and sew it on. Our leaves are ready.
For the most convenient use of the tape, you can burn the edges with a lighter so that they do not fray.
So, your lilac bunches are ready, you can attach them to the overall picture. We take our base fabric, sew on the finished bunches and don’t forget about the leaves. They can be arranged in any order as you wish.
It will look very beautiful if several leaves fall from the bunch. To give the picture originality, under the bunches you can make a base of padding polyester or other dense material.
The finished painting can be placed under a vase or basket, or it can be placed under glass and hung on the wall.
The second option for creating a beautiful flower arrangement with your own hands
Many experienced needlewomen use this option, considering it more convenient and easier. For this we need two needles and a whole, uncut ribbon.
We take the canvas and stretch it onto the hoop so that the fabric does not move along the hoop. We bring out 2 needles, one with thread, the other with ribbon. For convenience, the ribbon can be pulled out of the needle. Using the second needle and thread, you should make stitches on the tape in this order: two stitches along, one across.
After this, you should pull the thread and pull the ribbon into a gather, this is what will add volume to the bunch. Next, bring the needle and thread to the wrong side and secure with a knot.
We bring the ribbon to the front side of the picture and continue to embroider in the same order. We fix the ribbon on the wrong side after embroidering each flower.
When the ribbon runs out or you change color, it is also necessary to secure the thread on the wrong side.
Thematic video selection of master classes
Source: https://sdelala-sama.ru/vyshivka/613-vyshivka-lentami-siren.html
Embroider lilacs with ribbons? Easily!
According to the author. In this master class I will show you how to embroider lilacs.
For this I need 4 and 6 mm satin ribbons for buds, 1 cm ribbon for flowers, 2.5 cm ribbon for leaves and stems, a hoop, thread, scissors, a lighter and a print.
I start with the buds. I take 4 and 6 mm tape and stitch all the edges of the branches.
I bring the ribbon to the front side and circle it around the needle.
Then, retreating 0.5 cm from the tip of the tape, I insert the needle into the fabric, so you get a French knot on a leg.
I stretch the ribbon to the wrong side.
The first bud is ready, and we embroider the rest in the same way.
On the top of such buds you can embroider larger buds of a wider and different shade with a ribbon.
Immediately the embroidery becomes more voluminous.
Let's move on to the flowers. We cut the 1 cm ribbon into strips of 10-15 cm, then singe the ends with a lighter and make 4 or 5 folds, so it will be convenient to sew the petals.
We take a thin needle and thread and sew the edge of the tape back there.
Then we sew the bottom until the bend of the tape and so on until the tape runs out.
One petal was stitched and up and down again.
https://www.youtube.com/watch?v=H8G2kYaZN2A
We stitched the entire ribbon, it turned out to be 4 parts, which means there will be 4 petals, you can make 3 and 5, whichever is convenient.
We pulled the flower together and stitched it along the wrong side in the center.
And we sew the finished one to the lilac branch, retreating from the tips of the buds.
Then we fill the entire branch with flowers.
Using yellow floss threads we embroider the core of the flower.
Wrap the threads around the needle once and pierce the middle of the flower.
Next are the leaves. We embroider the leaves with a 2.5 cm green ribbon.
We brought the tape to the front side, retreated 3-4 cm and inserted a needle in the center of the tape, dragging it to the wrong side.
We sew all the leaves like this.
We embroider the branches with a 2.5 cm brown ribbon. We insert the ribbon from the beginning of the branch to the end, twisting it.
They twisted it, inserted the needle and tape onto the front side and brought it out to the back. I sew the ends of the ribbons on the wrong side with thread.
I should also embroider roses, but I’ll show you that in another master class