My own designer
Embroidered items are back in fashion, so without wasting time, you need to take that boring item out of your closet to turn it into a fashionable, stunning outfit.
To start, find a linen, cotton or wool item in your wardrobe made from a fabric with a simple weave. It is easier to create a pattern with your own hands. For decoration you can use soutache, floss, beads, rhinestones, ribbons.
How to make embroidery on clothes special and beautiful? It is necessary to comply with the specifics of the technology. When applying a pattern, try to maintain proportions so that your creation is one with the product, and does not exist separately from it.
If you need to decorate a rough fabric, then choose thicker threads and larger beads. Conversely, choose thin, elegant threads and small beads for light fabrics.
Be sure to check the threads for color fastness so that there is no disappointment from the work:
- soak the threads in water;
- wrap in white cloth, press;
- see if any stains have appeared;
If colored stains appear, there are ways to strengthen the paint :
- Lather them thoroughly with laundry soap;
- Immerse in very hot water, hold for 15 minutes;
- Rinse several times in cold water;
- Dip in a solution of vinegar and salt, boil for 5 minutes;
- Then rinse several times in water;
- Wrap in white material and press firmly.
Components for the solution:
- 1 glass of water;
- 1 tbsp. l. 9% vinegar;
- 1 tbsp. l. salt.
All girls love flowers. Turn your white blouse into a flower garden by decorating with threads that won't fade.
Basic mistakes
When embroidering with satin stitch, some mistakes may occur for beginners. Basically, they are associated with a lack of experience. The fabric may become wrinkled as a result of handling. This means that you have loosely tightened the stitches or, conversely, tightened them too much.If the fabric shows through the embroidery, then you did not place the stitches tightly enough.
How to embroider a petal correctly?
Long satin stitches:
More complex satin stitches:
First steps
Start your creativity with cross stitch. Buy a cross stitch kit and practice. Having chosen a successful design, you can decorate jeans or a denim jacket with it, sewing on the finished ornament as an applique.
Then complicate the process by applying embroidery directly to the product itself. If you do embroidery not on the finished product, but before sewing, then before cutting it is better to wash the fabric to prevent the design from skewing.
Specialized stores sell soluble canvas . With its help you can easily complete any drawing:
- Baste the canvas to jeans or a blouse.
- Using the diagram, embroider the ornament.
- After finishing the process, place the embroidered area in water for 10 minutes. During this time, the canvas will dissolve, leaving only the threads.
- Remove the threads.
There is also an overlay version of the canvas, woven from thick threads in the form of large, rigid cells. Like the soluble one, baste it to the fabric, and remove it after work: take tweezers, pull out all the threads one by one.
To ensure easy removal of threads, do not sew them to the fabric while working.
Bugle bead relaxation
Bead embroidery has its own nuances. For beginners, it is better to use thin tracing paper to transfer the design onto fabric:
- Draw a drawing on tracing paper.
- Place it on the fabric.
- Sew with large stitches.
- Embroider the pattern.
- At the end of the work, carefully tear the tracing paper and remove the basting.
Many designers create extremely exclusive items, embroidering them by hand with beads and glass beads. Embroidery looks especially beautiful on black or blue velvet and generally on clothes in dark shades. If it is difficult to embroider the product itself, then you can embroider a piece of fabric and then sew it on as an applique.
But a simple gray T-shirt has become a work of art!
Rhinestones, pearls, bugles will even turn an office shirt into an original outfit.
A cascade of beads is real craftsmanship!
Where to begin?
If you really want to embroider an expensive blouse with wonderful flowers, and at the same time a person has never held needles in his hands, then, of course, first you need to acquire your first embroidery skills. There are many master classes on satin stitch, cross stitch, and cutwork embroidery. You need to look through them and decide on the operating technique.
For beginners, it is better to start with a cross. After practicing a little on a separate piece of fabric, you can begin to create a pattern on clothing. On a shirt, an excellent area for embroidery will be the collar, as well as cuffs and pockets - that is, those parts of the product that are always visible.
To simplify your work, you need to choose schemes with repeating fragments. At the initial stage of creativity, they will not cause difficulties. As you gain experience and improve your skills, you can begin to create complex multi-color compositions on the back, chest or sleeves of the product.
Embroidery techniques
There are many stitches for working with beads, but the most popular stitches are: lowercase and stem.
Seam “Forward needle”
- the needle is brought out to the front side;
- a bead is strung on it;
- pass the needle through the fabric close to the bead;
- again the needle is brought out to the front side;
- make a small stitch from the wrong side;
- Re-attach the bead.
Lowercase seam
This stitch is similar to the Forward Needle stitch. But to firmly fix the bead on the line, after completing the stitch, the following maneuver is performed: the needle is inserted in the opposite direction.
Stalked seam
To get a more rigid pattern, cast on 2 beads, pass the needle through the fabric on the wrong side near the 2nd bead. Bring the needle to the face between the 1st and 2nd beads, pass through the hole of the 2nd bead. Place the 3rd bead and again go through the needle on the wrong side near the 3rd bead. Continue until the stitch reaches the desired length
Basic types of stitches
Satin stitch
Execution is done at an angle or straight across.
Satin stitch embroidery
To perform this type of stitch, you need to pull the needle from the wrong side of one contour of the design, then stretch it to the other contour of the front side. The threads must fit tightly to each other to obtain a high-quality pattern.
Satin stitch embroidery
Backstitch
The easiest embroidery stitch. Insert the needle from the wrong side of the fabric, then pull it back and pull the thread taut. Then you need to insert the needle again into the fabric, and pull it out a distance equal to the length of the previous stitches. This is the first step for the next line.
Embroidery: backstitch stitches step by step
Cross-stitch
To make cross stitch, first stitch a series of evenly spaced diagonal lines.
After that, create a cross as you go. Use the same holes whenever you can. The lower part should be sloping.
Interesting patterns for cross stitch:
Step-by-step embroidery for beginners
Try decorating a plain T-shirt. For a more rigid fixation, you will need non-woven fabric, slightly larger in size than the embroidery itself.
Mark the boundaries of the drawing with chalk.
Glue interlining to the wrong side.
To start, choose simple designs with repeating motifs.
Sew the first motif in the center of the sleeve.
Just a few motifs and an exclusive item in your wardrobe!
Having learned how to depict a simple motif, move on to working with glass beads, beads and beads at the same time. Beautiful patterns from a casual blouse or dress will make a luxurious holiday outfit.
Motives for creativity.
The Butterfly pattern is the most expressive motif for velvet.
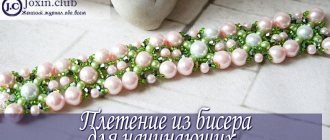
Pearl beads and green beads will come in handy here. First, embroider leaves and twigs, sew beads for the “clusters,” then surround them with a bright outline.
Machine embroidery on clothing and logo embroidery
Modern embroidery helps professional craftsmen mark their creations with a custom logo. The logo increases the significance of both the item itself and the craftsman. In a period of fierce competition, this technique becomes very important , since it gives individuality to the product, distinguishing it from the crowd.
Advantages of machine embroidery:
- Ability to produce the smallest patterns.
- Use of a wide range of threads.
- Highly durable embroidered logo.
- The quality of the fabrics doesn't matter.
- Playback speed and image quality.
- Work without failures.
Handmade work has always been highly valued , but many craftswomen are increasingly making large ornaments and complex images using a typewriter.
Embroidery applique can also be created using a machine:
- apply the pattern to the fabric prepared for appliqué;
- make a simple stitch along the contour to secure it;
- cut out excess fabric around the stitched element;
- sew the attached edges of the appliqué with a machine seam;
- Sew the finished decoration onto the clothes.
Rules of operation and selection of materials
Quality work begins with proper workplace design. Before you begin, you must carefully read the operating instructions for the machine and arrange your workplace in accordance with the following recommendations:
Clear the table on which the sewing machine will be placed of all unnecessary items. The product or piece of fabric on which embroidery will be done should not cling to anything. The working surface should be smooth, ideally slippery.- Despite the fact that new sewing machines are equipped with spot lighting, you need to place an additional light source on the top left - this will make it easier to see the progress of the work.
- All related tools must be prepared in advance. These are a hoop (wooden ones will not work), needles, threads, a seam ripper, small scissors with curved blades for cutting threads and broaches.
In addition, you need to buy spacers in advance for fixation (stabilizers) made of non-woven fabric or dublerin. For the same purposes, you can take newspaper or tissue paper, tracing paper. You will also need carbon paper and a soft pencil. There are special pencils on sale, the trace of which disappears after a day or when wet.
Fabrics and threads
You can work with any material, but you should take into account that machine embroidery at home on different fabrics requires different bases for fixation. Fixation during embroidery holds the fabric in the desired position and prevents it from deforming. You can fix the fabric using interlining of different thicknesses or special water-soluble interlining. For coarser materials, a dublerin base is suitable.
Stores are constantly updating their assortment, new threads and fabrics for embroidery appear. And it can be difficult to choose the right fixative for a particular type of fabric without first testing it. The choice of stabilizer depends entirely on the material, thread, type of sewing machine and the experience of the embroiderer. The fixing fabric is inserted together with the main fabric into the hoop. On organza, knitwear and other thin “capricious” fabrics, the fixer remains during use.
Thread color and quality
For embroidery, it is better to use threads specially designed for this purpose. They are of excellent quality, shiny, silky, and have a variety of colors. The color of the threads depends entirely on the idea of the design, but for embroidery to match the base fabric, the threads should be a tone - two darker than the base. The combination of colors is a separate topic. Each color has its ideal “partners”:
- red - purple and pink;
- orange - yellow, pink, red;
- yellow - light green and orange;
- green - light green;
- blue - purple, lilac, sea wave;
- purple - pink, blue, red, lilac.
Machine stitch
Do you have a special machine and want to try all the embroidery techniques? Program it on the surface to get an original thing.
Advice from experienced craftswomen:
- place the drawing on tracing paper;
- sew the outline manually or on a machine;
- break the pattern into sections to make it easier to embroider even the most complex pattern; start the car.
Experienced embroiderers will be able to realize the most imaginative idea!
In this dress you will conquer all the men in the world!
The realistic image will retain its unchanged appearance even after many washes.
Fashionable embroidery will decorate not only clothes, but also hats or belts.
Immense space for interior decoration.
To create an exclusive item, take the advice of experienced embroiderers: first embroider the material itself, and then sew the product.
Machine embroidery will decorate even small details of clothing: collars, pockets, cuffs, sleeves. You can revive dresses, skirts, and jeans with original patterns.
As a motif, you can use your own photographs or photos from magazines, images drawn by your child’s hand. Delicate flowers will enliven the most boring outfit .
It is fashionable to apply family coats of arms on underwear, bathrobes, tablecloths, slippers, napkins, and sofa cushions.
Types of Sewing Equipment
In addition to ordinary sewing units, there are also special embroidery machines. They are divided into two types:
- Professional (for large sewing enterprises) - high-class machines designed for embroidering several parts at the same time. This type of technique has several needles, heads, and wide hoops for embroidering large patterns and paintings. Moreover, you can work not only with regular embroidery, but also with sequins, beads, rope and other decorative materials. Production machines work much faster and with better quality, but are not suitable for home use due to their high cost and large volume.
- Household. For beginners, embroidery on a sewing machine should start with the household version. The work speed is slow, and you can only work with one pattern at a time. But such equipment costs much less and is not as voluminous as a professional machine.
Both industrial and household options require the participation of an embroiderer in the process. She holds the hoop with the canvas and directs it in the right direction. The equipment performs its tasks, but do not forget about the importance of the craftswoman’s experience in creating the canvas.
DIY French chic
The delicate cutwork web looks more like lace than embroidery. To buy a fashionable item you need to shell out a large sum of money. To get an incredibly sophisticated new addition to your wardrobe, you just need to work hard.
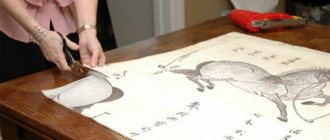
A distinctive feature of cutwork is that individual details of the motif need to be cut out . First, try making napkins and pillowcases, and then move on to more complex things. The embroidery process will completely captivate you, so there is hope that this exquisite piece will soon decorate your summer wardrobe.
For work, choose natural fabrics. Beginning needlewomen, pay attention to calico, satin, and thin linen. Choose silk or cotton threads. The thread color can be any. Many embroiderers use threads of the same color as the warp.
You will also need embroidery needles, a hoop, sharp scissors, a water-soluble fabric marker (or a simple pencil) and a template . Before starting work, the fabric must be wetted with water, dried, ironed well, that is, decated.
Let's begin the process:
- Secure the base with a hoop.
- Sew the outline of the motif using a “forward needle” seam.
- Fill the entire pattern with satin stitch. A shady surface is best suited.
- At the end of the work, secure the thread by inserting it under the last stitches.
- In the center of the elements highlighted in the diagram, we make crosswise cuts and open them.
- Then carefully cut close to the edge.
- Let's make bridges - openwork jumpers between parts of the motif.
- Let's steam the product using an iron with a steam generator.
To decorate the product you can use beads, ribbons, rhinestones .
Scheme "Lily"
- Sew all the lines with a needle-forward stitch.
- Use satin stitch to fill the double outline of the pattern and the stamen of the lily.
- Then do the breeding. To do this, you need to lay the threads 2-3 times over the fabric that we cut out, securing with stitches.
- Sew the brid with a buttonhole stitch.
- Use sharp scissors to cut out these pieces without damaging the stitches themselves.
Floral motifs can be created using a sewing machine:
- Topstitch all lines with a simple stitch.
- Embroider the necessary elements using satin stitch.
- Make brids, cut holes with sharp scissors close to the edge.
Safety precautions at work
No matter how passionate you are about the embroidery process, you must always follow safety rules. The workplace must be completely free of unnecessary objects, while the working area when working on a machine must be a space of at least 1x2 m.
When working with a sewing machine, the rules for working with electrical appliances also apply. A sewing needle can break at any time, so you need to handle it extremely carefully to avoid breakage. To do this, monitor the sewing speed and check the consistency of the threads used.