What it is
The name “bell” was assigned to the product because of its conical shape: the skirt widens slightly from the waist to the hem line.
Sometimes the style is confused with the “semi-sun”. The styles are similar only in appearance, but differ in width. The bell skirt is slightly narrower - it occupies 1/5-1/7 of the circumference, while the “half sun” accounts for 0.5 of the circumference. The first variety lies flat, and the second - freely.
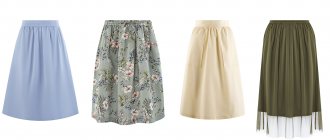
Huge color palette
The length of the model is arbitrary: mini, midi, maxi - it all depends on the preferences of the owner of the product, and the thickness parameters of the bottom are based on the structural features of the body.
Sewing the product is easy. The sewing process will not take much time. In patterns published on the Internet, DI is not taken into account, since drawing a line to the desired mark is not difficult, the main thing is to correctly calculate the waist and hips.
Handmade product
The skirt looks good on a figure of ideal proportion, without flaws. When cutting out bell skirts and patterns with your own hands step by step, the emphasis is on the hips and waist. This skirt is made in different variations: mini, midi, maxi. In any case, the product will look perfect on a proportionate female figure. A DIY bias skirt pattern step by step is not difficult to make; such a product can be cut by a novice seamstress. The most important thing is to perform an accurate calculation of the fabric, take measurements, and determine in advance the width of the future product. In terms of width, such products are:
- Slight odor;
- Average;
- Wide.
Slight smell
To ensure that the product looks perfect on your figure, you should match the length of your waist to your hips:
- If the difference between the waist and hips is insignificant, it is preferable to choose a narrow option;
- If it’s big, it’s on a wide bell.
To help those who want to sew a product, instructions.
How to make a pattern for a bell skirt
From the article you can learn how to make a pattern for such a skirt.
It is important to note that skirts that resemble a geometric shape such as a cone must be made with extreme care. Every element and every little detail is important. The thing is that they favorably emphasize the figure, as well as the waist. This skirt fits perfectly around the hips and looks a little wider at the very bottom. Further in the text you can find detailed information about what needs to be done to make such an interesting wardrobe item. A detailed description of the process will allow you to appreciate all the advantages of such a skirt. In addition, to make it you do not need to be a great sewing specialist. To do this, it is enough to have basic sewing skills, which almost every modern person can master.
First you need to take measurements. After this you need to decide on the length. In this case, we are talking about a fairly long skirt, but the length can be reduced at your discretion.
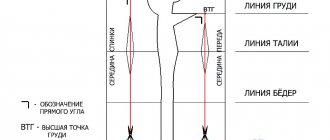
Step 1. You need to build a midline line. To do this, you need to mark point O on a piece of paper, and then you need to draw a line from it.
Draw the waist line. From point O you need to draw an arc with radius OA = ½*From – 4 cm = ½*68 – 4 = 30 cm. This is the waist line.
Step 2. Now we need to build a bottom line. In order to understand everything, you should carefully study the photo below. This will be quite enough.
Step 3. All that remains is to build the middle line. By repeating what is done in the figure, you can complete this task as quickly as possible.
To avoid any problems during work, it is recommended to use large pieces of paper. Otherwise it will end too quickly.
Helpful Tips:
- Then you need to measure the segments AB and A1-B1. They should be the same. If this is not so, then you will have to redraw everything. There is nothing difficult about this if you have a ruler and pencil at hand, so you should not use an uneven and insufficiently accurate drawing.
- You also need to control your hip circumference measurements. This is necessary in order to check how correctly the width was chosen. There may be times when adjustments need to be made.
- Quite often the pattern is made for the most standard figure. In this case, the values of the measurements should not be greater than the length of the arcs CC1 and DD1. It should be borne in mind that even a non-standard figure is not a problem, because in this case you can still make a pattern that will “fit” perfectly.
Step 4: Making the side seam line is relatively easy, even for a beginner. In this case, you need to draw a line from point O to point O1. It should intersect with the bottom line. If you can’t do this, you need to redraw it. After this, you need to form a side dart, and along the waist line to the right (as well as to the left from point O1) it remains to leave another 0.5 cm. Then you need to build smooth lines that should meet at the side seam. That's all. Now you can proceed to the next step.
This completes the construction of the pattern.
Step 5. It's time to make a cut along the bottom line, middle lines, and also the top line. You only need to cut along the side seam along the dart line. After this, you can admire your creation, because the pattern is ready.
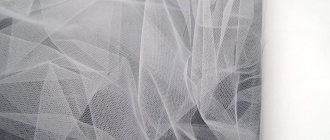
Fabric selection
For beginner seamstresses, the best choice is a plain material. The fabric should not be loose - satin, linen, denim, leather.
You might be interested in this: The procedure for sewing sundresses without patterns with your own hands
Note! Experienced needlewomen prefer silk or chiffon, knitwear. If you need your skirt to be warm, you can opt for a soft wool blend and sew a thin lining fabric to it.
Plain fabric
When sewing a product, it is better to choose plain fabrics, although the presence of checks and small patterns will not affect the appearance of the product.
When choosing a material, do not forget that cotton shrinks when washed; before sewing, you need to wet, dry and iron the material.
Satin bell skirt
Constructing a pattern
Draw a 90 degree angle on paper with point A at the vertex. Find the value of K.
K - characterizes the curvature of the upper section of the skirt at the waist. Depending on the expansion of the product along the lower boundary, K is:
- 0.8 - large bell;
- 0.9 - average;
- 1 - small.
Choose the middle bell. The K value is 0.9.
Pattern No. 1
Constructing a bell skirt pattern
1. Construct a right angle with the vertex at point O, from which a value equal to the radius is set off to the right, which is found using the formula: K (measure CT + CO) , where
K is a coefficient characterizing the curvature of the upper section of the skirt at the waist. Depending on the extension of the skirt at the bottom, it can be:
- 0.8 - for a large bell skirt
- 0.9 - for a medium bell skirt
- 1 - small bell for the skirt
СО - loose fit to the half-waist circumference, in our example equal to 1 cm.
OT = 0.8 (38 cm + 1 cm) = 31 cm
2. From point O with radius OT, draw a semicircle and mark the measurement value CT on it, taking into account the loose fit
ST + CO = 38 cm + 1 cm = 39 cm
And then a new point T1 was obtained.
3. From point T to the right horizontally, set aside a distance to the hips equal to 18 cm.
Section TB = 18 cm.
4. From point O with radius OB draw a semicircle.
5. From point T to the right, set aside the required length of the skirt (in our example, 70 cm).
Section TN = 70 cm.
6. Draw a semicircle from point O through H.
7. Connect point O to T1 under the ruler and extend further. At the intersection with semicircles, we get B1 and H1
Arc TT1 – estimated waist line
Arc BB1 – estimated hip line
Arc HH1 – estimated bottom line
After construction, check the length of the hip line (curve BB1), which should not be less than the measurement SB + CO = 52 cm + 1-2 cm.
If, after checking, the hip line had to be increased, and as a result the waist line has increased, then the extra centimeters along the waist line are either ironed, or sewn into darts along the side seams, or in thin fabrics they are made into a gather.
To adjust the waist coattails, as well as taking into account the tightening of the bottom of the product, raise the waist line and the bottom line. To do this, first draw bisectors and lay them up from the expected waist and bottom:
- for a large bell - 1.5 cm from the waist line, and 3 cm from the bottom line
- for the middle bell – 1.25 cm, 2.5 cm
- for a small bell – 1 cm, 2 cm
How much fabric will you need?
- Calculate the radius of the construction using the formula: K x (OT/2 + 1 cm). For example: 0.9 x (78/2 + 1) = 0.9 x (39 + 1) = 0.9x40 = 36 cm.
- Lay A to the right, the resulting value and put the designation T. A rounded line is drawn down from T. The value of OT/2+ cm for fit is plotted along the line. For a specific example - 78 cm/2 + 1 cm = 39 + 1 = 40 cm.
- Point T1 is placed. From point A through T1 there is a downward line. CI is measured from T and T1. In this case - 70 cm.
- The designations H and H1 are indicated.
- Check the hip line. For items T and T1, put the skirts down 18 cm, set the designations B and B1, draw the main line, measure it. The line length is no more than 52 cm in a particular case.
- Draw a bottom line from point H to point H1.
- Raises the waist and bottom.
Draw the center line of the pattern, setting aside the distance upward, depending on the type of bell:
- Large - waist - 1.5 cm, bottom - 3 cm;
- Average - 1.25 and 2.5 cm;
- Small - 1 and 2 cm, respectively.
When cutting, you should pay attention to cutting the product obliquely.
Bell skirt pattern
How to sew
The product can be sewn with one seam - if the size chart allows, with 2 or 4 seams. The product will fit perfectly on a belt with a zipper and an elastic band.
You might be interested in this Simple patterns and instructions for sewing beautiful pajamas
What is required for sewing?
- Material;
- Lightning;
- Button;
- Threads to match the fabric;
- Scissors;
- Special machine needles.
Bell skirt pattern
Work progress:
- Sew the side seam, sew in the zipper;
- Sew on a belt;
- Process the bottom of the product. An overlocker must be used to finish the seam.
Important. To avoid damaging the fabric, you need to make sure that the pattern is laid out correctly - the cut is folded along the grain (the weft thread is located along the edge).
How to cut?
- Patterns are applied to the cut, folded in half, so that one of the sides coincides with the fold of the material;
- Outline the pattern with chalk;
- Make seam allowances - cm;
- Cut out the panel;
Sewing in 2 seams
Sewing differs slightly: instead of a fold line on the fabric there is a cut line, to which, when cutting the product, a slight seam allowance is made. Operating procedure:
- Cut out the product;
- Cut out the canvases: front and back.
- Markings are made on the left cut under the zipper;
- Stitching the seam to the marking;
- Ironing, overcasting;
- Marking and attaching the zipper, stitching is done carefully.
Important! Before sewing the belt, the product is tried on - if the waist is loose, the fabric is stitched together with coarse stitching.
Pleated skirt
In order for others to appreciate the beauty of the figure - the waist and hips, you can sew the product with folds. The folds can diverge from the waist, or they can diverge from the hips; most often, they make counter folds.
Pleated skirt for girls
If there are several folds, you need to sew carefully so that their quantitative ratio in front and back is the same.
The basis for creating a pattern for a product with pleats is the classic version of the pattern, but it should be taken into account that it will take more fabric to sew a skirt with pleats.
Skirt cut with one pleat at the front
The basting is removed from the fold and ironed.
Model with several folds, cut in a similar way. The cut is based on a basic pattern.
Product with one counter pleat at the front
Skirt pattern with several folds
The finished pattern is cut into pieces according to the number of folds. At an equal distance along the line of the arc of the waist, bottom, mark the points and places of their connection.
- Cut along the formed lines.
- The wedges are laid out on the material in such a way that the distance between them is the same, identical in the depth of the fold, and the cut lines are parallel to each other.
- Trace with chalk, leave allowances.
- Cut and baste folds;
- Stitching side seams, inserting a zipper, sewing on a waistband, finishing the bottom.
- The final touch is ironing the folds and removing the basting.
You might be interested in this: The procedure for sewing a cocoon for a newborn
Bodice and hem finishing
If the calculations are carried out correctly, the hem line needs to be double-checked, the product tried on and trimmed if necessary. All this is not done at once: the skirt is wetted, dried, ironed, the bottom is leveled, and the protruding fabric is trimmed.
The design of the bottom can be done using an overlocker (when sewing from knitwear), and the machine can be hemmed manually using a “blind” stitch (hem parameters - 5mm). If desired, stitching of the bottom, edging with cord, sewing on a frill or lace material can be done.
How to sew a belt
To prepare a belt, draw a rectangle with the appropriate parameters (the belt part takes up 0.5 of the product). Patterns are placed on it, secured with pins, outlined with chalk and cut out.
The resulting part (strip) is folded along the inside out, in half, and the short sides are sewn together.
Important. To make the corners neat, some of the allowances are cut off from the part.
The part is turned inside out, ironed, and the seam allowances are ironed inward along the long side.
Insert the skirt along the waist line into the belt and baste it.
Stitching the waistband using an edge stitch.
Cut and sew over a buttonhole.
Sewing on a belt
How to sew a bell skirt
You can sew a skirt with one seam, if the size of the fabric allows, or with two or even four. It will hold well both on the belt with a zipper and on the elastic band.
Required materials and tools
You will need a sewing machine with an overlocker to process the edges of the fabric and join the parts, although some needlewomen prefer to sew by hand.
You will need to prepare for work:
- textile;
- lightning;
- button;
- paper for creating a pattern;
- measuring tape;
- ruler;
- pencil and chalk;
- threads to match the fabric, needles, scissors.
Calculations
The skirt must be cut on the bias - this should be remembered when calculating the required amount of fabric. For a model with one seam, the width of the cut should be equal to the length of the hem arc, and the footage of the fabric should be equal to the height of the future product, with an addition of 10-15 cm for the belt and hem.
To create a bell skirt pattern, you will need to take only two measurements: waist and hip circumference, and also determine the length of the product. The waist is measured at the narrowest point, and the hips, on the contrary, at the widest point.
Next, you need to decide on the desired width of the bottom and select the appropriate coefficient: for a large “bell” it will be 0.8, for a medium one - 0.9, for a small one - 1. This will be needed to determine the radius when constructing the waist line, and then the line bottom on the pattern.
To calculate the length of the waist arc, the following formula is used: coefficient x (half waist circumference + 1 cm). For the size of the hem arc: waist arc length + skirt length.
Example:
Let's assume the length of the product is 60 cm, OT (waist) is 70 cm, OB (hips) is 94 cm, the selected coefficient is 0.9.
It turns out: 0.9 x (70/2 + 1) = 32.4 cm - the length of the waist arc.
Accordingly: 32.4 + 60 = 92.4 cm - the length of the bottom arc.
Pattern
For a bell skirt, it is most convenient to draw the pattern on graph paper, but if you don’t have it, then regular paper will do.
Sequencing:
- Draw (construct) a right angle on paper, mark the vertex with point A. Lay off segments from it on the sides of the angle equal to the resulting radius (in our example it is 32.4), mark with points B and C.
- Connect points B and C with a rounded line so that the desired radius size is maintained along the entire length of the arc.
- Set aside from point B along an arc a segment equal to the half-circumference of the waist + 1-1.5 cm (for a slightly loose fit). The result is point B1.
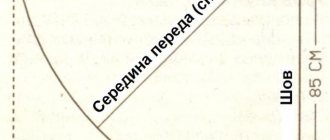
- Draw a straight line through points A and B1 - it will be the fold line of the canvas.
- From points B and B1 set aside a distance equal to the length of the future product. Mark points D and D1 and connect them with an arc with the calculated radius.
- You should definitely check the correctness of the dimensions along the hip line: set aside 18-20 cm segments from points B and B1, connect them with a smooth line and measure it. It should be equal to the half circumference of the hips + 1 cm.
If the model is supposed to be sewn with an elastic band and not with a fastener, then when creating the pattern you need to add 10-15 cm to the waist circumference.
Cutting
To avoid damage to the fabric, you must make sure that the pattern is laid out on the fabric correctly - the cut must be folded along the grain thread (the warp thread of the fabric always runs along the edge).
Sequencing:
- Place the pattern on the folded cut in half (along the lobar) so that one of its sides coincides with the fold of the fabric.
- Use chalk to trace the pattern.
- Be sure to make seam allowances of 0.5-1 cm.
- Carefully cut out the fabric.
You can sew the side seam and sew in a zipper. After this, sew in a belt and finish the bottom. The seam should be finished with an overlock stitch.
If two seams
The difference in the model with two seams is very small - instead of a fold line on the fabric there will be a cut line, to which you must make a seam allowance when cutting. You definitely need to remember about the correct layout of the pattern on the fabric - in this case, the middle of each part should be located on the bias.
Sequencing:
- Cut out, carefully cut out two panels (front and back).
- Start stitching from the right seam, then iron and finish the seam.
- Make a mark on the left cut for the zipper.
- Sew the seam down to the markings, iron, and overcast.
- Baste and stitch the zipper, make neat stitching.
Before sewing on the belt, you should try on the product - if the waist is too loose, you can tighten the fabric a little by sewing with a large stitch.
Belt
To cut a belt, draw a rectangle with the required dimensions. The width can be chosen at your discretion, and the length should be equal to the waist circumference + an increase of 1-2 cm for the fastener and + 0.5 cm for the seam allowance.
Sequencing:
- The remaining fabric needs to be folded along the grain thread (if the belt piece is ½), put the pattern on it, pin it with pins, outline it with chalk and carefully cut it out.
- Fold the resulting strip lengthwise, wrong side out (in half), and sew the short sides together. To make the corners more neat, some of the allowances in them need to be cut off.
- Turn the piece inside out and iron it, pressing the seam allowances on the long sides inward.
- Insert the skirt along the waist into the belt and baste.
- Sew the waistband using a neat edge stitch.
All that remains is to cut and sew around the buttonhole.
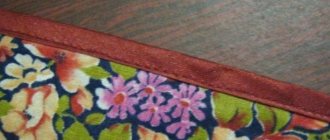
Bottom design
Even if all the calculations were carried out correctly, you should still check the hemline at the fitting and, if necessary, trim it. But it’s better not to do this right away, but first wet the skirt and let it dry. After this, you need to smooth it and level the bottom, cutting off the excess.
To decorate the bottom, you can use an overlocker (if the fabric is knitted), a sewing machine, or manually hem it with a blind seam (0.5 cm hem). If desired, you can stitch the bottom with an edging cord, sew on a frill or lace.
How to wear
This product is a real find for a fashionista. The skirt is perfect for creating different looks: frivolous, elegant, for going to work - it all depends on the material chosen for sewing the product.
Advantages: emphasizing the strengths of the figure, hiding flaws with the correct cut in length. For example, knee-length models lengthen the legs and hide the width of the hips. Pleated skirts emphasize the waist and give the missing volume to thin hips.
Top options:
- Blouses;
- Mikey;
- Jumper;
- Turtleneck with a classic cut.
Note! In order for the product to look perfect, the top of the composition should be devoid of volume, since the skirt is flared downwards.
It is for this reason that the top should be simple.
By color scheme
Colored items go well with plain ones, and a white blouse and a plain skirt are a great option for the office.
Master class: Wrap skirt according to two measurements!
A wrap skirt is probably the most comfortable skirt.
Due to the fact that the wrap and clasp can be adjusted without problems, it is perfect for figures who often and quickly change volumes. For the same reason, it is very suitable for women who are “slightly pregnant”