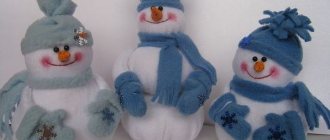
Hare Tilda
Tilda the Hare is a variation of the first doll that appeared in 1999 in Norway. The first model was invented by Norwegian resident Toni Finnanger. She not only made the first best-selling model, but also prepared a pattern for it. After this, other patterns appeared. This is how a whole store with textile models, accessories and patterns appeared, and our own production was created with novice craftsmen. After the first doll was released, a little time passed, and such a hero as the Hare appeared.
Hare Tilda
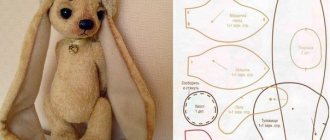
The classic pattern of a life-size Tilda hare was a diagram of an animal with an elongated body and a flattened head with an elongated muzzle. His nose and mouth were clearly visible. The eyes are represented by two dots. A characteristic feature was long ears, occupying 80% of the length of the entire body, long paws and elongated legs, like human ones. The model is distinguished by its laconicism and some asceticism, since only the nose remains drawn. The legs and body are not always proportional.
Classic model
Primitive dolls
This type of toy got its name because of its ease of implementation. This is a feasible job even for a child (under the supervision of an adult, of course). There are many options for simple dolls, and all of them are distinguished by the simple shape of the toys and the absence of complex elements both in work and in the pattern.
Easter bunny
In the culture of some countries of Western Europe, Canada and the USA, a rabbit hiding and laying out colored eggs is an integral symbol of Easter. Children look forward to this character no less than they look forward to Santa at Christmas; they enjoy looking for hidden eggs (not so much chicken eggs, but chocolate ones, really).
A handmade Easter bunny can be a wonderful addition to traditional decor this holiday. To work you will need :
Material (a piece of 30 by 30 cm is enough).- Hollow fiber or other filler.
- Non-woven fabric.
- Sewing machine and accessories.
- Pencil, paper and scissors.
- Two buttons for the eyes.
- Cosmetic blush.
A plump oval body and two ears - that’s the whole Easter Bunny. You can draw the pattern yourself, or you can use a ready-made template. The pattern for the bunny's body looks like an oval, in the upper part of which a triangle is cut out. This is necessary for a more regular and rounded shape of the toy. The hare's ears are elongated, rounded triangles, and the tail is made from a small circle of fabric.
Fold the fabric in half face to face and secure with pins. Cut the pattern out of paper and transfer it to the wrong side of the material. Trim off excess material, departing from the contours by 1-1.5 cm. Sew the main part of the body along the drawn line, 2 cm short of the sharp edges. Turn it inside out and stuff it with holofiber. Sew the opening with a blind stitch.
Cut out two ear pieces from non-woven fabric and place them on the corresponding pieces of fabric on the wrong side, adhesive side down. Iron with a hot iron through a thin damp cloth. Sew the pieces along the lines and turn them inside out. There is no need to stuff your ears with filler. To give the ears a more interesting shape, you need to fold the lower part, through which the ear was turned inside out, in half and secure it with hand stitches.
Sew the finished parts to the top of the hare's head using neat stitches. The tail for a rabbit is quite simple to make - you need to sew a prepared circle of fabric around the circumference with stitches, departing 1 cm from the edge. Pull the thread and pull the fabric together. Fill the resulting part with holofiber and finally tighten the thread, fixing it to a knot. Sew the finished tail to the hare's butt.
Sew on button eyes and brown the cheeks. You can embroider a small triangle of the nose with pink thread and lay a small vertical line down from it. Such a face will look cute and funny. The rabbit is ready!
Fabric selection
The hand-made Tilda hare has distinctive features that are difficult to miss. To create it today, many craftswomen around the world use only natural fabrics in the form of high-quality cotton, practical calico, thick linen, aesthetic poplin and beautiful staples, since the toy was originally intended as a children's toy. The colors of the fabrics are chosen to be discreet, but not faded.
Thick cotton base
Fleece and flannel are often used for the base. Both silk and knitwear, along with terry, are used as fabric for sewing bunny clothes. As for colors, these can be canvases with rustic and country motifs. For padding, padding polyester with holofiber is used. Some needlewomen also resort to regular cotton wool. As for decoration, lace, textile elastic bands and satin are additionally used.
You might be interested in: Creating patterns and sewing school aprons for the last bell
Fleece toy
Who is this doll
Tilda doll is a cute rag toy with “unfinished” facial features. This doll is often called the Angel of Comfort, since it has already become a kind of classic in the home interior.
The first Tilda appeared at the end of the last century. The author of the debut doll was the Norwegian Tonne Finanger. Having made the first rag beauty, she was so carried away that she soon put the production of ruddy toys on stream. The name of the first doll was Tilda, and soon the name was assigned to all subsequent toys.
Today the authorship still belongs to Tonna. However, the world is so inspired by the idea of long-legged dolls that their creation has already become a real fashion trend.
Today tilde is a separate style of toys. There are not only girl dolls, but also boys, as well as a variety of animals. Tildes also have a number of rules according to which each of them must be sewn.
Characteristics of the tilde:
- Long limbs. All toys have long legs and paws.
- Dark skin. The rule applies to little angels, since fur is more often used for animals.
- Laconic facial expression. The eyes, nose and other details of the face are made extremely concisely and simply. Most often these are small dots.
- Blush. Business card of style. Both dolls and animals receive beautiful rosy cheeks in addition to their simple faces.
Among the rules for sewing tilde dolls, great attention is paid to the choice of fabric. The material for the toy should be as simple as possible. Preference is given to soft natural fabrics such as calico and linen. Clothes for dolls should also be simple and “homey”. The exception is thematic dolls. For example, wedding angels.
On the Internet you can find hundreds of patterns for Tilda dolls. But animals are gaining more and more popularity. An example of this is the unprecedented rush for hares and rabbits. A hand-sewn hare from fabric can very well become a keeper of comfort. Patterns for such a toy can be found on the Internet.
Necessary tools
In order to sew a Tilda hare yourself, you need to take textiles for the base, material for stuffing, fabric for decorating the ears and face, as well as fabric for clothing. You will also need blush or paint to create a blush.
It is worth saying that since Tilda is often decorated with various accessories, additionally in the work you will need: beads, buttons, ribbons, openwork Swarovski beads, feathers, artificial flowers, clips, smooth and machine embroidery, sculptural items made of polymer clay, knitted inserts, miniature floral elements and other materials. Naturally, all of the listed decorative items can be used as desired.
Fittings for finishing
We sew a Bunny from felt
I am sharing with you the author’s pattern and master class for a bunny that can be placed on a mobile phone, a garland, or left as a toy.
- felt (white, orange, green, pink);
- threads in the color of felt;
— filler (holofiber, padding polyester, padding polyester);
— safe eyes for toys (can be replaced with a sewn-on part);
- threads for embroidering the muzzle.
The pattern is full size, just print it in A4 format.
Sharp scissors will help you cut the parts evenly.
You can glue all the pattern elements with tape or circle them with a special fabric marker.
Sew the muzzle with a buttonhole stitch. Sew the nose on top.
The process of embroidering the mouth and muzzle will be facilitated by a special fabric marker.
Scheme and master class
To embroider a Tilda hare according to a ready-made pattern, you need to take cotton as a base, knitwear as an addition, synthetic filler for stuffing, scissors, cotton threads, blush, buttons and lace. For work you will also need a sewing machine, iron and pencil.
Algorithm of actions:
- First you need to redraw the finished pattern onto flesh-colored fabric, folded in half.
- Next, sew the outline on a sewing machine and cut out the finished pattern with scissors.
- Turn out the resulting parts and stuff them with padding polyester.
- Carefully sew on the legs and arms by hand.
- Make bunny ears. To do this, fold the knitted fabric with the right sides facing each other, make a pattern and stitch it.
- Next, protect with a hidden seam and iron.
- Sew the ears to the head by hand.
Sewing pattern for a hare
Bunny face
The Tilda hare's muzzle is an integral part of its body. It is created at the stage of creating the first drawing and forming a pattern. After completing the described stage of creating the model and stuffing it with padding polyester, all that remains is to make the muzzle. To do this, you need to schematically mark the location of the eyes, nose and mouth on the finished product, and then embroider them using floss. The type of embroidery in this case is a regular seam. You can learn how to embroider a hare’s nose or ear in another way by looking at all sorts of formats online in natural size.
Note! Beads or buttons can be used as eyes, but in the classic model the eyes are also embroidered with floss. Blush is created using a cotton swab and cosmetics. The mouth can be embroidered with black threads. This is optional.
You might be interested in what can be made from velvet: cutting rules
Model's muzzle
Bunny body
The bunny's body is assembled. First, the head and body are created using one pattern. Then the upper and lower legs are sewn to the body. The last step is sewing on the ears. Some craftswomen create one pattern for two ears, and some create two. The classic model uses the first option. The paws, like the ears, are sewn on only by hand. This is a characteristic feature of the model. They are also created using a straight and simple stitch on a sewing machine. Alternatively, you could try making the entire piece yourself, or do some unusual double stitching for the body and legs.
Model torso
Sewing process
We offer you a detailed master class on sewing a Tilda hare. For convenience, we will divide the entire process into several stages.
Main part
- Take the fabric and fold it in half with the right side inward. Using pins, we attach life-size Tilda hare pattern . Pay attention to the quantity of each part indicated in the description of the pattern.
- We trace the details of the pattern, leaving about a centimeter on all sides for seams. You can transfer parts using a pencil, chalk or a small piece of soap. To make the hare look more impressive, you can make the lower part of the ears from a material of a different color or with some kind of print. By the way, about the ears. On the Internet you can find patterns with different sizes of hare ears. You can easily combine and take the details that you like best. Let's say, from a pattern of a hare with long ears, you can only take the ears. And you'll see - they will look harmonious with any pattern.
- Cut out the details.
- We sew identical parts together - we sew along the edges, leaving small unsewn areas through which the parts can be turned out. To make it easier to turn out narrow parts (paws, ears) and to make them look neater, we recommend making small cuts in the rounded parts of the parts. For example, on the tips of the paws and ears, in the area of the nose. The cut should reach the seam, but not cut through it.
- We turn the resulting parts inside out and fill them with filler. You don’t need to stuff it too tightly, but the parts shouldn’t be empty inside either. We carefully sew up the remaining unsewn areas, tucking the fabric inside.
Making clothes
It’s not difficult to create original clothes for the Tilda bunny, since all you need is to make patterns and sew them according to the sample. They are widely available online and sold in reputable craft stores. They are often produced in the form of a ready-made kit for sewing.
Bunny costume pattern
Sew a dress for a bunny
It’s not difficult to make any clothes for a girl’s bunny or a boy’s bunny today, since you can find hundreds of patterns online for every taste. All that remains for the novice master is to redraw the drawings onto the fabric, cut them out and connect them correctly using a sewing machine.
Important! If the design requires it, you also need to make darts so that the finished product is placed on the body according to the silhouette and is not asymmetrical.
The following is an example of a classic dress with a long openwork skirt and pantaloons:
- To make pantaloons, you need to prepare a pattern on cotton gauze fabric with an allowance of 1.5 centimeters.
- Each pant leg should be folded in half and pinned to match the seam line.
- Next, you need to make the internal seams and process them with an overlocker.
- Fold down the bottom and iron.
- Sew lace to the ends along the very edge.
- Then place one pant leg facing the other and pin it together, matching the seams.
- Sew the product and process it with a zigzag.
- Turn out and smooth out.
- Insert rubber bands.
Dress pattern
Next, you can start making a skirt:
- Cut the fabric according to the finished pattern and sew.
- Finish the ends with a zigzag.
- Sew lace or any other decor to the end of the product.
- Insert the elastic by folding the corresponding edges.
You may be interested in this: The procedure for sewing a fabric and felt bow
To make a topic you will need:
- Cut out the product according to the finished pattern.
- Leave a length allowance.
- Make a hole for the arms and sew elastic into the neck area.
- When ready, connect the top to the skirt. This can be done by hand or using a sewing machine.
Note! The bodice and skirt must be sewn on the reverse side. If you couldn’t do this carefully, you can come up with a belt made of fabric or accessories.
Panama
Making a Panama hat for the Tilda hare is easy. The following is an example of a standard headdress model:
- In order to construct the product, you need to take cotton textiles. It is advisable that the headdress matches the suit or dress.
- Next, you need to redraw the crown, bottom and brim from the finished pattern onto the prepared fabric and create a future pattern for the product. The number of crowns is 2 pieces. Number of fields - 4 parts, 2 of which are folded.
- After drawing the details, you need to carefully iron the workpieces and begin stitching.
- From the wrong side you need to connect two crowns together.
- Then attach the bottom to them.
- Then cut out and sew in the fields. All parts are sewn from the inside out manually or using a sewing machine.
Note! To create a more interesting image, after completing the design of the model, you can add a textile flower and sew it on the side of the product, capturing part of the crown.
Panama hat pattern
Overall, Tilda the Hare is a touching creation that today can be made with your own hands. Making a printed model yourself will not be difficult using the diagrams and step-by-step instructions presented above. In cases where it is not possible to use diagrams from the Internet, you can use diagrams from ready-made kits. After creating the base and clothing, you can decorate the finished product with accessories.
Master class on sewing the Tilda Hare toy
Author: Tatyana Khramets
Exclusively for the portal Masters of Handicraft
.
What needs to be prepared. I’m making a list for Tilda, which is close to the classic version.
Tools and materials:
- Pattern.
- Textile. For the “carcass” I take two threads. You can use plain linen. Well, or any plain natural fabric. You can use calico, calico, etc. on the inside of the ear. Either plain or with a small pattern (polka dots, checkered patterns, flowers). For clothes, any fabric (preferably also natural) you like. In the classic version, this is a checkered pattern, a small pattern, etc.
- Iron. During the cutting and sewing process, you must constantly smooth out the parts.
- Scissors.
- Pins.
- Chalk, pencil, marker. In general, this is what we will use to trace the pattern on the fabric.
- Needle and thread. Threads will be needed to match the fabric and black for the eyes and nose (I use black floss).
- Sewing machine. This is if you don’t want to sew by hand.
- Decorations Small buttons or beads. Natural texture is also desirable.
- Wood is ideal. Plastic - “like wood”. But this is purely optional. Will be needed for decorating clothes.
- Something to tone your face. Some people tint with tea and coffee, I use old blush.
Toy pattern
I will sew a hare with floppy ears in a hat.
Bunny body (“carcass”) Cutting, basting, stitching parts, stuffing, assembly.
Iron a piece of fabric. I have a double thread, slightly tinted with coffee. I brewed it in a solution of the cheapest instant coffee. But she made a big mistake in that she began to iron it after drying. Now it is slightly “chewed”. But when stuffing, the “wrinkles” are smoothed out.
I fold the fabric in half, but if the fabric is thinner or slips, it is better to cut each piece separately. Lay out the patterns so that there are seam allowances between them (approximately 0.5 cm).
We pin it with pins so that they don’t move.
We trace around the edge. I have a simple pencil, because... The fabric is not see-through and I will not wash the product. You can use chalk, special pencils, or a disappearing marker.
We pin together the parts that will be made of two halves (torso, arms, legs). There will be one ear on this fabric, and the second part will be from a different fabric.
Now the ear. At first I wanted to outline it on another fabric (it’s thin), but then I decided to make it simpler. I simply cut off the required piece, pinned it together and stitched one to the other. All excess is cut off. Yes, don't forget to leave an unstitched area for turning. Marked on the pattern.
Now let's put together the details. I sew on a machine. Line 1.5-2mm. If someone sews “by hand”, then the seam is “backstitch” or for embroiderers “backstitch”. It is advisable to make smaller stitches.
Please note (for those who sew on a machine) that it is convenient to cut off a piece of fabric with a cut (I only cut off the body, but it could have been left) and sew the parts one by one, and then simply cut them out. It is easier to stitch the fabric than each small piece separately.
If someone is uncomfortable using pins, then, of course, you can simply sweep away every detail. For those who sew by hand, I think it's best to cut out the cut first.
They cut it out and turned it inside out. To prevent the seams from pulling, it is better to trim the fabric at the bends before turning it out.
It is convenient to use a knitting needle for turning. We carefully straighten each seam from the inside.
Now let's iron it. One of my hare’s legs remained fairly crushed, but with stuffing everything will smooth out. The ear has not yet been sewn up at the site of the inversion.
I stuff it with synthetic fluff. Convenient thing. The carcass turns out so light, but elastic. We stuff tightly, again using the same knitting needle (and your fingers, of course). In order for the bunny to sit, we do not stuff the legs completely, leaving a little (1-2cm) empty space.
A small nuance: if you first lightly treat the edge of the product from the stuffing side with PVA glue (just lightly, along the very edge), let it dry, then the fabric will not fray when stuffing. Or, when cutting, leave a little more fabric on this side, and then, after stuffing, trim the fringes a little (this time I did that). If you stuff it with synthetic padding, you must tear it well into shreds so that it does not clump.
Here is the result of stuffing the carcass. The parts are ready for stitching. The ears are not sewn on yet. I'll actually sew them on at the end.
If you want a “standing” hare, stuff the legs all the way, so that all that remains is to sew them on. And then you will have to sew it in a circle with a hidden seam. However, he will only be able to stand leaning against something. It's too tall for standing. The legs just won't bend.
If you want it to sit, you need to stitch it and remove a little of the filler from the legs. Just a little bit, so that when sitting, the belly does not put pressure on the legs.
Well, the first part of the sewing is ready. If I missed something, something remains unclear, I will be happy to answer all questions in the topic on our forum.
I baste the legs to the back of the body. It seems to be visible in the photo. I do this so that it will be easier to sew later, they will no longer squirm. We immediately pay attention to the fact that they are located exactly in height. Those. pay attention to the location of the heels relative to each other.
I also lightly basted the front part, although you don’t have to do this and sew it on right away.
We sew the legs and body through, as if stitching, like on a typewriter. Then the hare will sit. You can use a “back needle” stitch, or you can simply go back and forth with a basting stitch twice. We make small stitches. We sew the space between the legs with the usual “over the edge” only finely. If you look closely, you can see a thread on the carcass. After fastening, I stretch the needle to any place on the carcass, pull the thread so that the body shrinks a little and carefully cut it under the fabric. The tail of the thread is hidden in the doll's body.
So, the legs were sewn on. Let's get to the hands. Fold the edge of the fabric at the base and baste the hem. This will make sewing on the handle much easier in the future.
We pin the handles with pins and make sure everything is even.
Sew the handles with a blind stitch in a circle. I go through it twice, first “roughly” so that it holds, and then with more frequent stitches.
Sew on the ears. I apply it as I like. Indeed, in Tilda, even the location of the ears plays a role in the character of the toy. I don’t make creases and folds, but I think that if you want, you can arrange and sew the back of the ear in some interesting way. I sew the top part. Here, in fact, is the assembled carcass.
Tailoring, decor.
We lay out the pattern of the panties and the straps on the fabric folded in half towards the edge of the fold.
The hat is also cut from two halves. If you take fabrics of two colors, the hat will turn out to be double, with a different one inside. The original breast is one piece, but on this fabric I will make a double one, the fabric is very thin, the folds will be visible. You might even have to sit it on a base.
And, of course, we cut out two rectangles for the skirt.
Probably someone wondered: “Where is the pattern for the skirt itself?” There is no pattern, the dimensions are in the text. Large hare 20.5x18 cm. Small hare 14.5x13cm. The first number is the length from top to bottom. Two separate rectangles are cut out, the breast is sewn on, folds are made on the sides (in the original near the breast) on the upper part of the skirt. There are also folds at the back. Then it will all be in the photos.
The details are revealed. This is the wrong side. The fabric is “planted” on an adhesive base, because shirt and thin. The ideal in the original, of course, is pure cotton, but where can you get the right colors...
We sew the pants. First, the top side seams, from top to toe.
Then we unfold it as in the photo and stitch from the bottom of one leg through the “corner” to the bottom of the second leg. You can immediately tuck the bottom. If the fabric is thick and fraying, then the very edge can be covered with PVA glue and tucked once. The doll is an interior design and, in theory, should not be washed.
We sew the hat. On the pattern, the dotted line indicates the place where it is not stitched. We sew everything else (continuously). Turn it inside out.
Sew the skirt along the side seams. Here's what we've got so far. You can also add straps, stitched and turned inside out. I just hadn’t turned them out yet at that time.
We wrap half of the cap (where the twist is) inside. The place of the twist can be sewn up with a hidden seam, or you can leave it like that. He won't be visible.
First fitting of a hat. We bend the margins slightly.
The pants are hemmed at the bottom and top, and are worn on a hare. We make pleats in the front and back so that they fit snugly. To be sure, you can also slightly “attach” it to the carcass. The photo is glared due to the flash, but it seems that the folds are visible.
We sew the breast in the middle of the front tight skirt. We sew straps to it with buttons. Everything has already been ironed.
We put the skirt on the bunny and put folds on it in the front, on both sides of the chest, and sew it on. We also put folds in the back so that the skirt fits snugly, and sew it on. Place the straps at the back under the skirt and sew them on. Draw a muzzle with a washable (disappearing) marker or chalk. Here I would not recommend using something that you cannot wash off (erase) from the fabric later. When drawing, you can either try on the cap or sew it on so you can see where to draw the eyes.
Take black threads. Better than floss. Fold one thread in half and thread the ends into the needle. We stretch it so that the folded end is longer. We stick it into the place of the eye, grabbing 1-2 threads of fabric, thread it to the folded tip, then thread the needle into the resulting “loop” and pull the thread through. The thread is secured without knots. If it is not clear, you can simply fasten the thread somewhere under the ears (so that it is not visible) and stretch it inside the head to the place of the eye.
Making a French knot. You can clearly see it here. True, it’s on tape, but I specifically chose such a video so that it could be seen.
Just make 3-4 turns with the thread. pierce until the next eye. We repeat. Then we pierce it to the nose, embroider a triangle and a mouth. We rouge our cheeks. You can tone it with tea or coffee, but I have never done this. Voila! Bunny under the Christmas tree in the company of friends.