The article will provide information on how to make jewelry from polymer clay.
You don’t have to buy beautiful, bright, juicy jewelry. You can make them yourself if you master the technique of working with polymer clay.
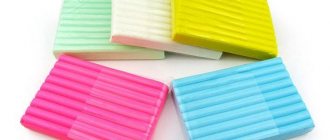
- Polymer clay is a material whose consistency resembles plasticine. But due to heat treatment, it hardens and turns into plastic.
- Polymer clay comes in many colors, shades and textures. Colors can be mixed, glitter and paint can be added to them
- This material is non-toxic and even a child can work with it
- You can make almost any type of jewelry from polymer clay: earrings, pendants, bracelets, watch bracelets and much more.
- Fantasy is the main condition when working with this material. Flowers, fruits, animals, abstract elements - this is not a complete list of what can be realized using polymer clay
How to work with polymer clay, tips
- First, let's choose a polymer clay manufacturer. It can be expensive or cheap, with a wide range of colors, and can be sold as a set or individual bars
- Manufacturers such as Fimo, Kato, Pardo are quite expensive. There are also domestic, cheaper analogues
- Do not immediately buy packaging of different colors. Buy 1 block and try it at home: how is its texture, mixability with other plastics and paints, bake the resulting material. Good clay should not crack or change color excessively.
- For sculpting, you will need standard colors, which can later be mixed. You also need tools and a small electric oven
- Usually on the packaging of polymer clay it is written how long it needs to be baked until ready and at what temperature
- Please note that you need to work with polymer clay carefully. To maintain color purity, work with medical gloves and on a clean surface.
- If you decide to make jewelry from plastic, then in addition to clay you will need accessories: earring earrings, fastening elements, decorative details and much more.
Polymer clay
Bright beads
For beginners, the easiest way to start is by sculpting beads that can be assembled into various jewelry. It is clear that the easiest thing that comes to mind is to simply take the color of the plastic, roll it into a circle, form a square or rectangle, pierce it with a toothpick to make a hole, and depending on the type of clay, bake it or leave it to cool. However, you can apply a few simple additional techniques and you will get original beads of the same shapes.
For example, salt technology. This is when the finished bead is rolled in coarse salt, thereby leaving an interesting relief on the surface of the workpiece.
After the beads have hardened, brush off the salt with a brush.
The next method is usually made from leftover clay, but you can also simply cut off several pieces from different flowers. The master class shows how to make a summer necklace. In addition to clay you will need:
- glass or smooth ceramic tiles so that the clay does not stick and is easy to use (you can use a special mat for modeling);
- a utility knife, preferably with a wide blade;
- toothpicks;
- pliers;
- waxed lace;
- jewelry cable;
- accessories for the lock (rings, end locks);
- beads.
Related article: Crochet little Christmas angel
We warm up the plastic thoroughly so that it becomes more pliable. Roll the pieces into sausages and place them into one without mixing yet. Approximately how to fold it is demonstrated in the photo.
Now we begin to twist the resulting block. The more rotations, the smaller the pattern.
You can make several such sausages. Then you need to cut them, pieces of different lengths are possible, then you will get beads of different sizes.
Actually now we roll the beads.
Since, according to the idea, either one cord or two passes through different beads, then, accordingly, in some we make a hole with a toothpick, and in others we widen it.
Now we figure out approximately how and where which beads will be located, and begin to assemble the necklace.
We string beads onto the cable, although if desired, they can be replaced with the same cord or strong thread.
You can also make a bracelet to go with the necklace.
Flowers made of polymer clay: master class
- The most common and any flower is roses. At first glance it seems very difficult to do, but it’s not.
- Pay attention to the structure of this flower - many petals held together, which are larger at the outer base and smaller at the inner one
- Let's prepare the materials: we need plastic in the color of the future rose (red, pink, yellow or white), a modeling stack with a ball at the end
- Let's make preparations for future petals: pinch off a piece of clay, knead it and roll it into a ball. Large balls are for outer petals, smaller ones are for inner petals.
- Now we're missing a bud made from a thin layer of plastic
- We make each petal from a ball, using a stack we give it a curved shape (this can be done with your hands)
- We attach the petals to the bud one by one, adjusting the splendor of our flower
- The finished rose can be used for decoration. To do this, you need to cut the base and make a hole for fastening.
- Carefully place the flowers in the oven and bake until done. Then they can be opened with varnish if desired.
Roses made of polymer clay
Color transition
As the previous master class showed, mixing colors can create interesting options. Therefore, we will continue to study the relevant master classes.
We take two colors of polymer clay, form them into rectangles and cut them into two triangles each.
Then, we make rectangles from triangles of different colors.
Now you need to cut the resulting blanks crosswise into equal sections.
We mix each segment with the paired one from the second two-color block.
The resulting rectangle with a color transition can be rolled out and used, for example, to make rose petals or assemble a flower. You can watch the video on how to make such a flower.
The next technique for working with color, which is easy to perform, is “Watercolor”.
Another way to combine different shades of clay is a little more complicated than those described above. However, the uniqueness and beauty of the resulting patterns is worth all the effort. The technique is called “Mok ume Gane”, it came to us from Japan and was first used in working with metals.
Related article: Beaded lilies: a master class for beginners with photos and videos
The video will demonstrate in detail how jewelry is created using this option.
Polymer clay earrings
Now let's learn how to turn our roses into earrings. There are two ways. One of which is simpler, the second is more difficult, but the result is simply gorgeous
Simple earrings made of polymer clay (rose blanks)
- Remove the rose blanks from the oven. They already have a hole for mounting
- To turn them into earrings we will need: a pin with a double-sided eye, rings for fastening, earrings
- We string the rose onto a pin and fasten it so that there is an eyelet at the top and bottom for attaching it to the part.
- Attach a hook to the top using a ring
- On the lower part - a bead in the color of a rose (or as your imagination dictates). The bead will make the earrings a little heavier and they will hang down without twisting.
Earrings made of polymer clay
Earrings in the form of a bouquet of roses
- We need rose blanks again. But now they are raw and very small in size. They can come in a variety of contrasting colors, such as red and white
- We make a ball base. We attach roses to it using a toothpick. Make sure that they are in good contact with the base ball and do not fall off after baking
- Gaps can be filled with small green plastic leaves
- Carefully make a hole in the ball where the pin will be attached
- We bake our flower bouquet. The baking time will be slightly longer due to the greater density of the clay.
- After cooling, we attach our ball to the wire. Spectacular earrings are ready!
Earrings bouquets
Polymer clay bracelet
- First, let's figure out what elements the bracelet consists of: the base (chain, rope, wire or fishing line), clasp and decorative elements
- We purchase the base and clasp from a hardware store, but we make the decorative elements ourselves
- Let's make a bright berry bracelet from raspberries and blackberries. It will complement any summer look and looks very original.
- To make raspberries, we need pink clay and green clay for the leaves. Making berries is very simple. The base is a dense plastic ball. Small balls of a similar color are attached to it. The balls are smaller at the bottom and larger at the top. We attach leaves to the base of the berry and attach a wire. Bake the berries according to the instructions for working with clay
- We make blackberries in the same way, but from black or dark purple plastic
- To make our bracelet brighter, in addition to the berries, we will attach beads to the base
- For the base of such a bracelet, it is better to use a chain with a decorative clasp
Bright bracelet made of polymer clay
Extruder technology
An extruder is a tool for working with polymer clay. It looks like this:
It comes with several attachments:
This tool helps make working with clay easier, and many techniques could be invented with its help (syringe, torn edge, etc.).
And these “knitted” decorations are also created using an extruder. Although even without it it would be possible to manually wind threads made of polymer clay, but, undoubtedly, this device greatly simplifies and speeds up the work process.
Related article: Weaving baubles from floss threads for beginners with photos and videos
Naturally, all the variety of forms and techniques for using polymer clay to create jewelry cannot be included in one article. However, what is written is enough to make you want to get acquainted with the wonderful world of polymer clay and want to add plastic jewelry to your jewelry collection.
Polymer clay ring
- A polymer clay ring can be made in two ways: solid plastic or based on
- A solid ring is made using a mold. A mold is a heat-resistant silicone mold that is filled with plastic and baked with it. The hard plastic is then simply removed from the mold, sanded and varnished
- For the second version of the ring you need a base. There are many such bases in hardware stores, where there is a niche for attaching plastic
- You can imagine endless ways to decorate a ring. There are a lot of options, but the simplest and most versatile option is flowers.
- A ring paired with earrings or a necklace looks especially original.
Solid rings
Ring based
Polymer clay beads
- To learn how to make beads from polymer clay, first learn how to make smooth, neat beads
- Even ordinary beads are not so easy to make so that they are the same size and correct shape. Practice making even balls of the same size and making holes in them for fastenings
- Once the basics are mastered, you can begin making decorative beads
Polymer clay beads with metal effect
- Such beads are difficult to distinguish from metal ones. But thanks to your imagination they will be unique
- We will need gray or metallic plastic, an embossing element (for example, a button) and tools
- First, roll out a smooth ball of plastic
- Now we roll out the plastic into a dense layer and use a button to emboss it. To prevent the button from sticking to the polymer clay, moisten it with water.
- Then carefully cut out the embossed elements with a blade and attach them to the ball
- We decorate the joint with a decorative plastic cord
- Make a hole in the bead for fastening
- These beads can be used for beads, bracelets, earrings and much more.
Polymer clay beads
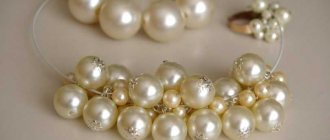
Polymer clay necklace
- Making a massive summer necklace from polymer clay is more difficult and requires some skill.
- For it we need: plastic, decorative beads, chain and fastening
- First, draw a sketch and decide where which elements will be placed
- Then we will prepare individual flowers, leaves and beads
- For the base, we need a piece of thinly rolled plastic of the desired shape. Choose only high-quality plastic for such work, otherwise a poor base simply will not withstand the abundance of elements and will break
- After preparation, we attach all the elements to the base according to the sketch. Don't forget to make holes for attaching to the chain
Polymer clay necklace
Hair decorations made of polymer clay
- Polymer clay can be used to decorate hair clips, headbands and garters.
- You can attach the elements to the base using special glue or invisible fishing line
- For any products consisting of several elements, you need to make a sketch, because imagination does not always correspond to the result
Delicate flowers for decorating hairpins and headbands
- We will need: polymer clay and stacks (you can use a toothpick)
- Knead a piece of clay of the desired color and roll it into an oval
- We make cuts, the same number as the number of petals planned
- Now we make each petal, bending it using a stack
- We give the flower the desired shape, trim off the excess plastic
- The middle can be decorated with yellow plastic stamens or simply filled with paint
- These flowers can be used for all types of decorations. They are very reminiscent of apple or apricot flowers
Flowers for polymer clay jewelry
Bracelet
This bracelet made of “cakes” and “gingerbreads” will appeal to both children and adult fashionistas.
To make this polymer clay jewelry you will need:
- polymer clay;
- acrylic paints;
- pastel colors;
- base chain;
- toothpicks.
Choose the colors of polymer clay, acrylic and pastel paints at your discretion.
Follow these instructions for creating polymer clay jewelry for beginners:
- Make preparations for the “cookies”. To do this, form two pancakes with a diameter of about 2 cm from brown clay.
- Make indentations along the edges of these blanks, pressing on them with toothpicks. Make two such rings from brown clay.
- From white clay, make a third element exactly like this. Connect them all together by placing the white ring in the center. To connect the elements, use liquid plastic.
- Make a hole in the center for fastening, insert the wire and bend it with pliers, send it to the oven for baking. Decorate the “sweetness” on top with acrylic paints and pastels, creating an imitation of gingerbread or cookies.
- Make these 5 elements. When painting gingerbread cookies, try to apply contrast, alternating them one at a time.
- String decorative elements onto the bracelet chain. Stylish decoration is ready!
Other ideas for a master class on creating jewelry from polymer clay are presented in this video:
0 Comments
Clay headbands
- For clay rims, it is better to choose a thin base, plastic or metal.
- When securing the elements, make sure that they do not cling to the hair.
- Here are examples of headbands for inspiration:
Clay headband
Clay headband
Clay headband
Hairpins made of polymer clay
- The basis of the hairpin can be an old plastic hairpin, a regular automatic hairpin or bobby pins
- To ensure that the hairpin lasts a long time, do not choose elements that are too massive for small bases.
Hairpin ideas:
Hairpins made of polymer clay Hairpins made of polymer clay
Types of techniques for working with polymer clay
Plastic allows you to make jewelry in a wide variety of designs. This largely explains the variety of polymer clay jewelry on sale. The most popular techniques for working with this material are sugar, watercolor, filigree, mokume Gane.
As can be seen from the various master classes on polymer jewelry for beginners, the easiest way to master each technology is to make long beads. To do this, you need to make beads of the same size from plastic, string them on a thread, fire them and varnish them.
Brooch made of polymer clay
- Let's make a simple but cute cat brooch from polymer clay
- We choose a cat template that we like. We print it on the printer in the required size and cut it out
- Now we prepare the plastic, rolling it into a thin layer
- Place the template on the plastic and carefully cut out the desired shape with a blade.
- Then we decorate our brooch at our discretion. This can be done using small elements, sparkles, strands and much more. Don't limit your imagination
- We bake our brooch and use glue to attach it to the base.
Brooch idea
Cat template
Cats template
Polymer clay pendants
- Making an original abstract pendant is easier than it seems
- To do this, we will need plastic of several colors and a special machine for rolling out plastic.
- This machine allows you to roll out polymer clay evenly and, what is important, create a smooth color transition
- This result can be achieved without a machine, but it is painstaking work.
- We lay the plastic in the desired color scheme and roll it into a thin layer
- Then we cut off even thin strips and roll them into circles
- It looks original if the edges of the strips are rough
- Bake the resulting element. It can be used as a pendant or part of a necklace
Plastic pendant
Recommendations for working with polymer clay
First you need to decide on the plastic manufacturer. Domestic manufacturers are much cheaper than foreign ones and are not inferior to them in quality.
Don't buy a set of different shades at once. Take one block for testing. High-quality material should mix well with paints and should not develop cracks during the baking process.
Carefully read the instructions on how to learn how to make jewelry. This can be found on the clay packaging or online.
It is better to work with plastic with gloves and on a clean surface. This will help keep the color clean.
Take care of jewelry accessories in advance.