What is decoupage?
This is an amazing technique that allows you to give ordinary objects an unusual look using an ordinary picture or a special napkin.
This is an inexpensive way to make the interior of your own apartment or house especially cozy and memorable.
This is a great way to give your favorite but shabby items a new life.
This is a great way to spend time with your family.
The decoupage technique for beginners is not as complicated as it might seem when looking at the lovely creations, most of all reminiscent of luxurious items of palace utensils or pretty handicrafts of artisans of the 18th-19th centuries, inherited from great-great-grandmothers and retaining their enchanting beauty.
Well, speaking without emotion, the artistic technique of decoupage is a method of decoration using a picture glued to the surface and coated with varnish on top for durability.
The name of the craft comes from the French verb “to cut,” as the image was simply cut or torn out of a postcard, newspaper, or other printed items.
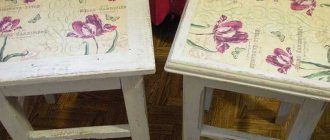
Decoupage of an old stool
The first step is to chip off the old layer of paint using a chisel or spatula. Then thoroughly sand the entire surface and sand it. All that remains is to prime the stool with a special acrylic primer for wood.
Paint the stool with matte white paint using a wide, stiff brush. Take different beautiful napkins, separate the top one, cut out interesting designs from them and create a composition right on the stool. Carefully cover all the drawings with PVA glue, and when it dries, apply 2-3 layers of colorless furniture varnish.
A little history
This type of creativity first appeared in the Middle Ages, when practical German artisans began to decorate the furniture they produced in this way.
But the design style reached its first heyday in the 18th century, when Italian and French masters imitated expensive inlays made of wood or leather in this way.
Note!
DIY gifts for February 23rd - a large selection of ideas for creating unusual gifts for Defender of the Fatherland Day
- What to give a 2-year-old boy - a list of the best options for an interesting and useful gift (120 photo ideas)
Papier-mâché - TOP 120 photo reviews of original products. Detailed instructions for beginners on creating beautiful crafts
A little later, the technique became popular among poorer segments of the population. At the end of the 19th and beginning of the 20th centuries, the decoupage technique conquered all of Europe and moved to America, where it acquired the form of a craze.
The development of new technologies, an increase in production and consumption pushed handicrafts into the background, and for a long time it was in some oblivion. But now it is coming back into fashion.
Materials
The decoupage technique for beginners does not require large financial investments. At first, the craftswoman will need decoupage cards; they are denser than ordinary napkins and are guaranteed to stick without holes, tears or folds. Yes, it’s more convenient and easier to work with them.
In the future, when the technique of decoupage with your own hands is mastered almost perfectly, you can even use paper napkins from the store or newspaper sheets (such crafts look especially good in retro or simple city style).
An acrylic primer will help ensure better adhesion between the base and the design, and it will also eliminate minor surface defects.
Glue. To begin with, you can use the most ordinary PVA, but over time, such a craft can turn yellow from the inside and even crack, so in the future it is better to buy acrylic glue or adhesive varnish, which can be applied to the base and used as a final coating.
The varnish will help fix the picture and give the homemade product durability. It is best to use water-based acrylic varnish. It does not have a strong odor, washes well and dries quickly.
Note!
Kinusaiga technique - TOP-140 photos of the best ways to create crafts using the Kinusaiga technique with your own hands + instructions for beginners
- Do-it-yourself passe-partout - a master class with step-by-step do-it-yourself schemes. Making tips + photos of the best examples
Decoupage with napkins: TOP-150 photos of ways to decorate with napkins. Simple instructions for beginners at home
Acrylic paints are useful if you want to make a colored base or beautifully inscribe the selected image on the surface. To begin with, you can buy two or three colors, one of which will be the base color, and the rest will become an accent to underline the design.
Decoupage cutting board
The cutting board is easy for beginners to work with – the smooth, flat surface seems like it was created for decoupage. Both plastic and wooden boards will do. You will need white acrylic paint, several colored bottles or colors, spray varnish and PVA.
To easily disassemble the napkin into layers, you can iron it and spray it with varnish - this way it will not tear or come apart. And to easily spread and spread it on the surface, add as much water as possible. You can dry the flat surface with a hairdryer, and then varnish it, smooth out any uneven surfaces and add decor.
Tools
The technique of decoupage from napkins will require preparing a small set of tools for comfortable work. It will include synthetic brushes for painting and underpainting, as well as for varnishing the finished product (it is better to purchase one wide flat and one thin brush, and later buy what you need), a spatula for sealing cracks (if any), sandpaper for leveling and cleaning surfaces, small pieces of foam sponge for applying primer or background.
Where to begin?
Those who decide to master this kind of craft need to choose a base, that is, an object on which to apply a drawing. Bottles, vases, cutting boards, napkins, clothing items, candles and even furniture are suitable for decoupage. The base material can be made of wood, glass, metal, fabric. Beginners should prefer wood, stone or ceramics.
The choice is quite large. For “dummies” in this matter, it is better to choose something simpler that you won’t mind ruining if it doesn’t work out the first time. The pattern can be cut from napkins, greeting cards, magazines, wrapping paper, or from printed pictures found on the Internet. Before starting the lesson, you need to prepare the necessary material.
The DIY decoupage video technique is well presented using the example of an ordinary bottle with a smooth surface.
- The base is, for example, a wine bottle.
- PVA glue or glue stick.
- Brush for applying glue.
- White and blue paints.
- Napkins with a pattern.
- Dish sponge.
- Toothpick.
- Disposable plate.
- Varnish for coating the finished product.
Master class on decoupage
Step #1.
Cut the sponge into 2 parts to make it easier to work with. Pour a little paint into a disposable plate and lightly blot it with a sponge.
Step #2.
Apply paint to the entire surface of the bottle with light movements, quickly removing the sponge. And leave to dry for 12 hours.
Step #3.
Apply a second coat of paint in the same way and wait for it to dry.
Step #4.
Prepare the pattern. Cut out a design from a napkin. It is not necessary to cut out all the elements along the contour; the white background of the napkin will not be visible on the painted bottle. Dilute the glue in half with water.
Step #5.
The drawing is applied to the bottle in parts. Glue is applied to the pattern element placed on the bottle using a brush in the direction from the center to the periphery.
Step #6.
The same thing is done with the next element: it is applied to the bottle and covered evenly with glue.
Step #7.
It is better to place small parts of the pattern on the back of the bottle. After the glue dries, the contours of the white paper will be completely invisible.
Step #8.
Creating a dark blue outline will complement the work well. This color can be easily achieved by mixing white and blue paints.
Step #9
Then the resulting color is applied in dots using a toothpick.
- Step #10.
- The work ends by coating the bottle with varnish.
- This way you can transform an unnecessary bottle into an original vase.
As you practice your skills and improve your technique, your work will get better and better. Moreover, if the activity is enjoyable, mastery can be achieved as a result. This hobby is a good distraction from everyday troubles and helps you relax after a hard day.
Due to modern fashion trends, decoupage video materials for beginners are quite in demand and help to quickly learn the basics of this art.
This kind of needlework will help you unleash your creative potential and make the interior of your home original and more comfortable.
Source: https://webdiana.ru/dom-i-semya/rukodelie/2090-video-uroki-dekupazh-dlya-nachinayuschih-iskusstvo-i-hobbi.html
The basis
Wooden cutting boards or straight plywood boxes and drawers will be useful as a basis for the first experiment.
Although you can use plastic, iron, porcelain or glass surfaces of any shape and size.
But in this case, it is necessary to take into account that all these smooth materials give poor adhesion to other materials, and the rounded or convex shapes of the object for decoration are difficult even for experienced needlewomen.
So it’s better to start decorating Easter eggs using the decoupage technique after gaining experience in creating crafts in this area.
Pictures of the decoupage technique will help you decide on your first creations and select everything you need for creativity.
Types of decoupage
Different decoupage techniques will help you elegantly design different types of surfaces.
Stages of work taking into account materials
Each decoration method requires following certain steps and has its own nuances. It is important not only to properly prepare the piece of furniture, but also to do the decoupage correctly. In this case, the finished result will please you for many years.
Napkins
Decoupage with napkins is the best option for beginning craftsmen. The method is simple and gives complete freedom in choosing a pattern. So, for decoupage of kitchen furniture, thematic pictures with cooks, fruits or vegetables, and floral patterns in country style are suitable. You can choose neutral patterns, flowers, and ornaments for your bedroom. It is recommended to decorate the headboard of the bed with patterns in vintage style. Floral patterns on closet doors and chests of drawers look beautiful. Images of animals, cartoons or toys, and decoupage cards are suitable for the nursery. They can be used to decorate cabinets, cribs, and drawing tables. For the living room, it’s also easy to find suitable ideas depending on the room’s design style; for example, marine-themed images on the table surface and cabinet doors look beautiful.
This decoration method is perfect for decorating doll furniture.
To decorate the surface with the selected napkins you need:
- Apply a solution of PVA glue and water (1:1) to the prepared product, and then proceed to gluing the napkin element you like.
- The image should be carefully straightened, expelling the air.
- After gluing, treat the surface with glue and leave for a while.
- When the decor is completely dry, cover everything with furniture varnish.
Types of furniture painting, step-by-step decoration at home
Glue the cut out elements of the napkin onto the prepared product, straighten the images, expelling the air
Apply glue to the surface and leave to dry.
Coat with furniture varnish
Shell
The decor with nut or eggshells is reminiscent of craquelure patterns. Despite the apparent complexity, this is a simple technique. Moreover, it can be performed either separately or with additional decoupage patterns. When using shells, you can achieve the effect of antiquity, and some craftswomen even use this technique to imitate reptile skin.
A similar effect will look beautiful on kitchen furniture; the appliances can be used to decorate cabinet doors and table surfaces. In the bedroom and living room, products that seem to be covered with the skin of an exotic reptile look beautiful and appropriate. For a children's room, you can decorate a chest of drawers in a vintage style or decorate the cabinet doors using the decoupage technique with napkins and add shells.
To work, you will need raw egg shells. It is thoroughly washed and the inner film is removed. You should also prepare PVA glue and a brush. After this you need to proceed as follows:
- If you are planning a decor with an image, then the first thing you need to do is apply the design using the technique you like.
- Apply a layer of PVA glue to the area of the surface selected for decoration, then apply a shell and lightly press on it so that it cracks.
- Using the back of the brush, place the pieces in the desired order. Then press down lightly again.
- Then, when the pieces are in the desired position, lightly tap them with the back of the brush. In this way, you should cover the entire desired surface with decor, then coat the shell again with PVA glue diluted with water.
- To give the effect of reptile skin, lightly tint the shell with special wax, and finally secure the decor with 2-3 layers of varnish.
Prepare the furniture Apply a layer of PVA glue to the surface, place the shell pieces in the desired order, tap on the surface with a brush Apply a solution of glue and water, add a pattern if desired, secure the decor with several layers of varnish
Paper
The most popular methods of decoupage furniture using paper. These could be photographs, unwanted wallpaper, clippings from comics, newspapers or magazines. For the living room, wallpaper that matches the decor of the room is suitable. They can be used to decorate a closet, chest of drawers or coffee table. It is better to choose comics and clippings from fashion magazines for the children's room. In this way you can decorate a table, chest of drawers, closet or headboard. It is recommended to decorate the compartment doors in the bedroom with photographs.
It should be remembered that the thicker the paper, the more glue it requires to get wet. For example, wallpaper requires at least 3-4 layers. They must become plastic in order to fit as tightly as possible to the surface. Do-it-yourself furniture decoupage is performed in the following sequence:
- Properly prepare the surface of the furniture.
- Spread the area for decoupage and paper with glue. The latter should become as flexible as possible.
- Place the paper on the surface and gently smooth it out, expelling air bubbles, then apply diluted glue to it and leave to dry.
- To secure, coat the product with varnish.
If desired, this technique can be combined with coloring. It is permissible to use craquelure varnish.
Spread the area for decoupage and paper with glue
Place the paper on the surface, smooth it out, expelling air bubbles
Apply diluted glue to the surface, leave to dry, and coat the product with varnish to secure it.
Textile
Fabric can be decorated in different styles. Using this material, it is possible to create volume so that the drawings seem as realistic as possible. To decoupage furniture with fabric, you can use any smooth textile - from chintz to silk.
In this case, you can use either large pieces of fabric or work using the patchwork technique. Such decoupage will look very beautiful on cabinet doors and bed headboards. For the kitchen, you can use fabric that matches the color of the walls or household appliances. Children's cabinets or a chest of drawers will be transformed after decoupage with bright, colorful fabric, and the living room will look beautiful after decorating with floral motifs.
Types and features of furniture varnishes, their characteristics
Master class step by step:
- Carefully soak the selected material with PVA glue.
- Place a piece of fabric on the surface for decoupage and give it the desired shape.
- Leave to dry.
- Afterwards, if desired, paint the necessary parts with acrylic paint and add additional decor.
After everything has dried, you need to coat the fabric with acrylic varnish in several layers. Lace decor has its own characteristics. Such elements should be covered with putty so that they stick well later. However, the product will have to be removed from all the recesses so that the texture of the lace decoration appears.
Impregnate the material with PVA glue, lay it on the surface of the furniture, give it the required shape, leave it to dry, cover the fabric with acrylic varnish in several layers
Leaves
This technique requires collecting the leaves you like, placing them between white paper and ironing them. As the substrate gets wet, it should be replaced. Thus, it is necessary to completely dry the leaves.
Using dried leaves, you can lay out ornaments, flowers, drawings on furniture, or decorate the entire surface. So, in a nursery it will look beautiful if you decorate the head of the bed with delicate leaves and flower petals. For the bedroom, you can decorate the cabinet doors with an autumn herbarium. A country-style living room will be decorated with a chest of drawers with falling leaves on the front side; it is recommended to decorate the kitchen cabinet with leaves of fruit trees or grapes.
To decoupage using this method, you should prepare leaves, PVA glue and brushes. Then you need to act like this:
- Apply PVA glue to the surface to be decorated.
- Lubricate the leaf and apply to the product. Next, you need to carefully iron the element and cover it with diluted glue.
- This is how you should decorate the entire area.
- Wait until the surface is completely dry and coat it with varnish.
Apply PVA glue to the surface to be decorated
Lubricate the leaf, apply to the product, iron the element, cover with diluted glue Wait for the surface to dry completely, coat with varnish
Reverse decoupage
The reverse technique allows you to place an image on transparent objects. In this case, the design is applied to the inside facing outwards.
The principle of creating such decor is the same as that of direct decoupage, but it will require much more attention and concentration. But a decorated table or vase will definitely impress your household or guests.
Decopatch
This technique differs from the first two types of creativity with paper and glue. In this style, the entire surface is covered with a pattern (or patterns), leaving no free space at all.
Very often the main image is complemented by patterns or ornaments that resemble patches. Therefore, sometimes such decoupage is compared to patchwork.
But it will be very difficult to rip up the area you don’t like and redo it. So the principle “measure seven times, cut once” will have to be followed 100 percent
Artistic decoupage
This technique is often called smoky decoupage. To create it, artistic drawing skills will be useful, since in it you will have to blur the edges of the pictures with the help of paints, gently combining it with the base.
If you are not sure that this technique will work out the first time, you can first practice on a sheet of paper, simply attaching a picture and finishing it with paints.
Basic Rules
A master class on decoupage technique will show the entire sequence of actions. It is not as complicated as it seems at first: the surface is primed, covered with paint, glue and an image are applied to it, and all this is varnished.
But before that, it’s better to learn the basic rules that will help you make a good craft the first time.
It is necessary to paint the entire surface that will be visible. For example, for a flower pot you will have to take care of painting the bottom and inside all the way to the ground, and maybe a little deeper. And if you plan to give the pot without flowers or greenery, then you will have to cover all surfaces with paint.
If imperfections are visible in the paint, you will have to repaint the entire surface, achieving the ideal tone.
Light background colors will help make the image more realistic and expressive. In addition to white, all pastel shades will look great.
Before applying each subsequent layer, the craft must be dry. Rushing through the creative process is a great way to ruin everything.
Small pictures are easier to apply. Therefore, for the first work it is better to use them. Before gluing, you should once again make sure that the picture is suitable for the selected area in size, color or subject. To do this, it is simply leaned against the base.
The glue is applied from the center to the corners, thoroughly covering the entire surface. The pattern is carefully smoothed out, straightening out all the folds.
Decoupage. Photo and video decoupage master class
In 18th century England this method was known as "jaanning". Contemporaries call it decoupage. The technique is classified as decorative and applied art. The main material is colored paper. Cuttings from it are placed on any objects and covered with varnish.
Sometimes you have to apply up to 40 layers. The goal is to consolidate the composition and eliminate the transition between the clippings and, for example, a flower pot. As a result, decoupage looks like inlay or painting. Let's get acquainted, first, with the history of technology.
The origins of decoupage
Judging by the name, the method originates in France. In the language of this country, the word “decouper” means “to cut.” The masters of decoupage who lived in France in the 17th and 18th centuries are also known One of them is Empress Marie Antoinette. Madame de Pampadour also held a high position. She was the favorite of Louis the 15th.
France, indeed, became the birthplace of decoupage techniques , but only in Europe. In Asia, the method was known back in the 12th century. There is evidence that the Chinese adopted their skills from the nomads of eastern Siberia. Tribal tombstones decorated using the decoupage . True, instead of paper, the Siberians used pieces of animal skins and bark. But the Chinese began to use paper, which they had invented at the beginning of our era. Residents of the Middle Kingdom made decoupage of boxes , furniture, lanterns, and windows.
It was from China that decoupage, the idea of decorating objects using varnish and paper, leaked to Europe. At first, its residents began to buy products from distant Asia, then they learned to make them themselves. We mainly decorated furniture. Here are some examples of 18th century French decoupage:
Decoupage furniture in the West has become an alternative to eastern interior items. The fashion for everything exotic and Asian came to Europe in the 17th century. Buying a cabinet or chest of drawers from the Middle Kingdom was considered a sign of good taste. But transporting things from the East was not cheap and was available only to the elite of society. Therefore, following high-ranking persons, low-income citizens became interested in decoupage. At first, they recreated budget copies of real goods from China.
Then they began to develop their own design, more sophisticated and European. The introduction of carving to the middle and lower classes gave the elite a reason to abandon their favorite hobby and disparagingly call decoupage the art of the poor. However, this only encourages modern designers. Craftsmen like to create cheap items that fit with dignity into the most sophisticated interiors. Let's learn this too.
Decoupage candles
This is a simple task with an effective solution. To work you need a candle, or paraffin for it. Decoupage napkins are used as decoration . Craft stores have special samples. They are sold individually and usually cost around 10 rubles. You have to pay extra for choice and artistic value.
It is not always possible to find beautiful napkins in hardware stores. Although, standard packaging is also suitable for do-it-yourself decoupage . There are cold and hot equipment. In the latter case, the paper layer is ironed with a metal spoon heated over a fire. It slightly melts the paraffin.
It saturates the napkin, firmly adhering to it. In the cold technique, the decorative layer is fixed to the candle with a glass rod. The surface is smoothed over and gluing occurs. So, let's do this decoupage step by step , in accordance with the following master class:
The cold method is usually used for candles with thin walls. Napkins stick to them better. If the contact is unreliable, craftsmen secure the decorative layer with additional elements. You can, for example, wrap a candle with twine, a string of beads, or a satin ribbon. Consider decoupage for beginners (photo) :
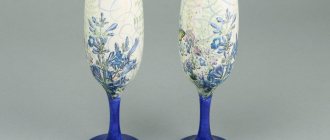
Decoupage bottles
The decoupage technique allows you to make a valuable souvenir from an ordinary bottle, for example, Soviet champagne. The decorated option becomes not only a budget-friendly, but also an exquisite gift for the New Year, March 8th, or Birthday. “decoupage” master from Irina Sergeeva. She explains clearly, and the woman’s products can give inspiration.
https://www.youtube.com/watch?v=YT1svp7TyKEand
There are several styles in which you can make a present:
— The classic applique is noticeable on the glass. That is, transitions between the background and the napkin are visible. It is this technique that is usually discussed in the “ step-by-step decoupage ” sections. Photos of standard samples are also the most common.
— The artistic style eliminates the noticeability of joints. The result is a smoky effect. The base of the bottle is tinted and decorated with sparkles and dabs of glue in order to blend with the design on the paper.
— Volumetric decoupage at home is done with a special paste, small pebbles, coffee beans, eggshells, or pieces of fabric. They replace the usual napkins, or complement them.
— Decopatch is a mixture with patchwork, that is, a patchwork technique. The surface of a bottle or other object is completely covered. Small, bright pieces of paper and fabric go end to end.
— There is also reverse decoupage . A master class on it is always glass decoration. But to do this with a bottle, you will have to attach the napkins from the inside, not the outside. It's almost impossible. Therefore, the reverse method is usually used for transparent tables, dishes, and trays.
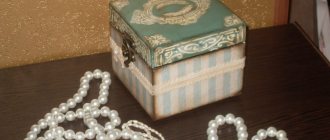
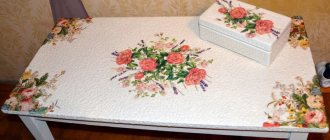
Decoupage of boxes and wooden boxes
Boxes or drawers are not just souvenirs, but things that are irreplaceable in the household. Traders call them storage containers. But in order for everything to be in its place, sometimes you have to pay considerable sums. Designer, beautiful and stylish products are expensive. Meanwhile, you can make an original, and even exclusive, thing yourself.
A piece of wood will be required. This is a cheap item. Next, we stock up on acrylic paints and glue for decoupage . to buy aerosol varnish, glue for gold leaf, sandpaper, transparent wax and craquelure. The latter creates cracks in the paint, an antique effect. The list of materials is approximate. For example, if you don’t want to make a vintage box, you don’t need craquelure. In general, let's start acting - we will repeat the master class “ Decoupage. Creative ideas »
https://www.youtube.com/watch?v=f0_VeftU8LA
What will your decoupage ? After all, just as Europeans once refused to copy the decor of things from the Middle Kingdom, you will refuse to simply repeat video tutorials. To make it easier to move to the next level, look at examples of diverse, successful work. Get inspired:
Decoupage furniture
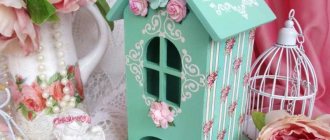
Pictures for decoupage , paints, varnishes, allow you to stylize a typical piece of furniture. There is no need to throw away a good-quality chest of drawers that does not correspond to the Provence direction. It is enough to cover the product with white, turquoise, green paint, create scuff marks, and add images of lavender and other wildflowers.
There are also baroque decoupage styles . Take more gold pigment, varnish, napkins with ornate patterns, and stucco. If light colors dominate your home, you shouldn’t throw away a dark-colored chair lying around from Soviet times. decoupage for beginners can do with it :
When working with furniture, it always needs to be sanded first. Only then does decoupage begin. Creative ideas will help create, for example, the atmosphere of a writer's office. It is enough to cover the chest of drawers with newspaper and book pages. Decorating a coffee table with pictures of kissing and hugging couples is suitable for a romantic, playful interior. Napkins with pink hearts are good for a child's room where a girl lives.
By the way, even a child can learn decoupage for beginners step by step . In his creation, a teenager can express preferences and hobbies. Anyone whose favorite lesson is geography will probably cover their desk with maps of the area.
Decoupage in the photo proves its worth in different styles and settings. By the way, about the situation. The item does not have to be in the interior. Decoupage also helps to decorate belts, bags, wallets The video is not difficult to find on the Internet. Most tutorials advise you to draw a preliminary sketch of the project.
It’s easier to work this way, especially if you are creating a complex composition. decoupage store will allow you to bring your wildest ideas to life . There are many of these on the Internet. In real life, retail outlets are typically referred to as “art supplies.” But the main commodity for creativity is imagination. Use it, create masterpieces for yourself and, perhaps, even for sale.
Some advice from experienced craftsmen
Thick paint is harder to apply than liquid paint, so don’t be afraid to thin it. A couple of thin layers will be preferable to one thick application.
Slow drying in natural conditions will help the product retain its attractiveness longer.
You can't apply too much varnish.
Sandpaper will help correct most imperfections.
Following these simple rules and tips will help you achieve even quite complex decor, such as the technique of decoupage of bottles, glass jars or eggs.
A photo of the decoupage technique will help you see what has already been done by craftswomen and choose a suitable craft for beginning needlewomen.
Decoupage - lessons, master classes, videos | Handmade Jewelry
12/20/201501/26/2016 rukodel1964 DIY jewelry
How to beautifully wrap a gift or a hand-made decoration? Beautiful packaging will create a pleasant impression of the gift. Even an inexpensive item in original and beautiful packaging will bring joy and festive mood. It’s especially nice if the gift box is made by your own [...]
05/01/201510/22/2015 rukodel1964 Decoupage - lessons, master classes, videos
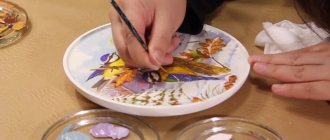
Artistic marbled plate (complex decoupage). You will need: A glass plate, a paper reproduction of the coat of arms, a flat brush and a retouching brush, a cut brush, a piece of sponge, acrylic paint in colors: ivory and natural umber, a retarding medium, glue […]
05/02/201410/20/2015 rukodel1964 Decoupage - lessons, master classes, videos
Decoupage on a wooden tray - craquelure. The cracking achieved by using a two-component craquelure varnish on a wooden tray looks very natural. A network of tiny cracks forms on the surface of the tray, and the finishing is done on top of decoupage, before varnishing, […]
05/02/201410/20/2015 rukodel1964 Decoupage - lessons, master classes, videos
Decoupage of plates (craquelure) with your own hands. Working with glass requires more time than decorating other surfaces, but glass allows you to create exquisite products using two-component craquelure varnishes. The following is a decoupage project on a plate, complemented by […]
Source: https://magazin-rukodel.ru/category/dekupazh-svoimi-rukami/dekupazh-uroki-master-klassyi-video