Today, there are many techniques that give old furniture a fresh and unusual look. Among the most popular is decoupage. This technique involves decorating products with designs in the same style by gluing them to the surface. Decoupage is a budget option and does not require much effort.
We will look at ways and ideas for decorating tables in decoupage style.
Choosing an image for decoration
Decoupage with napkins is the most popular technique. You can buy napkins of a wide variety of types in specialized stores.
Printed designs or ornaments are suitable for decorating small surfaces. For example, for the English style, drawings with geographical maps are often used.
Experienced craftsmen use fabric, lace, various book pages and photographs to decoupage an old table with their own hands.
Often there are pale and monochrome drawings, so you should make a base so that the drawing looks expressive and clear.
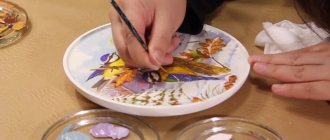
If you know how to draw, then you can complement the decoupage with interesting artistic ideas.
To create a 3D effect, decorative plaster for modeling is used as a base. It makes the drawing more “alive”.
Decorating instructions
A classic master class consists of several successive stages. It is suitable for decoupaging a coffee table with your own hands or any other interior item with a flat wooden surface. Step-by-step instruction:
- the table top is sanded with sandpaper;
- prime the surface and leave until completely dry;
- small cracks and gaps are puttied and dried;
- repeat sanding with fine sandpaper;
- prime the surface a second time and allow to dry;
- cover the tabletop twice with the paint chosen for the background;
- the necessary fragments are cut out from the selected samples;
- lay out the cut out parts on the plane of the furniture;
- each decorative element is outlined with a pencil;
- the fragments are coated with glue and fixed to the surface;
- smooth the part with your hands or a roller, expelling the air;
- when all the decor is fixed, apply a thin layer of glue on top of it;
- after drying, the tabletop is varnished several times;
- The table legs are varnished or tinted with a suitable color paint.
For an even finish, it is convenient to use aerosol varnish.
Since acrylic products have an unpleasant odor, it is recommended to dry them outdoors. This speeds up not only the weathering of harmful substances, but also the drying process of the varnished coating itself. If it is necessary to achieve an artistic effect, after gluing the fragments, the details are drawn with a thin brush. In this case, to obtain a voluminous result, it is better to use an acrylic contour.
Tips for making a computer desk with your own hands, stages of work
It’s not difficult to do table decoupage yourself if you follow the step-by-step instructions and all the recommendations for choosing materials. The end result in the form of an originally decorated piece of furniture will delight you with its individuality. By being creative, you can successfully update the decor of your living room, bedroom or kitchen.
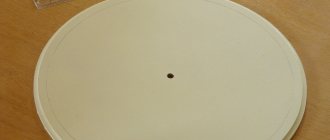
Sand the surface
Prime, fill cracks and gaps, paint the counter top
Cut out the necessary fragments
Lay out the cut out parts
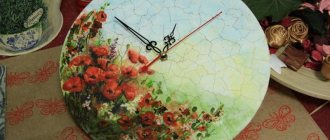
Fix the parts and varnish
Tips for Newbies
If you decide to try to decoupage a table with napkins, it is recommended that you familiarize yourself with all the intricacies of the process.
Basically, this technique is not difficult to perform and involves the use of a minimal amount of material. Except that sometimes difficulties arise if the furniture has a complex shape (patterns, carvings, corners).
To make the finished product look organic and beautiful, you should listen to the following tips:
- When decorating plastic or glass, it is necessary to degrease the surface. This can be done with alcohol.
- If the surface has uneven surfaces, you need to sand it with sandpaper.
- For glass tabletops, it is recommended to use only special napkins for decoupage, since ordinary ones will not work.
- To visualize the finished result, you can look at photos of table decoupage or entire master classes.
Step-by-step free master class for beginners on decoupage of a desk
- First, we must sand all surfaces of the table with sandpaper and degrease them.
- Then we cover it with soil. First we apply the primer with a brush, and then roll it with a dry roller. This method saves effort, time and paint spent during decoupage.
- Then all surfaces of the table must be covered with paint of the background color using a roller in 2 layers. Each layer must dry thoroughly.
- We prepare the selected motif for gluing - we place all the details in the right places and evaluate the entire composition.
- Apply glue to both sides of the pictures, smooth them with a brush or roller and let dry.
We decoupage each of the drawers of our table
To decoupage the front of desk drawers, you need to measure the length and width of the surface and cut the paper to size.
Cover both sides with glue and apply to the front of the drawers.
Using a rag, gently smooth the paper from the center of the drawer out to the edges. Once the glue is dry, use a utility knife and ruler to trim off any excess paper.
The final stage of work for beginners
The final stage of this technique is the application of finishing acrylic varnish, in order to preserve the result of our activities in its original form for a long time. The varnish can be applied with the same brush that we used for the paint, after rinsing it under running hot water.
Thus, we decorated our old desk using the decoupage technique. And on the updated table a photo of your loved one in a photo frame decorated in scrapbooking style would look nice. If you liked our step-by-step master class with photos, leave comments, write reviews and ask questions in the comments. Good luck and inspiration to you!
Additionally, study our article “BEAUTIFUL PICTURES FOR DECOUPAGE: COLOR, BLACK AND WHITE, WEDDING, NEW YEAR, AND IN VINTAGE AND PROVENCE STYLE”, it will help you wisely choose images for work.
Preparing materials for work
Before you begin, you should purchase the following materials and tools:
- primer (acrylic is best);
- fixing clear varnish;
- sandpaper;
- scissors and glue;
- bowl of water;
- napkins for decoupage or printout.
After purchasing the materials, you can begin preparing the surface to be decorated.
Decorating a desk for a child
Usually children study at a desk - draw, do homework. If the table already has visible flaws (drawn or erased surface), then use the decoupage technique.
Decoupage of a desk is an ideal option to avoid buying new furniture. Select the drawing style taking into account the design of the room and the child’s preferences.
For a girl, drawings of delicate flowers or cute animals are suitable. And for a boy, cars or super heroes.
Features and advantages of the technology
Making a table decoupage with your own hands means using imagination and a little patience to create an original work. This option for updating furniture consists of choosing a pattern of a certain theme and decorating the table surface with it. Afterwards the product is varnished and dried well. The advantages of decoupage furniture are:
- ease of operation;
- use of inexpensive special materials or improvised means;
- extending the life of furniture;
- giving the item attractiveness and originality.
There are 5 types of decoupage in total:
- Straight. Gluing the image directly onto a surface, which can be glass, wood, metal, plastic.
- Back. Gluing the design to the glass surface from the back side.
- Volume. Three-dimensional materials are used for decoration: textiles, eggshells, beads, stones, etc.
- Art. In this case, the line between the background and the picture is erased by using different techniques, resulting in the creation of a single hand-painted painting.
- Decopatch. This variation involves gluing small pieces of paper onto the table surface. Paper is used that imitates different surfaces (wooden, textile). You can work with regular napkins or special decoupage cards.
- Sospeso Tresparente. A pattern is glued to a special thermal film; when heated, the image takes a three-dimensional shape.
Straight
Back
Volume
Art
Decopatch
Sospeso Tresparente
There are different styles in decoupage, the most common of which are:
- Provence. Appeared in the French province, expresses romanticism and rustic simplicity. Drawings of delicate flowers and scenes from village life are glued onto the surface of light shades. Aging is often used.
- Ethnic. It is distinguished by the use of bright elements that relate to a particular country or culture. Decoupage is made with fabric, ornaments, and animalistic motifs are used.
- Victorian. The style owes its appearance to Queen Victoria. Characterized by a combination of the luxury of palace life and classical elements.
- Shabby chic. It is an imitation of antiquity using light pastel colors and patterns with flowers and blurred images.
- Simple City. Expresses a rustic urban style using pieces of old newspapers or magazines. In this case, any available materials are used.
- Printroom. Works in this style look very effective. It is made using photocopies of old images in black and white on a light background.
The decoupage technique originated in the 12th century in China, when peasants, trying to decorate lanterns, windows and other household items, began to cut out patterns from paper and stick them on surfaces. Decoupage as an art form was later mentioned in the 15th century in Germany. In the 17th century, the technique gained popularity in Venice, when inlaying furniture pieces in Chinese and Japanese styles became fashionable. In the middle of the 19th century, many countries became interested in the decoupage technique, and in Russia it appeared at the beginning of the 21st century.
The decoupage technique is great for people who don’t want to say goodbye to their favorite furniture. An updated decorated table will last a long time.
Provence
Ethnic
Victorian
Shabby chic
Simple City
Printroom
Fabric for decoupage
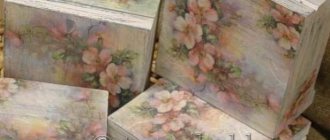
The decoupage technique involves the use of not only paper drawings, but also fabric. This option has the main advantage - the surface retains its brightness even after long-term use.
- Savoy House chandeliers, their features
Engineering geodetic surveys
Geological exploration of the site
Wooden furniture is best suited for decorating with fabric. Its preparation is the same as for napkins. You just need more glue to secure the fabric to the wood.
What is decoupage?
Agree that things made with your own hands are always something amazing and original. They are always valued much more than interior items purchased in a store. Recently, home craftsmen have been using various methods of decorating furniture elements, making them different from others. And one of the unusual and quite popular decorative techniques today is decoupage.
The basis of the decoupage technique is cutting out various images from various materials, such as napkins, newspapers, paper, leather, fabric, and transferring them to the surface to be decorated (glass, wood, porcelain, etc.). Even the most inexperienced beginner can do this type of decoration, the main thing is to follow the simple recommendations and advice of professional craftsmen.
Decoupage in the kitchen
The kitchen is the place where the whole family and guests most often gather. I want to make this place cozy and beautiful. To do this, you can focus on the kitchen table in decoupage style. Making it yourself is very simple.
The subject of the pictures is selected taking into account the overall design and color palette of the kitchen. Pictures of fruits, vegetables, flower arrangements, etc. are used as standard.
You can not limit yourself only to the table, and decorate the tray, vases and other small details.
Summarizing
- Geological exploration of the site
- Search for underground communications
- Granite monuments for the grave
There are not always funds to buy new furniture, but the old one is no longer pleasing to the eye. The ideal option here would be to use the decoupage technique. This will not only help update the interior, but will also give you the opportunity to show your creativity.