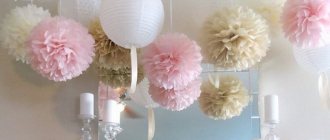
We have all been accustomed to Christmas tree decorations since early childhood. The combination of “Christmas tree balls” has long been an integral attribute of New Year celebrations. At the same time, you can decorate your apartment or Christmas tree not only with standard shiny balls, but also with beautiful paper crafts made by yourself. The master classes presented here will help you create your own New Year's paper balls for home decor.
Honeycomb balls
Probably everyone has seen these beautiful multi-colored balls. But you had no idea how easy it is to make them. Called as simple as shelling pears, all you need to make these balls is:
- Paper (the more sheets you take, the more magnificent your ball will be);
- glue;
- scissors;
- pencil;
- ruler;
- two multi-colored markers.
Time required: 1 hour and 30 minutes.
Honeycomb balls
- Preparing for manufacturing
First, we need to prepare for the manufacturing process. You need to take a regular sheet of paper and draw stripes on it along which you will glue the ball. Draw lines every 3 centimeters, alternating red and black. You can also print our version - Preparing the circles
Now let's prepare the circles. Take any oval object, such as a plate or compass. Whatever size your oval is, the same size ball you will receive. Draw an oval on the sheet and cut it out, do the same with the rest of the flippers. - Preparation of blanks
You have ready-made round blanks. Take one and bend it in half. Check that the sides match, this is important. Cut the circle in half along the fold line. You will get two halves, do the same with the rest of the blanks. - Assembling our paper ball
Now we can start assembling our paper ball. You have many halves of a circle. Take the blank with the lines and attach it to the edge of the sheet. You need to apply glue along the red lines. - Gluing the blanks
Take another semicircle blank, place it on top, now you need to spread glue along the marked black lines. - Assembling a paper ball
Continue alternating until you run out of semicircles. - Done!)
Next, connect the first and last sheets and you will get a honeycomb ball.
Introduction to technology
To begin with, we suggest you make one of the easiest types of this craft to get acquainted with this figure. This will be a kusudama flower, and we offer you a diagram for assembling this figure. This is what all the elements of this figure will look like, which will then need to be glued together and shaped into a ball.
Article on the topic: Mesh knitting with a diagram and description of creating a snood and sweater
To work, we will need 60 square sheets of paper measuring 7/7 cm and PVA glue. From this amount of paper we should get 12 flowers, which will consist of five such shapes.
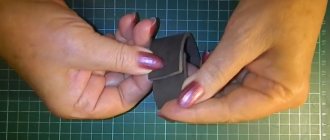
We bend our square sheet of paper so that we end up with a triangle.
Now we bend the corners of the triangle to the top point and get a rhombus.
Then fold the previously folded sides in half.
Next, open both folded sides and carefully smooth them out.
Now we need to bend the upper corners of those sides that we folded so that they are equal to the main figure.
We bend both sides in half and glue the resulting triangles together.
And now we need to make 5 of the same petals and glue them together to make a flower.
You can watch the video for more detailed information and find out the answers to all your questions:
Now, in order to get a ball from these twelve colors, we need a few more minutes.
For this work we need glue, lace or a beautiful ribbon and beads for decoration.
Let's take 6 flowers, place one of them in the middle, and glue the other five around the central flower.
Now we will glue the flowers together, we will apply glue little by little, starting to the right of the center fold line.
When the glue sets well, we move on to gluing the next flower.
We glue together very carefully , first the first six colors, and then we get one hemisphere, and then the remaining six and we get the second hemisphere. By themselves, they look very beautiful and can already serve as a decorative item. But still, let's finish our figure.
Now let's design a lace or ribbon, depending on what you choose, on which the kusudama will be held. To do this, take beads and string them onto a cord. We tie the first and last beads with a knot to hold them in place.
Related article: Cross knitting of a vest and pullover for women with video
All we have to do is connect the elements of our future ball; to do this we need to apply a small amount of glue inside the fold.
Then we glue the lace to the upper and lower petals, but the glue should be applied exactly in the center of the petal. We will glue the second part of the ball when the glue on the first one dries.
Well, that's all, our kusudama ball is ready. You can hang it above your bed, in your living room, or use it as holiday decor. It will also make a great gift.
You can also watch a video on how to assemble this ball correctly.
Ball with flowers
1. Take any ball, we have a foam ball.
2. You need to cut out a lot of flower blanks from colored paper, they should be of different sizes.
3. Now we collect the ball. You need to glue the paper blanks onto the base.
4. Glue large flowers first, then smaller and even smaller ones; the centers can be made from beads or seed beads.
5. The ball will be ready when you have completely covered it.
You can also cover the ball with paper roses; we told you how to make paper roses in the article (paper roses).
Balls made from long paper strips
Two-color balls made of stripes with a drop-shaped pattern are an excellent solution for a New Year's interior, decorated for the holiday in two colors. Small toys can be hung on the tree, and large ones on the walls, or you can arrange them without hanging them. In such a craft, the main color can be the color of the symbol of the coming year.
Balls made of stripes, patterned with circles of different sizes, look slightly twisted towards the bases and with small gaps in the body itself. Made with your own hands, they can even become a decoration for the New Year's table setting.
By increasing the distance between the circles in the strip, you can get a ball with perfect circles as a pattern. Perfectionists will be happy to see such decoration!
You can also make a handmade New Year's ball from straight, even strips of paper. In this case, you don’t even need templates - it’s easy to cut even strips yourself, and their length will determine the size of the finished product, which also depends on the creator.
Even strips can be glued together on their own; make circles out of them and glue them; secure the composition by stitching; attach bows made from the same strips on top; sew the parts together, putting a bead on top of them.
Straight stripes can be either perfectly smooth or patterned - just draw the pattern you like, enclosing it in an oval, combine several of these ovals, cut out this paper “queue”, then round it a little with a pen or pencil and fasten it to the edge and upstairs. If you use special stencils, this is one of the easiest ways to create a New Year's ball.
Fans of more “magical” figures will certainly appreciate the beauty of a ball made from paper with curved stripes. Such a ball will come out with small gaps, but to make it you will need only three wide stripes.
Simple paper ball
For this type of paper balls, you need to cut out circles from multi-colored cardboard. Next, when you have the circles ready, you need to bend them in half and glue them together. The more circles you make, the more voluminous and beautiful your ball will be. When you connect all the circles, glue the first and last element together and close the circle. Now you have a finished paper ball.
Paper circle balls
New Year's crafts are often very logical in their production. Also here - the ball is assembled from circles. Small rounds cut out of paper can be folded in half, cut, glued, folded, stitched, secured with or without strings. In gluing, you can combine two or three circles to give the finished product a different shape.
Corrugated paper ball
This type of balls resembles everyone’s favorite peony flowers. To make such a ball we will need:
- Corrugated paper;
- Scissors;
- Thread;
- Take a roll of corrugated paper (the more paper you take, the larger the ball will be);
- Bend the paper into an accordion shape;
- Trim the sharp edges, make them rounded, so your ball will look better;
- Fasten the figure in the middle with thread;
- Now straighten the paper, separate the balls of paper one by one;
- Ready!
Paper balls for decorating the hall with your own hands - diagrams and descriptions for beginners
There are many ideas for creating balloons to decorate a room. Among them there are very simple ones that are not difficult for beginners to repeat. And having diagrams makes everything even easier!
"Zeppelin"
Such a balloon, if turned upside down, will look great on your Christmas tree. Download the diagram, cut out the parts. Connect the centers of the parts. And weave the edges together in a checkerboard pattern.
The second option is similar to the first, but differs in the size of the scales, to which the craft will cling and gather, acquiring volume.
Here is a diagram for them.
And another no less interesting diamond-shaped pattern of the ball.
In my opinion, they make great Christmas tree decorations! Here is the diagram for the last option.
Next, you will need a little skill in assembling it. Watch the video to see how to do it correctly.
And the continuation of the assembly of a three-dimensional paper model of a balloon in video 2.
Then all that remains is to assemble the basket - look at part 3.
Modular ball - new
We use a template and cut out 30 identical modules using it. . You need to cut out the parts and hook them into the slots.
Before attaching the last sector, pull a loop of thread through it and secure with a circle of paper.
Paper Christmas ball toy
These are very beautiful and unusual balls, it is better to make them from two colors so they look more beautiful.
- First we need to prepare the workpiece. Cut out the main elements from colored cardboard (Figure 1). You should end up with 12 rays of one color and 12 rays of another color. Also cut out two small circles;
- Glue the rays onto the circles as shown in the picture. Also fasten the rays of a different color, but so that they look in the opposite direction;
- Now place the two pieces on top of each other and weave them together;
- You can now attach the ribbon.
Even more diagrams on how to make a paper ball
Balloon with basket - master class
Here you can choose the manufacturing technique.
Option number 1. Beautiful ball. If you need to create a craft quickly, then look for a beautiful small colored ball. Preferably round in shape. Weave it from a thick thread or take a ready-made mesh. Make sure that the ball fits comfortably inside and that the edges of the mesh remain free. Trim carefully if necessary.
Creating a cart. You can cut it from a regular plastic cup and paste it on the outside. Or glue it from a sheet of cardboard. If you have a ready-made basket, even better. Tie it using the loose ends of the threads to the ball. Ready.
Option No. 2. Volumetric balloon with a fabric basket. A great New Year's surprise that even a child can make if given some prompting.
Required:
- unnecessary newspapers;
- ordinary rubber ball;
- diluted paste;
- brush;
- pieces of multi-colored fabric (preferably one type);
- cardboard;
- a ball of rope or braid.
Step-by-step instructions:
This papier-mâché balloon will turn out beautiful, large, and can then be hung from the ceiling.
- Making a paper (newspaper) ball. Following the instructions described above, inflate the ball, then sequentially cover it with thin strips of newspaper, dipping them into the paste. Do not tape the space below, around the tail. Leave a hole.
- While the workpiece is drying, you can make a basket. To do this, take cardboard and glue a small basket step by step, focusing on the ball.
- Carefully make 4 small identical holes in the top of the finished basket. Make sure they are symmetrical.
- Decoupage ball. It has dried, now deflate and remove the rubber base (inflated ball). Cover it with strips of fabric/colored paper (whichever is preferable). Carefully make 2 holes on top, placing them close. The papier-mâché ball is ready.
- Measure 2 pieces of rope. You take one, put the tip through one of those holes at the top of the ball, then pull it out through the second. Center so that two identical ends hang down. Tie them by securing them in two opposite holes in the basket. Do the same with the second remaining rope. Tie the ends alternately to two of the four holes (see picture).
- At the top of the children's toy you can make an additional loop through which it can then be hung from the ceiling.
INTERESTING: Useful things using DIY scrapbooking technique
The creativity will be completed with a small doll or man with Lego, ready to fly.