How to do it correctly?
Although the name “volumetric applique” sounds unusual, it is not difficult to do. To do this, just print ready-made templates or diagrams, cut them out and glue them along the fold lines. The applique templates are made in such a way that by bending and gluing them along the designated lines, you can get a three-dimensional toy.
Most templates are already presented in color, so you will need to print them on a color printer. However, there are also colorless diagrams on which only conditional lines are indicated. It is enough to apply glue to the side parts of the workpiece and fold it as required by the diagram. If you decide to paint such a blank, you need to do it in advance, since it will be difficult to paint the applique in volumetric form.
Here are some examples of such applications.
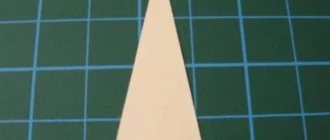
This is the simplest applique that a child can easily make.
- Print the template.
- Cut along the outline.
- If you want to make a colored pyramid, you need to color it before forming the pyramid or simply cut out a template from colored paper.
- Fold the parts of the workpiece intended for gluing.
- Cover them with glue and form a pyramid.
Magical forest
Colored toys
This application is a little more complicated, but its principle of operation is the same. There is no need to color it: you just need to print it on a color printer.
- Cut out the printed template.
- Fold the template along the fold lines.
- Lubricate the “wings” with glue and assemble SpongeBob.
- Check that the glued parts are held tightly.
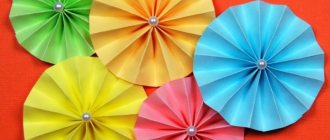
You can see other colorful applique toys here.
poppy flower
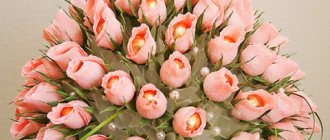
Now let's try a more complex application - make a poppy flower.
- Print out the flower templates. If you decide to make a bouquet, you will need several blanks.
- Cut out the applique components.
- Place the flower corolla blanks on top of each other so that the petals of the top one are in the spaces between the petals of the bottom one.
- Glue the whisk together, giving it a three-dimensional shape.
- Glue the black center inside.
- Glue leaves on the outside of the flower at equal distances from each other.
- If you are making a bouquet, then each flower can be placed on a wire stem wrapped in colored paper. You can also paste flowers onto a postcard or a pre-prepared base.
Such voluminous applications will look natural and simply magnificent.
You can make almost any flowers this way by printing out blanks from the website or preparing voluminous appliqués from multi-colored paper. Here, for example, is a lush carnation. However, unlike the poppy, this applique is more complex, since you will have to form the corolla of the flower from six parts.
Dog booth
Here is another more complex application. From three main parts you can put together a dog house.
- Print the templates and cut them out along the outline.
- Fold along the fold lines.
- Attach the walls to the base of the booth, forming a cube with two pentagonal walls.
- Glue the green roof on top.
The booth is ready. If you don't have a color printer at home, you can cut out parts from colored paper or simply color the blanks.
Photos of master classes on postcards
Read here - Master class on snowmen - basic methods and step-by-step description of how to make a snowman figurine with your own hands (105 photos)
Did you like the article?
0
Corrugated paper
Corrugated paper is more suitable for creating voluminous appliqués. It is initially a little convex, and if you use this quality correctly, you can do interesting things.
- Prepare the base for the applique. This can be cardboard or thick colored paper that is not saturated with glue.
- We apply the outlines of the drawing to the base in advance.
- From blue corrugated paper (you can take paper of any shade), cut out small squares measuring 1 sq. cm.
- Place a pencil in the center of each square and roll it slightly so that the squares take on a three-dimensional appearance.
- Without removing the pencil, apply glue to the end of the square and glue it.
- Fill the entire drawing with such squares.
Master class “Volume applique from colored paper”
Larisa Kozyreva
Master class “Volume applique from colored paper”
Dear colleagues!
This is the fifth time in our city and region that the educational festival “Rainbow of Creativity” is taking place. Previously, I took part as a student. I learned from the masters , but this time I decided to show my colleagues my skills .
Today I would like to bring to your attention a master class “ Volume applique from colored paper ”
.
The technique is not complicated, but quite interesting, it can be performed as in school. age, as well as with preschoolers.
Applique classes contribute to the comprehensive development of children, create positive emotions and good mood.
In this technique, volume is given by various curls, spirals, wound on a pencil or using scissors.
You can cut out several blanks of one element and stick one on top of the other, duplicating it several times; such applications are called overlays .
To work you will need:
• Colored and white paper
Cute sheep
For work you will need the following tools and materials:
- Non-woven fabric;
- Sintepon;
- White and beige fleece pieces;
- Sewing threads in white and beige;
- Beads;
- White satin ribbon;
- Scissors;
- Sewing pins;
- Sewing machine.
Article on the topic: Do-it-yourself motankas made of thread: master class with photos and videos
How to properly complete the application? Let's look at the step-by-step instructions.
Based on the template presented below, we draw our sheep on non-woven fabric. We cut it out.
After that, we place the cut piece on the padding polyester and cut it out, it is advisable to do this, leaving a little extra space on the padding polyester.
On the wrong side of the white fleece we lay padding polyester and interlining, as shown in the photo.
Using sewing pins we fasten all the components together. And we stitch it on a typewriter.
We cut out the sheep, almost at the very line.
Now we are working with beige fleece. We pin and sew on the head and legs using a typewriter. The excess must be cut off.
Then we make a hat for the sheep out of white. Here's what happened:
Next we make the eyes from satin ribbon. As you can see, the steps are the same everywhere: attach, sew and cut.
Now we make a curl on the fur using machine stitching. Along the edge of the finished pattern, cut off the excess fabric.
Using a beige thread, machine stitch the mouth and folds on the legs. We make eyes from beads, and embroider the nose with black thread.
This concludes the master class.
Progress:
1. Choose the base of the postcard.
2. The color scheme of your postcard.
3. Using curly scissors, we make blanks for the frame.
4. Take a flower (we have asters, trace and cut out (we make 4 blanks, a leaf - 3 pieces, grass, a butterfly - 2 pieces (you can use a template, or you can: take a strip of paper folded in half, draw one half, cut out and we get a symmetrical blank, cat.
5. Now the main thing: we take the flower and, with the help of our fingers, bend our petals in half, without touching the center of the flower , so we bend each flower , leaf, grass and butterfly.
6. We will not glue the entire element, but only the middle-edge of the workpiece.
7. Glue it carefully (only the middle, decorate the middle of the flower with a bead .
Thank you for your attention. Good luck to everyone!
"A flower for grandma." Master class on a greeting card using the 3D applique technique.
"Forest clearing". Master class on applique from colored paper “Forest Clearing” applique master class. Paper is an amazing material, one of the most accessible for children's creativity. Create a fabulous one.
Application made of colored paper “Cat”. Master class Application from colored paper “Cat”. Master Class. Purpose: making an applique from colored paper. Tasks: - consolidate the skill.
Master class for parents and children “Oblachka”. Volumetric applique made of colored paper Author: Podgornyak Olesya Viktorovna Position and place of work: teacher at a municipal budgetary preschool educational institution.
Master class “Volume butterfly made of colored paper” Master class “Volume butterfly”. I offer the master class “Volume Butterflies,” which the children and I did. So, for work we need:.
Master class “Volume butterfly” made of colored paper Dear friends and guests of my page, I offer a master class on a 3D butterfly that my children and I made for group work. About.
Volume options
You can make many interesting crafts from paper for children. A bouquet of hyacinths made using the 3D applique technique will look very beautiful. To create it you need to stock up on:
- yellow and pale lilac copier paper;
- green corrugated paper in two tones;
- two toothpicks;
- glue with a pencil;
- five cocktail straws;
- cardboard cylinder;
- thin satin ribbon.
Step-by-step instructions for creating a craft look like this:
First you need to prepare future inflorescences, for which you divide each leaf lengthwise into 3 parts and cut into strips.- To create flowers, we make cuts along the entire colored strip with a width of 5-7 mm.
- Using a toothpick (after splitting its tip in two on one side), you need to twist the cut flower fragments.
- The fourth step is to form the inflorescence. To do this, the prepared strip is gradually wound onto the straw.
- To make the hyacinth stem look natural, it is better to wrap it with a strip of green corrugated paper. The beginning of the tape is attached with glue at the base of the stem and wound tightly. At the end, the strip is also fixed with glue.
- At this stage, the flowers are formed into a bouquet and placed in a vase. If the craft is dedicated to some event, you can place the flowers in a package and wrap it with ribbon. In this case, the bouquet stands in a cardboard cylinder, decorated with a pink satin ribbon.
With the help of paper you can realize many different creative ideas. Applications made from it are light and elegant. Children will certainly enjoy joint activities of this kind, and adults will have a reason to escape from the daily bustle of life.
Do-it-yourself volumetric paper applications
Paper provides enormous scope for creativity, especially when there is free time and a great desire for this. It is best to make three-dimensional applications with children, they will find it interesting. In addition, such an activity will be useful for the child, it will help him develop thinking, and perseverance and fine motor skills will also develop during the work.
The benefits of three-dimensional application for a child have been confirmed by many psychologists; with its help, the child begins to think three-dimensionally. In the future, this occupation may develop into the profession of an architect or builder. The little man also learns to decorate the space beautifully, which affects his taste. It’s not for nothing that kindergarten always includes classes on creating three-dimensional applications in its program.
Try decorating the walls of your child’s room with voluminous appliqué, it will look cute and will lift the spirits of the people around you. Knowing various techniques for creating three-dimensional appliqué, you can create a masterpiece and give it to your loved ones on their holiday.
Arm yourself with paper, glue, scissors, a ruler and start creating! You can really create some great creations out of these things.
Techniques for creating bouage appliqués
There are many techniques for creating volumetric applications.
Trimming, quilling, and origami are the most popular ones. Having mastered them, you can make truly magnificent things that will decorate any interior. You can also use any available means - eggshells, cereals to add volume - it will look original.
Simple technique
To begin with, you can try to master a simple technique. Try to draw a tree with your child. To do this, draw a sketch on a piece of paper. Then you will need to prepare all the necessary materials and begin the creation process.
The crown of the tree can be an uneven circle of colored paper. The leaves for the crown are cut out separately from another sheet of colored paper. Can cut out a figurine of a bird that you can sit on a tree. Cut out the bird also from colored paper, but choose a different color. The bird should contrast with the tree. The bird can also be folded from paper using the origami technique.
Glue on the crown, tree trunk, don’t forget about the leaves and the bird. The tree trunk can not be glued, but attached to the drawing. You will get the simplest volumetric applique. But what pleasure will it give to the child, having made it, he will be proud of himself.
Mastering complex techniques
In fact, even a small child can master even the most complex techniques, so don’t be afraid to do intricate things. To fluff, you just need to glue a few small pieces of paper. Parts can be crushed, compressed, flattened, etc.
Try the trimming technique, which involves rolling small tubes of small pieces of paper into a square shape. Using a straight rod or toothpick, you need to form bundles. The squares are crumpled around a sharp object and glued to a large sheet of paper. A pattern is formed from several such convolutions. The rod should hold until the bundle is firmly glued.
It must be said that such an activity requires perseverance, but helps to relax the nervous system. Many packages can be prepared in advance, then all that remains is to glue them to the drawing. They will look great and create a three-dimensional image.
Handprints and outlines
Probably, many years from now, an adult will be interested to know what his palm was like in infancy, and how it changed in size over time. The handprints collected in the album will help you remember the stages of your life's journey. Sometimes mothers place a handprint in a photo frame, but in any case, when making such drawings, gouache or watercolors and a landscape sheet are used. Older children can make their own impressions by first placing their palms on the painted surface, then resting them on clean paper. The baby cannot do this on his own, so his mother comes to his aid.
Another way to capture a palm is to outline it with a pencil, felt-tip pen, etc. The contours of the hand can be drawn on the sheet multiple times, using different colors. The result will be a kind of “growth tree” that can take place on the wall in the nursery. It will be updated periodically. This kind of drawing can be made by tracing the hands of all family members. And if you use fabric and colored threads, you can get interesting embroidery.
Of course, in the examples described above we are hardly talking about the child’s own crafts, because in these cases the creativity comes from the parents, but for an older child this type of needlework will arouse undoubted interest. He is already capable of depicting, albeit clumsily, albeit with significant help from adults, meaningful plots.
A sheet of colored paper can serve as a canvas for a little artist - here several impressions will be left with the palms of your hands. Black dots and commas will turn your palms into cheerful octopuses. You can draw writhing algae on a sheet with paint-smeared fingers.
You can use your palms to make a fish in an aquarium. Her fins and tail will be depicted with fingerprints. An adult will add eyes and a mouth to the fish. The picture will be complemented by painted bubbles. Children's palms can depict flower buds on paper. Surely the kid will figure out to add stems to them and fill the background of the picture with green grass.
Palms will help to depict a huge number of animals:
- the peacock's tail will be made from several fan-shaped prints;
- the body of a hedgehog or porcupine - from a pair of prints superimposed on each other;
- spider or crab - from symmetrically left handprints;
- the centipede caterpillar will come out of 4-5 prints.
What can be done using the quilling technique
Mastering the quilling technique will be a little more difficult. But it's worth it because you can make some really attractive appliques with it. First you will need to make blanks from double-sided colored paper.
For this you will need sewing needles, patterns, nail scissors, and a board. The needle is stuck into the board; colored paper will need to be wrapped around it. Patterns help to give an even shape. Each petal must be secured with a needle so that they do not unfold. One needle is attached at the bottom to keep the shape sharp, the other in the middle and the third at the top. When the sheet is ready, it needs to be attached in place with glue.
With the help of quilling, we can present the objects around us in a non-standard way. Create paper applications with your own hands and make cards, panels, decor and many other things out of them if you want to surprise people.
The little ones can be encouraged to make appliqués using the tear-off method, when the material is glued by tearing it off. This activity is quite useful for young children, as it develops fine motor skills and promotes speech development. For older children, you can make the task more difficult and ask them to cut along a pre-drawn contour.
The role of applications in child development
Paper applique involves the step-by-step creation of a picture by gluing elements of different shapes and colors onto a cardboard or paper base. After looking at various photos of paper applications for children, you will understand what this type of activity is and what kind of finished work you can get at the end of the process.
The paper applique technology is quite simple. The child himself, or with the help of his parents, nanny, or teacher, must come up with what kind of picture he would like to depict, prepare the tools necessary for the creative process, make patterns of elements, alternately cut out small details from paper sheets that will be needed to recreate the intended image and successively glue them onto the chosen base.
Paper flowers in a pot
Such flowers are an excellent way to decorate a holiday card, especially for the holiday of March 8th. First you need to form a pot where you will place multi-layer flowers. The stems of the flowers are glued to the pot or you can place it on a sheet of paper where they are drawn.
Next you will need to craft the flowers. Take a piece of polystyrene foam as the middle, but you can also use a simple piece of paper, which you need to crumple first. Then cut out petals from colored paper and stick it around the center. Show your imagination and take and decorate voluminous paper applications with your own hands using ribbons, beads and other available materials.
If you want to make voluminous paper flowers with your own hands, then corrugated paper will help you. Flowers made from corrugated paper will look large and airy. You should make petals of different sizes - small, medium, large, and then the flower will look more attractive. The lower edges of the petals should have a cut. They are folded overlapping and then bent outward. By gluing the petals to the base, you get a flower. Any kind of flowers can be made this way.
If you want to make chamomile, then you will need a white sheet that is cut into strips. By folding the strip and gluing the edges, you will get a beautiful petal. Glue the edges of the petals to the yellow center made from three layers of paper. Even a small child can make a chamomile.
And if you want to make paper flowers more complicated, then try making a chrysanthemum from paper cones. To make a cone, you need to cut out a 5 by 5 cm square from paper and then roll it into a cone. It is better to coat the ends of the paper with glue so that they are firmly attached. When you have at least 40 pieces of cones, you can assemble a three-dimensional flower from them. A paper rose is also made.
You can make templates and flower schemes in advance and use them to create a bouquet of beautiful flowers.
Advice from professional needlewomen
Before you make a fabric applique with your own hands, you need to correctly select all the necessary materials and tools. Not only the attractive appearance of the future product, but also the ease of working on it will depend on their quality. Another important factor in the success of fabric appliqué is strict adherence to the sequence of actions and recommendations of experienced craftsmen. Among the many tips, it is worth highlighting the following:
- Individual elements of the composition must be attached to the base using pins. Thanks to them, you can change the location of certain parts at any time without causing harm to the base material. This is especially important when using a large number of small workpieces.
- To sew an applique onto fabric, you need to use the thinnest possible needle. This will make your craft more neat and beautiful.
- It is best to use cotton threads to attach image details.
- Before starting work on the craft, you need to sharpen the scissors well. Their sharpness will be needed when cutting out small elements of the composition.
- Do not sew pieces of fabric close to the border, as they may pull together, which will lead to a lack of space on the base.
- The edges of complex figures or patterns that have at least one acute angle (heart, star, etc.) must first be basted along the contour along which the final seam will go.