Modular origami - cat
How to make a cat out of modules?
In the first lesson we propose to consider the traditional scheme. For it we will need modules of white and any other colors. The author of the lesson used paper blanks of any color. As for the final stage of design, you can use absolutely any materials from appliqué to doll accessories.
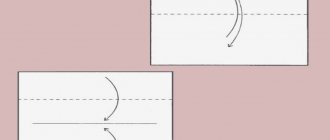
- We will fold the first row as follows.
- This circle consists of 50 blanks. The result should be a ring like this.
- We assemble the next two rows in the same way, placing the modules in a checkerboard pattern.
- Next, according to the diagram for assembling an origami cat from modules, we insert three white blanks.
- In the fifth row, we put six more on these three white modules, and then in each subsequent row we add one.
- In this way we move the next 11 rows, at this stage there should be 15 white modules in a row. From this moment we begin to remove one module at a time. This will look like a rounded breast.
- At this stage of the master class on making a modular origami cat, the chest ends and the colored rows begin again. To connect the head and body, add three more white modules in the middle part.
- Let's move on to the next stage of making a modular origami cat - the head. To do this, we form a series of modules by inserting them on the other side. We form the next row with modules in the same position.
- This is what the workpiece currently looks like from above.
- In the third row we take three white modules and arrange them in accordance with the breast.
- Next we form the cheeks and the head itself.
- We gradually bring the modules together to form a head.
- We will decrease the last three rows by three modules so that in the last row you get 41 modules. Next, we form the ears, as shown in the picture.
- We make the cat's tail from triangular modules from a strip of blanks curved along the body.
- All that remains is to decorate our cat and everything is ready!
Modular origami cat - assembly diagram of the famous Kitty
The popular cat with a bow is currently one of the most popular characters. It can be found not only on children's handbags, but also on adult things. We suggest looking at a diagram of how you can make a Kitty cat out of modules.
To work, we will need white (588 pieces), pink (132 pieces) and green (14 pieces) modules. We will use felt for decoration.
- We form the first row of 28 white blanks.
- On the second row you need to add two pink blanks; they will play the role of shorts in the future.
- The next level consists of 28 white modules and two colored ones. We insert the pink modules as shown in the picture.
- Next, we move according to the diagram and use more pink modules, as indicated in the figure.
- Now we turn over the work done and make the next row only from pink modules.
- The next two rows are also colored. And on the seventh row we form sleeves for Kitty’s blouse from green modules.
- Next, we form the neck and arms from the green modules.
- We lay the next row on the other side and form a neck.
- Let's start shaping the head. It is slightly larger in size and consists of 35 modules.
- Next, we bend the rows with our hands and form the head.
- All that remains is to cut out the handles and eyes according to the templates. To do this, you can use thick paper or felt.
- Modular origami cat Kitty is ready!
Using the modular origami technique, you can also make other figures, for example, a hare and a snake.
Saucy mustachioed
We invite you to consider the diagram and algorithm for making the cat Ryzhik.
For this handsome man we need 480 modules of 1/16 size, for the chin and cheeks we need to make 44 modules of 1/64 size and 74 modules of 1/32 for the tail.
1) We will start with the front paws.
2) For the first row, take 3 modules and place them on the short side, for the second row ─ 2 modules. And so you will need to alternate 18 rows.
3) For row 19, take 3 modules. And on the 20th row we connect the paws of our cat together, this will require 20 modules.
4) Then we alternate modules 5 and 6 for another 6 rows. For the 27th row, take 4 modules, and for the 28th row, 5 modules.
5) Then from 29th to 33rd we alternate modules 4 and 5, and from 34th to 39th ─ 3rd and 4th modules.
6) From the 40th to the 42nd row, an increase of 1 module begins on each row. And for the 43rd row take 8 modules, for the 44th row ─ 7 modules, and for the 45th ─ 6 modules. Now we make each ear separately, alternating 2 and 1 modules. Here the front part is ready.
7) Then we make the back, also starting from the paws, from the 1st to the 4th row we alternate 3 and 2 modules.
Related article: How to make your first sex unforgettable
 In order to get the legs, you need to insert 3 modules into the bases with the reverse side.
9) For the 5th row we take 3 modules, and on the 6th row we connect the paws, you will need 5 modules for this.
10) After the paws are connected, we begin from the 7th to the 18th row, alternating 6 and 5 modules. From the 19th to the 23rd ─ we alternate 4 and 5 modules, and for the 24th take 3 modules. After this the back is ready.
11) Now we need to give the necessary bend to the front and back of our handsome man. To do this, take PVA glue and lubricate the internal parts of the parts with it, and leave the neck flexible for now.
12) Secure these parts with toothpicks and leave to dry.
13) Now let’s move on to one of the main details of the cat - this is its face, which starts with the ears. We assemble 2 parts: 1st row ─ 1 module, 2nd ─ 2 m., 3rd ─ 3 m., 4th ─ 4 m., 5th ─ 3 m., 6th ─ 4 m.
14) To make the forehead, take 3 modules.
15) Next, take 10 modules and connect the ears to the forehead. And we will assume that this is the 1st row.
16) For the 2nd row, take 9 modules, for the 3rd ─ 10, and starting from the 4th row, reduce by one module from each row to 3 modules on the 10th row. Do not forget to squeeze the muzzle on both sides so that it has the correct shape.
17) Now we make the cheeks, we will use modules of size 1/64: 1st row ─ 2 modules, 2nd ─ 3 m., 3rd ─ 4 m., 4th ─ 5 m., 5th ─ 3 m., 6th ─ 2 m., 7th ─ 1m. And for the chin we also take 1/64 modules: 1st ─ 2 m, 2nd ─ 3 m, 3rd ─ 4 m, 4th ─ 5 m.
Article on the topic: How to make a fortune teller out of paper with your own hands step by step - photo, video
18) Then we begin to assemble the muzzle, using ready-made eyes and a nose, which can be bought at any hardware store. Glue them with silicone glue.
19) We assemble the tail using modules of size 1/32, we need to assemble 28 rows, alternating 2 and 3 modules. And we finish like this: 29th row ─ 2 modules, 30th row ─ 1 module.
20) Now we have done the most work, all that remains is to collect all the parts together and secure them with toothpicks and glue.
21) Whiskers for a cat can be made from paper.
22) And cut off all the toothpicks that are visible.
Here our Ryzhik is ready!
Cat tail assembly diagram
1) First level – five white elements.
2) Second level – four white elements.
3) Third level – five white elements.
4) Next, we alternate levels of four and five elements until we reach 20 levels of each type.
5) Level 41 – six elements.
6) 42nd level – eight elements.
7) 43rd level – seven elements.
8) Level 44 – similar to level 41.
9) 45th level - similar to the third.
10) 46th level - similar to the second. Now all that remains is to glue the tail to the body and our cat is ready!
If you want to make a saffron milk cat, then the pink elements in this scheme can be replaced with white ones, and the white ones with orange ones. You will get a real red cat with a white belly. And for fans of everything Japanese, we offer one more scheme.
“Kitty cat” using modular origami technique
This Japanese Hello Kitty cat is popular all over the world. To make it, we need 588 white modules, 132 pink and 14 green. For decoration, you can use multi-colored pieces of felt.
1) We make the first row in the form of a ring of 28 modules.
2) We do the second row in the same way, however, we add 2 pink modules there. These will be our cat's shorts.
3) The next row includes 28 white pieces and 2 pink ones. Insert them as shown in the photo.
4) Add another row.
5) Turn the workpiece over. We make the next level only from pink elements.
6) Two more pink levels. On the seventh row we add green modules.
7) We make a neck and paws from green elements.
8) We lay the next level with the back side up - this will be the neck.
9) We make a head from 35 white modules.
10) We form the head by bending the modules with our hands.
11) Cut out the paws and parts for the muzzle from felt. Our cat made from modules is ready! Because The figurine is hollow inside, it can be used as a small vase or a cup for pencils.
Cute kitty
And now we present to your attention the assembly diagram for the Lizon cat.
1) First, we need to assemble a circle of 50 modules that will be connected to each other.
2) We assemble subsequent rows using the same principle in a checkerboard pattern.
3) Next you need to insert 3 white modules.
4) And we assemble the next 11 modules according to the same principle, and after there are already 15 modules in a row, it will be necessary to reduce their number. Then a rounding will be obtained, and this completes the production of the body.
5) Now we begin to assemble the cat’s face from the modules. We form a series of modules, inserting them into each other one by one. We also insert 3 white modules into the head and after that we begin to form the cheeks and head, as shown in the figure.
6) We form the modules gradually, in the last 3 rows we reduce 3 modules each so that in the last row we get 41 modules. And after that we form the ears.
7) In order to assemble the tail, you need to form a strip from the modules and bend it in the desired direction and attach it with glue.
For our beauty’s face, we use improvised materials, or those that you bought at a hardware store, and decorate it. We attach eyes, nose, mouth and antennae, and everything else is at your discretion. Well, our beauty is ready.
Related article: How to fry an omelette in a new way, without oil
Modular origami cat
- 2 brown sheets of folding paper, 10x10 cm
- 2 white sheets of folding paper, 10x10 cm
- 5 brown sheets of folding paper, 5x5 cm
- 4 white sheets of folding paper, 5x5 cm
Origami module
To fold the cat, first prepare the base modules from all the sheets
origami cat diagram
- For the front paws, take one sick brown module , the double tip pointing down. Insert one large white module (torso) from above with a double corner into the front paw module.
- Now insert one large brown origami module (hind legs), double end down, into the white body.
- Position one large white origami so that the long side of the triangle is on top and the double corner points to the left. Draw a cat's face. Next, insert the right ear first with the double corner facing down. Then insert the left ear, which will hold the double top of the head.
- Alternating colors, make a tail out of small modules.
Modular origami cat
- Finally, place the head on the top corner of the brown front paw module. Insert the tail with the double end from above into the hind legs.
Now you can play with the cat, and you can also make a frog.