Do-it-yourself voluminous water lily made of paper for children and flowers using the same technique
At first glance, it’s a fairly simple master class, but still, such a craft requires effort on the part of little children’s fingers, but it develops fine motor skills extremely effectively, and, as you know, you can’t do without it. When a child gets the hang of gluing petals, he will really like this process and will not want to stop, therefore, dear educators, teachers and parents, prepare a lot of colored paper and glue, and a good mood will come with this craft. Moreover, using this technique you can make not only a water lily, but also a pincushion lily for your mother on March 8, and entire bouquets of flowers.
Petals
Our final goal is a paper water lily. With our own hands we repeat the manipulations described above for all circles, providing them with petals. Next we need scissors. Cut out circles and petals. Let's move on to the next stage. We bend the petals up. Take yellow paper. From it we cut out a strip 1 cm wide and 20 cm long. Using a ruler, we mark lines on the strip every five millimeters. Using the resulting strokes, we cut the fringe, which will decorate our water lily in the center. Using a pen, roll the strip into a spiral shape. To prevent this “structure” from unraveling, we fasten the ends of the fringe with glue. Carefully remove the strip that was previously rolled into a spiral from the handle. Take green paper. We cut out a leaf for our water lily. Place the spiral in the center. We add fringe. The scheme described in this material is not the only one; there are many of them, but this approach can be called convenient.
Step-by-step master class on how to make a paper lily
We need: white paper, green colored paper, yellow paper, glue, scissors.
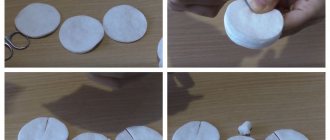
To make one lily, cut out 2 circles from white paper, one with a diameter a couple of cm larger than the other.
We need to make equal cuts in them at the same distance. To do this, let's divide the circle. First, fold it in half.
Then in half again.
Fold again, aligning the round edges.
We expand it and see that the circle is divided into 8 identical sectors.
Now we cut along the fold lines, but not all the way.
To make a water lily petal, mark the middle of the segment. Lubricate half the edge with glue.
We connect and overlap the corners to form a sharp petal, and glue it together. There will be more overlap - the petal will be narrower and thinner. Lightly connect the edges - the petal will be wide.
We also glue the other petals together. When you turn it over, it will look like this:
We do the same with the second circle, which is smaller. Place the circles of petals on top of each other and glue them in the center. We cut out a leaf for the lily from green paper, glue a flower onto it, and make a center out of yellow paper.
How to make a light water lily flower out of paper. DIY paper water lily: making it with children
At first glance, it’s a fairly simple master class, but still, such a craft requires effort on the part of little children’s fingers, but it develops fine motor skills extremely effectively, and, as you know, you can’t do without it.
When a child gets the hang of gluing petals, he will really like this process and will not want to stop, therefore, dear educators, teachers and parents, prepare a lot of colored paper and glue, and a good mood will come with this craft.
Moreover, using this technique you can make not only a water lily, but also a pincushion lily for your mother on March 8, and entire bouquets of flowers.
Step-by-step master class on how to make a paper lily
We need: white paper, green colored paper, yellow paper, glue, scissors.
To make one lily, cut out 2 circles from white paper, one with a diameter of cm, the other cm.
We need to make equal cuts in them at the same distance. To do this, let's divide the circle. First, fold it in half.
Then in half again.
Fold again, aligning the round edges.
We expand it and see that the circle is divided into 8 identical sectors.
Now we cut along the fold lines, but not all the way.
To make a water lily petal, mark the middle of the segment. Lubricate half the edge with glue.
We connect and overlap the corners to form a sharp petal, and glue it together. There will be more overlap - the petal will be narrower and thinner. Lightly connect the edges - the petal will be wide.
We also glue the other petals together. When you turn it over, it will look like this:
We do the same with the second circle, which is smaller. Place the circles of petals on top of each other and glue them in the center. We cut out a leaf for the lily from green paper, glue a flower onto it, and make a center out of yellow paper.
The core can be made simply in the form of a circle or you can glue a piece of foam rubber there and a needle bed will come out. And if you change the color of the petals to yellow, you will get not a lily, but a water lily (water lily). In the same way, you can make other flower crafts, for example, a three-dimensional flower applique.
Volumetric applique flowers using the same technique
Everything is similar to the master class about lilies, but we take paper of different colors. We glue them together in the same way and get magically beautiful bouquets :)
You can make a paper water lily that looks like a real flower yourself. Water lily is a beautiful flower that grows in ponds. It is called a mermaid flower.
How to make a water lily from paper? Let's look at a master class on the process of creating a paper water lily step by step.
To create a paper water lily, you need to prepare some materials
. To get started you will need:
- yellow corrugated paper;
- pink corrugated paper;
- a small piece of cardboard;
- ordinary stationery scissors;
- PVA glue.
Using scissors, you need to cut seven strips; they should be 1.5 centimeters wide. Then six strips 1.2 cm wide and five more - 1 cm. We begin to make petals from the strips.
In order for the strips to take the shape of petals, you need to stretch them with your fingers, creating a boat shape. It is necessary to cut a circle with a diameter of 4 cm from corrugated paper.
You need to glue seven strips on top of the cut out paper circle. You should start gluing in a checkerboard pattern.
Gallery: paper water lily flower (25 photos)
Master class “Do-it-yourself paper origami”
To make an origami paper water lily you only need two multi-colored sheets of paper
. The paper must be colored. First you will need 1 pink sheet of paper and 1 green sheet of paper. You will also need glue to secure the pieces of paper. The paper should be two-layer and not very thick.
First the diagonals
. To do this, you need to fold a sheet of paper in half twice. Then each corner of the paper sheet needs to be folded towards the center - you get a small square.
The corners of the resulting square must be folded again. The third time you need to repeat the same steps.
Then the resulting square is turned face down, and again the corners of the paper square are folded.
After this, the corners of the square are bent a little again, but this time not towards the center. Thinner paper makes it easier to fold the paper than thick paper.
The paper craft must be turned over to the front side again. Then you need to start opening the petals of the water lily.
Everything must be done in a checkerboard order:
First the first row is folded, then the second and finally the third row.
You can complement the water lily with green petals. To do this, just glue two paper jugs of different colors together. Unlike a real water lily, a paper lily will not wither and will always delight you with its appearance.
Felt water lily, DIY master class
A water lily can be a wonderful gift for a loving soulmate. Anyone can make a water lily with their own hands, you just need to be patient. Let's look at the master class step by step, the entire scheme for creating a water lily from felt.
To make a felt water lily
The following components will be required:
- multi-colored felt;
- small needle;
- threads;
- small scissors;
- PVA glue.
First, rectangular pieces of felt are cut. Then you need to make them look like petals. To do this, pieces of felt are cut with scissors. The resulting felt pieces are slightly bent and their ends are glued together with glue.
You can sew the petals together if you don’t have glue on hand. The middle of the flower should be made of orange felt. To do this, you need to cut out a circle with scissors. The resulting circle is attached to the back of the petals. The result is a beautiful water lily.
This water lily will come in handy instead of a brooch or hairpin.
Paper flower made from origami modules
Many origami lovers have a question: how to make origami from modules? Let's look at a master class on the process of creating a water lily with step-by-step operations for making crafts from origami modules with your own hands.
To work you will need:
- PVA glue;
- color modules of different colors.
- paper (white or colored, crepe or corrugated);
- glue, scissors, tape;
- paints;
- decorative ribbons and other materials for decoration.
You need to make a water lily from modules according to the following scheme
. You can choose the colors you like.
We put it in a row:
Each row of modules is glued together with glue. You should get six petals. The next step is to connect the petals. Take 1 white module and connect two petals. Three modules are connected.
We begin to create a flower according to the following scheme: it is created in the same way. We begin to lay out the rows. The first one consists of two yellow modules. The second one is made of 3 yellow modules. The third one is made of 4 modules of the same color.
The fourth is made of 5 yellow modules.
At the next stage, you need to decrease modulo until 1 remains. Create six blanks. We connect each piece together using glue.
Paper water lilies: photo
Nowadays you can find absolutely any product in stores. However, everything made with one's own hands has always been more valuable.
Therefore, making flowers from paper is rapidly gaining momentum and becoming an increasingly popular craft. Beautiful flowers decorate halls, tables, festive arches, and they are given to loved ones.
Water lilies will look original in the decor, and if you still don’t know how to make a water lily out of paper, then this article will be useful for you.
Paper water lily
Handmade water lilies look no worse than natural ones. If you don’t know how to make a water lily flower out of paper, then first prepare the following materials and tools:
How to make a paper water lily with your own hands
To make a water lily beautiful, the first thing you need to do is cut out three flowers with 12 petals each from cardboard. In this case, two of them should be the same size (about 10-15 cm in diameter), and one should be slightly smaller (no more than 8 cm in diameter).
The flower that will be located below all should be left without any changes. The remaining two need to bend the petals with scissors or a pencil.
Now you need to glue all three parts together by dropping a small drop of glue into the center of each of them. The small flower should be on top.
All that remains is to make the middle. To do this you will need a small strip of yellow paper. It is cut into fringes and twisted into a spiral, fixing the edge with glue. When the part is dry, it is glued to the center of the flower. Additionally, water lily leaves are cut out of green paper. Now you know how to make a water lily out of paper, and there should be no difficulties.
Origami
A fluffy and beautiful origami-style water lily can be made from just one sheet of paper. To work, you need to prepare one pink and one green leaf, as well as glue.
The paper for making crafts should be double-sided; besides, it is best to choose less dense sheets - they are much more convenient to fold.
The first step is to mark the diagonals by folding a square sheet of paper in half twice. Next, each of the four corners needs to be bent towards the center to create a smaller square.
The paper square must be bent again, just like the previous time. Similar actions need to be repeated a third time.
After this, the protruding corners are bent again, but not towards the center, but just a little. At this point it becomes clear why you need to choose thinner paper.
The paper blank is again turned over to face itself and the petals of the water lily begin to open. First the first row is folded back, then the second, third row - the final one - the smallest.
Additionally, the water line can be decorated using a green leaf cut in the shape of a real one. The two parts are simply glued together.
Now you won’t have any questions about how to make a water lily out of paper using the origami technique.
From paper you can make a large number of a wide variety of flowers, which, unlike living ones, will not wither and will delight the eyes of others for a long time. Today, such products are actively used in decorating halls, banquet tables and festive arches.
Water lilies look original and can be made by both adults and children. And if you don’t know how to make a water lily out of paper, then arm yourself with patience and the necessary materials, and the recommendations presented in this article will help you cope with the task.
We study techniques for folding paper water lilies with our own hands
Using different techniques, you can layer water lilies that are as beautiful as real ones.
The most common option, however, is not the simplest, making a flower using the origami technique.
To fold a water lily, as in the photo, you will need:
- 4 sheets of A4 paper (red or pink);
- 2 sheets of A4 paper (green);
- a piece of wire.
A sheet of paper of the main color (red or pink) is divided into 4 even parts, arranged along the width. To do this, you need to use a ruler and a simple pencil. The drawn lines are cut using scissors.
Now the strips of paper are folded in half in the longitudinal direction, that is, along the length. Then the corners and long sides of the strip are folded.
Now the resulting workpiece needs to be carefully folded in the middle in the other direction, outward, as if folded in half.
All 16 pieces of colored sheets, both red and green, must be prepared in this way for further work. Only one, the very last green piece, should not be turned outward, but rather inward.
Now the work with module failure begins.
To do this, two red ones are superimposed on the green blank.
A simple paper water lily
The classic model folds up in a few minutes.
Beginners should use soft paper, as thick petals are difficult to straighten. A flower made of two-color paper will look interesting. It is recommended to take large squares - at least 21x21 cm. Step-by-step instructions:
- Fold a piece of paper diagonally on both sides to mark the lines.
- Bend the corners towards the center. Iron the folds thoroughly.
- Fold the corners towards the center again. Smooth out.
- For the third time, fold the tops towards the middle.
- Turn the product over.
- Fold the tops towards the middle. Smooth out any wrinkles.
- Fold the corners.
- Gently pull the layer of paper from the bottom.
- Turn out and straighten the petal. Be careful not to tear the paper.
- Inside the petal, lift the corner up.
- Straighten out the remaining petals and corners.
- Pick up the next layer, making a second row of petals.
- Spread the lotus.
- If desired, you can put a smaller flower inside to create a lush, voluminous water lily.
You can add leaves to the origami lotus to make it look more realistic.
- As when folding a flower, fold the corners of a square sheet of paper to class=”aligncenter” width=”720″ height=”479″[/img]
- Repeat the action.
- Turn the product over.
- Fold the corners again to class=”aligncenter” width=”720″ height=”479″[/img]
- Fold the tops of the square.
- Form the leaves like the first petals of a water lily.
- Place or glue the flower into the resulting rosette.
You can make a night light from classic paper water lilies. You will need an LED and a 3V coin cell battery. The LED is inserted into the center of the water lily, and the paper is pierced with its legs. A battery is installed between the LED legs. The light should light up. The structure is fixed with tape.
Video tutorial:
Happened?
Not really