The crochet technique involves creating an imitation of various types of lace. In the article “crochet Bruges lace models and patterns” we will look at the technique of lace knitting, called Bruges lace in Europe, and Volgograd lace in Russia.
The basis of this knitting is a continuous strip of braid. Its free curves form an original and unique pattern. Bruges lace is used as a border or trim for any product. You can also make wonderful bedspreads, napkins or tablecloths from it.
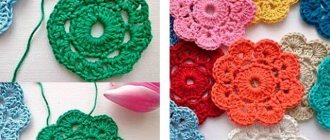
Crochet basic lace tape with detailed patterns
In the example shown, the lace ribbon consists of 5 double crochets. Depending on the model, its length and number of columns may vary.
If you alternate double crochets and checks, you can get a very interesting border. Each row must begin with arches for lifting. The number of air loops they consist of depends on the length of the ribbon, as well as the style of the motif.
Master class on making Bruges lace ribbon
Methods for connecting lace ribbons with patterns
You can connect two ribbons of Bruges lace in different ways - sew them over the edge, or crochet them with a loop stitch. The latter option is more successful, since there are no traces of the connection of the tapes left on the product.
Methods of joining knitting elements
The history of lace
It is known from history that the first lace works appeared at the beginning of the 15th century. Airy weaves of thin threads were originally used to decorate napkins, bed linen, tablecloths and knit necessary interior details. However, in the 18th century, lace became quite popular, and lace collars, shawls and other wardrobe items appeared as elegant details of the image.
The homeland of unique lace, products from which are especially popular among fashionistas all over the world, is sophisticated Belgium , namely the city of Bruges, after which the crochet technique is named. Previously, thread weaving was considered an exclusively male activity, but later it gained particular popularity among the fairer sex. It is known that the technique of Bruges lace was even taught in schools for girls, and this subject was considered mandatory for study for a long time.
Initially, Bruges lace was woven on special wooden bobbins, stuck in the way the pattern was intended. For simple patterns, 300 bobbins were used, but for complex intricacies, Belgian needlewomen took 700 pieces. Nuns were considered especially skilled in this area, whose handiwork was highly valued by the nobility.
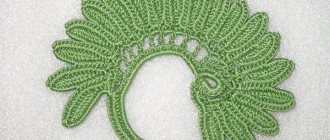
Bruges lace with daisy motifs
Before starting work, leave 10 cm of thread. Then we knit a chain of 5 air. pet. for the first arch. Next we make 2 pillars. with double crochet, 1 air. pet. and 2 pillars. with a double crochet on the “tail” that was left at first.
After 5 air. pet. lifting we begin to knit the second row. We make 1 pillar in it. with a double crochet on all the loops of the previous row, after which we perform another 5 air. pet. rise.
We continue crocheting until the 47th row, and in the process of completing the next row we attach the chain to the first row and cut off the excess thread.
Next, in the central part of the motif we make an air loop, and then 4 yarn overs. Then we insert the hook into 2 arches of the inner part of the ribbon and make 1 yarn over. We pull out 1 loop, finish with a double crochet stitch, knitting loops 2 by 2.
Next we knit a picot - 4 air loops are connected with a stitch with the 3rd loop from the hook. We continue knitting the central part until the middle is filled. When the work is finished, fasten the thread.
Schemes for implementing the “daisy” motif
Handicraft Basics
Absolutely all patterns and models of Bruges lace crochet begin with knitting a chain of 10 air loops, which are then connected by 5 knitted stitches. A mandatory element is a specially placed eyelet loop at each bend, which will help in the future in creating a pattern and fastening the tape. Having reached the turn to the next row, 5 chain stitches are knitted again and the stitches are repeated. This creates a ribbon of the intended length.
Needlewomen note that the side eye loops can be left of different lengths. This trick will help make the pattern more unique. You can also change the number of columns between turns. There may be 3, 5, 7.
There is no limit to the imagination of the needlewoman in the fact that between the connecting posts you can leave a certain distance, in a loop or several, which will also add points to the author’s work. When creating the required pattern in the step-by-step instructions for beginners, it is recommended to connect Bruges lace by the ear loops.
In order for the ribbons to be at an equal distance or parallel to each other, it is recommended to connect them with identical air columns. If you connect a lace ribbon with columns of different heights, you will get a divergence, which is also used in crochet patterns. By filling the void between the main tape with various air transitions, you can get a particularly interesting and complex pattern.
Bruges lace from the knot motif. Master Class
We leave a part of the thread approximately 10 cm long. Next we knit the first arch of 5 air. pet. On the remaining part of the thread we make 5 double crochets and 5 chain crochets. pet.
We continue knitting in this way until the 25th row. 5 air pet. in the 26th and 28th rows it will be necessary to replace it with 2 air. pet. and 1 connection a column that will unite the opposite arches of the 2nd and 4th rows and 2 air. pet. so that the central part of the lace can be attached.
We continue knitting the motif until the 47th row, and then attach it to the 1st row. Cut the thread. Fill in the central part.
We knit 1 air. loop, and then alternate a double crochet stitch, a 3 crochet stitch and a 4 crochet stitch. We insert the hook into the inner unknitted arches on each side of the braid. Fasten the end of the thread.
The ancient way of knitting
Bruges lace: napkins, the diagrams of which are presented in this article, items of clothing, are reminiscent of the products of Vologda and Flemish craftswomen who worked with bobbins. They did not knit the braid separately in order to later lay out a pattern from it. The stripes wove, connected and branched, bypassing the pins, directly on the substrate, in accordance with the wide and thin lines of the design applied to it. Currently a popular technique is to crochet a long ribbon with loops on the sides and join it into a pattern right during the knitting process.
Bruges lace with triangle motifs, crocheted
We will knit this motif a little differently than the previous ones. First we make a chain of 5 air. pet., after which we add another 5 air. pet. for the first arch.
We continue to knit in the sixth loop from the hook, alternating rows of 5 stitches. double crochet and 2 squares. At the end of the 7th row, 2 chain stitches. and we knit 1 single crochet under the previous 3 inner arches so that we get an angle. We do 2 more corners in the same way.
When the 48th row is knitted, leave a thread 10 cm long and cut it. With this thread we will connect the last row with the cast-on chain using an “over the edge” seam.
Before starting to fill the motif, make a chain stitch, and then knit 9 times: 1 stitch. without crochet 3 chain stitches into the starting loop; We end the row with a connecting post. to the first pillar. without a crochet, after which we knit an additional connection. pillar. to the first arch.
When performing the second round of the row, it is necessary to connect all the unknitted inner arches with two double crochets, knitted together. We finish the circular row with a connecting post, knitted into the 3rd of 3 chain stitches, replacing the first post. double crochet When the knitting is ready, cut the thread.
Using the presented knitting techniques you can create such amazing products in the style of Bruges.
It is impossible to list all the options; there are a huge number of them. Thanks to this, you can always choose the model you want to knit. Or, using a modular system, create something new and exclusive.
Bruges lace, crochet description
In this article I will talk about how to knit Bruges lace and show the basic techniques of the Bruges technique. The finished result will be similar to Vologda lace, but real Vologda lace is woven using bobbins, while Bruges lace only needs a hook. I have come across mentions that this lace knitting technique, in addition to “Brugge”, goes by many names: Brussels lace, Flemish lace, Vologda vilyushka. It doesn’t matter what you call it, the main thing is to be able to connect it. The technique for making such patterns is not complicated if the basic principles of joining the braid are understood.
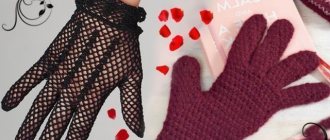
A product made from Bruges lace looks something like this:
This is one of the simplest options out of the endless number of combinations that exist. The basis of Bruges lace is a braid, most often consisting of four double crochets. In more complex products, other braid options may be used, but I will consider patterns based on just such a four-column classic braid. The pattern is formed by connecting arches of braid.
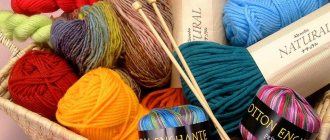
The yarn for work should be chosen thin so that the product is beautiful and weightless. And the hook, accordingly, is also used thin - 0.5 - 1.0 mm. And if we knit clothes for dolls using the Bruges lace technique, then take the thinnest hook that you can handle, and you can generally use sewing threads.
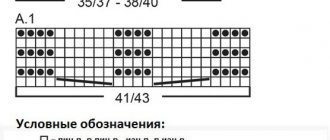
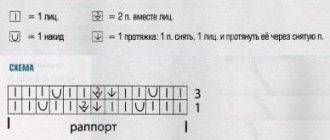
Conventional abbreviations:
VP - air loop, PSBN - half single crochet, RLS - single crochet, PSSN - half double crochet, SSN - double crochet, SS2N - double crochet, SS3N - triple crochet.
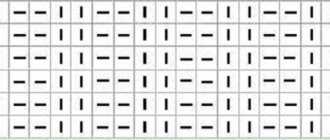
We begin to knit the braid from a chain of air loops. 1 row. 10 ch, dc in the seventh loop from the hook, 3 dc, one in each loop of the chain, 6 ch, turn knitting. 2nd row. 4 dc, one at the top of each dc of the previous row, ch 6, turn knitting. Then repeat the second row until the desired length.
Technique for knitting simple Bruges lace patterns
When the braid bends and turns to the side, it needs to be knitted in this place with some modifications. The row should be shortened on the side in which the bend needs to be made. The next photo shows the beginning of the bend. In the bending places we knit like this: an arch of 6 VPs, then sc, hdc, dc, dc. That is, at the beginning of the row there is a short stitch, and at the end there is a long and full double crochet. Beveled rows are necessary so that the braid does not bristle, but lies flat.
If we want to form a 180-degree turn, then we will need at least 6 such beveled rows. In the next row we knit: Dc, Dc, Hdc, Sc. And don’t forget, of course, to make arches of 6 VP between the rows.
Knitted 6 modified rows. We have three arches looking towards the bend. Now we knit 3 VPs (not 6, as in a regular arch, but only 3, that is, half of the arch).
Then insert the hook into the last three arches, pull a loop through them and knit a sc:
Now we finish the arch we started, knit 3 VPs and knit the last modified row: sc, hdc, dc, dc:
After this, we return to knitting regular rows consisting of four DCs. We knitted an arch from 6 VP, knitted 4 DC, 3 VP (this is half of the arch). Now we will need to connect the new braid arches with the already connected ones. Insert the hook into the arch that was the last one before starting to knit the rounding, pull out the loop, knit sc:
Then we finish the current arch, knit 3 VP and continue the braid - 4 DC, 6 VP arches:
We knit in this way until we connect all the internal arches, that is, until the formation of a new bend begins:
There can be any number of connected arches, depending on how wide the product you require. The bend is formed in the same way as we knitted the first one:
After completing the bending, we connect the arches from the VP:
As a result of all operations, a tape like this is obtained; it must be continued to the required length:
It was the simplest vilyushka. If the design of the product provides for a rotation not by 180 degrees, but by another angle, then when making a bend you will fasten not 4 arches together, but 3 or even 2.
Now let's try to tie a little more complicated fork with the center in the form of a cobweb. This fork is larger in size, and to complete it we will need braid with 14 beveled rows, you can count it by the arches from the VP. 7 arches with shortened rows, and at the very beginning 1 arch without shortened rows, this arch is also involved in the formation of the fork.
First, knit a chain of 3 VPs (half an arch), make 4 yarn overs. Insert the hook into the 2 nearest arches, pull out a loop and knit a double crochet stitch (this means that you knit 2 yarn overs out of 4 on the hook. After this, a loop from the knitted double crochet stitch remains on the hook, 2 yarn overs remaining from 4 and the first working loop:
We make 2 more yarn overs, insert the hook into the next 2 arches, knit CC2H, on the hook there are 2 loops from the posts, 2 yarn overs and a working loop:
We repeat the same with the next two arches. Make 2 yarn overs, insert the hook into two arches, knit SS2H:
We do not combine the last arch, we make 2 yarn overs, insert a hook into ONE arch, knit CC2H:
And now we complete the web. We knit CC2H from those loops and yarn overs that remained on the hook. We make 3 VPs that will complete the started arch, and perform a shortened row of braid - sc, hdc, dc, dc. Turn the knitting and knit 1 row without shortening: 6 VP, 4 Dc.
And the last final step is connecting to the very first arch:
This completes the fork with the cobweb in the center. This is the smallest vilyushka with a cobweb. In nature, there are larger forks, for them you will need to knit more rows, make more arches, the circle will be larger, and you will have to make not 4 yarn overs for the web at the very beginning, but 6. That is, not the columns with double crochets, as we knitted, and stitches with three crochets.
Bruges lace provides various options for connecting elements. We have already discussed the simplest option - this is when simply two arches of air loops are connected with a single crochet. You can connect two arches with a half double crochet or double crochet. You can even do it with double crochets or with three crochets, you need to look at the situation to see which is best suited for the pattern.
There is another simple and often used method of connecting 4 arches with cross-shaped posts. In the finished product it looks like this:
Brussels lace: history and examples
Dear friends, I want to continue my excursion into the world of ancient lace. We've already talked a little about Chantilly lace. Here:
Today I would like to show you my selection of photographs of elite and my favorite Brussels lace.
World-famous Brussels lace has always been considered a luxury, even though the craftswomen did not use gold or silver threads in their work. The basis of the lace was only the thinnest linen thread, practically invisible during spinning.
The most elegant elements of the ornament - often fantasy, with stylized plant elements - were made separately. The connection was made with an incredibly thin tulle background, or with ties (this is how motifs are connected in a type of Brussels lace called “duchess” - lace that does not have a background, in which the ornaments are connected directly to each other).
Creating such splendor “out of nothing” (embroidered lace was very aptly called “sewn by air” by contemporaries) seems something supernatural.
Work on lace was very painstaking and unproductive: to create a few centimeters of lace, the craftswoman had to work all day, but the perfection of technical techniques in the production of openwork is amazing to this day.
The popularity of Brussels lace abroad in past centuries was incredible! Lace was used to decorate the magnificent multi-layered dresses of the court ladies. In a men's suit, not only the collars and cuffs, but even the cuffs of boots and the belt of weapons were complemented by expensive openwork embroidery. Even the interior upholstery of royal carriages was trimmed with lace.
The nobility's passion for lace in England and France was excessive, and the amount of money that went into paying for precious foreign lace was a significant blow to the economy. To stimulate the development of lace making within the country, the import of Brussels lace was banned in England. Smuggled under the guise of English lace, lace from Brussels was called "Angleterre" (Point d'Angleterre). Brabant lace in many ways imitated Brussels lace; in France (Mirecout), England (Honiton) they wove lace in this style, but French and English lace was woven from a denser thread, it is more “dense”, “heavy”, repeating the grace of the lines of the openwork pattern and Only Brussels craftswomen were able to fully achieve the required density of weaves in a product.
Ella Weber