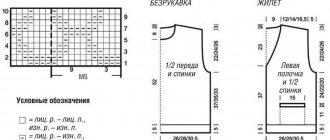
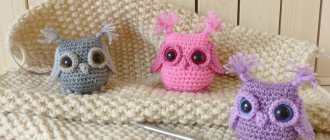
Leg warmers are fashionable knee socks that do not have a heel. As a rule, they are not expensive, but they can change the image beyond recognition. Leg warmers are popular not only among adults, but also among children. In them, the child always looks unconventional and will be the center of attention.
The word "gaiters" came to us from France. At first, this accessory was used only in sports, in aerobics classes. Later, famous designers found a use for it in everyday wear - in addition to making it from knitwear, they began to knit leg warmers with crochet or knitting. Let's consider several options for openwork knitting.
Knitted leg warmers with a voluminous pattern
This model is ideal for wearing in the autumn season. It will not only complement your wardrobe, but will also keep you warm in cool weather. We will need Alize Merino Stretch yarn. Why her? Because the thread consists of wool, acrylic, and PBT elastic. Thanks to this, the pattern fits well during knitting, the product itself is warm, stretches well, while maintaining its original shape.
The length of the leg warmers will be approximately 31 cm, the width of the upper part will be 31 cm, and the width of the lower part will be 37 cm.
To work, you need to prepare - 2 skeins of yarn, 100 grams each, hook 5/0 (3 mm).
We will knit in circular rows, without seams or increases. The product below will be wider due to the pattern.
We collect 60 air loops in a row, and then close it into a ring. We start each row with lifting loops. To make the edge of the product look neat, we knit one row with single crochets. Next, we knit the “Spikelet” pattern as shown in the pattern to the desired length.
We repeat knitting from the second row. In subsequent cases, we change the double crochet stitches of the second row to concave stitches. The knitting ends with lush stitches in the fourth row.
Knitting pattern for embossed concave double crochet
Lush column diagram
It is better to knit the edge of the leggings with a single crochet. This will give the product a finished look. At the end of knitting, we cut the working thread and then hide it inside.
The second leg warmer is knitted similarly.
Openwork crochet leg warmers
Openwork leg warmers look very elegant. They can be worn with a short dress or miniskirt. Despite their chic appearance, knitting them is not at all difficult.
So, we will need: 150 g of Olga wool blend yarn, black, hook No. 2.
We collect a chain of air loops, and then close it into a ring. The length of the chain should be equal to the circumference of the shin. We knit according to pattern 1 until the desired height is reached (approximately 40 cm).
Next, according to pattern 2, we knit the holes for the lace, and then make 1 row with single crochets. Tie the edge of the product “picot”, as shown in diagram 2.
Now, you need to stretch the laces into the holes and, if desired, decorate them with pom-poms.
Variety of knitted products
The name "gaiters" is of French origin. From their first sporting purpose, they have grown into casual stylish clothing. The first models were made from knitwear, and only later they began to be crocheted or knitted. It is very convenient for an inexperienced knitter when there are clear and simple patterns and descriptions of crochet leg warmers. According to their purpose, these things are divided into several types:
- sports;
- children's;
- domestic;
- elegant;
- everyday;
- seasonal.
The use of unusual patterns when knitting this item of clothing turned it into a fashion accessory. You can crochet leg warmers for dancing. They should be soft and warm , as they help warm up the muscles during dancing or aerobics. And you can come up with the most unusual design, the main thing is that it matches the dance costume.
Openwork leg warmers look very elegant on girls. They harmonize perfectly with a short evening dress and make the whole look chic.
Warm crochet leg warmers
This accessory can be worn not only on the shins, but also on shoes. Thus, the boots will look non-standard and will also be protected from dirt.
We will need two skeins of yarn of different shades that match each other and a hook suitable for the thickness of the thread. Knitting should be done in circular rows, according to the pattern below.
To determine the number of air loops, it is necessary to measure the circumference of the shin at the widest point, or the width of the boot top. The length of the chain of air loops should be equal to the circumference of the shin (or boot top).
Knitting elements, which are marked in a darker color in the pattern, are made in one shade, and lighter ones in another. Also, it should be noted that first we crochet the leg warmers on one side of the chain of chain stitches, and then on the other.
If the leg warmers are intended for dancing, it is necessary to provide a hole for the heel. Depending on the anatomical features of the legs, the width of the gaiters can be adjusted by adding or decreasing the number of loops.
Material for work
Depending on the desired model, yarn is selected for it. For warm knitted items, yarn containing wool, acrylic and elastic will be very good. This composition is well suited to a three-dimensional pattern, while the finished product stretches well, maintaining its original shape.
For knitting openwork patterns, yarn of the same composition is suitable, only with a thinner thread.
Among craftswomen, yarn from Italian or Turkish manufacturers is valued. It has a wide range of noble color shades suitable for leggings.
For children's knitted items, it is advisable to use yarn made from natural fibers.
The amount of material depends on the size of the finished product. For example, for a stocking length and width of 30 cm, approximately 170–200 grams of yarn are collected. For bulky items, yarn consumption increases significantly. The hook is selected to suit the thickness of the thread.
Warm crochet leg warmers with pineapple pattern
This model of leggings is warm and very beautiful. You can wear it with almost any outfit, except, perhaps, for office and evening wear. Leg warmers are in perfect harmony with large knitted clothing (sweaters, tunics) and leggings.
They can also be worn under a skirt or shorts. To knit this product you need to prepare: 300-350g of wool or cotton yarn and an appropriate hook. If desired, you can take another ribbon that will tighten the leggings.
We begin to knit 2 motifs. We collect a chain of air loops and close it into a ring. Next, we knit 2 pairs of 3 double crochets, between which there should be 5 air loops.
We start each row with lifting loops. Next we knit according to the pattern.
When the motifs are ready, they need to be connected and tied at the top and bottom with 2-3 rows of arches made of air loops.
We tie the finished product with double crochets and, if necessary, stretch the ribbon.
We knit a hat and leg warmers for the Paola Reina doll. Master Class
I suggest knitting and sewing an outfit for the Paola Reina doll, which includes a sweater, hat, leg warmers and a skirt. We will sew the skirt and knit the rest. First we will practice on simpler products, and then we will knit something that is a little more complex. Today I am publishing my new master class on knitting a simple hat for the Paola Reina doll. We will knit leg warmers with the same pattern to complete the set.
I really like two-color patterns on knitted items, but I don’t like to knit jacquard, I’m not good at it, so we will knit using a technique called “lazy jacquard”, in this technique the pattern is obtained by removing loops. We will knit the simplest version of lazy jacquard that exists in nature.
This is what the finished outfit will look like:
I used 2mm double needles and Coco Vita Cotton yarn (50g = 240m). You can use another yarn that is similar in size, but it is better to choose a yarn that can be ironed and steamed, because the finished product will look better after steaming.
I recommend knitting a small sample first to gauge your tightness. If you knit samples of approximately the same size for all products, then when you have collected several pieces, you can sew them into sofa cushions for Barbie or Cruselings dolls.
For patterns based on stockinette stitch, it is better to choose a combination of knitting needle number and yarn thickness so that the knitting is tight, then the loops will lie smoothly and beautifully. But if you have not yet learned how to knit tightly, then you can correct the situation a little with the help of an iron.
For the sample, cast on 22 stitches using thread No. 1.
Row 0: edge, purl 20, edge.
1st row: edge, 20 knit, edge.
2nd row: edge, purl 20, edge.
From the next row we attach thread No. 2. Now the color of the working thread will change every two rows.
Row 3: edge stitch, (knit 2, slip 1 stitch onto the right needle, without knitting like a knit stitch)* repeat 6 times, knit 2, edge stitch.
In the next photo I showed the moment of removing the loop, the loop is simply transferred to the right knitting needle, and the beige working thread remains behind the fabric, this means that the loop is removed as a knit stitch.
When you have completed the third row, the work should look like the photo below. Loops of two colors alternate on the knitting needle - beige, knitted, and turquoise, removed as knit.
We continue the 4th row with thread No. 2: edge, (2 purl, remove 1 loop as a purl) * repeat 6 times, purl 2, edge.
The next photo shows the moment of removing the loop as a purl, the working thread remains in front of the fabric. We purl the beige stitches and remove the turquoise stitches.
After 4 rows the work looks like this:
5th row: we completed two rows with thread of color No. 2, which means it’s time to change the color of the working thread, take again thread No. 1, edge, 20 knit, edge. In this row we knit all the loops the same way - both beige loops and turquoise loops, which we removed without knitting in the two previous rows.
The photo below shows the moment of knitting the knit stitch that was removed two rows in a row. And you can also appreciate how sharp my cat’s teeth are, he chewed the tips of my Teflon-coated knitting needles, but the cat is not a monster that bites through steel, these knitting needles are just aluminum.
After row 5 the work looks like this:
Row 6: edge, purl 20, edge.
Then repeat rows 3-6 as many times as you need. Knit an additional 2 rows with knit stitches using turquoise thread for symmetry of the pattern. Close the loops. Estimate the size of the resulting rectangle. If the sample is 5.0 - 5.5 cm wide, then you can safely knit a hat, leg warmers, and a sweater exactly according to the description and diagrams; the products will fit a Paola Reina doll 32 cm tall. If your knitting density differs significantly, then you will have to either take knitting needles of a different thickness, or recalculate the number of loops taking into account your knitting density.
Scheme and description of knitting a hat for a doll:
Cast on 72 loops with blue thread on stocking needles, distribute 18 loops on each knitting needle and knit 7 rows with a 1x1 elastic band, that is, alternate 1 knit stitch, 1 purl loop.
If your knitting density is significantly different from mine, you can cast on more or fewer loops, but their number should be a multiple of three, because the repeat of the main pattern is made up of three loops. And it is desirable that the total number of loops is also divided by 4, because when you begin to narrow towards the crown, in this case there will be 4 equal segments, but this is not important, you can make 2 segments that differ by 1 loop.
The diagram shows loops from one needle out of four. If you knit according to the pattern, then what is shown on it must be repeated 4 times in each row. In this case, I show all the rows on the diagram: both even and odd. Since we are knitting in the round, all rows are knit, we will only knit purl stitches when we are knitting an elastic band. Therefore, knitting a hat will differ from the technique of knitting a sample precisely in the absence of purl rows.
This is the kind of hat we should get:
Rows 1 - 7, blue thread: (1 knit, 1 purl)* repeat 36 times.
After the 7th row, we attach a white thread and then knit according to the pattern using the lazy jacquard technique.
Row 8 and row 9, white thread: (slip 1 stitch as a knit stitch (the white thread remains behind the fabric), knit 2)* repeat 24 times.
Row 10 and row 11, blue thread: 72 knit stitches.
Then repeat rows 8 to 11 6 times.
Row 32: - repeat row No. 8.
Row 33: - repeat row No. 9.
At this stage, the depth (height) of the hat is 5 cm, if you knit looser than me, and you reached this size earlier, then you need to start narrowing the hat at this point.
After the 33rd row, the white thread will no longer participate in the work, cut it off, leaving a small tail for fastening.
From the 34th row, the cap begins to narrow. To evenly taper and to get a rounded crown, we will make 8 decreases in each even row, and knit each odd row without changing the number of stitches. Thus, we get 4 identical isosceles triangles, which taper towards the crown.
Row 34: (knit 1, knit 2 together, knit 13, knit 2 together) * repeat 4 times.
Row 35: knit stitches to end of row.
Row 36: (knit 1, knit 2 together, knit 11, knit 2 together) * repeat 4 times.
Row 37: knit stitches to end of row.
Row 38: (knit 1, knit 2 together, knit 9, knit 2 together) * repeat 4 times.
Row 39: knit stitches to end of row.
Row 40: (knit 1, knit 2 together, knit 7, knit 2 together) * repeat 4 times.
Row 41: knit stitches to end of row.
Row 42: (knit 1, knit 2 together, knit 5, knit 2 together) * repeat 4 times.
Row 43: knit stitches to end of row.
Row 44: (Knit 1, knit 2 together, knit 3, knit 2 together) * repeat 4 times.
Row 45: knit stitches to end of row.
Row 46: (Knit 1, knit 2 together, knit 1, knit 2 together) * repeat 4 times.
Row 47: knit stitches to end of row.
Row 48: knit 2 together * repeat 8 times.
Then cut off the working thread, leaving a small tail, use a needle to thread this tail through the 8 loops remaining on the knitting needles, pull and fasten.
I already had a master class on knitting an openwork hat for the Paola Reina doll, if a two-color hat seems difficult for you, you can knit a simpler hat.
In the pattern for knitting a hat, for clarity, I have highlighted in color those loops that we knit in the second color.
*Click to view the diagram in full size
Scheme and description of knitting leg warmers for a doll:
We will also knit the leg warmers in the round on stocking needles. Cast on 30 stitches with blue thread and distribute them onto 4 knitting needles, I distribute them like this: 7+8+7+8.
If your knitting density is significantly different from mine, you can cast on more or fewer loops, but their number should be a multiple of three, because the pattern repeat is made up of three loops.
Row 1: (1 knit, 1 purl) * repeat 15 times.
2nd row -5th row: repeat row No. 1.
6th row and 7th row: attach a white thread and knit with a white thread, (slip 1 stitch as a knit stitch, 2 knit stitches) * repeat 10 times.
Row 8 and row 9: replace the thread with blue, 30 knit stitches.
Row 10 - Row 23: repeat rows 6 to 9.
Row 24: 30 knit stitches with blue thread.
Row 25 - Row 29: (1 knit, 1 purl) * repeat 15 times.
Close the loops.
*Click to view diagram in full size
Happy knitting! Let your dolls be beautiful!
While you are practicing on a hat and leg warmers, I have already prepared the next master class on knitting a sweater from this kit, and you can complement the outfit with another product.
© All copyright materials presented on the My-Dolls.info website are intended for private use. Copying for the purpose of publishing them on other resources is prohibited!
Seamless Crochet Leg Warmers with Ribbon
Another option for knitting leggings. We will perform it in circular rows, and then we will draw in a beautiful ribbon that will secure the product to the leg.
To work, you need to prepare one and a half skeins of gray yarn and a little white. All yarn should be the same thickness and texture so that the pattern is not distorted. Also, we will need a hook that matches the thickness of the thread.
We collect a chain of air loops, the length of which should be equal to the circumference of the shin at the widest point, and close it into a ring. Next we knit according to the pattern. Closer to the top of the product you need to knit 4 rows of white yarn.
When the knitting reaches the desired length, tie the edge with a double crochet and pull in the ribbon in the white zone.
Description of the process of knitting knee socks
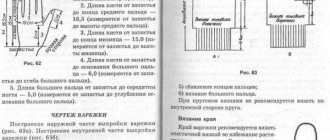
Dial a chain of 72 chains and close it in a circle. Continue knitting according to pattern 1, gradually decrease the air loops in the pattern towards the ankle, in the arches - up to 5. Having knitted 54 rows according to pattern 1, continue knitting half of all loops according to the same pattern, for the second half, knit a chain of 36 chain stitches and based on it, knit the bottom of the foot, alternating 1 half double crochet and 1 single crochet. Knit 16 rows in this way, decreasing 1 tbsp. on both sides of the bottom of the foot.
For the toe, knit rows of st. b/n, evenly decreasing 4 tbsp in each row.
For the heel on one side of the left hole, knit 36 tbsp, then knit 24 rows of dc, divide the work into 3 parts of 12 sts and knit 24 rows of dc on the central loops, with the last st in each row knit together with st. side parts. Sew up the resulting hole with a needle.
Pass a thin hat elastic along the top of the golf course.
The second patterned knee socks are knitted similarly, but according to pattern 2.
Crochet booties red
It turns out that knee socks can not only be purchased, but also uniquely knitted, not like everyone else’s. And your child will be different from other children.
download free crochet magazines
Material:
cotton yarn – ;
100 g. Hook 1.5 mm. crochet baby scarves
Crochet leg warmers with elastic pattern
You can knit an elastic band not only with knitting needles, but also with crochet. Leg warmers with such a pattern will look very unusual, which will attract the attention of others.
The advantage of knitting this particular model of leg warmers is to learn how to crochet an imitation of elastic on a thick fabric. In the future, this technique can be used when knitting hats, scarves, collars and sleeve cuffs.
For this model we will need 450-500 g of wool yarn of medium thickness and a hook No. 6.
The height of the finished product will be 45 cm. We cast on 36 air loops and knit 2 rows with single crochets. We start the third row with a lifting loop and knit 1 single crochet.
Now we move on to imitation of an elastic band. In every second row it is necessary to knit such loops as shown in the diagram, alternating with every 2 single crochets.
There is no need to add or decrease loops. The model of the gaiters is such that it should not fit tightly to the leg.
When the knitting reaches the desired length, fold the fabric and sew it to form a pipe. If desired, you can tighten the ribbon to secure it.
Bright crochet leg warmers for the little fashionista
These leg warmers will become your little one's favorite accessory. They are bright and elegant. Can be worn with jeans, a short skirt or shorts. Ideal for girls 3-5 years old.
For work you need to prepare: pink and white acrylic yarn, a 5.5 mm and 3.5 mm hook, 2 tablet buttons.
We knit in two threads. We start with white yarn and a 5.5 mm hook. As shown in the picture, make a cast-on edge using 30 double crochets.
This method of casting on loops makes the edge more elastic. Next, you need to connect the chain into a ring and knit in circular rows, alternating 1 row of double crochets and 1 row of single crochets. You should get 6 rows of white yarn.
We continue knitting in the same way, but only in pink.
We knit the last 10 rows in white, but with a 3.5 mm crochet hook.
You can attach a flower to the finished product. You can link it like this.
Pink flower
We collect 6 air loops and close them into a ring. Then we knit 15 single crochets and connect them with a loop to the beginning of the row.
To the end of the row we knit the following pattern: 2 single crochets, an arch of 10 chain stitches, skip 1 single crochet from the previous row. There should be 5 arches.
Each of them must be tied with 1 single crochet, 1 half double crochet, 1 double crochet, 1 double crochet, 5 double crochets, 1 double crochet, 1 double crochet, half double crochet and 1 double crochet. Each of the petals must be tied with a connecting post.
White flower
We collect a chain of 4 chain loops, connect and knit 10 single crochets into a ring. Then connect to the beginning of the row.
The sequence of the pattern: 1 single crochet into the single crochet of the previous row, and into the next single crochet we knit *1 half crochet, 1 double crochet, 5 double crochets, 1 double crochet, 1 half crochet*. We repeat the pattern from * to * 5 times. We tie each petal with a connecting post.
Next, we connect the white and pink flowers, decorate the middle with a button and attach them to the side of the leggings.
For little fashionistas
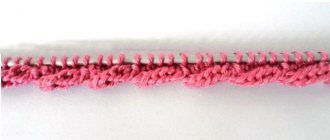
Bright leggings are loved not only by women, but also by girls. You can knit them for a girl quickly, but beautifully. Cast on air loops according to the volume of the baby’s lower leg, connect with a ring. In the first row, knit three chain stitches, then knit chain loops. All subsequent rows are knitted similarly to the first. To brighten the product, you can change the color of the thread itself. Having knitted the required length, complete the work. Make the edge trim according to pattern number one.
Related article: Weaving a stroller - flower pots made from newspaper tubes
All that remains is to embellish the work. Attach the original lacing to the side, and at the top there are three beautiful flowers, which can be knitted according to the pattern.
The result was bright leg warmers for the baby. Now little feet will always be warm.
Multi-colored crochet leg warmers
To create such a model of leg warmers you need many small balls of yarn. Leftover threads from previous products are ideal.
The cheerful colors of the leg warmers guarantee a good mood even on dull autumn days. This is another reason to knit such an accessory.
What we need to prepare for work: approximately 200g of “Sock” yarn of different colors, about 50g of “Iris” yarn for making flowers, hook No. 3, as well as shoelaces 1.5 meters long.
We collect a chain of 60 air loops that correspond to the circumference of the shin, and then connect it into a ring. Next, we knit the first row according to the following pattern: 3 lifting chain stitches, 59 double crochets. We perform the remaining rows following the example of the first.
To make the color look cheerful, the color of the thread needs to be changed periodically. It is better to make the width of the stripes different. When the knitting reaches 30 cm, tie the top and bottom edges according to pattern 1.
The main product is ready, now you can move on to decorating it. We stretch the lace into the side part, as if it were not a legging, but a boot, and at the top we attach three flowers, knitted according to scheme 2.
This is how you can knit beautiful leg warmers simply and without much time, which will make your look unique. Good luck with your knitting and pursuit of beauty.
What yarn is suitable for crocheting leg warmers?
The choice of yarn depends only on the time of year for which the model will be intended. It may not be such warm grass (for a warm spring day). And for winter - very thick wool or soft merino wool .
Pekhorka yarn
Even iris is often used to create unfinished socks. The combination of yarn types looks very nice.
Iris threads
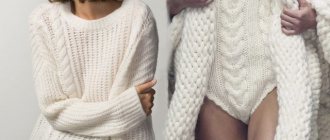
The base can be done with pekhorka , but the lace can be placed along the edge and along one side. The result is a cute product that can easily be worn with a skirt and sneakers. In this set, leg warmers will become a link between sports shoes and a skirt.