Scarf-collar (snood): distinctive features
This model is distinguished by the fact that, in fact, it is a canvas closed in a ring that is wound around the neck. You can also find such a name as “endless scarf”. There are many varieties of snoods, depending on the width and number of turns.
You can knit a scarf-collar with knitting needles if you understand the huge variety of patterns and descriptions that are presented on the Internet:
- A narrow and long snood - it is worn instead of a regular scarf, usually in several turns.
- A wide and long snood is a real transformer that can be worn not only around the neck as a scarf, but also as a replacement for a headdress, and even worn as a vest or bolero.
- A snood tube is a wide and short scarf worn as a collar or hood.
The most important feature of any snood is its versatility. It is perfect for everyone, regardless of gender and age.
Current colors for scarf-collar
Snood is a full-fledged accessory, which means that it most often becomes a bright accent in the image. To knit such a scarf, you can choose bright and saturated colors, or muted shades, depending on the desired result.
Experts also recommend that the snood match the color scheme with gloves and a headdress . It is not necessary that they be the same color. The main thing is that the shade matches.
Another fashion trend is the choice of several color accents that combine with each other. To do this, you can use special tables to select the right pairs by color.
Patterns and patterns for knitting snood
A scarf-collar with knitting needles (patterns and descriptions for it are very diverse) can be knitted in different ways and in almost any pattern. But you need to adhere to a simple rule - the more complex the yarn, the simpler the pattern should be. So, when knitting from fancy yarn, knitting with an English rib, garter stitch, or a pearl pattern is perfect.
To knit openwork or arans, you should choose a plain yarn on which the pattern will be clearly visible. When choosing patterns and descriptions for knitting a scarf-collar with knitting needles, you need to take into account their complexity. For beginners, weaving braids and arans may be too difficult, but they can easily cope with patterns of purl and facial loops
Options for simple patterns of knit and purl stitches
Openwork pattern options
Pattern options with braids and arans
However, braids and arans are difficult to perform, and not all beginners are able to knit them correctly, but there are imitation patterns that are visually very similar to braids.
Japanese knitting on a box
This is a completely extravagant hand knitting of a scarf, the existence of which is simply impossible to guess. In essence, this is the same knitting on fingers, only instead of fingers, the first row is cast on specially cut recesses in the box.
This method has its advantages:
- the scarf will be warm (hollow inside);
- the scarf will be of sufficient width, because you can add more loops to the box;
- By taking a smaller box, you can knit a little thing for a child.
A master class on making a scarf without knitting needles on a box is given in the following video. The lesson is in a foreign language, but in this case the sequence of work is important to us, and it is shown here step by step.
Video: Knitting on a box
General recommendations for knitting
Recommendations:
- To knit a short snood, you can use circular knitting needles to make it seamless. A long snood is easier to knit like a regular scarf, and then sew it.
- Particular attention should be paid to the density of knitting. It should not be different, otherwise the width of the finished product will be uneven, which can spoil the appearance.
- The main difficulties arise with knitting in stockinette stitch, as the edges of the product curl. Therefore, scarves are usually not knitted with this pattern, but you can try the following techniques:
- To avoid such a nuisance, you can make stripes of 3-5 loops with a pearl pattern along the edges of the product.
- Another option from folding is to crochet the finished product around the edges. To do this, you can choose simple single crochet stitches, or a “cross stitch”.
The main thing is to correctly calculate the crochet density so that the fabric does not tighten, but also does not create unnecessary waves. Usually, along the width, one stitch is knitted in each loop, and along the long side, two stitches are knitted in a loop, or alternated with one stitch or two as needed.
- The finished product can be thoroughly steamed, or wet and stretched on the base. But here you need to take into account what yarn the scarf is knitted from and whether such processing is acceptable.
- For winter scarves, you can make a two-layer version by sewing two fabrics knitted with stockinette stitch together.
- It is most convenient to calculate the required snood length using the table.
Start knitting
Follow the illustrations, we’ll explain it in your fingertips! Knitting for beginners should be elementary - even a child can do it.
Casting on loops: Hand knitting without knitting needles and a hook also begins with casting on loops, directly on the right hand. Take thread from 3 skeins and make the first loop about 1.5 m from the end. Place the loop on your right hand and tighten. Using your tail, place a loop over your left hand from bottom to top, take the working thread left behind with your left hand and pull out the loop. Place the new loop on your right hand and tighten. Make 10 loops.
First row: place the working thread on the thumb of your right hand, make a fist. Pull the outer loop from your wrist off your fist. You will have a new loop in your right hand, put it on your left hand and continue in the same vein with the rest.
Knit the second row in mirror image. Continue knitting from right to left and from left to right until you finish. Leave about 4 meters of yarn for the last row.
On such thick “knitting needles” the work goes quickly. You can knit a scarf in just half an hour. If you need to put aside hand knitting without knitting needles and a hook for a while, just remove it from your hand. When putting the knitting back on, make sure that the loops are not twisted.
Last row: Knit 2 stitches as usual, then simply slip the first one from the hand, leaving the second one on the wrist. Knit 1 more, remove the previous one. When the last loop remains, take the end of the working thread, thread it through it and tighten.
Sew the ends of the scarf: align the edges, pull a loop from the remaining thread through the loops of the two outer rows, pull the next one through the loops of the edge and the working loop. At the end, tighten the loop and hide the end.
The scarf is ready. And how delightfully fluffy it turned out!
Well, for clarity - a video!
Source
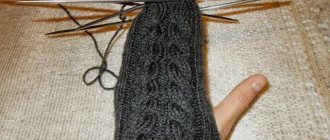
Snood braids for beginners
A scarf-collar with knitting needles (patterns and descriptions can be found on the Internet) is very often knitted with various braids, plaits or arans. But beginners are afraid to take on such work, since these patterns seem complicated to them. However, a simple braid itself is easy to knit. The main thing is to correctly understand how and where to make crossings, and then you can get an excellent result.
To knit such a snood with regular braids, you will need either long knitting needles (at least 35 cm long) or knitting needles with a short fishing line (60 cm fishing line will be enough). The size of the knitting needles should be selected according to the thickness of the yarn. Usually the labels indicate the recommended knitting needle size.
But if it is necessary for the fabric to be denser, then you need to take knitting needles 0.5 mm smaller than recommended. If you need a looser fabric, you can safely take knitting needles 1 size larger.
You will also need an auxiliary knitting needle. You can purchase a special knitting needle with a bend in the store, or you can replace it with a regular hairpin or large pin. Each craftswoman finds the most convenient way for herself.
It is better to choose mixed yarn for work. Pure wool can be very frizzy, and cheap acrylic often starts to pill after a short period of wear.
If you need a more voluminous and warm scarf, then you should choose threads with a thickness of 100 g/100 m. If you need a lighter option - 100 g/250m. Be sure to knit a sample first to check how the thread behaves when twisted.
Basic pattern
This is a simple braid pattern that is knitted using 12 stitches. It alternately makes 4x4 crosshairs. If desired, you can vary the number of crossed loops, then the braid will be wider or narrower. But you need to take into account that the more stitches you remove onto the auxiliary needle, the more difficult it will be to cross.
In this case, the braid stitch is 16 loops, including 4 edge loops, 2 on each side. When knitting a snood, you don’t have to knit these loops and then the total number should be a multiple of 12. The diagrams show 2 options for “braiding” the braid. The only difference between them is how the crosshairs will be positioned.
Scheme 1
For a braid according to the first pattern you need 16 loops. The first edge loop of each row is removed without knitting, and the last one is knitted purlwise.
Knitting pattern:
- In the first row, the edge is removed, then the purl is knitted, 12 stitches are knitted, the last two are purled again.
- The second row needs to be knitted according to the resulting pattern - knit stitches over knit stitches and purl stitches over purl stitches. On the wrong side, all rows, which in this case are even, are knitted according to the same principle.
- The third row is knitted exactly the same as the first.
- In the fifth row, the first crossing is knitted: remove the first loop, purl. Transfer the first 4 loops to an additional knitting needle and leave them in front of the fabric. Then knit 4 loops with knit stitches, and after them the 4 left for work are also knitted with knit stitches. Knit the remaining 4 stitches and finish the row with two purls. This is a cross to the left.
Knitting a scarf collar: braid knitting patterns
- From the sixth to the eighth row everything is knitted according to the pattern.
- In the ninth row, a second crossing is made: the first loop is removed again, the second is knitted purlwise. The first 4 loops are knitted, then four loops are transferred to an auxiliary knitting needle and remain behind the fabric.
- Next, knit 4 loops from the main knitting needle, and then from the additional one. The last 2 loops are purl. This is how the crossing to the right is performed.
- Then the report is repeated from the first row. If desired, you can make a larger distance between the crosshairs by knitting more rows. The main thing is that the crossing is done in the front (odd) row.
Knitting according to Pattern 2 is performed in the same way, only first a cross is made to the right side, and then to the left.
Description of work on snood
Description of work:
- Cast on the required number of stitches on the knitting needles. If there are paths of purl loops between the braids, then you need to cast on a number of loops that is a multiple of 16.
- The required length of the snood is knitted according to pattern 1 or pattern 2. For a long snood that will be worn in 2 turns, you need at least 100 cm in length.
- Sew the beginning and end of the snood using a hook or needle.
Simple knitting snood
It is better to start knitting a snood with a simple model. A simple model is best knitted from thick yarn with a regular elastic band. Such a collar will be very elastic and comfortable to wear.
Knitting pattern:
Note!
Knitting amigurumi for beginners: step-by-step instructions with photos and description of the amigurumi creation pattern
How to knit bactus with knitting needles: beautiful patterns, easy patterns, new models, master class with photos and descriptions
- Do-it-yourself crocheted napkins step by step: master class for beginners, photos, diagrams, ideas
- Determine the size of the segment 10 loops. Cast on the loops on the knitting needles according to the estimated width of the snood. The number of loops must be a multiple of 4.
- Knit the first row with regular knit stitches.
- Next, knit with a regular elastic band according to the pattern: 4 knit loops, 4 purl loops.
- Create a fabric 70-80 cm long. Close the last row.
- Sew the ends of the fabric using the yarn from which the item was knitted.
A simple snood is ready.
Snood knitted from thick or thin yarn
Lately, scarves made from thick and bulky yarn, or from very thin thread, have become very popular. To knit with such yarn, you need to choose the simplest patterns : garter stitch (all loops are knitted) or a pearl pattern (knit and purl alternate according to the pattern).
Pearl pattern
For knitting from a thin thread, use stockinette stitch. Here, the folded edges play into the hands of the craftswomen and create the necessary volume and airiness.
To work you will need:
- Thick yarn - no more than 100 g / 100 m. You can often find yarn that is made in the form of a cord or braid; it is perfect for work. The composition can be any.
- Fine yarn - at least 50 g / 150 m or, respectively, 100 g / 300 m.
Snoods made from fine wool yarn with the addition of mohair look very stylish. Knitting needles need to be selected according to the thickness of the yarn. For thick thread, these will be knitting needles starting from size No. 5, but for thin yarn, you can safely take knitting needles thicker than recommended to add additional volume to the fabric.
Description of work:
- Knit a sample measuring 10 by 10 cm and calculate how many loops correspond to 1 cm. For thick yarn, it usually turns out that 1 cm is equal to 1 loop. For thin stitches, up to 5 loops can fit in 1 cm, depending on how thick the yarn and knitting needles are. Based on this, you need to calculate the required number of loops.
- For a simple snood 50 cm wide, you will need to cast on 50 loops with thick yarn, and from 150 to 200 loops with thin yarn.
- Knit the required length of fabric with the selected pattern. When knitting a pearl pattern in the first row there is an alternation - one front, one purl loop. And in subsequent rows, the opposite one is knitted above each loop: over the front one - purl, and vice versa.
- At the end, you need to connect the ends of the scarf, closing it into a ring. To do this, you can use a hook, a needle, or, without removing the knitting needles, knit the last and first rows together.
Scarf with French motifs
Using the example of one of the simple models, even a beginner will figure out how to tie a collar. Beautiful motifs will give the product a special charm. You can also always complement the set by knitting a hat or beret.
Materials for a two-color snood you will need:
- - acrylic yarn of two colors, per 100 g - 100 m. The first color - seven skeins, the second - eight;
- - knitting needles No. 4
- - a needle with a large eye for stitching
Work process:
1. Each skein is divided into two balls. 132 loops are cast on the knitting needles. The first 12 rows are cast on in stocking stitch. This principle is based on the alternation of front rows with back rows.
2. Row 13 begins by tying a thread of the second selected color. To do this, knit six loops with the first thread. Next you need to tie a different color and make 2 more loops. Then follow 10 loops in the first color, 10 in the second. Continue like this until the end of the row, the last 4 should be a thread of the main first color.
3. From 14 to 19 rows - stocking stitch with a given alternation of two colors.
Note!
- Knitting amigurumi for beginners: step-by-step instructions with photos and description of the amigurumi creation pattern
- How to knit bactus with knitting needles: beautiful patterns, easy patterns, new models, master class with photos and descriptions
- Do-it-yourself crocheted napkins step by step: master class for beginners, photos, diagrams, ideas
4. From the 20th row, the colors change places. The knitting principle is the same as in the second stage. The pattern is repeated 7 more times. For continuous knitting without gaps during color changes, the threads need to be intertwined with each other.
5. Starting from the 28th row and 40th row, the fabric of the original main color is knitted. The remaining ends are hidden, the fabric itself is stitched with a needle.
To make the knitted item soft, it should be steamed.
Openwork scarf-collar knitted
Openwork things always look attractive and interesting. Spring looks are often complemented with lace and lace snoods, and it looks very stylish.
A scarf-collar with knitting needles (patterns and descriptions of openwork for such a thing are quite easy to find) can have different patterns. The most common option is leaf motifs.
To work you will need:
- yarn of any composition with a thread thickness of approximately 100 g/200 m;
- suitable knitting needles No. 3.0 with fishing line from 80 cm.
Pattern Description:
- The pattern report consists of 15 loops wide and 20 rows high. When knitting this pattern, you need to pay special attention to uniform placement. It's best to use a row counter so you don't accidentally skip a row.
- In the diagram, the front (odd) rows are read from right to left, and the purl (even) rows are read vice versa.
Description of work:
- This pattern is knitted in the round. It is very important to calculate the required number of loops, and then cast them on the knitting needles. All knitting is closed in a ring, and so it continues.
- Knit the required height of the snood, and then carefully close the edge of the crochet or needle.
How to count the number of loops
Making a sample will help you avoid problems with sizing and alteration of the item. There are many options for creating it. The simplest is to knit a small fabric with the desired pattern:
- 1. Cast on an even number of stitches on the knitting needles. On circular ones, accordingly, it closes into a ring.
- 2. Immediately you need to start the main fabric with the selected pattern.
- 3. When you reach the end of the row, you should make marks. This can be done either with a marker or with a thread of a different color.
- 4. In this way, knit 10 cm in height.
For a simple fabric, you can calculate the number of loops by measuring the length of the resulting piece with a ruler. Then divide the number of loops cast on at the beginning by centimeters. This way you can find out the number of loops per 1 cm.
Snood scarf with English elastic band for women
The "English rib" pattern is quite popular. The fabric, which is knitted with such a pattern, holds its shape perfectly. In this case, the scarf will be quite embossed and voluminous. To work, you will need any yarn with a thickness of about 100 g/250 m and suitable knitting needles No. 2.5 - 3.5.
Knitting needles can be used as long pairs (no shorter than 35 cm) or on a short line (no more than 50 cm). When knitting this pattern, you must knit the first base row, and then alternate the second and third rows. The pattern is double-sided.
If the pattern is knitted horizontally:
- Cast on the required number of stitches + 2 edge stitches on the knitting needles and knit the base row.
- The required length of fabric is knitted.
- The fabric is closed into a ring and stitched.
If the pattern is knitted vertically:
- Cast on as many loops as necessary and close the knitting into a ring.
- The required height of the product is knitted.
- It is better to close the edge of the product with a needle or elastic method. This way the elastic band will retain its mobility and will not stretch over time.
Elastic edge closure without needle:
- Knit 2 loops, remove one loop without knitting. Knit the resulting 2 loops.
- Knit one stitch again - there will be 2 loops on the right needle. Transfer them to the left needle and knit together.
- Continue this way until the end of the row. Tighten the last loop and hide the end of the thread.
Crochet snood
No less reliable and beautiful results are obtained when crocheting a collar. Moreover, many people get used to a hook more easily than to knitting needles.
In addition to hook number 4, you will also need 100% micropolyester yarn. Its density is 115 m per 50 g. You need 230 g for a scarf.
Designations:
V.p. - air loop
Pdsn - half double crochet
Work process:
1. A chain of 140 vp is made. and closes in a circle. This is the first row of the product.
2. For the next row, two lifting loops are made. Then alternate 1 hdc, 1 ch. and to the end of the row. As a result, 70 hdc should be collected.
3. Next, 2 lifting loops are picked up again. 1 hdc is knitted into the previous ch. Afterwards the process is identical to the second row. This creates a checkerboard order of columns.
4. From rows 4 to 36, knitting continues according to the same principle. At the end of the work, the thread is hidden.
To make the item larger, the number of loops is doubled if desired.
For complex options, it is suggested to listen to detailed explanations in the video of knitting a collar. They clearly show the principle of knitting a particular pattern.
Scarf snood-hood
This universal snood model can be a scarf or even a hat. In itself, this is a rectangular sheet of the required length, which is closed in a ring. Such a scarf-collar differs from ordinary snoods, perhaps, only in its width - most often it starts from 50 cm.
To work you will need:
- Any yarn that is thick enough - about 100 g/200 m.
- Suitable knitting needles No. 3.0 – 4.0. It is better to take knitting needles on a fishing line, since it is inconvenient to knit such a voluminous and large fabric on long knitting needles.
It should be taken into account that for a snood 50 cm wide and 100 cm long you will need several skeins of yarn.
Description of work:
- Choose any pattern you like and knit a 10x10 cm sample to calculate the knitting density.
- Based on how many loops fit into 1 cm, cast on the required number of loops.
- Knit the desired length with the selected pattern. Most often it is from 100 to 150 cm, so that it is enough for 2 turns.
- Close the fabric into a ring and sew the ends. This can be done with a needle, crochet or knitting needles.
Video: DIY scarf
In this way, you can make various scarves, snoods, and collars without knitting needles. These are voluminous warm things that can be knitted, even without knitting needles, literally within 30-40 minutes. Original, fashionable and unusual things will make their owners stand out from the crowd. And connecting them, as is clear from the video, will not be difficult. Even if you have to interrupt your work (for example, you urgently need to go somewhere), this hand knitting allows you to transfer the fabric from your hand, for example, to a plastic bottle, and when you return, continue again.
Read
Examples of knitting openwork women's berets
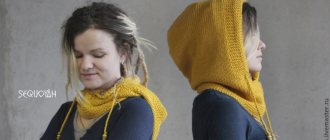
Snood pipe
Among snoods, this option can be called the smallest. In itself, such a scarf-collar is a fairly narrow knitted tube (most often seamless), which is worn around the neck without turns.
It is very easy to knit. You can even use large double needles for this. It is rare that such a snood is made with a seam. This usually happens in cases where the craftswoman wants to make a special pattern of horizontal braids along the upper or lower edge of the product.
If you make such a scarf-collar a little wider and longer, it can also transform into a hood.
To work you will need:
- Any yarn.
- Matching knitting needles. You can take knitting needles on a small fishing line (60 cm), or a set of long double knitting needles.
Description of work:
- You need to choose a suitable pattern. For such snoods, various elastic options or patterns with vertical arans and braids are best suited. This pattern tightens the fabric a little and provides a more secure fit in the neck area.
- Cast on the required number of loops, close the knitting into a ring and knit according to the chosen pattern.
- Knit the desired height. If you plan to use this snood as a hood, you can make a hollow elastic band along the edge to insert a lace there. Or just close the loops.
Knitting a snood scarf on your hands without knitting needles in 30 minutes
This snood scarf or cowl scarf can be knitted without knitting needles in just 30 minutes.
You will need:
For a figure-eight scarf - 4 skeins of very bulky yarn (1 skein - 100 grams/40 meters or 150 grams/100 meters)
- Measure 4 equal pieces of yarn with a total length of about 3 meters.
- First, make a loop and thread it around your wrist.
- Now make at least 12 loops on the right hand.
- Remember that you make loops from the tail of the yarn so that the working thread is wrapped around your thumb.
- Second row: Holding the working yarn on your right hand, slip the first stitch from your hand. Pass the resulting loop through your left hand. Continue with the remaining stitches, creating the next row in the same way.
- To finish the scarf, you need to close the loops. To do this, work with the first and second loop, threading the second through the first. Continue with the next loops, passing the previous one over the next one.
- Finish with all the loops and tie a knot at the end.
- When you have finished casting off all the stitches, pass the remaining yarn through the last stitch and tie a strong knot. Leave about 70cm of yarn at the end.
- To make a figure-eight scarf, fold it right side up and bring both ends together.
- Take the long end of the thread and pass it between the loops on both sides (as shown in the video).
- Tuck the remaining ends inside the scarf. Finish by tying the knots and cutting off the excess.
Children's snood for a child knitted
A knitted scarf-collar (patterns and descriptions can be found on the Internet) for children is an excellent alternative to regular scarves. It is easier and more interesting for a child to pull on such an unusual piece of clothing instead of getting tangled in an ordinary scarf. The main thing is to choose the right model and yarn.
Snood for girls
Little fashionistas love to imitate their mothers. Therefore, two-turn snoods are perfect for them, as they not only look stylish, but also retain heat well.
To work you will need:
- High quality children's yarn. It is better to choose those tested on the packaging. Such threads undergo strict quality control and are safe even for the smallest children.
- You also need to choose suitable knitting needles. Due to the fact that the fabric is smaller than for an adult snood, it is quite possible to get by with a pair of long knitting needles (about 35 cm).
Description of work:
- It is very important to choose the right pattern. It must be remembered that large and voluminous patterns of braids, which look good on adult women, will look funny and inappropriate on a little girl.
- However, some braid patterns can be made smaller by making the crisscross with fewer stitches. But this cannot be done with all patterns. Therefore, be sure to knit a test sample and see how the pattern will look. This pattern will also help you calculate the required number of stitches that you will need to cast on to start knitting.
- Cast on the required number of stitches and start knitting according to the pattern. For children under 3 years old, a 2-turn snood should be about 15 cm wide and 80 cm long. And from 3 to 10 years old, the width will be 20 cm and length up to 120 cm.
- Having knitted the fabric of the required size, you need to close the loops and close it into a ring. You can sew 2 edges with a needle or crochet.
Snood for a boy
Boys, unlike girls, do not like very voluminous things, so a snood pipe is an ideal option for young gentlemen.
To work you will need:
- High quality children's yarn. It is better to choose brands that contain less than 50% wool so that the product is not scratchy.
- Knitting needles must be selected according to the thickness of the yarn. For a tighter knitting, you can take knitting needles 0.5 - 1.0 size smaller. You can get by with stocking needles of sufficient length.
Description of work:
- Choose a suitable pattern. It is better to give preference to one of the types of elastic, either garter stitch or pearl pattern. For older boys, geometric patterns made from alternating knit and purl stitches will look interesting.
- Cast on the required number of loops. You can calculate it using a sample that needs to be knitted in advance. For children under 3 years old, such a snood tube usually has dimensions of 50x30 cm. And for ages from 3 to 10 years - 60x45 cm.
- Tie the snood to the required height and close the loops. If an elastic band was chosen as the pattern, then it is better to close the loops with a needle or in another way that will preserve elasticity.
Snood is very versatile. This is an accessory that, in skillful hands, will allow you to create dozens of looks. There are a huge number of patterns and descriptions for scarf-collars knitted with knitting needles, but a special twist can be given to this item of clothing if you use additional decor in the form of large buttons, leather tags, brooches and fasteners.
Article design: Natalie Podolskaya