Patterns describing crocheting summer berets
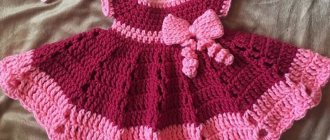
An attractive and flirty hat - a beret will not only protect your head from the sun's rays, but will also add style and charm to your look. This model is suitable for the summer for both a young girl and an older lady.
Prepare 1 skein of Lily cotton yarn (100% cotton, 125m/50g), hook number 2.
Start knitting from the top of the beret. Follow the steps in diagram 1, then continue with diagram 2 until the desired height of the product. For the required stiffness and fit, finish with 3 rows of single crochets.
If you want a more voluminous take, then when performing cx. 1, make 2 more circular rows.
Source: Beach Fashion magazine Knitting is fashionable and simple.
Scheme and description of work
First you need to select a pattern and pattern, and then based on this you can crochet a beret. An example of making a simple classic product: to begin with, 7 air loops are collected, closing into a ring. In the next row, 2 double crochets are knitted into each loop.
After this, start knitting the fabric pattern:
- One more row is knitted according to the same principle, and in the next row, after every 2nd column, 1 loop is knitted.
- 1 row is knitted with single crochets, with an increase of 2 air loops, and fluffy stitches. They are formed from 7 unfinished elements with a double crochet, knitted under a common top from one base loop. The extreme “bumps” are knitted from 4 air loops, attached to 6 unfinished double crochets, made under a common top from one main loop.
- In the next level you need to knit 3 arch loops and a single crochet stitch. Then 4 chain stitches are created, and a stitch without extra charge is knitted into the middle of the arch of the previous row. Next, a level of double crochets is knitted into each loop of the previous one.
This pattern is repeated throughout the entire expansion of the product. After this, you need to start reducing the canvas.
This is done starting from the 18th row. It is knitted according to the 13th stitch principle, but the combination is as follows: 2 double crochets, a loop, 2 double crochets are knitted through the 5th stitch with an increase in the previous tier. The next 3 rows are created according to the same pattern as levels 19–21.
Next, in each arch of 4 loops, 2 double crochets are knitted, a loop is added in the 23rd row, and 2 stitches are threaded through the 4th stitch with an increase from the previous tier. Rows 24 and 25 are formed on the basis of 14 and 15. In level 26, instead of 4 loops, 3 are knitted. Level 27 involves knitting into arches of 3 air loops in turn: 1 double crochet once and 2 double crochets twice.
How to knit an openwork beret
To knit an openwork multi-colored beret, prepare 1 ball of melange yarn (or sectional dyeing) with characteristics of 315 meters / 100 grams, a little turquoise thread for finishing and hook number 2.
Knitting description:
- Cast on a chain of 10 chain stitches and combine into a circle. From the center, work 21 double crochets.
- Work according to the diagram.
- Next, knit a single stitch, at the same time evenly decrease in each circle (5 sts, 7 sts, 10 sts) to the desired size.
- Finish the beret with three to five rows without decreases.
- Tie 1 row along the edge with turquoise color. Art. b/n with pico.
Crocheting a beret - step by step for beginners
The first beret is difficult to knit openwork, but dense, warm and elegant - certainly. Leave some more thread for a scarf, mitts, and mittens to complete your look. When you get a warm beret, you should take on the openwork version.
Classic beret
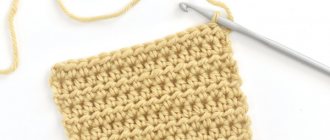
Crochet hats are usually crocheted from the top of the head. You need to pick up two or three loops, close them in a circle and knit in a spiral. In each loop, five single crochets are knitted. The new row is knitted like this: in each loop, after 1 - 2 single crochets. It all depends on the threads: sometimes you start to get something like a shuttlecock. Then the number of columns needs to be reduced. Does the knit tighten? Enlarge! You need to get an even circle. Keep it even as you knit and add 6 to 8 stitches on each row. Continue knitting several rows without increments. Then start rows with decreases of 6–8 stitches. You need to try on the beret to understand when to stop decreasing. Having reached the desired parameter, knit the band in simple rows without decreasing.
Simple openwork beret
The simplest beret is a summer version of the mesh type. You can knit it like a cobweb consisting of chains. Knitting begins from the middle: a chain of air loops is knitted. We make three to five loops and close the circle. Next, from each loop, knit several stitches, between which make an air loop. In the next row, knit a chain - seven loops, attaching to the resulting circle through three loops. A row is knitted with such chains, after which you need to knit chains of greater length, say, from eleven chain stitches, attached with a single crochet to the middle of the chains of the previous row. This is how the circle should be connected. After this, we do not increase the chains, but knit them to the same length.
Simple openwork beret
Simple openwork beret scheme 2
Summer beret
If you are good at crocheting, then it will not be difficult for you to find beautiful openwork patterns for knitting a beret. For example, a fan pattern. For beginners, you can take a simpler scheme. Cast on 5 chain stitches, from them we knit 2 chain stitches for lifting, and then alternate 3 chain loops and a double crochet from the base of the row - five times. The series closes. The next row again begins with two lifting loops and consists of repetitions of three chain loops and two double crochets. You need to do 11 repetitions, after which – 2 air loops. The third row is done in the same way, only 1 single crochet is performed. Next, the beret is knitted in the same way, only you need to add a column in each of the forming petals. Try on the job. When you realize that there is no need to increase the size, knit the petals straight and try them on again. Then you need to knit 7 rows in each petal with decreasing stitches. The bottom edge of the beret is knitted from two rows of single crochets.
Summer beret
Summer beret scheme 2
A simple summer model for beginners
Despite the fact that the beret is knitted with simple mesh knitting, it looks elegant and feminine. Even a novice craftswoman can knit a hat. You will need 60 grams of Lira yarn (60% cotton, 40% acrylic, 150m/50g). Start with a chain of 10 chains. etc., close them in a ring. Carry out the columns according to the first scheme, not forgetting about the increases. Then continue according to the second pattern to the desired depth of the beret. Finish with two rows of double stitch.
How to knit a warm beret for the winter
It is better to knit warm berets for winter from down threads. This will give them a stunning look and make them as warm as a fur hat. In addition, when knitting a beret, not a single animal will be harmed, since the yarn is made from sheared wool from goats or sheep of specially bred breeds. This type of wool is found under the name “Angorka” (more often referred to as goat wool) or “Mohair” (this name refers to sheep or even camel wool, which does not exclude its advantages). You can knit a beret from wool both by knitting and crocheting. A seamless product comes out either by crocheting or using circular knitting needles.
Winter beret “Snowball”: diagram and description
1.)
Make 1 loop.
2.)
We knit 12 single crochets from it.
3.)
Next, we knit 2 tbsp from each loop. without a crochet - you get 24 in total.
4.)
Again 24 stitches - one from the loop. We get a “snail”.
5.)
We begin to knit this row differently: 1 tbsp. single crochet from the loop, from the next one - 2 similar stitches, 1 chain stitch and so on until the end of the row.
6.)
1 single crochet - from 2 loops, 2 tbsp. single crochet - from 1 loop, chain stitch - and continue until the end of the row.
7.)
Next, make single crochets from each loop 3 times, 2 tbsp. – knit from 1 loop, knit a chain loop and continue until the end of the row. At first, the work will turn into a flounce, but do not worry, because the tails are included in the style of this beret. In addition, after this row you have to make decreases through the row. As a result, the resulting wedges will begin to wrap.
8.)
So, we knit 2 single crochet stitches together, knit 1 stitch twice from a loop, and from the next stitch – 2 stitches, a chain loop and continue until the end of this row.
9.)
1 tbsp. Single crochet is performed 4 times, then 2 of the same stitches and an air loop. We do this until the row is completed.
10.)
We knit 2 single crochets together, perform 1 such stitch three times, then 2 single crochets and a chain stitch until the row is completed.
Reductions are made until the work reaches the desired diameter.
The last two rows must be knitted with columns in each loop. The third row is special: you need to put an elastic band and tie it.
Voluminous beret-hat
Today, berets and hats with braids are gaining popularity. Sometimes even an ordinary felt beret is found with braid-type clips. Such patterns are very good to make on knitting needles using a special pin. If it is not in your toolkit, then you should use a regular hairpin, an additional knitting needle or any other wire product that has a smooth surface from which the loops will not come off. Such a device allows you to overlap loops, which allows you to get the structure of a rope or braid.
If you only have a crochet hook in your arsenal, you should be smarter and make your work profitable using yarn. Learn to crochet with bouclé yarn. Even if you perform the beret using ordinary single crochets, the knitting will not look smooth precisely due to the special texture of the thread. In addition, the beret hat will be warm. You should initially make a pattern for the beret so that you can check your work against it. But if you knit without a pattern, then you need to make an even circle of at least 30 cm in diameter, and then think about decreasing. A simple fitting will show when to stop making them. Don’t forget to tie a band: it will allow the beret to fit well to your head and not stretch from wear. When the product has stretched, it is worth saving the work by knitting a row on the band, where to pass the elastic.
Cotton beret
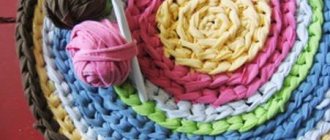
Cotton yarn is great for a beret for the summer. The next elongated model is knitted with the simplest knitting. But despite this, any girl will look stylish and fashionable in it in the summer.
You will need 50 gr. purple and 10 gr. beige yarn Violet (100% natural mercerized cotton, 282 metres/50 g) and hook number 1.5.
Crochet pattern step by step:
- Use purple to make a chain of 210 chains. p. plus 2 p. for lifting. First 3 p. knit as follows: 1 r.: column b/n; 2 rubles: *column s/n, air stitch* 3 rubles: column b/n.
- Next, skip 36 stitches for the tie and repeat the pattern for the beret from the 1st row. But at the end of the 4th p.m. do not knit 36 stitches for tying.
- From the 6th p.m. Continue knitting in circular rows. At the same time, at 8 p.m. add 1 rapport, and in the 9th - 2 rapports.
- 11 rub. do it in beige.
- Then 2 times: (6 r. violet color, 1 r. beige color).
- Next, knit 6 r. violet color, and in the 6th r. reduce by 1 air.p. in all rapports.
- Then knit an openwork beret, gradually decreasing to 6 sts, bring them together and secure.
Basics of knitting
A beret is a soft, flat-shaped headdress that does not have a visor. It was originally used as an element of military uniform, but very quickly became popular among civilians.
The most popular is the crocheted beret, which is made from different yarns according to the time of year. It's not too difficult to make, you can do it yourself. This allows you to create an individual design that emphasizes sophistication and adds uniqueness to the overall look.
This type of headdress is practical and durable.
Crocheting is a type of needlework that can be learned at any age. Before you start creating a voluminous crochet beret, you need to learn how to cast on a row of air loops that serves as the base. The first step is to become familiar with the technical skills and knowledge of how to crochet. You should practice knitting double crochets , half-stitches and double crochets. If there is a diagram and description for beginners, crocheting a beret is not as difficult as it seems at first.
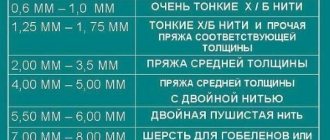
The yarn is selected in accordance with the number of the crochet hook: the thread is taken 2 times thicker than the tool. This is done to overcome excessive looseness or density of the knitted fabric. The larger the hook, the larger the pattern and the more voluminous the beret.
The most suitable and easiest to start with is the classic beret. To knit a beret for the winter, threads made of wool, down, and mohair are used; summer options are made mainly from cotton - it is quite breathable.
Autumn and spring options should include protection from the wind.
After the yarn and hook have been selected, the knitting density is calculated. To do this, measure the volume of the head in centimeters. Next, a pattern is knitted, which will be the basis of a woman’s headdress, with parameters of at least 10 x 10 cm. The resulting square must be washed and dried in order to prepare for shrinkage or slight stretching of the model.
Cotton Lace Wonder
To crochet this beautiful openwork beret, prepare 100 g of CoCo yarn (240m/50g).
Hook No. 2. Using patterns 1 to 4, knit a sufficient number of individual particles, arrange them either in artistic disorder or in a circle and fill the empty space with a mesh of air. The pattern for the beret band is single crochets. Finish with a picot.
Summer openwork beret crocheted from iris for women
This summer beach beret for women is knitted from floral motifs using iris threads.
A bright, showy, defiant look is what you need on a summer evening at sea. The accessory will never go out of fashion and every new holiday season will look like a new super fashionable model. For the beret, take threads with parameters 240m/50g and hook No. 2. For the pattern for a women's beret, see the diagram below. Connect the motifs when knitting the last row of the motif. At the end, knit the headband table.b/n.