In Russia, crochet began to develop at the end of the 20th century. Craftswomen and fashionistas began to decorate their homes and clothes with openwork items. A knitted napkin became the first stage in the development of needlework by beginning knitters. Over time, the product took root in household use as an interior decoration and a symbol of comfort.
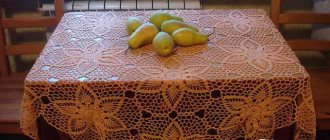
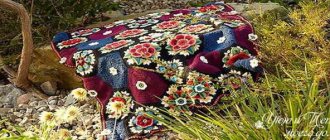
Knitted napkins come in a variety of shapes and patterns, colors and textures. You can decorate a chest of drawers, a shelf, or a coffee table with handmade lace.
Crochet patterns for napkins are simple and straightforward, usually presented with detailed descriptions.
Choosing threads and a hook for knitting napkins
Cotton threads are the main material for knitting napkins. Why cotton and not wool or acrylic? They are elastic, and it is this quality of thread that is necessary for knitting napkins. Things knitted with such threads are not deformed, which is important for the final shape of the napkins. Any colour. It’s better to start with white; all your actions are clearly visible on it, especially knitting mistakes. You also need to choose the thickness of the thread; napkins made of thick threads do not look openwork and airy. When buying threads in a store, read the packaging; the thickness of the thread is characterized by a number. For your first experience of knitting napkins, use darning number 10. During the knitting process, it will not give you any surprises.
All hooks and knitting needles have a number. For thread number 10, the best hook is number 1.5 or 2. The number indicates the diameter of the hook, measured in mm. Hooks are made of metal and plastic. To knit napkins, choose a metal hook. You have chosen the threads and hook, now you can start studying the terminology of crochet.
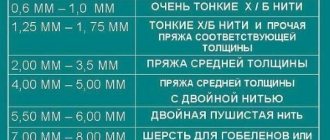
What threads are best to knit napkins from?
To better understand which threads for knitting napkins are thinner and which are thicker, I compiled a table of meterage per 50 grams.
As we can see from this list, the thinnest threads are lace and snowflake; they are comparable to bobbin threads for sewing. And the best thing would be to knit napkins from them.
But I understand that not everyone can do this.
The most popular and acceptable threads for crochet napkins are highlighted in green. Moreover, among them, according to reviews from needlewomen, many people like Pelican the most.
The other types are too thick and not suitable for napkins, in my opinion.
Most of the types on this list have mercerized cotton, a special treatment that makes the thread more durable and shiny like silk. These are the ones you should choose for knitting.
And one more thing: if classic, openwork napkins are better knitted from thin threads (snowflake, iris, rose, pelican, aster, dandy), then voluminous napkins with relief elements with thick threads turn out better, the pattern in them is more clearly visible, this is a lily , Anna 16, openwork pekhorka.
Hook for knitting napkins
On the sign I wrote down the number that I think suits best. But many needlewomen use a hook with number 2.
It all depends on your preferences and knitting density. It’s not for nothing that the numbers are written with a dash.
It is important to choose a hook that will be more convenient for you to knit and that the knitting is not too loose and not too tight.
What thread do you use to knit napkins? Share with us in the comments.
Sincerely, author of the blog “The Comfort and Warmth of My Home” Olga Smirnova
Needlewomen who are in one way or another connected with knitting unanimously repeat that crocheting is a little easier than knitting. Any yarn or thread is suitable for crocheting, but crocheting is faster.
First you need to purchase a hook (it is better to buy one with a flattened part at the base of the hook so that your middle finger does not get tired). Also, its thickness depends on the thickness of the thread, and, consequently, the type of product that you will knit. Yarn can be natural, plant-based, artificial and synthetic.
Natural yarn is made from animal wool (sheep, camels, llama alpaca). Cashmere threads are made from the hair of high mountain cashmere goats. The cost of such threads and products made from them is very high.
Basic crochet techniques
- Air loops are the main knitting technique that is used to create openwork patterns. Knitted by crocheting the working thread through a loop.
- Connecting loops are those that connect the pattern into a circle.
- The lifting loop is used when knitting in stitches around the ring and for moving to the next round.
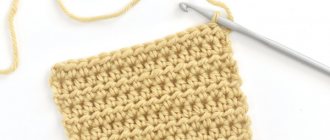
- Single crochets are the basic or main element of crochet. Once you learn how to knit a basic stitch, you will be able to knit all other stitches. They are all derivatives of the base column.
- Double crochets. They give the products airiness. There are stitches with one crochet, two or even three.
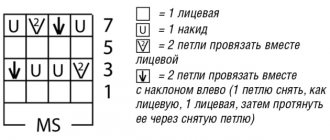
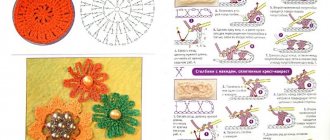
How to read diagrams correctly
When learning to knit, it is the patterns that will help you do everything correctly from the very beginning. Moreover, they are also used by experienced craftswomen. There are several basic rules when reading diagrams:
- They must be studied from bottom to top and from the center in a circle.
- Front or odd rows are read from right to left.
- Purl or even lines look from left to right.
- The circular series is studied counterclockwise.
Rapport is that part of the pattern that repeats; on the diagram or in the description it looks like this: “*...*”. Each knitting begins and ends with loops. A rapport can be located between them, which is repeated the required number of times.
Some of the symbols on the diagrams can be confusing. However, everything is simple here too, if you remember the basic signs:
- the air loop is designated by the abbreviation - VP;
- single crochet - sc or sc;
- double crochet - double crochet;
- half-loop – PP;
- half column - PS.
- С2Н, С3Н, С4Н are columns with two, three and four crochets, respectively.
It’s not so difficult to learn how to crochet tablecloths and napkins. In this case, the result may be unexpectedly pleasant. The house will always be cozy with warmth, and friends will certainly rejoice at the gift from the bottom of their hearts.
Crochet napkins: simple patterns for beginners
The ability to read patterns is also an important element of any knitting. Pattern repeat is the basic element of the ornament. Rapport is a repeating part of a pattern. It is essential for reading schematics and making them easy to use. When starting to work on a circuit, carefully read the symbols; they often differ among different circuit developers.
A few simple crocheting patterns for napkins for beginners:
Simple napkin patterns for beginners with detailed descriptions
Are your knitting needles, threads and good mood ready? Then we begin to look at examples. To understand the logic, I suggest considering both a square and a circle.
Square napkin
The scheme is called "Bell". The result should be a delicate napkin approximately 26 cm in diameter. The description is so simple that a beginner can handle it!
- Cast on 12 stitches and distribute onto 4 double needles, joining into a ring.
- Knit rapport 4 times as indicated in the diagram.
- All yarn overs are knitted with knit stitches.
- From rows 66 to 77, please note that all loops are knitted only in the front way.
- In the 71st row we should have 36 repeats on the knitting needles.
- After the 78th row, close the loops with a crochet hook.
- The last openwork row is columns with 12 air loops between them.
Round napkin
It is designed for a large size. The result is approximately 50-55 cm, depending on the yarn and knitting density.
- Cast on 8 stitches, distribute onto 4 knitting needles, 2 each.
- The first two rows are considered zero and are knitted.
- Further according to the scheme. On our knitting needles, rapport should be repeated twice on each.
- All even rows are knitted!
- From row 27 you can switch to circular knitting needles.
- In the 31st row, 6 are made from one loop.
- At 43 - from one to 3.
- From the 47th row, where the red line runs, this fragment is repeated three times.
- On the 55th row, the loops are closed with a crochet hook. Tying - first a single crochet row. Then a row with a connecting column.
Ready! All that remains is to carefully wash, starch, lay out and dry.
How to crochet a napkin for beginners
Knit a sample. Knitting any napkin begins from the center, by closing a certain number of air loops into a ring. Start by knitting a small round pattern. Usually, for napkins, an even number of air loops are closed into a ring, for example, 6. They are closed with a connecting loop. Start the next round with a lifting loop and knit single crochets. There should be 11 of them, and together with the connecting loop - 12. It is important to know that each new circle begins with a lifting loop, and each circle ends with a connecting loop. Knit the next round with chain stitches and double crochets. It is not necessary to count the loops and stitches, this is just a sample necessary for you to feel the thread and hook. You have linked the pattern. You can start working on the napkin. To get started, choose a round napkin with a simple pattern and a diameter of about 20 cm, or watch a master class on knitting a simple napkin for beginners. Take our recommendations into account and start creating a masterpiece. You will succeed.
Stages of execution and patterns of knitting napkins
For the first handicraft lessons, napkins with simple loops and patterns will be most suitable. Standard patterns will help you master the technique of crocheting napkins.
"Snowflake"
Small in size and easy to make, “Snowflake” is the best project for a beginning knitter. The execution scheme is simple and clear. Yarn consumption is minimal.
- Knit a chain of twelve chain stitches. Connect it in a circle with a single column.
- Knit the first row with double crochets, as in the diagram. Connect the beginning and end with an air loop.
- Tie three in. p., then four tbsp. with two yarn overs in the loops of the bottom row. Repeat the combination until the end.
- The next circle repeats the previous one, with the number of double crochets in the pattern increasing by two, and the number of chain loops by one.
- In the fourth row the quantity is in. p. increase to five, and st. from 2 n. until eight.
- In the next row, nine chain stitches alternate with ten stitches. from 2 n.
- In the sixth row the quantity is in. p. – eleven, art. from 2 n. – four (between them there is a distance of two stitches from the previous level).
- The seventh row starts from the 5th century. st. Stolbikov - 15, they are knitted through the air loops of the previous row. The pattern is repeated around the ring.
- In the eighth row, six stitches are knitted. p. and one tbsp. from 2 n. + pico of four c. p. Next, knit a stitch with 2 n. after 2 tbsp. lower level and further according to the scheme.
A small and elegant “Snowflake” will not only help decorate a table or curtain, but can also serve as a stand for a glass, vase or decanter. From interconnected “Snowflakes” you can make a beautiful tablecloth or bedspread.
If you need a beautiful lamp shade in your home, you can knit several of these accessories and connect them on top of an inflated balloon. Next, coat the resulting canvas with PVA glue and, after waiting for it to dry, burst the ball inside the craft. The knitted lampshade frozen in a round shape is ready!
"Chrysanthemum"
Beautiful snow-white lace, 48 cm in diameter, is knitted from cotton thread size 325 m / 50 g, crochet number 1 - 1.25.
- Cast on 8 air loops and connect them with 1 tbsp. s/n in the ring.
- In the first row, dial 3 v. p. and knit 31 stitches s/n in the cast-on circle. Finish the row by connecting the last s/n stitch with the third st. n. beginning.
- Next, knit according to the pattern, starting each level with an air loop, ending with a connecting post.
“Chrysanthemum” will look beautiful on a round coffee table or on the kitchen table on top of a tablecloth.
"Sun"
Stylish large canvas with correct proportions and a simple pattern. The diameter of the finished work is 46 cm. For the work you will need 50 g of cotton yarn size 325 m / 50 g and hook No. 1 - 1.25.
- Knit 7 chain stitches, close the edges with a ring using one connecting post.
- Start row from 3rd century. p., then dial 23 columns s/n, finish with a connecting column in 3 in. n. beginning.
- Continue knitting the pattern in circles according to the pattern, starting each level with chain stitches and ending with a connecting stitch.
The pattern is repeated in the indicated fragments in the instructions in a circle.
It is better to wash the accessory by hand in warm water with baby soap or gentle detergent. Fruit or wine stains can be removed with regular boiling water. Grease stains can be removed by soaking in dishwashing detergent.
It is not recommended to twist the canvas. Excess water is carefully squeezed out, after which the openwork product is laid out on the table. Iron it with a hot iron from the center to the edges.
You can starch a napkin with a special spray before ironing or immediately after washing by dipping it in a starch solution for a few minutes.
With such care, a neat accessory will serve as a decoration in the house and delight the owner for many years.
Today, many shops are open for craftswomen, delighting with a huge assortment of tools and threads for knitting of various qualities and shades. The instructions needed for the job are available not only in magazines for knitters, but also on the Internet, where you can gain knowledge, master a new technique, or share your experience with other knitters.
How to give an even shape to a crocheted napkin
When the product is ready, it must be given an even and neat shape. It is necessary to moisten the napkin in warm water and steam it properly with an iron. This method is suitable for small items knitted from cotton threads. For larger napkins and with different floral inserts, you need to take starch and dissolve it in hot water. Bring to a jelly-like state, and immediately immerse the product there for 25-30 minutes. Then the napkin must be straightened with your hands, smoothed with a lukewarm iron, and laid out on a flat and hard surface to dry completely. After this treatment, the napkins become not only smooth, but also durable. If the napkin has a complex edge, for example, in the form of elongated leaves or zigzags, then after treating with starch, each protruding edge should be secured with a safety pin to a thick blanket or other dense fabric.
During this action, you need to try to maintain the symmetry of each element so that the napkin pattern turns out the same and even. Once the pins are removed, the product will be in perfect shape. Napkins have to be washed from time to time because of the dust and dirt that settles on them. In this case, you need to put the product in a warm soapy solution, then squeeze it lightly and repeat the same steps with starch again. If there are beads and beads on the napkins, then the iron cannot be used. Pin the product onto a hard surface, covering it on top with damp gauze and a harder cloth, such as a terry towel.
Beautiful, smooth and neat napkins are not only home decoration, but also the pride of any needlewoman. Such decorative decorations look very stylish both in modern apartments and country houses, delighting with their exquisite delicacy and beauty.
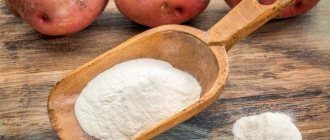
How to starch napkins
Napkins are starched so that they keep their shape well.
You will need:
- an incomplete glass of water;
- starch packaging;
- spoon;
- saucepan with 1 liter of water.
Preparation.
- Pour 3 tablespoons of starch into cold water.
- Mix everything well.
- Pour the resulting mixture into boiling water. Mix.
- The liquid becomes thick.
- Turn off the stove and wait until it cools down.
Process:
- Dip a napkin into the starched solution and distribute it evenly.
- Squeeze.
- Place on a flat, firm surface, straightening out all the corners.
- Leave until completely dry (approximately 8 hours).
- Carefully remove from the surface.