- 91790
- 13-10-2020
- Author: Mysekret Team
- 1
Knitted flowers have become very popular. We crochet flowers, then decorate clothes, hats, and use them as keychains for a phone or backpack. Very beautiful bouquets can be created as a gift: flowers as decoration will please any girl or woman!
In the photo below you will find many options for using this accessory. But, besides this, a simple tutorial (you can watch the video on YouTube for free) will help you figure out how to knit correctly, a detailed lesson with a description and useful, understandable patterns will be just the thing for beginners! So let's get started!
Knitted flowers: application
It seems to many that the time of crocheting is a thing of the past and only grandmothers do it. As you can see in the photo of crocheted flowers, this is more than a modern decoration.
Options for using crocheted flowers for decoration:
- Decoration of hats, caps and panama hats
- Use in necklace, bracelets or earrings
- Decor for handbags
- Bookmarks
- Napkin clips
- For decorating clothes
- Decor of sofa pillows
- Decor for refrigerator magnets
- Scented brooches or pendants
- Greeting card decor
- Wall mirror decoration
- As a phone ring holder
There may be even more use cases. The most important thing is that these flowers are knitted by hands and carry the warmth and love of the author.
Site blog “Crochet patterns - detailed description of patterns, crochet lessons”
Crocheted curtains for kitchen windows are an excellent solution for amateur designers who value comfort, comfort and hand-made exclusivity.
The openwork decoration of the window openings preserves the fullness of natural light, creating an extraordinary atmosphere in which even the glossy panels of furniture facades lose their severity and become homely warm.
If you have crocheting skills, you can make wonderful airy curtains, and in the future, a unique designer set of tablecloths, napkins and chair covers.
Content
The idea of decorating your home interior with knitted items is as old as time, but that is where its value lies. From century to century, ladies, using simple equipment, wove products of breathtaking beauty. The results of hand knitting can still be found in village huts: unique patterns decorate bed hangers, pillow covers, tablecloths, and towels.
Laconic white and blue knitted curtain for the garden
Not all village huts were divided into rooms, because the living space was located around a Russian stove installed in the center, and the kitchen, bedroom or dining area areas were conventional.
Thanks to this, there were no special rules for the design of crocheted curtains for the bedroom or kitchen curtains - all devices were made in the same style.
It becomes clear why even tiny, moderate items were distinguished by a unique design and were made with unusual craftsmanship.
Small white curtain with crocheted patterned inserts
A distinctive feature of patterned products is their small size. Large curtains lose their attractiveness, because the grace and uniqueness of the original patterns are buried in lush folds.
On the contrary, a neat rectangular half-window curtain is a kind of small but delightful work of art.
Subtle knitted patterns form a plot picture, and before us is no longer just a curtain - but a real hand-knitted masterpiece.
Openwork forest landscape
Modern crocheted items are virtually no different from those that decorated the homes of our great-grandmothers.
A huge number of varieties of threads have appeared, which have become more wear-resistant and stronger, but the knitting techniques have remained the same.
If you want to crochet curtains or curtains on your own using ready-made patterns, first you will have to understand the symbols and signs accompanying the drawings.
One of the advantages of needlework is that it does not require huge expenses, and the necessary tools and raw materials for the work can be easily and cheaply purchased in a special store. So, you will need a small set:
- a hook (or better yet, a set of tools of different sizes);
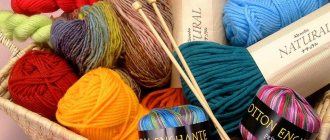
- threads;
- scheme.
The hook is the main and only tool that differs in size, which depends on the diameter of the head. You can choose a size from No. 0.5 to No. 8, but remember that its thickness should be approximately 2 times the thickness of the thread. The material of production - metal, wood, plastic - does not matter, we focus on ease of use.
A good set with hooks of various sizes
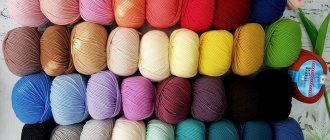
Cotton, linen, silk, wool, and synthetics are used to produce threads. For kitchen curtains, it is better to use natural material or threads with a small addition of synthetic fibers - the finished fabric will hold its shape perfectly and will last even longer. We select the number of skeins depending on the size of the curtain model, and the color according to our own taste.
Threads are sold in small skeins indicating the composition and thickness
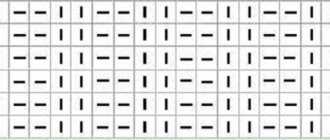
Detailed diagrams and descriptions of the process of crocheting curtains can be found in books, magazines, and on websites for needlewomen. Schemes are images of ornaments and patterns in the form of special icons and signs. Often only pieces of drawings are placed because they are repeated or alternated. You may come across the following conventions:
Table of symbols for beginners
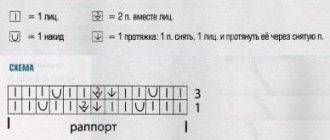
Advanced and experienced craftswomen use more complex patterns that allow them to create unusual, large or airy patterns. The number of characters increases with increasing difficulty of weaving:
A set of symbols for the most experienced needlewomen
There are usually several favorite techniques for knitting curtains (this is also important for knitting in general):
- Irish - a combination of artistic details placed on a grid;
- loin - alternating air loops and columns;
- Bruges - an imitation of the Vologda pattern, for weaving which requires bobbins;
- Brumstick (Peruvian) - knitting with an additional thick knitting needle.
You can learn to work in any technique, but it’s better to start with the most common one – fillet. To train a skill, it’s enough to use someone else’s thought, and in the future, once you’ve gotten your hands on it, it won’t be difficult to create your own models of knitted curtains and other decorative items.
Before creating curtains for the kitchen, it is better to practice on the smallest items, for example, napkins. Try using different sized tools and threads to see the difference in results.
Having knitted a napkin from a certain material, identify it and wash it - this way you can find out how much shrinkage the finished fabric gives and whether it sheds after washing.
We offer three options for crocheted curtains for the kitchen with diagrams and short descriptions.
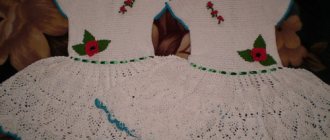
Beautiful light curtains are a combined solution of a linen base and openwork lace in the form of a wide border with floral motifs. The color of the lace and background can be changed, focusing on the design of the surrounding interior. For example, for a bright room with dark furniture and white wallpaper, all-white knitted curtains are suitable.
Ready-made sample in yellow-blue tones
The dimensions of the parts knitted using the fillet lace technique are 13.5 cm x 80 cm. For two curtains you will need 4 parts - two inserts and two lower borders. The amount of yarn for the indicated sizes is 2 pcs. 100 g each (one skein is enough for 85 cm of border and 70 cm of insert), it is better to choose cotton threads in standard skeins of 387 m/50 g. Tool size - No. 1.
Diagrams A (bottom border) and B (inset) show the basic pattern. One cell corresponds to 3 loops: empty - 1 tbsp. s/n + 2 vp; filled - 3 tbsp. s/n. First we knit a border - 55 ch. and 3 v.p. rise, then insert - 79 v.p. and 3 v.p. rise. The number of rapports is free; you need to finish in a mirror image.
To ensure that the fabric remains even after washing, make sure that the thread composition of the fabric and lace matches. After finishing work, stretch the finished elements, cover with a damp cloth and let dry.
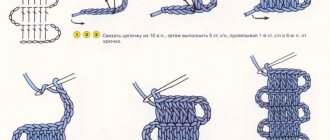
Pico is an airy element that is often used to decorate the edge of lace with floral or ethnic motifs. Fillet knitting with picot looks light and delicate, allowing you to give knitted items more grace and fragility. The presented fragment can be used as a detail to decorate a linen curtain or as a separate accessory - a knitted lambrequin for a kitchen window.
Knitting materials
For production, you can choose any yarn from simple cotton to exquisite cashmere. Cotton is suitable for bookmarks, summer brooches or postcard decor. Viscose or silk are also suitable for these purposes.
These materials will look spectacular on napkin rings or as jewelry. Thick woolen materials are suitable for winter jewelry, sofa cushions or refrigerator magnets.
The hook must be selected depending on the thickness of the yarn. It should be one and a half times thicker. For viscose or cotton yarn, hook number 2 is suitable, for woolen yarn - number 4-6.
How to crochet a flower: diagrams, explanation
Creating a crocheted flower is quite simple to do if you read the diagram correctly. In principle, it is based on simple combinations repeated one by one. And it always starts from a circle of air loops. But still, start small, don’t chase complex schemes - in the future this will help you achieve incredible results. It is also worth noting that such a creation does not take much time - on average, one flower takes about 10-15 minutes.
Important: You can knit from any thread - wool or alpaca, or maybe cotton or even linen. But still, for a flower, you should not take a thread that is too thick, like merino yarn. Angora and silk look very beautiful. Moreover, they can be combined with each other.
Basic crochet flower
Flower with 6 petals
- There are actually a lot of basic schemes. After all, the original number of v.p. will set the core, where you begin your knitting. And remember - the more there are, the wider the center hole will be. But it’s easier to just type columns on them.
- Now the columns themselves - it looks more beautiful if this is the initial ring of v.p. tie st. b/n. This way you can overlap that center circle. Moreover, their number should be 2-3 times greater than the number of vp itself. With this you already set the number of petals.
- Next comes their formation. To do this, do 3 vp for the first time. for lifting and 3-5 ch. to connect with the next column (depending on the pattern and width of the petal), then 1 tbsp. s/n and continue until completion.
- Then you knit the petals themselves. But there must be a smooth formation, therefore Art. b/n, semi-st. s/n and 3-5 tbsp. s/n. We offer you several options at once. So that you understand that the basis is based on one motive, just this number v.p. and art. affects the number and size of the petals and the core itself.
Schemes
But pay attention to the diagram when there is a larger set when creating petals. That is, the scheme that is taken as a basis does not change. But due to the large number of columns, the flower turned out to be more voluminous and wavy.
You can adjust the width of the petals
Another simple diagram, but a slightly different flower shape
Flower with pointed petals
Simplified crochet flower pattern
- If you need a large number of small flowers, then this quick method is exactly suitable for these purposes. After all, knitting one element takes about 5 minutes. The set according to the first example starts from 8 vp, and from the second - from 6.
- You also knit a ring from st. b/n. And then immediately make protrusions of the petals from Art. s/n. The second scheme, as you can see, is very simple - a rise and 3 columns.
- The first scheme will give more magnificent and dense leaves. But, although the diagram is shown without half-columns, it is still better to use them before lifting. That is, skip the first and last column in each petal by making a replacement. This will make for a smoother turn.
Note: As a little advice and a clear example, any flower in any pattern looks more beautiful with multi-colored threads.
Small flower according to a simplified scheme
Video: Simple crochet flower pattern
Ideas for inspiration
You can get ideas for inspiration anywhere. It could be a beautiful piece of jewelry, or an ordinary flower from a flowerbed or bouquet. You can crochet a shape of any complexity, which is why this type of knitting is so popular.
The most picturesque look are voluminous crocheted flowers, which are quite difficult to make, as they have complex patterns and require assembly and starching. Simple flat options can be done right away, having mastered the initial knitting techniques.
Note!
DIY fruit bouquets - TOP-200 photos with instructions for creating a bouquet of fruits with your own hands. Unconventional ideas with simple diagrams and work overviews
Paper lily - TOP 100 photos of the best product options. Master class with step-by-step diagrams and drawings for creating an origami lily with your own hands
- Crochet rose - diagrams and descriptions of how to crochet a rose with your own hands. Crochet technology + interesting craft ideas
To begin with, it is better to use diagrams and descriptions for beginners. This will help you master the principles of creating petals and inflorescences. For convenience, you can also watch a video on crocheting flowers. Later, relying on them, you can create your own masterpieces.
How to turn such a flower into a flower in a clearing?
It is enough to simply sew on a button of a suitable size so that the flower is fastened to it. Choose buttons on a stem with eyes, a nose and a mouth.
This way the flowers look more interesting and immediately become an educational toy. Fastening a flower onto a button develops fine motor skills of children's fingers.
Details about educational simple toys and how to knit them for beginners are described here.
The same flower can be knitted in the following variations:
Let's look at how to crochet a flower for beginners with a video, free of charge, so you can watch it again and again?
Basic designations
- VP is a regular air loop. From these loops, air chains are created, which are the basis of any product.
- The runway is a simple air lift loop. The main element thanks to which the canvas appears.
- RLS – single crochet or single crochet. Also the basis of any canvas.
- Dc - double crochet. More complex element. Allows you to get elongated rows with a beautiful pattern.
- C2H - double crochet stitch, a more complex element. Allows you to get a more elongated pattern or beautiful ruffles.
- PS – half-column. This element is used to connect parts, rows or seal knitting.
- PR – previous row.
- SS – connection column. It looks like a half-column. Performed as a connecting element.
Having mastered these basic loops, you can easily knit products of any complexity. The main thing here is perseverance.
3 row flower
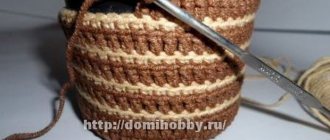
Prepare: scissors, threads of 2 colors, a hook according to the size of the threads, look at the photo to choose the right one.
- Let's get started and start with the first air loop, then knit another 6 VP (air loops). Close the ring with a connecting post, through 2 loops, the last one and pull the thread on the hook. The first row is ready.
- 1 ch for lifting, then knit 11 single crochets into a ring. At the same time, we lay the thread from the inside and make sure that it is not visible from the other side. If there is no space left in the ring, and not all the loops are knitted, move the knitting, making the knitting tighter and tie all the loops into the ring.
Having finished the last loop, cut off the thread, leaving a long end, thread the hook into the second loop of the row and grab the thread through it and pull it through, pick up the outer wall in the last loop and pull the thread through it.We form the same external loop. We hide the remaining part of the thread along the wrong side of the knitting, prying it under the loops and pulling it through. Cut off the remaining thread.
- Fold a thread of a different color in half, form a loop and pull it through 2 slices of the top loop, then knit 11 chain stitches.
We knit the connecting post into the next loop, connecting the chain and the base, we knit it in 2 segments, laying the tail of the thread inside from the outside, hiding it. Repeat with 12 petals.Having knitted it to the end, we knit the connecting post in the same way to the base and stretch the loop, cut the thread, leaving a tail so that it can be hidden. On the wrong side, we hide the thread, threading it through the loops.
A flower of 3 rows is ready.
Video on how to knit a flower from 3 rows for beginners, step by step:
Basic flower
The first step to creating compositions is knitting the basic elements. The main one is a simple basic flower of several petals. There are a lot of such patterns for crocheting flowers from yarn. But the principle here is the same: a circle to which the petals are attached.
Step-by-step instruction:
- Make a chain of 7-15 VPs. The diameter of the core, and therefore the size of the flower, depends on the number of VPs. 7 VP is suitable for a flower of 5 cm, and 15 is needed for a pattern of 10 cm.
- Close the chain with 1 PS. Tie 2 sc into each loop. This will create a dense core.
- Next, make 3 runways and start knitting the base of the petals. To do this, you need to make 3 VP and 1 DC through 1 PR loop. Then repeat the pattern in a circle.
- Next, it makes sense to take a different color of yarn. This will make the flower look more colorful.
- You need to make 1 runway and 1 sc, then 7 dc in the air loops of the PR. In the DC from the PR, on the contrary, make 1 RLS.
- After this, make 1 runway to move to the next row and make 1 sc in each loop. You can make the last row a different color - then the flower will have a beautiful frame. Also, for more magnificent petals, you can make another row, but it contains not 7 dc, but 9 dc.
Volumetric crochet flower
It is no less simple to perform and is knitted according to the same pattern as its simple version. The only thing is the number of layers. Thanks to them, you get a realistic flower. The main thing is to understand the sequence - in each next row the number of petal columns s/n increases by two each time, as does vp. during petal formation. And don't forget to always start and end the petal with half-columns.
Volumetric flower diagram
You can create a different number of tiers and decorate at your discretion
And here is another version of a cute flower in a voluminous motif.
Scheme
Video: Volumetric crochet flower with peaks
Crochet cactus
A knitted cactus will become a picturesque three-dimensional painting or still life. This is a wonderful craft that gives you the opportunity to train and feel your strength.
Step-by-step instruction:
Note!
- DIY edible bouquets - TOP 130 photos with instructions for creating a bouquet with your own hands. Creative ideas with simple diagrams and photos of finished works
- Craft primroses - simple instructions for creating crafts from scrap materials. Schemes of beautiful DIY products + photo reviews
Crafting tulips from paper - TOP-100 photos of interesting ideas for creating tulips from paper + simple instructions for beginners
- Make a chain of 10-30 VPs. The number of air loops determines the thickness of the cactus.
- Close the chain with 1 PS. Tie 2 sc into each loop. Then make 1 runway and repeat 3 rows.
- Make also one row of their dc. After this, 3 more rows from RLS.
- Knit the stocking in this way until it becomes a long, acceptable size.
- Using sc, complete the knitting, gradually reducing the number of stitches after 1-2 loops.
- Knit 2 more smaller stockings in the same way. Stuff the stockings with cotton wool, foam rubber or rags. Attach small baby stockings to the main cactus.
- Knit one basic flower from yarn of a different color and secure it to the top of the cactus. The product is ready.
Incredibly beautiful crochet flower with a twist
- Make a sliding loop. That is, you do not knit a vp, but simply connect the thread into a ring, wrapping it. Next 2 ch. for lifting and knit 10 tbsp. s/n. But now you pull the same columns into a closed ring by the edge of the thread. Alternatively, dial 10 vp. and immediately tie them up. s/n. Don't forget to connect the columns together.
- Now dial 15 ch. in each previous loop. Connect them with half-columns. You will end up with a very thick chamomile.
Extremely easy to implement
- Tie an air chain from v.p. ten columns b/n. In the middle of our petal, create a small hole for bending from 2 ch. and another 10 tbsp. b/n. Do this with each hole. Please note that the curl of the petals will already begin to form at this stage due to their number and density. Connect with a simple column.
- Knit all rows of 10 tbsp. s/n., already connect 3 vp, which you insert into the first column of the previous row. You tie each petal, connecting them with a connecting post. Please note that in the first petal you will first have 9 loops due to the fact that there will be a rise from 3 ch.
- So the beautiful flower with an unusual twist is ready! If you wish, you can tie it with a thinner thread of a different color. Or replace Art. s/n in simple columns b/n.
Incredible beauty
Video: Unusual crochet flower
Complex lily flowers
Although these are more complex elements, with skill they can be completed in 5 minutes. Flowers and crochet patterns for them can be simply memorized.
Step-by-step instruction:
- Make a chain of 8 VPs. A larger number is possible - the diameter of the core depends on it.
- Close the chain with 1 PS. Tie 2 dc into each loop and repeat this row, but sc.
- Next, make 3 runways and start knitting the holes of the petals. To do this, you need to make 8 VP and 1 Dc through 1 PR loop, then 2 RLS Then repeat the pattern in a circle.
- Next, tie 3 VP from the hole and a DC from the PR as many as 7 DC, then make 1 VP and again 7 DC, 2 more SC in the SC from the PR. Repeat the pattern in a circle. This will create the outline of the petals.
- Now you need to tie the petals next to each other using sc, and on the protruding edge of each petal make 3 dc, 1 ch and 3 dc.
- At the end you need to tie a row of 1 sc along the contour. On the protruding edge of the petals, make 3 dc, 1 dc and 3 dc.
Using this pattern, it is easy to master the principle of how to crochet flowers for beginners. This produces very elegant flowers with long petals. They look very elegant. Using this principle of creating petals, you can make larger, more voluminous flowers.
Large flowers can look like decor in the interior. To do this, they need to be starched and secured to floral wire.
Creating flowers
simple flower
This is the simplest option, suitable for beginners. Knitted according to the principle of the middle plus petals. The work uses alternating low and high columns from the edge to the middle, respectively. In this case, you can knit both in the arch and in the loop of the previous row.
Volumetric flower
To create more complex colors it is possible to use more than one layer. This creates a multi-tiered flower. To create it, you need to knit one or more rows of petals under the main pattern. Each next level should be increased in length or a combination of yarn colors should be used.
Flower with narrow petals
It does not start from the finished center, but around a chain of air loops, which only after finishing the work are connected into a circle. A petal is made up of air loops drawn up from the center, into each of which a connecting post is knitted in a downward direction. The number of loops and petals is unlimited. Afterwards you need to straighten the product like rays.
Flowers with ruffled petals
There is another way to make a flower, which gives an unusual result. For it you need to knit a simple ring, in which you add as many stitches as possible. This makes it fall like a large wave. This means that there are no individual petals in the flower, but only a circle that has curled up, creating this effect.
You can add more waviness. In the same way, after the first circle, one or more more are done. You need to connect them not by overlapping them one on top, but by folding them next to each other.
Crocheting flowers is a fascinating process, thanks to which you get a beautiful and unusual product. And every time the result is different. With more experience, more and more interesting and complex elements emerge. Combining yarn colors and adding beads and seed beads adds personality. A piece of jewelry or bouquet made with love can be a great gift. And most importantly, you don’t have to be a master of crocheting to cope with such a task.
Chamomile knitting pattern
Knitting a chamomile involves knitting the petals separately.
Step-by-step instruction:
Note!
- Mimosa craft: TOP-160 photos of simple and complex crafts. Master class for children and adults on making mimosa with your own hands
DIY napkin flowers - a detailed master class with simple diagrams. Non-standard solutions for creating flowers + photos of finished crafts
DIY paper flowers: a detailed master class with simple work patterns + photo examples for beginners with interesting color options
- Make a chain of 8 VPs. Create a core from it according to the previous schemes.
- Knit a row according to the pattern 3 CCH, 2 VP and so on.
- Tie the next row around the perimeter with 1 double stitch in each loop. Ignore CCH from PR.
- Knit 3 runways, then 2 C2H in 1 PR loop 3 times, then 3 runways and 2 PS, then repeat the pattern.
- Chamomile petals are ready. For variety, you can take yarn of different colors.
Knitted bouquet
Before starting work, you need to choose yarn of different colors, and you should try to make sure that the colors are combined with each other. For example, red and yellow, blue and orange, etc. In addition, in the process of creating the product, you will need wire.
First, you need to knit a vase for the future bouquet. Use a hook No. 0.9 and pick up yarn of the color in which you want to see the future “vessel”: five chain stitches in a circle C4C.
- First rapport: runway and 11 CCH, you need to cover the SS.
- Second rapport: Three runways and a CCH in one lifting loop, two CCHs ten times each. If all the steps are correct, you should get twelve SS times.
- Third and fourth rapports: three runways, two dc in the next dc and the previous repeat - and so on until the dc is completed.
- Fifth – sixteenth rapports: three runways, CCH in the CCH of the previous rapport, SS.
When the vase is finished, you can move on to the flowers themselves. In total, according to this pattern, you should get twelve buds. From the selected yarn you need to cast on six chain stitches in a SS circle. On the first rapport: six VPs, three unfinished C2NS, which we knit into one ring, five VPs four times.
Now the core of the twelve buds should be made of a different color. On the first repeat: runway, ten sc, leave 20 cm of thread and trim the rest.
The stems for the flowers should be made as follows: wrap the wire with yarn and coat it with PVA glue. You need to attach leaves to the top of the stems.
Sheets for stems: twelve VP, on the first repeat, sc, nine sc in the next nine chain stitches, two VP, eight sc, in the next eight chain stitches. Second rapport: runway, seven sc in the next seven sc in the previous rapport, two sc in the arch, two VP, two sc in the arch, eight sc. Repeat the execution according to the scheme with direct and reverse rapports.
The last step is the final assembly of the product. It is necessary to carefully assemble all the elements. To prevent the vase from losing its shape, it is recommended to use plastic molds as a frame.
How to knit leaves
As expected, green leaves also accompany the flowers. They make compositions more beautiful and picturesque. To knit leaves you need to take green yarn.
Step-by-step instruction:
- Make a chain of 15 VPs. You can take more VPs - the length of the leaf will depend on their number.
- Knit a row of sc.
- Next, knit 4 sc and then dc, the last 4 stitches should also be single crochet.
- The next row is 6 sc, then dc and the last 6 sc.
- Repeat the same on the other side of the leaf.
- If the leaves are larger, then you need to add the number of rows according to the same principle.
Assembling compositions
After the flowers are created, they need to be collected into a single composition. You can use different methods for this:
- Crochet the flowers with the same yarn using half-columns. Such a connection will be the most natural and unnoticeable.
- Sew flowers with sewing threads or the same yarn. It is better to choose yarn, since such a connection will be the most invisible.
- Connect the flowers using wire. You can use regular steel yarn, wrapping it with yarn, or you can take a special floral yarn.
Fastening compositions
The finished product must be secured to clothing or an interior item. If the flowers are supposed to become a table decoration, then it makes sense to starch them or install them on wire. The wire will act as stems.
You can attach flowers to any smooth surface: a mirror, a refrigerator magnet, a photo frame using double-sided tape.
You can simply sew a flower onto your clothes. A large safety pin will look impressive, especially if it is decorated with beads or rhinestones.
If you use crocheted flowers to decorate your phone, you can use any thick viscose thread and use it to secure the flower to your phone. You can also sew it to a phone case, if the material of the latter allows it.
Rose
- We collect 40 VP.
- Dc in the 4th loop from the hook, knit all loops with dc (36).
- 2VP, between the columns we insert a hook RLS, 5DC, repeat until the end of the row: RLS, 5DC, stretch the thread, cut off leaving a long tail. The last one should be RLS.
- Roll the rosette in a spiral and sew using the remaining thread. Hide the remaining thread. The rose is ready.
Rose
How to decorate flowers?
We decorate with beads, beads and, if desired, tie a crawfish step of a different color along the petals.
One of the best ways is to place a bead or a beautiful button in the middle of the flower. For children's hats or hats, we recommend choosing buttons with a smiley face. It looks original and interesting, and can also be a subject for teaching with your baby when learning about the mouth, nose and colors.
A pompom in the middle of the flower also looks beautiful, for a voluminous middle.
Flower decor
The final touch in the design of knitted flowers is their decoration with rhinestones or beads. As you can see in the video, this is quite simple to do, but it looks impressive. Flowers are embroidered along the edges of the petals with beads, rhinestones, beads made of natural stones or sequins.
The sparkling elements look like drops of dew. They attract attention and make the flower unforgettable.
Other crochet flower options
Read here - How to knit a skirt - modern models and the best sewing ideas for beginners (130 photos)