How to choose yarn and hook number
You can crochet a wide variety of headbands. It is important to choose the right threads for knitting and a suitable hook for them. The denser the threads, the greater the relief of the patterns and the volume of the bandage.
When choosing yarn, you should adhere to the following recommendations:
- The choice of yarn depends on when you plan to wear the headband (in cool or warm weather). In summer, you should choose yarn made from cotton, viscose or linen. For warm options, purchase wool or wool blend. If you knit it in several threads, the bandage will be more voluminous;
- since this product comes into contact with the scalp, it is necessary to choose threads with a natural fiber content of at least 30-40%;
- The best yarn thickness is 250-300 m/100g.
When purchasing a hook, you must follow the following rules:
- the length of the hook should be from 12 to 16 cm;
- the end of the hook, where the head is located, should be sharp, but not too sharp, so as not to cut yourself;
- the handle can be plastic, aluminum or steel. Plastic ones are light, but break easily, while steel ones are heavy, but will last longer;
- The hook diameter is selected to be the one recommended on the yarn label.
Longitudinal bandage
In the process of creating a dressing, one of two methods can be used. The first is longitudinal knitting, in which the product is seamless. The operating principle is as follows:
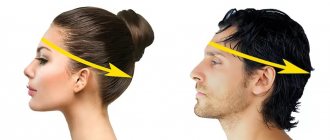
- Cast on a chain of chain stitches. Its length should correspond to the circumference of the girl’s head. It can also be determined using a control sample. To do this, you need to multiply the number of loops per 1 cm by the circumference of the head. When making a pattern, cast on the chain in multiples of 9 stitches.
- Close the chain with a ring and continue knitting rows 1-5 according to the pattern.
- Knit the next 5 rows in a mirror manner.
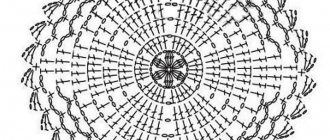
Headband Pattern Ideas
A headband that can be crocheted using a variety of patterns will become an indispensable item in your wardrobe. Among the most popular patterns for headbands, some are presented in the table below.
| Name | Drawing | Scheme |
| Braids | ||
| Volumetric plaits and braids | ||
| Chunky knit pattern | ||
| Pattern with relief | ||
| Openwork pattern | ||
| Braids and plaits | ||
| Paths with openwork | ||
| Leaf pattern | ||
| Close knit |
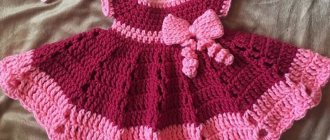
Headband Cat with ears - step by step master class
You won’t see any kind of headbands on women’s heads! There are also warm ones: made of wool or mohair, or light, supportive ones made of cotton. For spring and summer, you need a cotton crochet headband. The hook number depends on the thickness of the thread. The thinner the hook, the denser the product. Experienced knitters advise that for cotton thread it is better to take a 1.75 hook, for wool or wool with additives - 2.5. And, as you know, usually the number of the recommended hook is always on the yarn tag.
We will knit the headband itself crosswise, and we will knit the ears separately. Cross knitting is very suitable for beginners, since it shows the width of the headband and can easily be made wider or narrower. It depends on how many Air Loops you collect. As you knit, the product is tried on the head and the length (head volume) is determined.
Abbreviations: VP - air loop, RLS - single crochet, PP - half loop, p. - loop.
So, we chose the yarn and hook, and we begin to crochet a headband.
First, let's decide what pattern to knit the main part. Some people call this pattern “faceted elastic,” but in the textbook it is designated as “single crochet with edge.”
In any case, you need to start with an air loop:
Scheme number 1.
To make such an elastic band, we cast on a chain of 15 loops.
This will be the width of the elastic. You can take more or less stitches - it depends on the desired width. In the photo there is a warm bandage 15 p. wide.
We dialed a chain of 15 VPs and after dialing a chain of VPs to move to the 1st row, we make 1 VP (it’s called a lifting loop).
1st row: insert the hook into the second loop of the chain and knit RLS (dc/single crochet). Next - to the next point of the chain and again RLS - and so repeat until the end of the row. At the end of the row - 1 VP lifting and knitting turn. RLS is worked like this:
Scheme number 2.
2nd row: knit all SC loops behind the back wall! The loop, when viewed from above, looks like a pigtail. Each item consists of two half/loops - PP. The PP that is closer to us is the front PP. And vice versa - the one that is further from us is the rear PP, or otherwise - the rear wall.
Insert the hook into the loop from above, pick up the back wall, pull out the working thread and knit a sc behind the back wall (loop arc). Let's look at the photo. This is how the hook goes:
Next, knit sc to the end of the row only behind the back wall. At the end, ch 1 and knitting turn.
The next row is knitted like the 2nd row. We leave the front PPs unknitted - they give the pattern relief. In this way we knit the strip to the desired length, trying it on the head from time to time. In the video, the result is an elastic band like this:
Elastic band in single crochet stitches. Crochet. (crochet elastic stitch)
When the length is sufficient to fit around the head, we connect the beginning and end of the knitting. You can sew the beginning and end using a needle, or you can crochet it.
We finished crocheting the main part. Next we will make and sew on the ears.
How to knit ears
We already have a crochet headband knitted for women. All that remains is to understand the description of the ears and connect them.
Crocheting ears seems like nothing complicated, but in reality we want to crochet just such beautiful ears as in the photo. These ears are made from a sliding loop and a single crochet. For the ears, we crochet 4 parts, and then tie them with sc.
First you need to make a sliding loop. I knit it like this:
Next, around the sliding loop we knit 7 sc (how to knit sc - see diagram number 2).
Tighten the sliding loop by pulling the “tail” of the thread. We knit 1 VP in the last sc, turn the knitting. Next will be the 2nd row.
2nd row: 4 RLS in each stitch, at the top of the triangle we knit not 1 RLS, but 2 RLS, and then RLS in each stitch 1 VP and turn of knitting.
So, in the 2nd row we got 9 RLS and VP.
3rd row: 2 sc in the outer st, sc in each st of the base to the top of the triangle, at the top - not 1, but 3 sc in one point. In the last paragraph, also 2 RLS. It turned out 13 RLS and VP. Turn.
So, in every second row we knit 2 sc in the outer loops, and at the top of each row we knit 3 sc.
When we have tied the eyelet part to the required height, we tie the base of the RLS. We sew the ears in pairs and sew them to our headband.
In the video - crocheting an ear step by step:
Crochet – Lesson 216 – Triangle – Crochet triangle motif
How to knit ears - option number 2
If it is easier for you to knit ears according to the pattern, then you can use this pattern:
Here, in this version, the ears begin to be knitted from 2 VPs. In the first VP, knit 3 sc, then in each row, knit 2 sc in the outer columns. This way we increase the ear detail in width and height. At the end, tie a sc.
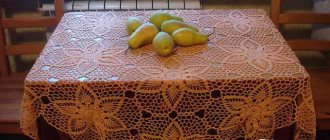
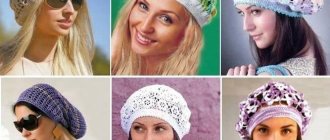
New fashionable headband models in 2021
Crocheted headbands are a fashionable and practical element of a woman's look. In 2021, designers are offering new fashionable options for stripes. They come in different designs, colors and finishes. Today, the most popular types are headbands made from several materials: satin, cotton, silk.
The most popular types of dressings include:
- product with a small pattern;
- spiral pattern;
- jacquard designs;
- openwork knitting.
To decorate the accessory, you can use bows, buttons, and flowers.
For older women, it is worth choosing monochromatic headbands. For special occasions, you can use rich shades, and for everyday life, calmer tones. Beautiful colors: chocolate, emerald and eggplant. The table below shows some options for headbands with knitting patterns.
| Name | Scheme |
| Option in the form of a bow | |
| Openwork strip | |
| Floral motif |
This crocheted headband will become an indispensable item in your wardrobe. It can be worn by both women and girls. A variety of headband models allow you to wear this accessory with any style of clothing. This accessory can be made with your own hands. The ease of execution allows even beginners to knit it.
Article design: Natalie Podolskaya
A simple and cozy headband for beginners
This item will definitely complement your fall-winter wardrobe, knits up very quickly and will protect your ears from colds.
Even beginners will be able to knit such a thing with their own hands in one evening, since the pattern is very simple. The size is adjusted as you knit, which allows you to knit the product exactly according to the girth of your head.
Materials
For a head circumference of 56 cm you need 1 skein of wool yarn (110 m / 50 g) and a hook number 2.5.
Description
10 air loops are cast on - this is the width of the bandage. Knitting is done in half columns. Each row should begin with an increase in height due to the additional air loop, and then continue the pattern.
Having knitted the strip to the required size, close the loops. And then, since the strip was knitted, it must be connected into a ring by sewing the edges. For the winter version, the decoration will be a small piece of fur in the color of the yarn.
Basic Crochet Elements
- An air loop is created by pulling the thread from the previous element.
- A single crochet stitch is knitted by pulling a loop from the previous one, which is passed a second time through two links on the hook.
- A strong double crochet is called a half double crochet. A yarn over is made, then a loop is pulled out from the chain link, then the thread is grabbed again and passed through all three loops that have formed on the hook.
- Half single crochet. This is the simplest element. It is knitted without a crochet. The thread is grabbed through a chain link and passed directly through the loop on the hook.
- Single crochet stitch. We do it as follows. We make a yarn over, then pull the thread through the chain link, and then pull it through the resulting loop and yarn over. There will be two loops on the hook. Grab the thread again and pull it through.
- A double crochet stitch is knitted in exactly the same way, only we cast on two yarn overs at once, and pull the thread out three times, first through the first yarn over, then through the second and then through the starting loop.
As a result, the row gains height.
After five double crochets, we begin the decrease (see diagram above). The result is a wave.