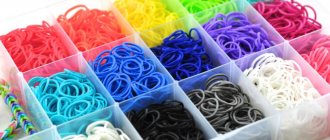
Today we will learn how to weave bracelets for every taste. There are a huge number of options for this decoration. You just need to stock up on bright colored Rainbow Loom rubber bands and follow the step-by-step manufacturing instructions. You can buy elastic bands of one color, different colors, individually, in a package, or buy a whole set of Rainbow Loom. It includes everything you need for weaving. Elastic bands, machine and hook. At the moment, manufacturers offer us a huge range of choices, they have even created neon elastic bands with pimples that glow in the dark. You can buy them in stationery and children's stores, as well as on the Internet.
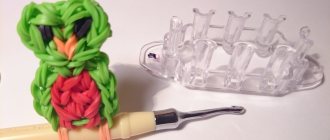
The most common weaving machine is the slingshot. It consists of two columns fixed to the base. This mini-machine can be rotated in any direction, while it stands on the table. With its help, you can easily learn how to weave amazing bracelets.
Slingshot bracelet "circular knots"
Master Class
- Take an elastic band and twist it into a figure eight.
- Pull onto the posts.
- Take the next elastic band and stretch it over the columns in the usual way.
- Take the hook and throw the bottom elastic band into the center of the two posts.
- Take the elastic band and twist it in half.
- Place on the right post.
- Take the hook and insert it into the grooves of the post on which this elastic band is attached.
- Pry up the bottom elastic band, then pull it through the twisted elastic band.
- Transfer to another column.
- Place the elastic on two posts, do not twist it.
- Throw the elastic band from the right column into the center.
- Throw the bottom elastic band from the left column into the center.
- Repeat these steps until you reach your desired bracelet size.
I recommend watching the video: how to weave a bracelet from rubber bands in “circular knots” on a slingshot.
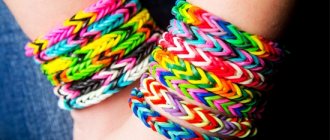
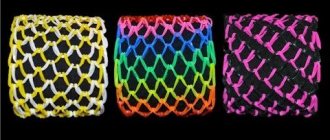
Bracelet made of rubber bands with “circular knots” on a slingshot.
“French braid” or How to make super popular bracelets from elastic bands on a slingshot
What use can be found for thin rubber bands used to tie up bundles of money? It turns out you can make jewelry out of them! Children and teenagers took a break from tablets and TVs and plunged into a new type of creativity. They weave funny jewelry from rubber bands - bracelets, beads, keychains. “Cross” cannot ignore such a popular topic, so we will join in. We’ll look at how to make bracelets from rubber bands in a detailed master class, where we’ll study one of the basic weaving techniques - the “French braid”.
This fascinating type of needlework has an interesting history. A loving father decided to surprise his daughters and create a device for weaving jewelry. Of course, the daughters were delighted with their father’s invention. The popularity of the new hobby spread to the neighborhood children. It was decided to release bright creativity to the masses. So, in 2011 the first sales began. And today, weaving bracelets from rubber bands has reached the peak of popularity.
From the materials we will need:
- rubber bands (here are red and green, you can take any colors you like)
- hook-and-loop fasteners
- slingshot (special or homemade)
- crochet hook
It is not difficult to weave a bracelet from rubber bands on a slingshot. We put one red rubber band on the slingshot in such a way that, crossing it, we get a figure eight.
We string two more free elastic bands on top of the figure eight.
Using a crochet hook, remove the figure eight elastic band, lifting it above a pair of loose elastic bands. One side first.
Repeat the previous step with the second side of the figure eight.
We string another loose elastic band onto the slingshot.
We throw the elastic from the penultimate row on one side to the top using a hook.
We throw the elastic band of the last row on the opposite side to the top.
Next, alternate the colors so that an elastic band of one color is replaced by an elastic band of another color.
If the previous one was green, now we are using red.
We weave in this way until the desired length of the bracelet is reached.
We throw the elastic bands of the penultimate row to the center of the weaving: first on the left, then on the right.
We complete the weaving by attaching the fastener. We thread the part through the beginning and end of the bracelet.
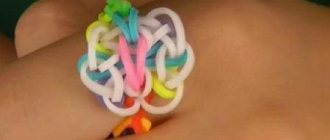
A red and green, almost New Year's accessory is ready.
Once you master this bracelet, all other weaving techniques will be easy. Watch how to weave bracelets from rubber bands in video tutorials. We have also selected for you a video tutorial on how to weave a ring from rubber bands.
YOU WILL NEED IT
In addition to bracelets made of rubber bands, baubles do not lose their popularity. Especially for young fashionistas and fashionistas, a selection of “Cross” tutorials on weaving baubles:
How to weave baubles from floss threads
Weaving baubles from ribbons
How to weave beaded baubles on a machine. Baubles made of beads and pins
Patterns for weaving personalized and super stylish beaded baubles
SHARE! "Cross" will not give bad advice! 
Fusilli slingshot bracelet
Master Class
- Take the slingshot and put on the first rubber band with a figure eight.
- Place the next elastic band, twisted in half, onto the right post.
- Place the next rubber band, twisted in half, onto the left post.
- Place the next elastic band without twisting it over the two posts.
- Remove the bottom elastic inward from each post.
- Remove the top branches of the gum, which are twisted in half, in the middle.
- Place the elastic bands on the two columns with a double twist.
- Throw the bottom elastic band inward.
- Throw off one turn of the double elastic band.
- Repeat these steps until you reach your desired bracelet size.
I recommend watching the video: how to weave a “Fuzili” bracelet from rubber bands on a slingshot.
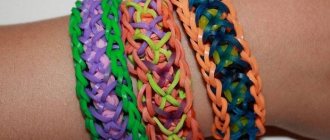
FUSILLI bracelet on a slingshot made of rainbow loom bands
If you don't have a slingshot, don't despair! We have prepared diagrams for you: how to weave a bracelet from rubber bands on your fingers.
History of appearance and features
The rainbow was invented in 2011 in Michigan. It was invented by Malaysian Chung Chhun Ng, the developer of the seat belt. He once noticed his daughters weaving bracelets from rubber rings on their fingers. Ng tried to do it himself, but could not, his hands were too slow for delicate work, so he invented a special loom using 15th century technology.
The daughters were amazed at the complex models this machine produced. Ng further improved his invention into a plastic version of the device, which became the basis of his business empire - a set of plastic boxes, bags with multi-colored rubber rings, a hook or a loom. If the buyer does not operate a machine, he can make models using pencils, fingers and even clothespins.
The basis of weaving is the following approach:
Weaving begins by transferring the elastic band, twisted in a figure eight, to the slingshot, and is completed by pulling the elastic band onto both columns without twisting, and the loops from the columns of the slingshot are transferred to the center.- The latter are thrown onto a column and decorated with a special fastener called a clip.
- Do the same with the first loop of the model.
- Next, weaving is carried out according to the pattern, strictly according to the instructions.
In this process, there is no limit to creativity and imagination, and even products made according to the same pattern become designer jewelry, thanks to the multicolored shapes.
Fishtail bracelet on fingers
Master Class
- Place a figure eight rubber band on your fingers.
- Add 2 more elastic bands, you should have 3 figure eights on your fingers.
- Swap the middle and bottom elastic bands without removing them.
- Throw it into the center.
- Put on the next elastic without twisting it.
- Throw the bottom elastic band into the middle.
- Repeat these steps until you reach your desired bracelet size.
I recommend watching the video: how to weave a bracelet from fishtail elastic bands on your fingers.
Weaving bracelets from rubber bands... fish tail
Black snakes
Forming different shapes using rubber bands is good fun for children and adults. You can make fancy snakes using rubber bands and a hook. Execution scheme:
- Start by securing the garter to the hook three times.
- Pass 2 elastic bands through the center, creating a shape as shown in red in the image.
- Finish the snake's head. Take a couple more rubber bands and go through the center of all 6 shapes that form the snake's head. Place one end of this pair through two elastic bands and pull them through.
- Crochet through the middle of the shapes that form the snake's head and secure with a red garter, passing it through the center, connect the 6 head shapes, and then pass through the center of the other end of the red chain, pull, and the snake's tongue is ready.
- Weave the body using weaving techniques to make common pendant bracelets.
- Start from the end left over from the two chains with which you finished the head, twist them along two pencils separated by an eraser.
- Place another pair of ribbons on top of the curves.
- Then pass the other end of the curved garters to the center and begin weaving the leather.
- Once the snake's body is the desired length, pass the bottom chain over the pencil, securing the piece.
The snake is ready and can serve as a bunch of keys, toys and ornaments.
Bauble made of rubber bands on a three-row machine
Master Class
- Move the middle row of the three-row machine one post.
- Put two rubber bands on the posts.
- Start with the bottom row of the first column, and the second row of the middle column which is offset one to the left.
- Place the elastic on the second row of the first stitch, on the bottom row of the third stitch, on the bottom row of the second stitch, and on the middle row of the third stitch.
- Complete two rows.
- Turn the machine over.
- Place an elastic band, twisted in half, onto the middle outer post.
- Remove the bottom elastic band from the middle outer post.
- Place the elastic on the post on which it is attached on the reverse side.
- Remove all the rubber bands and put them on the posts where they are attached.
- Secure the weave.
- Put on the hook clasp.
I recommend watching this video.
How to make a bracelet from rubber bands. Style Dragon Scales on the Rainbow Loom machine
Bracelets made from Rainbow Loom elastic bands have been gaining popularity lately. They can become not only your hobby, but also an original gift idea for a friend. We wish you success!