Weaving from rubber bands - the history of the hobby
Original silicone bracelets came to us from Europe and America. There, this type of needlework is called Rainbow Loom, which translates as “rainbow machine,” and is actively used in classes at school, kindergartens and summer camps. This fun was invented by Chin Chong, an engineer. His daughters were fond of weaving baubles, and the caring father decided to diversify their hobby by adapting small silicone rubber bands for weaving jewelry and building a primitive machine. This hobby quickly spread throughout the world. Psychologists say that this type of needlework promotes the development of finger motor skills and has a beneficial effect on the nervous system.
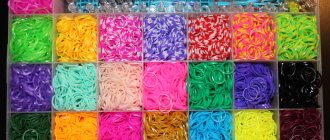
What can you use to weave bracelets?
The fashion for weaving with silicone rubber bands has appeared relatively recently, but has confidently won a huge number of fans, especially among teenagers. There are many weaving technologies that can be mastered with the help of special devices for this type of needlework. This:
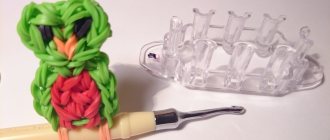
- the slingshot that comes with the rubber bands (a small plastic fork with two blunt prongs);
- pencils that create an imitation of a slingshot;
- machine (plastic base with small cylinders that can be moved).
However, even without them, you can make great decorations using your fingers or a dinner fork, and come up with original patterns with funny names.
How to weave a bracelet on your fingers?
It is very convenient to weave beautiful bracelets from rubber bands on your fingers without a machine. After all, this does not require any additional tools - only about a hundred multi-colored rubber bands are enough. You choose the color to your taste, just note that they should have the same thickness - then the bracelet will turn out beautiful and with a uniform pattern.
- We twist the elastic band in a figure eight and put it on the first – thumb – and second fingers.
- We take a rubber band of a different color and perform the same operation with it. Just put it on your thumb and middle finger.
- We twist the next elastic band into a figure-of-eight loop and put it on the first and fourth fingers.
- Now we put on three rubber bands, without twisting them first, on the thumb and index, thumb and middle, thumb and ring fingers.
- Let's start weaving. We pull the last bottom elastic band from the first finger into the middle, and do the same with the bottom one on the index finger.
- We pull the next rubber band at the bottom on the first finger to the center again, followed by the bottom one from the third.
- We pull another pair of the last ones from the first and fourth into the middle.
- We put new rubber bands on the same sequence of fingers, but we don’t make loops out of them.
- Repeat yarn overs in the middle.
- After the length of the bracelet is ready, we throw the remaining last pair of elastic bands onto the clasp (it’s convenient to take an s-shaped clip). A bracelet made of rubber bands without a machine on the fingers is ready. This pattern is called “rain”.
On a slingshot
Difficulty: medium
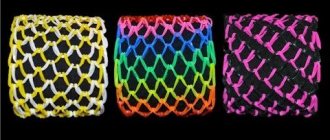
The second most popular way to weave bracelets is using a slingshot. We will learn how to make a bracelet called "sidewalk".
We will need: a slingshot, a hook, a lock and 88 elastic bands of 2 colors (let it be green and orange, 44 of each color). To make the bracelet stronger, we will use 2 elastic bands. So, we pull 2 green rubber bands onto the slingshot so that we get a figure eight.
Next, take 2 orange elastic bands and simply pull them onto 2 slingshot posts. Let's make sure that the slingshot is turned towards us with the notches and begin to work with a crochet hook. We pry up 2 green rubber bands on the right and move them to the middle.
We put on the next pair of green elastic bands. Then we hook the first 2 pairs of rubber bands on the left and move them to the middle.
We stretch a pair of orange elastic bands and move the 2 lower pairs from the right to the middle. And so on until the desired length of the bracelet appears.
To complete the product, instead of pulling on another pair of elastic bands, we move 1 bottom pair to the middle. Then we put the remaining pair on the hook.
We connect the elastic bands on the hook to the other end of the bracelet using a lock, and our “sidewalk” is ready!
You can make your own sidewalk by watching one of the video tutorials below.
Watch more video tutorials on weaving rubber bands on a slingshot
Technology for making a bracelet on a fork
Using a fork, you can weave simple bracelets from rubber bands without a machine. In this case, the drawing turns out small and very beautiful. To master this weaving technology, we take:
- rubber bands of different colors to suit your taste;
- fork with four prongs;
- toothpick (it’s convenient to use it instead of a hook to remove rubber bands from the teeth).
The bracelet manufacturing technology is as follows.
- Twist the rubber band into a figure-of-eight loop and place it on the middle tines of a fork.
- We put another figure-eight rubber band on the outer teeth.
- Now we put the elastic band folded in half onto the middle teeth.
- We throw the lower elastic band of the left and right outer teeth into the middle. For convenience, you can use a toothpick as a hook.
- We put on another double elastic band and again throw the lower outer elastic bands, now of the middle teeth, into the center.
- Alternating yarn overs, we weave the entire bracelet.
- To complete the weaving, we throw the outer elastic bands into the center, and the middle ones onto the clasp.
The design of such a rainbow bauble is called a “droplet”.
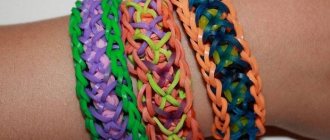
How to weave bracelets from rubber bands ideas
The next most complex and probably the most famous braiding style is the fishtail. The result should be a voluminous harness; on average, you will need about 50 rubber bands and one fastener to make it. The product can be woven on a loom, but if you don’t have one, you can do it with your fingers, we start the same way as in the first option, we put a “figure eight” on the middle and index fingers, the following elements are not twisted. Now we place two elastic bands of any color on top and remove the figure eight on them, then another one and remove the bottom one on it, and the top elastic remains on the fingers, thus we continue to weave to the end, you just need to hook the lock and you're done.
A similar method of weaving is called “caterpillar”, here you will need a simple machine with four columns, we place two “eights” crosswise, then string two rows of “rings” in turn, i.e. not twisted elastic bands and remove the eights on them, then continue to add one row at a time crosswise and remove the bottom row on it, you should get a thick flagellum with a jagged pattern. We complete the weaving by throwing all the loops into one corner, threading an elastic band through them and fastening the clasp to it.
The classic version of a bracelet made of rubber bands is the iris; this product was invented by Chin Chong, who once worked as a crash test engineer at the Nissan concern. He lives in the USA, in the state of Michigan, and his two daughters inspired him to open the world. To work, we need a fork, the first elastic band is folded in half and put on the two middle tines of the fork, inverted as a figure eight. Then we place two more pieces in a similar way, but on the two outer teeth, respectively, one on the left, the other on the right. We remove the first elastic band over the middle loops and move the workpiece down. Next, on the middle two teeth we place another elastic band, twisted in half, but without folding it into a figure eight. We remove the previous row over the last elastic band and then proceed in the following sequence: one elastic band in the center, two on the sides, repeat two such rows for each color.
If you find it difficult to work with your fingers, you can use a hook or a regular toothpick to pry up the Loom bands. The bracelet really looks like a rainbow if you take the appropriate colors. When you have made a strip of the required length, you can finish weaving, transfer the loops from the outer teeth to the middle ones, then place the lower loops on the upper ones. There are two loops left in the center; we put a new ring on them, twisted in half. We string loops over it. Then we place the remaining two loops one on top of the other, hook the fastener in the shape of the letter “S” onto both loops, and remove the product from the fork. Since we put the first rubber band on with a figure eight, the bracelet is easy to fasten. Straighten the knots a little, stretching the canvas in length and width, the bright cheerful decoration is ready, you must agree that the process did not take much time.
Let's consider another option - “dragon scales”, this option is wider and more openwork. In the process we will need multi-colored elastic bands, four fasteners, a hook and a machine with one row of posts.
We make the first row of rings of the same color, place the “eights” one after another, there will be four of them in total in the row. Next, we place the elastic bands on the gaps in the same way; it is important that you need to twist them in the direction away from you. Now on the posts where there are two layers, we crochet the bottom loops. We lower the row down so that it is convenient to string the next one.
We put it on in a ring, now without twisting it into a figure eight, again on those posts where there are two rows, we put the bottom loop on the top one, one loop on the left will be free. We lower the product down, now we take the next color. We make the row in the same way as the previous one, from the first column. P
We continue with the same color, only starting from the second column. And so on, for each color there are two rows, if you want, you can do more. When you have reached the leg length, do the following: remove the outermost loop and put it on the adjacent post, do the same from the opposite end. We take the next loop on the left and put it on the next post, also on the right, as a result the loops will remain on four posts, we put clasps on them and the product is ready.
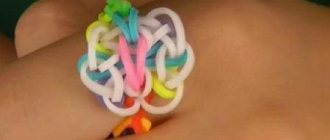
Beautiful bracelets made from rubber bands are made with a star pattern. You will need a machine with three rows of posts, a Loom band of different colors and a hook. First, we put on black rings around the perimeter, 10 on each side and two more on the ends. On this basis, we begin to make stars with six rays each.
We put rubber bands of a different color on the first free column in the middle, it is important to follow the sequence, they should go clockwise. On the next free column we do the same, and so on, until all the columns are filled, you get seven blanks for stars.
Now we put a folded black elastic band on the middle posts, starting from the outer one, then through one. We turn the product over, and starting from the opposite end, remove the outer colored elastic band using a hook and put it on the central post. We change the remaining rays of the star counterclockwise from the center to the edges, we do the same with the next star, we change the first loop to the center, and the rest from the center to the edges counterclockwise. Now we begin to change the black eyelets in the same way as the stars along the contour on the left and right. When all the black loops are woven, take a black elastic band and thread it through the outer loops of the bauble and leave it on the hook; with its help it will be easier to remove the product from the loom.
So, carefully pull the bracelet off the machine, straighten the stars, slightly stretching the product to the sides. If the product is not long enough, then you need to make an extension as follows: put a black elastic band on your fingers, put another one on top and string one on top of the other, add such loops until you get the desired length.
After this, all that remains is to hook the clasp onto the last two loops on the opposite side and the rubber bracelet with stars is ready. For a special occasion, you want to have a more elegant decoration, in this case I advise you to make a bead bracelet according to our master class.
A very beautiful braiding option is the “French braid”; girls especially like this method. We begin to weave the decoration in the same way as using the fishtail technique. You will need a machine with two posts and rubber bands of two colors, I have green and orange. We put on an orange number eight, a green ring on it and an orange ring on top again. We take off the figure eight, put on another green ring on top, but then there are differences: on the right we remove not the bottom loop, but the middle orange one, on the left we remove the bottom green one. The next row is the opposite, put on an orange ring, remove the central loop on the left, and the lower one on the right. We go in this alternation until the end of the “pigtail”, we finish as follows, at the end there are two loops left on each column, we remove the lower ones in turn, and then we throw the remaining left loop onto the right column, hook the fastener to these two loops and remove the product from the machine.
Making a thick bracelet without a machine
Silicone rubber bracelets can come in not only a variety of patterns, but also in different sizes. It all depends on what kind of jewelry you like best. Thick bracelets can be woven without a machine using a fork. Weaving on fingers is not suitable for such baubles, since five supports for these models are not enough. Therefore, we take two forks and fasten the handles with tape to create a row of 8 teeth.
No special skills are required to weave massive jewelry from rubber bands. You just need to carefully follow the diagram.
- We make figure eights from rubber bands and put them on the teeth in pairs.
- We put an elastic band on teeth 2 and 3, 4 and 5, 6 and 7. We don’t make an eight out of them.
- We throw the bottom rubber bands up.
- We put silicone rings in pairs on teeth 1 and 2, 3 and 4, 5 and 6, 7 and 8.
- And again we send the lower rubber bands to the upper ones.
- We make a bracelet of the required length.
- The last row is slightly different from the previous ones. We take the rubber band and put it on all the teeth at once, twisting it before each one. We throw the side elastic bands to the center, and the bottom ones to the top ones. Thus we thread the two remaining loops into the crescent clasp. We attach the lower part of the bracelet to this clip. The “cell” bracelet is ready.
Step-by-step instructions and patterns for weaving a “Lazy” bracelet without a machine
To create the “Lazy Man” product you will not need any special skills or abilities. Both beginning adults and the younger generation of needlewomen or creators who are just learning the basics of creativity with Rainbow Loom can master the technique and make their own original decoration in this style. It is possible to weave such a product without a machine, using improvised means, and also to use the remains of elastic bands, which are unsuitable for creating a more complex masterpiece.
To make this bracelet you will need:
- Rainbow Loom in different colors, the choice of which depends on personal preference or what is left over from previous works.
- Tools – hook, pencils, slingshot.
- S-shaped clasp.
- If desired, additional decorative elements can be used - beads, pendants, jewelry.
- 7 changes for drivers that will take effect in the fall
- Will there be indexation of pensions for working pensioners in 2019?
- Bad and good cholesterol
Weaving without a slingshot machine
To make a simple bracelet, it is not necessary to use a special machine (beginning needlewomen may not have one). A classic slingshot, which is often sold in a set with rubber bands, is useful for this work. This method is very simple, understandable, accessible, and even young children can cope with it. This hobby develops the child’s perseverance, and the fine motor skills involved in weaving contribute to the development of speech abilities and activates creative thinking and imagination.
To work you will need:
- Rainbow silicone rubber bands. Single colors for the base of the bracelet and bright colors for creating the main pattern.
- Slingshot.
- A hook that will help make your work easier.
- S-shaped clasp for accessory.
Instructions for the step-by-step creation of the “Lazy Man” accessory using a slingshot:
- Having prepared all the necessary tools and materials, you should take plain Rainbow Loom, with which work begins. Turn the slingshot so that the notches are in front - this will facilitate the process of creating the product.
- Put a rubber band on the slingshot, first twisting it with a figure of eight. Place another element on top, but this and all subsequent ones do not need to be twisted.
- Remove the lower loops alternately from the right and then from the left columns. Attach the fastener chain to the resulting link.
- Continue working according to the scheme: put on one elastic band, remove the bottom loops and throw them to the center. You should get a simple, even chain.
- Weave until the required size of the bracelet is obtained, then transfer the remaining loop from the right column to the left and leave in this position.
- The second stage is creating the outer layer of decoration from bright multi-colored rubber bands. To do this, you simply need to put them on a chain base, like beads on a thread, alternating colors. To create an original decoration, you can use alternating elements in shades of the rainbow or a gradient - from darker to lighter colors. Even a simple alternate use of multi-colored Rainbow Loom will help create a product that will look stylish.
- After achieving the required density of the elastic bands, you should connect the ends of the decoration by throwing the clasp over the two loops that remained on the slingshot.
- A simple but very beautiful accessory is ready. Look at the photo with an example of a woven bracelet:
To see the details of making an accessory using a slingshot, watch this video from YouTube:
How to weave a bracelet from rubber bands using a crochet hook
It is possible to create a “Lazy Man” bracelet from Rainbow Loom rubber bands, using only a hook, which is required in every bag. For the creative process, you will need an S-shaped clasp to connect the ends of the decoration. Here are step-by-step instructions for weaving such a product using a crochet hook:
- To create a chain, you need to put a rubber band twisted in a figure eight on the hook (all subsequent elements do not need to be twisted). Place the next elastic band on the hook and pull it through the existing loops, you will get a new link in the base chain.
- Next, to create a chain, you need to thread one link into another, continuing weaving until the required length of the product is obtained. Be sure to put a fastener on the first link, and remove the last one and tighten the loop to secure the previous elastic bands. To prevent the beginning of the product from being lost when casting on the second layer, leave a tightened loop on the hook.
- To create a spectacular accessory, you need to string rubber bands of different colors onto the resulting base, alternating their shades and creating a unique pattern. To make an interesting decoration option, special decorative elements can be used - pendants, beads, and other items.
- Having put on enough Rainbow Loom, you need to close the product by attaching the clasp to the last loop. The bright decoration is ready!
How to properly weave a bracelet from lazy rubber bands using a hook, look at the video:
- Increasing the retirement age in Russia for men and women - the latest news and features of the new law
- How much will a summer holiday in Russia cost?
- Social support measures for the elderly and people with chronic diseases
How to make a “Lazy” bracelet on your fingers
You can make a unique accessory with your own hands, without using additional tools. For work, instead of specialized attributes, fingers can be used. This is very convenient: there is no need to buy additional tools; you can do creativity anywhere, having a few minutes of free time; When weaving jewelry, it is possible to regulate the stretching of the loops of the chain.
To work you will need:
- Rubber bands of a neutral color - white, black or transparent.
- Rainbow loom of bright colors. The more shades used in the work, the brighter, more beautiful and more unusual the finished product looks. The advantage of this type of decoration is that rubber bands left over from different sets used in other masterpieces can be used for the work.
- S-shaped fastener to secure the ends of the product.
- Fingers of the left hand (for right-handed people); for convenience, the index and middle fingers can be used.
Step-by-step production of the product:
- Put an elastic band on your index and ring fingers, then twist them in a figure eight.
- Thread the second element onto your fingers without twisting the second and all subsequent elastic bands.
- To create a chain, the lower loops need to be removed and thrown up. Using a similar pattern, you should weave a chain of the desired length so that the bracelet does not pinch your wrist. Then put the clasp on the first twisted elastic band, and transfer the last loops to one finger so that the chain does not unravel during the work, and you do not have to start the process all over again.
- String multi-colored Rainbow Loom onto a chain. To achieve a pattern, alternate the shades of the elements according to a certain pattern (for example, to create a rainbow effect or gradient) or improvise by using rubber bands without a specific sequence and without observing any order.
- When all the elastic bands have been put on or the desired density of the elements has been achieved, close the bracelet by connecting both ends of the thing into a circle.
- An interesting, unusual accessory is ready and can become a worthy decoration on a fashionista’s hand.
To learn more about the step-by-step execution of the product on your fingers, watch the video:
An easy way to weave with pencils
The necessary tools for weaving bracelets, for example, a machine, a hook or a slingshot, are not always at hand. The beauty of such creativity is that almost any available things can be used for it. To create the “Lazy Man” product, a pair of pencils or classic ballpoint pens is ideal. For the creative process you will need:
- Two pencils connected to each other.
- Plain rainbow elastic bands in soft shades.
- Beautiful Rainbow Loom in bright (sometimes contrasting) colors. The more shades used in the work, the more interesting the product looks.
- Fastener for connecting the finished accessory.
- Hook for convenience.
Master class on weaving products on pencils:
- Place the rubber band twisted in a figure eight onto the pencils.
- Throw one more element on top, but so that all the other rubber bands do not cross.
- Remove the bottom element and place it on top of another elastic band. Repeat this chain weaving pattern until you obtain the product of the required size.
- Place a fastener on the first loop, and transfer the last loops to one pencil, but do not remove.
- When the chain is ready, you can start decorating the product. Place colorful rubber bands on the base, alternating elements, sticking to a certain order, or improvising.
- Having reached the required density of the Rainbow Loom on the base, connect both edges of the bracelet, securing them with clasps.
- The original “lazy” accessory is ready.
You can get acquainted with the detailed step-by-step creation of jewelry by watching the video: