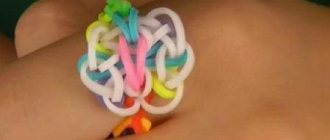
Heart made of rubber bands is a very bright keychain that can be hung on your keys or on your mobile phone, distinguishing yourself among your friends and demonstrating to everyone your main hobby, because every day Rainbow loom rubber bands are becoming more and more popular among young people who are happy to learn new techniques, complex and quite simple. You can present the heart to a friend or family member on February 14, and it will definitely be the best gift that expresses your feelings.
Now it’s time to figure out how to make a heart out of rubber bands , the video lesson here, as always, will be the main assistant, but we will try to give some comments that will make it easier to master the new technique.
First, pay attention to the quality of your rubber product; unfortunately, lately you can come across low-quality products, the walls are very thin, the colors are faded, and they quickly tear when knitted. Such a weaving kit will only cause disappointment, because all your efforts will be in vain.
Pay attention right away that the ring is made using high-quality rubber, and does not burst when stretched, and the walls do not become thin and transparent. As a rule, high-quality goods are produced under the original brand “Rainbow loom”, but in stores there are also high-quality American fakes, and using such material, it is a pleasure to make various accessories, for example, covers for a vase and a candlestick.
How to weave a heart from rubber bands
The first option is a heart made of rubber bands on the machine , for which we only need two rows, so we can remove one so that it does not interfere with us. A plastic machine is a very convenient design for this type of creativity, in which you can change the number of rows.
For the heart, we will use only six columns, for example, three rows, which are located in the middle of the machine. You also need to remove the base of the machine from under the posts so that only through holes remain there. By the way, a bag on tour would also be an excellent pendant.
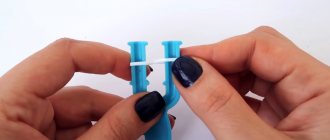
Now you need to take a weaving machine, and you can proceed directly to making the craft using a new technique, of course, using a hook, without which it is impossible to imagine this type of creativity; it is needed to make the angel heart made of rubber bands neat.
You can take rubber bands of any color. The first ring must be wrapped around the hook four times. Then you need another ring, which you need to put on the tip of the hook, pull it down a little, and carefully lower onto it the four turns that were wound earlier. The wound one should be located in the center of the other ring, which we will now attach to the machine by the “ears”. Now these ears must be hooked onto the far and near columns of the very first (among the three) of our prepared rows, under which there must be no base of the machine. It is on this that in the future you will master the process of how to weave an angel’s heart from rubber bands .
Now you need to hook the “eye” with the hook and pull it onto the adjacent post of the row located next to it (that is, the second one), also pick up the second “eye” and put it on the adjacent post. Now each “ear” is draped over two posts, and the twisted ring is located in the middle.
Where to get diagrams
Without a diagram you won't be able to do anything. Where to get them and how to learn to read them - you need to look for them on specialized forums, or in video tutorials on weaving
, of which there are two in this article. At first it may seem difficult, but it’s worth keeping in mind that even children are into this hobby and almost everyone is great at it.
Video courses are also intended for beginners. Valuable knowledge is given completely free of charge.
There are collections of diagrams and even programs that allow you to create diagrams yourself. For example, you want to do something unique, but you can’t find a pattern. Then you use the program, draw up a diagram, and the program will tell you how much material, blanks, bases you need.
You need to start with simple and understandable keychains, gradually move on to complex and advanced ones. This is the only way to achieve mastery of rubber weaving
.
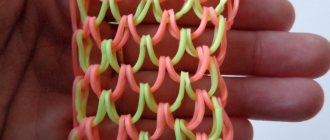
Below is a step-by-step photo lesson with patterns for weaving from 146 elastic bands:
Heart made of rubber bands on a machine
Now we take the next pair of rubber rings, and pass the hook into the center of the ring twisted four times, pick up two rubber bands at once with the tip and pull it through the center of the turns. Now the “eye” that is draped over the hook must be hooked onto the outermost (third working) lower post on the right, and the eye that we hold with our fingers must also be hooked onto the post, but this time on the top one. Now we need to remove the rubber bands from the two columns of the central row, after which you can notice that our four turns are located in the middle of our working surface of the machine, which includes three rows.
We pass the hook inside the turns again and put two more new rings on its tip. The eye from the hook should be hooked onto the lower central post (from which we only recently removed the unnecessary edges of the ring), and the part that you hold with your fingers should also be hooked onto the central post, but the top one.
After this, use your fingers to try to lower the stretched rubber bands as far down as possible. One rubber ring must be twisted with your fingers two turns, and then thrown at once over three columns of the row below us, it turns out that the ring will be held by the outer columns, and the central one will be located in the middle.
The next ring must be twisted in a “figure eight” and one end of this “eight” should be thrown over the three columns of the row closest to us, and the second part of the “eight” on the top ones. It’s a very confusing process, how to weave a heart from rubber bands , but we try to describe it in as much detail as possible.
We lower the weaving down a little to make room for the next elements. Now we twist the rubber ring two turns and put it on the first row (as we remember, we have two columns in one row, so we put the ring on two at once). We twist the ring twice again and now we put the third row on two.
Next, we pay attention to the ring that we twisted in a figure eight and put on the upper and lower posts; it affects the entire working surface. The hook must be placed on the side under the rubber weaves and grab the figure eight rubber band in the place where the weave is formed. Pull it back and throw it off the bottom column of the right row, while it should remain on the central column. In the same way, remove the figure eight rubber band from the left row. Now at the bottom we have this elastic band forming a triangle, we also need to throw it off from the upper extreme columns. After this, you can notice that this “eight” has now transformed into a rhombus.
Two rings should be placed on the outer rows. Next, you need to take an elastic band that has been twisted twice and thrown over the bottom three columns; you need to grab it and throw it to the center from the right and left columns. We lower it again, there are now six rubber bands on each extreme one. First, you need to remove the two central ones and throw them into the center. Then we throw the bottom two inside. We do the same with the other column, but first you need to carefully distribute which rubber bands are located at the bottom, in the middle, at the top. In addition, you can learn another interesting technique on the machine, how to weave heart bracelets from rubber bands , for which you need to use two or more colors to make it look bright.
Those who have not yet purchased a machine are interested in other weaving methods, for example, whether it is possible to make a heart from rubber bands on a fork , as was previously practiced with voluminous wide bracelets. Of course, there is also an option for which you need to tie two forks with tape and start weaving on the cloves.
Heart made of rubber bands
Our process, like weaving a heart from rubber bands , is entering its final stage, but to better understand the technique, it is better to watch the video master class.
You also need to throw off the two central and two lower ones from the outermost columns of the upper ones. Use your fingers to lower the woven fragment down and continue weaving. One ring should be thrown over the three lower columns, and the next one should be thrown in a figure eight on the nearest and farthest row. We put one rubber band on each side.
After this, you need to take off the rings again, this is the main process in order to master the technique of how to make a heart out of rubber bands and get a beautiful keychain. When you take off the rubber bands, you can’t get confused in the order. Now you need to throw the figure eight inward, from the outer ones, always leaving the central pillar, so that a rhombus is formed.
Next, we’ll put two rings on the outer rows and throw a ring from the bottom row inward. Then you need to repeat the steps, throwing off the outer “ears”. Then you need to throw off the lower two from the central one (there are four or two pairs in total). We repeat, throwing two rubber bands on the outermost ones. We now leave the central ones alone and work only with the extreme ones. Then put three rings on the outer ones, while throwing off the bottom pair.
Now it’s a little clearer to you how to weave a heart out of rubber bands , and you can make presents for your friends.
Heart made of rubber bands without a machine
Of particular interest are always techniques where there is no need to use a special machine, so you can weave a heart from rubber bands without a machine , which will become an excellent keychain.
Without a machine, you, of course, will not be able to create a three-dimensional heart, as in the example described above, but such a craft will be an excellent start in mastering a new popular technique.
First, let's figure out how many rubber rings we need to make such a suspension. You can immediately lay them out in front of you so as not to get confused in the order. So, we need one r., eight times two, then two times two singles, three more singles separately, again eight times two, and one more for closing.
For this work, how to weave a heart out of rubber bands, a video is also available on the Internet, and you can watch it to better understand the main stages of execution.
For this product you only need a hook, which you will use to weave. You need to put an elastic band on it, wrapping it three times. Now the pairs need to be hooked and three turns released on them. We leave two “ears” on the hook. Then the next pair and again remove a pair of ears and leave the new “ears” on the hook. This needs to be done with all the paired rings that we prepared in advance; we remind you that there were eight pairs in total.
In this case, the heart made of rubber bands will resemble an ordinary bracelet, which will not go in a circle, but will be wrapped, forming our heart.
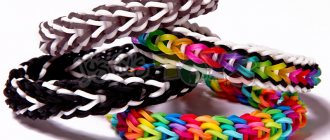
Rubber Bracelets: Heart
Very bright bracelets are made from “Heart” elastic bands , which are also knitted on the machine to make a neat product. The bracelet may consist of several elements that would go along the entire circumference or only three of them, and the rest of the bracelet will be represented by simple weaving, which is described here.
So, how to weave a heart bracelet from rubber bands and how much working material you need to take. For one element you need to take sixteen rings, which is why many people prefer to make only 3-4 figured elements that are visible on the hand, and the inside of the bracelet will be the simplest, which can be woven on the fingers. This way you can save material and make many more colorful crafts.
A bracelet made of rubber bands “Angel Heart” is an original gift for friends, not only for girls, but also for boys, if you make it in dark colors.
To understand how to weave a heart from rubber bands, you must watch the video to understand all the intricacies. After all, such creativity is especially popular among teenagers and schoolchildren, and the material can be found in stationery stores, art stores and various trays with a wide variety of goods. It is more convenient to buy them online not only on official websites, but also on other online shopping platforms, so you will definitely find all the colors you need.
For those who decide to take weaving seriously, you can purchase a large set that immediately contains all the necessary tools.
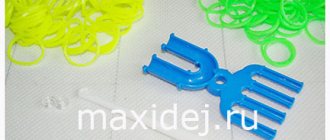
Tools slingshot and hook
A slingshot for weaving is sold in stores with almost every set of elastic bands.
This is the most common lumigurumi tool due to its compactness and ease of use. A mini-machine slingshot is a plastic device with two “horns” and a handle for holding the tool. The horns on one side are convex, which gives shape to the elastic and protects it from twisting. On the other hand, they are equipped with concave grooves, from which it is easy to pick up the elastic band. When working, the slingshot is positioned with its horns facing up.
Also, the lumigurumi kit usually includes a small plastic hook. It is very convenient for them to remove the rubber bands from the slingshot, moving it into the groove. If this tool is not included in the kit, you can use a regular crochet hook.