"Owl" made from cereals, seeds and grains
Using combined techniques and a variety of materials, you can create a real masterpiece. Let's present the “Owl” master class.
Materials you will need: PVA glue with a brush, a sheet of cardboard, gouache paints and a brush, a pencil. From cereals we will take different seeds, rice, peas, seeds, buckwheat. To secure the painting, colorless furniture varnish or silicate glue is useful.
Let's start working on the painting:
1. On a sheet of white cardboard, using a stencil or randomly draw an owl.
2. Using gouache, paint the sky. Glue on the owl's nose, eyebrows and eyes. The eyes and nose are bones, and the eyebrows are made from seeds.
3. Apply glue around the eyes and on the bottom of the head. Cover these places with rice. Next, carefully lubricate the body and cover it with buckwheat.
4. We also generously lubricate the head with glue and cover it with buckwheat.
5. Let's start with the wings. You should start from the bottom of the wing. Lay out the seeds and cereals in layers. The white seeds will be the first. They are most similar to feathers - they have sharp ends and are large in size.
6. The next layers for the wings will be green coffee, black seeds, pasta and peas.
7. Cover the moon with peas and paint it with yellow gouache. For decoration, we suggest using small star pasta. We also paint them yellow. Draw the eyes.
Related article: Knitting toys
8. Place the painting under a press until it dries completely. For example, under a stack of books. After drying, open with varnish or glue and insert into the frame. Karina is ready.
A bright applique made from natural materials will be an applique made from pre-dyed rice. Such variety will greatly interest the child.
Crafts for elementary school “What autumn gave us”
Of course, to make compositions on this topic, it is enough to have everything you need at hand. This means you need natural material and available means. Plus your desire, imagination and of course fantasy. If it’s really difficult and inspiration doesn’t come, then take these ideas and create.
I suggest the girls take their favorite doll and decorate her with such a golden outfit.
This is how it turns out you can go to the park and pick up dry leaves and you are already a magician).
Brilliant, isn't it? Such a queen came out of an ordinary toy.
Well, for boys I recommend using this idea, also using maple leaves. Take a piece of plasticine and make a perky hedgehog.
Do this work using physalis.
Or, for example, build an alarm clock or a clock from twigs.
A sprig of rowan and pine cones will help you decorate.
Well, last but not least, probably the most popular will be a craft using seeds. I always see such creations at exhibitions in kindergartens and school competitions.
Everyone knows that autumn is rich in fruits and vegetables, so make wonderful masterpieces.
By the way, decorate your classroom amazingly by making garlands of acorns, chestnuts and rowan berries.
Or this idea.
Make a web and bring it to school.
Probably the most enchanting thing will be this beauty, well, a real symbol of this time of year in all its glory, this is the girl’s face. Take any flowers, plants and create.
You can make a portrait like this. I think elementary school students and even preschoolers will cope with this work with a bang. Well, middle school even more so.
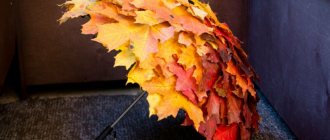
A gift like this looks super, these are roses, but unusual, and made from maple leaves.
You need to learn how to roll leaves correctly, here is the sequence of actions. Watch this short master class:
On this topic, how to create such a bouquet, I found this video on the Internet on the YouTube channel. Maybe it will be useful to you too. Enjoy watching.
You can decorate a wreath beautifully.
Don’t forget that it won’t be difficult to build a lot of creations from spruce branches.
What a cute owl came out, you can’t take your eyes off it.
You can build an oak tree, look how wonderful it turned out.
Here's another idea, take note.
Autumn crafts from natural materials for school for exhibition
Until mid-autumn, spiders are actively working and weaving their webs. So our spider turned out to be a hard worker.
Spider.
We have already made a spider from chestnuts and hot glue with branches.
Today it will be made of twigs and plasticine.
We place four branches one on top of the other (the shape resembles a snowflake) and tie them in the middle at the junction.
Then we fasten this structure with plasticine. We straighten the branches so that they are all approximately the same distance from each other.
Having stepped back a couple of centimeters from the edge of the branch, we pass in a circle with a thread, intertwining all the branches.
Then we do the same in the middle of the branches. And again, closer to the junction. It turns out to be a cobweb.
Glue a maple leaf to the center of the craft with plasticine.
We plant small birch leaves on plasticine in different places of the web.
Let's make a spider:
- Glue a ball of plasticine to the acorn.
- First glue 2 white plasticine circles to this ball, and then glue black circles onto the white ones. These are the eyes of a spider.
- Be sure to draw an arc under the eyes with your fingernail. It is a smile!)
- We cut a thin twig and insert these pieces of the twig above the eyes, like eyelashes.
- Glue plasticine to the bottom of the acorn.
- We cut thin branches (8 pieces) of birch into 15 cm pieces. Each branch is slightly bent in the middle.
- We insert the branches on both sides of the acorn into the plasticine.
Glue the spider to the middle of the maple leaf. We straighten his paws.
This is such a cute spider we have!
Author
https://youtu.be/4jqwKiDTCBo
Hedgehog.
We fill a plastic half-liter bottle with pebbles to make the structure heavier. We put a gray sock on the bottle and tie a knot in the sock. Cut off the excess part. Screw the lid onto the neck (through the sock); This is a hedgehog's nose.
Glue the eyes above the nose. We glue cones along the entire perimeter of the bottle, except for the spout. We decorate the craft with artificial apples and pears.
Simple, but it turned out original!
Author