Good afternoon, friends, there are only a few days left until the New Year.
It's time to think about how to decorate your home for this wonderful holiday. You can make many different decorations with your own hands - fluffy snowflakes, beautiful New Year's balls and other interesting crafts. Of course, it will be impossible to do without a green New Year's tree. Some will want to install a living forest beauty, others - an artificial one. We have already made a three-dimensional Christmas tree from paper, and also made a mini tree from scrap materials. Today I want to offer you several interesting options for making a forest beauty from ordinary spruce and pine cones.
Crafts made from natural materials carry a special atmosphere of comfort and kindness. They turn out to be unusual, one-of-a-kind exclusive jewelry made with your own hands. These classes are exciting, you can involve all family members in them. It will be more fun and interesting for everyone to create together. Connect!
DIY pine cone tree - step-by-step instructions with diagram
Such a cute Christmas tree can be made from anything. The base of the future forest tree is made of cardboard, rolled into a cone. Then any available materials are glued to the base - tinsel, shells, pasta, buttons, etc. In our case, these will be pine cones.
Important: the Christmas tree made from cones turns out to be quite heavy, so the base should be made of thick cardboard.
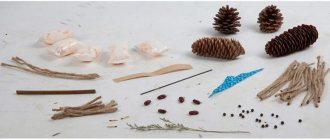
What you will need:
- paper glue
- glue gun
- scissors
- thick cardboard
- fir and/or pine cones
- varnish or paint in a can
Instructions for use:
1. Let's make a cone-shaped base from cardboard. Sending a cone is easy - draw a circle with a compass (you can also circle any round object with a pencil). Fold the circle in half and cut along the fold. We roll half the circle into a cone, and glue the ends with office glue or PVA. Just in case, I am attaching a diagram of how to make a cone out of paper.
Cut the circle to the desired size. You can make a small Christmas tree to put on the table, or a large one for the floor if you have a lot of pine cones. In this case, you can glue the cone from a sheet of Whatman paper.
2. Now we begin to glue the cones to the cone using a hot gun, starting from the base.
It is better to work with a glue gun, as it instantly fixes the elements in the right place.
4. Do this until all the cones completely cover the paper cone. The tree can be left in this form, covered with shiny varnish on top.
Or make a silver or gold Christmas tree out of cones using a can of spray paint. You can choose other colors that are suitable for New Year's decor - white, blue, red.
5. Decorate the finished tree to your taste by gluing elements of New Year’s decor. This could be artificial snow, small balls, garlands of beads, bows, etc. You can decorate the top with a star by cutting it out of foil or other material with glitter. Your idea will be enlivened by Christmas tree tinsel and shiny sequins.
Let's get started
For work we will need:
- Cones. Their number depends on how large a decorative Christmas tree you want. The more cones, the larger and more magnificent the Christmas tree made from pine cones. Cones for crafts need to be chosen that are good, without defects;
- Glue gun;
- Spray paint cans. The color depends only on your imagination;
- Garland;
- There are two ways to make such a Christmas tree: by gluing the cones onto a pre-prepared cardboard cone or onto a fiberboard base. In our master class, production will be carried out using the second method, with a base made of fiberboard (instead of fiberboard, you can take a sheet of chipboard or any other dense material that can be easily cut).
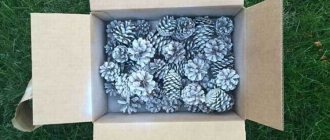
Now that the cones have been processed, the first thing you need to do is sort them into large and small. This task can easily be entrusted to a child.
Next, we take our sheet of fiberboard (chipboard or other dense material), this will be the basis of our Christmas tree.
The leaf size will vary depending on how large you want your tree to be.
We have a sheet measuring 30x30 cm. We draw an even circle on it with a compass and cut it out with a jigsaw. Only dad can handle this task, and in this way you can involve the whole family in the process of creating a fluffy beauty with your own hands!
In the cut out circle you can make another smaller circle, as shown in the photo. This is necessary in order to then place a garland inside the future Christmas tree, thereby creating beautiful tints and glow.
You can also make legs for the tree to make it more stable. You can use special iron legs, or you can buy plastic furniture legs in the store. The main thing is that the base stands firmly on the surface.
Now let's proceed directly to gluing the cones. To do this, take the largest cones and use a glue gun to glue them along the edge to our base. Glue is applied directly to the cone itself, both to its base and to the sides, in order to fasten adjacent cones together. When the first circle is glued, you need to wait for the glue to completely dry and harden, otherwise the entire structure may fall apart.
Article on the topic: Women's hat with a pompom knitted with a description and photo
The second row is a little more difficult to make: the cones are attached to each other, in the spaces between the cones of the first row. There is no need to skimp on glue if you want to get a stable structure. Again, we wait for it to dry completely when we finish the second row. And in the same way we glue the remaining rows, with each row moving the cones a little towards the middle, forming a cone.
For the top of the Christmas tree, it is best to choose an oblong cone with a pointed tip to make it look more realistic.
Next we have an important step to take - painting. This is not necessary if you want to preserve the natural colors of the material. We will cover the Christmas tree with silver spray paint. Let us repeat that you can choose absolutely any color.
It is best to paint with aerosol paints outside, since such paints have a specific smell that is not so easy to air out, or we open all the windows in the apartment, and cover the walls and floor in the place where painting will be done with newspapers so as not to stain anything around. After painting, you need to wait for the paint to dry completely.
Now let's go back to the hole in the base. We will place a garland in it so that the Christmas tree sparkles from the inside. The decision whether to decorate the tree itself or not is up to you, we threw a little tinsel on top.
And now our beauty is ready! Its production took about 1.5 hours, not including the preparatory stage, and also turned out to be minimally expensive. We wish you pleasant creativity!
Step-by-step master class on mini Christmas trees made from pine cones for beginners
Agree that any cone in appearance resembles a mini Christmas tree. The easiest option is to make a small Christmas tree from one cone. Even a child can do it, because it’s not at all difficult to do.
Stages:
1. For the craft, you should select one or more of the largest and most beautiful pine cones.
2. Then paint the cones with acrylic paints of any color - completely or just the tips.
3. Make a base from plasticine, which can also be painted white so that the Christmas tree looks like it’s in a snowdrift.
4. Then decorate the little beauties with multi-colored balls from the same plasticine or glue real beads, sparkles, and beads onto Super Moment glue.
These are some unusual and very cute souvenirs made from ordinary forest cones. Here the forest beauties were decorated with pompoms - small balls made of yarn.
Instead of a base, you can use a regular bottle cap. Glue it to the bottom of the pine cone with strong glue (for a super moment or hot from a gun). Then the mini Christmas trees will have legs on which they stand perfectly.
The top can be decorated with stars cut out of shiny material, foil or plain paper, which is then painted with shiny paints. Here a small flower pot was used for the base.
There are many ideas for decorating Christmas trees, you can choose from the suggested options or come up with your own.
Crafts made from pine cones in the form of a Christmas tree for kindergarten for the New Year
The previous crafts in the form of small Christmas trees from one cone are suitable not only as a souvenir that can be given as a New Year's gift, but also for a competition in kindergarten.
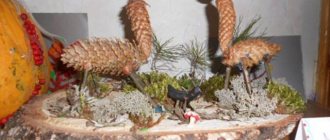
If you want to make a larger Christmas tree, then another simple option for children with the participation of their parents.
What you will need:
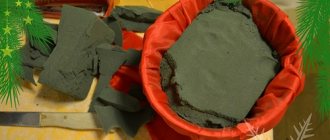
- Floral sponge in the shape of a cone
- thin wire
- wooden sticks with a sharp end
- cones - large, medium and small
Stages:
1. First, let's prepare the cones. It is necessary to wrap a thin wire several times around the blunt ends of wooden sticks. Now we wrap the wire itself around the base of the cone.
2. We begin to form a tree, collecting it from the base. First, we form the bottom row of the largest cones.
3. The next row will be made of smaller cones. And so we continue until the very top.
4. We insert a long fir cone into the top instead of a spire.
Christmas tree made of pine cones: DIY Christmas crafts
Have you decided to decorate your apartment or country house for the New Year?
Or maybe you don’t know what to do with your beloved child on a long winter evening? Or haven’t figured out what to give to your girlfriend, friend, or work colleague as a souvenir for the New Year? The news portal “Vtemu.by” is ready to answer the above questions in this article! We invite you to make an amazingly beautiful and easy-to-make New Year's craft - a Christmas tree made of pine cones.
The craft is so simple to make that even a three-year-old child can handle the creative work.
To make a Christmas tree from cones you will need beautiful fir cones, your imagination, accuracy and desire to create and create something new.
Christmas tree made of pine cones in a pot
In order to make such a charming New Year's souvenir - a New Year's craft, you will need a small pot. This could be an old coffee mug, a candlestick, an egg cup, etc.
A beautiful, even fir cone will also be needed.
Thoroughly clean the fir cone from unnecessary debris and dirt and dry it. Now using acrylic paints, paint the fir cone. You can make the whole pine cone one color, or paint just the tips. You can also use paint in a spray bottle.
Secure the finished decorated cone in a pot. Decorate its top with a luxurious New Year's star.
Christmas tree made of pine cones, decorated with colorful balls
What would a New Year tree be without colorful Christmas decorations? If you want to make your Christmas tree more elegant, then decorate it with multi-colored balls.
You can make balls using the felting technique.
- An easier option is to use multi-colored plasticine, from which you roll balls of the same size.
- If you want a glamorous Christmas tree, then use beads and rhinestones that can be glued to the pine cone using hot glue.
DIY tree made from pine cones
- And finally, another master class on making a Christmas tree from large pine cones.
- To make a Christmas tree like this you will need a large number of fir cones, hot glue and a base for the Christmas tree.
- The base for the Christmas tree can be a cardboard cone tightly filled with newspapers or a foam cone.
Glue the cones to the cone using glue. Decorate the finished Christmas tree with Christmas tree decorations and garlands.
Source: https://vtemu.by/igry-i-razvlecheniya/elka-iz-shishek-novogodnie-podelki-svoimi-rukami/
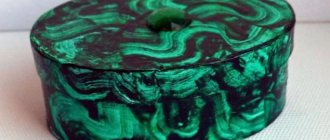
Master class on making a Christmas tree from cones and balls in the form of Jerusalem artichoke
A New Year's tree made of cones in the form of a topinary will look very cool. To work, you will need a foam ball, which you can buy in craft stores.
Instructions:
1. A wooden stick 25-30 cm long is inserted into the ball and fixed with strong glue (for a super moment or hot from a gun). The trunk of a decorative tree can be pre-painted by spraying silver or gold paint from a spray can.
2. You will need an empty flower pot, in the center of which we insert a barrel with a ball. We fill the pot with old crumpled newspapers, or another filler - sand or the same polystyrene foam. The pot can also be silver-plated with paint in advance.
3. Now we form the crown of the tree by gluing pine cones all over the ball with a hot gun. We also glue cones around the trunk in its lower part.
The cones can be silvered with paint in advance, or this can be done in an almost finished product.
4. And finally, the final part - we decorate the topinary at our discretion. You can use everything that is found in the house for this - any decorative elements.
Look at some more wonderful photos of hand-made New Year trees made from pine cones and balls. They will decorate your home for the New Year and create a pre-holiday atmosphere in it.
Christmas tree from cones: 5 master classes on how to make a Christmas tree from cones
Environmental trends are at the peak of popularity; buying a live Christmas tree for the New Year is a detriment to nature, but artificial needles are not inspiring. Do not rush to despair - you can make a Christmas tree from natural material without harming the environment. This material is cones.
It is simply irreplaceable in New Year's decor - it will last a long time, and is flexible, and interesting, and has many options. Below we will suggest several simple ways to build a real Christmas tree from pine cones and scrap materials. And their number depends solely on your imagination and perseverance!
Christmas trees made of cones and corks
Necessary materials:
- Pine cones;
- paint and sprayer;
- wine bottle caps;
- scissors;
- glue gun and silicone glue tubes;
- small stars made of foil or wood.
Sequencing:
- Dilute the paint with water and spray it on the outer edges of the scales, or apply it with a sponge. Let dry by blowing lightly with a hairdryer. The green edges and brown core make the pine cone look like a real small tree.
- Make a cut at the top of the cork so that the base of the cone fits there, add a drop of glue and glue the cone.
- Apply a drop of glue on top to secure the star. The Christmas tree made of cones is ready!
You can diversify your Christmas tree made from pine cones by using decorative caps decorated with bright gold or silver paint - you get Christmas trees in pots:
Another option is to add a decorative wrap of burlap with twine and foil, or glue small decorative elements like lace ribbon.
Found on AliExpress / Art Supplies
Christmas tree made of cones step by step
If in the first case we turned a small cone into a Christmas tree, now the task is more difficult - to build a full-fledged Christmas tree from pine cones.
End of debate - Christmas tree or pine for New Year? Having mastered a simple skill, you can reconcile both options by creating a luxurious Christmas tree with branches and a conical top.
This useful activity can be combined with a pleasant walk through the pine forest, because how else can you stock up on materials for crafts?
What do we need:
- pine cones - a lot, to create a small cone you will need at least 30 pieces;
- spray paint of any bright shade - who said that a spruce should be green, if blue and even silver spruces exist in nature?
- white acrylic paint;
- art brushes;
- glue gun and silicone sticks;
- a thick cardboard base with a diameter of at least 30 cm;
- miniature Christmas tinsel.
What should be done:
- Spray the pine cones with spray paint. It is better to paint them outdoors, otherwise you risk splashing paint on the floor, furniture, and the smell it leaves is not always pleasant.
- While the cones are drying, we build a cardboard cone. To do this, put a point in the center of the circle and, using a ruler, draw a radius from it along which we make a cut. We roll up the cone and glue the joint. After the glue has dried, you can paint the cone in the color of the cones, or paint only the top with white acrylic “to look like snow.”
- Using a brush or sponge, apply white strokes of “snow” to the edges of the scales.
4. Next, at a distance of 5-6 cm, apply droplets of glue to the cone, and immediately plant the cones on them, before the glue has time to thicken.
5. It is better to place the largest cones at the bottom, and select smaller ones as you move up - this technique will add naturalness to the tree.
6. Next, glue small Christmas tree decorations and beads to the tops of the cones.
7. The finished cone can be glued to a stand made of plywood or cardboard for boxes. Or you can “seat” it in a plastic flower pot, wrap it in burlap or weave a wreath of natural pine branches along the base, decorating it with tinsel.
Found on AliExpress / New Year Decorations
How to make a Christmas tree from fir cones
If you have mastered such a stubborn and “prickly” material as pine cones, then you can handle spruce cones even more so. Would it be superfluous to have such a cute tree on a Christmas fireplace or windowsill?
The principle of its manufacture is the same. For decoration, you can use all the materials that your imagination suggests or limit yourself to a minimalist design of wood with cones, as in the photo.
What is needed for making:
- fir cones of different sizes;
- paper cones of any size. It is advisable to use thick cardboard that will withstand the weight of the pasted material;
- glue gun and silicone glue sticks;
- Christmas tinsel and spray paint - optional.
The algorithm of actions is the same - we twist the cone and secure the edge with glue.
Apply drops of glue and secure the cones. It is more convenient to hold the cone in weight, while glueing the lower rows of cones perpendicular to the surface of the cone - after all, we will need to place it on a horizontal surface.
Even in such a laconic design, trees with cones look very original.
How to make a Christmas tree from pine cones on a stand with a garland
Another simple way to make a New Year's beauty from pine cones is on a stand. For the base you will need thick paper or cardboard.
We will need:
- pine and fir cones
- hot glue gun or PVA
- cardboard
- scissors
- a thread
- colored paper
- spray paint
Step-by-step instruction:
1. Cut out a circle of any size from cardboard. This will be the base and stand for the Christmas tree. To make the stand look elegant, paint it gold or silver.
2. We begin to glue the largest cones to the base. Glue them together in the form of a six-pointed star.
3. The next row is made of 5 medium cones. We glue them in a checkerboard pattern in relation to the first row.
4. This is followed by a row of 4 smaller cones.
5. We place the last pine cone on the very top of the head and glue it with PVA or faster glue - from a hot gun.
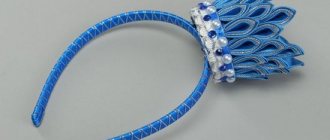
6. The Christmas tree made of cones is ready, all that remains is to decorate it. Attach a pointed star cut from gilded cardboard to the top of the head. You can cut out small stars from colored paper by gluing them to a thread. Place a beautiful garland with stars on the New Year's tree.
You can also put a real garland on such a Christmas tree, with glowing lights. Then on long winter evenings it will be very cozy to sit in its New Year's lights.
Preparation rules
Very often, cones falling from spruce and pine trees turn out to be closed and only open after a while, thereby changing the original appearance in which this cone was delivered to your home. This can somewhat overshadow the craft, so before you start making a Christmas tree from spruce or pine cones, you can familiarize yourself with some of the intricacies of preparing cones for the craft.
- If you want to leave the cones closed, after collecting them you need to put them in a container with wood glue for literally 20-30 seconds, this will not allow them to open.
- If you have collected closed buds and want them to open as soon as possible, there are several ways to achieve this:
- you can let them cook for half an hour and then dry them on the radiator;
- send the cones to the oven, preheated to 250 degrees, for 2-2.5 hours.
- Plus, heat treatment will kill microbes and small insects living in the buds and make them safe.
There is also a way to adjust the shape of the cone: you just need to soak it in water for 5-10 minutes, tie it with thread and dry it on a radiator. To bleach the cones, they need to be soaked for 5-6 hours in water with diluted bleach (1:1), then rinsed thoroughly and dried.
Article on the topic: All popular patterns of floss baubles for weaving
New Year's craft spruce from cones for school - master class
And now I propose to make a forest beauty from scales from pine cones. This Christmas tree looks very original. It can be painted in any color that matches your interior.
We will need:
- Cones
- Sheet of cardboard
- Acrylic or other paints for painting
- Brush
- Hot glue
- Pliers or sharp knife
- Clove (spice) - bud
Manufacturing process:
1. Separate the scales from the cones using pliers or a sharp knife.
2. Cut a cone from a piece of cardboard and glue the edges.
You can use an unnecessary candy box for this craft.
3. Using glue, we begin to glue the scales to the base of the cone as shown in the photo.
4. Glue a carnation bud to the very top.
5. When the Christmas tree is dry, paint all the scales with a brush and acrylic paint.
6. To make the beauty shine even more, grease the ends of the scales with PVA glue.
7. And sprinkle them with glitter or sparkles. That's it, our Christmas tree is ready, it turned out very nice and, in my opinion, no longer requires any additional decorations.
Beautiful Christmas trees made of pine cones with fruits for New Year's decor
A New Year's beauty can be made not only from pine cones, but also supplemented with other natural elements. What do you think of these New Year's trees with dried orange slices?
The forest beauty looks very creative with roses made from dried tangerine and orange peels. Don't throw away citrus peels, now you know where to use them.
You already know the working principle of making these Christmas trees from cones. You can choose any option convenient for you. And then decorate using pieces of dried fruit - oranges, tangerines or limes.
It looks unusual, bright and very original!