Step-by-step master class
To work you will need (master class):
- Pieces of natural fabric with minimal stretch;
- Scissors;
- Needle and thread to match the fabric (the parts can be sewn using a sewing machine or by hand);
- Monofilament is a transparent thread similar to fishing line;
- Sintepon, holofiber or other soft material for filling. Cotton wool is not suitable because it clumps up a lot.
- Stand;
- Decorations for decorating a mannequin pincushion.
Making a mannequin requires patience and precision in work. So, step-by-step instructions for the master class:
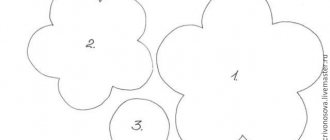
- Draw a pattern of the mannequin’s “body” on a piece of paper. The pattern of the front part, back, side part and bottom should fit on A4 format.
- We cut out the fabric. We transfer the front part, bottom, back and two side parts in a mirror image (left and right) onto the material. Remember to leave 0.5 cm for seam allowance.
- We sew the details. Sew the completed parts of your mannequin from the wrong side along the side and shoulder seams using a sewing machine or by hand. We do not touch the base and neck yet. Turn the resulting shape inside out.
- Bottom of the mannequin. Before sewing the bottom piece (oval), strengthen the base. For example, insert a piece of cardboard or cut out the same oval from plastic. Place a thick piece at the bottom and then sew the fabric together with discreet monofilament thread. A stand (stick) will be inserted into the base of the hand-made needle case. Make a hole in the middle for it in the rigid base, as in the pattern.
- Padding. Soft material is stuffed inside through the neck. The neck is sutured.
- Stand. There are several methods that craftsmen who make needle bed mannequins with their own hands actively use:
- We take a small juice tube, a nail a little longer than the tube (about 10 cm), or a block of any shape. We cut the tube, leaving only a flat area. We insert a nail inside the tube. We drive a nail into the block, thanks to which the mannequin-pincushion will stand. It can be of any shape - rectangular, square, triangular, fancy. It can be hewn, left “as is” or painted to match the mannequin along with the straw. We hide the head of the nail at the base of the mannequin. We sew up the hole, piercing the tube several times. Check the stability of the finished needle bed mannequin and strengthen it as necessary.
- We take a round stick (you can use an ice cream stick) and a plate from under a small flower pot. Turn the plate over and cut it to the desired size. If the plate is light, weigh it down. To make the finished mannequin-pincushion heavier and more stable, glue a flat pebble, metal plate or part (large bolt) inside with silicone glue. In the middle of the plate we cut a hole into which the stick is inserted, and fasten the other end to the base. Drape the base (plate) with fabric or paint it to match the mannequin along with the stick.
The master class is completed. The finished product can be decorated with beads and pieces of fabric.
MK pincushion-mannequin
Difficulty: above average
Working time: 1 day
Materials: velor, wooden stand, foam rubber, holofiber, beads, fishing line, sequins, satin ribbon, lace, calico
According to the author.
So, to make such a mannequin we will need: a stand (can be made from any available materials, there are a lot of master classes on this topic on the Internet), cardboard, foam rubber, tulle, beads, sequins, stretch velor fabric and a blank doll body ( I use a body sewn using a textile hinge pattern).
The shape and size of your mannequin will depend on the pattern you choose. My mannequins are large, 37-40 cm, which is why they look so impressive.
When the body is ready, we will begin work on turning it into a mannequin))
First, carefully close the place for stuffing - the neck. Gather the fabric around the hole and tighten it.
Now we need to make a “dress” pattern; the fabric must have stretch! And it should stretch across!!!! It is very important!
We lay out our blank on the fabric, outline it schematically, stitch it and cut it out. Leave a hole at the bottom for stuffing.
Now turn it inside out and pull it onto the carcass.
We close the hole with a blind seam:
That's all for now with the body. Let's start decorating the stand. By the way, you can also decorate stands for dolls and toys in this way. It turns out very beautifully and neatly.
We will need 2 circles from our fabric. We outline the base of the stand + 2 cm for allowances.
We assemble the first circle around the perimeter with a thread and pull the resulting “bag” onto the stand. We fix it.
From below we should get a smooth, beautiful bottom:
Now we cut out 2 more circles, equal to the base, from cardboard and foam rubber.
Now you need to center the holes in the cardboard and foam circles for the rod. Let's make this kind of sandwich. And in order not to waste time, we paint the stand stem in the desired color.
Next, we lubricate the puncture site on the foam rubber with glue and glue the fabric to it, then, similarly to the bottom half, we decorate the top:
We connect both halves by carefully piercing the fabric. You can cut a tiny hole with scissors, but don't overdo it!
We press the puncture site as hard as possible with our fingers and then lift it up a little. So that the hole in the foam rubber is beautifully designed.
Next, we connect both halves with a hidden seam:
Now you need to place the body on the rod. We put it on a stake))) I first pierce it with a knitting needle in order to kind of lay out the direction and distribute the stuffing around the puncture.
I lubricate the puncture site and the rod with glue, I use Moment-Crystal. And I insert it by force, scrolling and pulling... physical strength may be needed here.
All! The workpiece is ready. Now decoration and decorations))
In this sense, I am very lucky; our handicraft store sells ready-made lace, which I use for mannequins. It comes in different colors and I use it))) But you can embroider something, and come up with something of your own... If only you had some imagination!))
This time I decided to make a mannequin with a skirt, embroidered it with beads, sequins and lace.
Please note that all the decor is sewn not with threads, but with FISHING LINE! It is practically invisible and this makes the work look neater and more “more expensive”))
The end result is this beauty:
Thank you for your attention! Be creative and let it be beautiful on your desktop)))
Source
Features of creating a pincushion in the tilde style
Tilda is made according to the same instructions as a regular one. The differences are due to the tilde style, in which not only pincushions are made, but also toys and interior items.
Peculiarities:
- For the tilde, natural fabrics in pastel colors are used. The nude top and dress are separated. The dress for the tilde pincushion is made of fabric with stripes, polka dots, and checkered patterns.
- The head of the mannequin can be made or not. Instead of the head, you can sew one or more beads. In any case, the face of a tilde doll is conditional. Hair is made from yarn.
- Tilda has different shapes. Her body is pear-shaped, expanding downward. You can use a pattern for a doll as a basis. Without using a leg pattern, we make a stance instead. Hands are made upon request. Often tilde style dolls are made with wings.
- A pincushion in the style of a tilde needs lace, beads, and buttons.
Pincushion mannequins have gained popularity due to their spectacular appearance. Today they have become a stylish and useful accessory in the interior. Thanks to the variety of ideas and styles, they will fit into any design.
LiveInternetLiveInternet
Quote from Irina_EL's message
Read in full In your quotation book or community!
Pincushion mannequins Many beautiful ideas and master class
Pincushion mannequins or mini-mannequins.
Many beautiful ideas from Tatyana Romanyuk and Anna Khromova
Master class on sewing an interesting mannequin from Svetta
Master class from Svetta, text by MK
By popular demand, I am publishing my photo master class on making mini-mannequins. Have you prepared some beautiful rags, scissors, threads and needles? Then let's get started! 1. Pattern. I draw patterns for my mannequins myself, sometimes I just use the basic version and then finish the shapes on the fabric. The shapes can be your favorite: wide or narrow, long or short, straight or with a non-standard shape. Each time I choose a different shape so that all the mannequins do not look alike. If anyone finds it difficult to draw the shape of a mannequin, you can copy the silhouette from any picture or photograph.
To create a pattern on fabric with a pattern, I always use a transparent version of the template, since it allows you to adjust the desired pattern to the future mannequin when cutting. I made a transparent template from a thick pocket folder. 2. Sew the body. After I have cut out the two parts of the future mannequin, I sew them together, leaving the bottom part open: I turn the workpiece right side out and fill it with filler. I fill the very top of the mannequin a little more densely than the whole body, so that it has the ability to hold the load of the future top decoration, and the main part can bend and change its movements and shape. I fill the lower part more densely for durability.
This way, by bending and turning, you can change the pose of the mannequin, giving different movements to the body. For this reason, I do not fill the central part tightly.
3. Decorating the bottom of the mannequin. We make an outline of the bottom part of the mannequin /filled/ on cardboard, cut out one of the bottom parts. Remember that the cardboard part should be slightly smaller than the bottom of the mannequin itself!
I cut out from a piece of fabric /never throw away all the scraps of fabric when working!/ a shape along the cardboard part, but of a larger size:
Using basting, I tighten and secure the fabric part, inside which I place the cardboard part:
I sew the finished lower part to the lower part of the mannequin:
4. Decoration of the mannequin. I’m not describing anything specifically, since this is your personal flight of fancy. This could be a skirt:
Or a placed flower at the top:
Any ladies' accessories:
And additions to them:
5. Mini hats or pincushion hats. MK on hats can be found in my tips.
I use lemonade bottle caps to make mini hats for the mannequins. Hair dye caps are ideal for very small hats.
To attach the hat to the mannequin I use these needles:
From the back of the hat I bring a needle to the bottom:
And I put the hat on the mannequin. If it is stable, you can glue the needle with glue, but first find the correct position for the hat and then glue it to the mannequin.
Video from Svetta
I wish everyone beautiful mini mannequins! Svetta.
Sources:
https://svetta-silk.blogspot.ru
https://vplenuidei.blogspot.ru