Nitcography
This is a very interesting needlework technique. You can also hear other names for the technique, for example, thread painting or painting from knitting threads. The drawing technique is very interesting, it does not use paints or brushes, the working tool is thread and PVA glue.
By choosing this technique, you will be able to realize your artistic potential, without the need for special training. Once you try this technique, you will certainly become a fan of it.
Panel made of threads and nails
Another interesting idea is an elegant panel made of threads stretched over small nails. Watch step-by-step photos or a video with a master class, and you can make such a panel yourself from the most available materials.
Necessary materials
As already noted, this technique is very simple, and based on the materials it can even be called budget. Most likely, you can find everything you need for work at home. To work you should prepare:
- The most common PVA glue.
- A simple pencil and scissors.
- Cardboard.
- Threads.
You can use cardboard as a base, or you can use glass, hardboard or any other base.
We pay special attention to the choice of threads. They will be needed in different colors, depending on the image you choose. The thickness of the threads should be the same.
If you purchase new threads, then it is better to immediately buy different colors from one manufacturer, one model. If you use strings, the transitions will be visible. But, on the other hand, some people will like it even more. Wool threads are quite suitable for thread printing; it can also be acrylic threads or floss.
How to work in nitcography technique?
When all the materials are prepared, you can proceed directly to creating a masterpiece. We offer you a master class on crafts made from threads:
Take a rectangular shaped cardboard. Using a simple pencil, draw the desired image on it. Suppose you decide to make cherries, draw them. For beginners, it is better to choose the simplest images, without small elements.
Now you can proceed to drawing the outline of the image with thread. Apply glue along the contour of the drawing, which was made with a simple pencil. Now, along the contour where the glue is applied, apply a black thread, these will be twigs, berries and leaves, with a black outline you will highlight the borders.
Note!
DIY military crafts step by step: 150 photos of the best craft ideas for children for school or kindergarten
- DIY crafts for May 9 step by step: 150 photos of the best crafts for Victory Day
DIY crafts for February 23rd step by step: master class with photos and descriptions of how to make crafts for Defender of the Fatherland Day
To ensure that the thread lies along the contour, use a skewer, toothpick or knitting needle. You can also press the thread a little with this tool so that it is fixed. Leave your work so that the glue dries and the outline is well fixed.
Now you can move on to filling the internal space on the berries and leaves. Apply PVA glue inside the outline and begin to apply the thread in spirals in turns.
As you work, help yourself with a skewer or knitting needle. Try to ensure that each new turn lies close to the previous one. Crafts made from threads on cardboard using this technique can be either simple or complex, which is not a shame to call a real work of art.
Crafts made from copper wire
Copper wire is considered the recognized leader among all materials for “wire” needlework. Wire of different thicknesses is used, which depends on the element of the composition being created. For example, it is advisable to make the frame parts from thicker wire, while the connections and windings are made from thinner material.
We used “copper wire” in the name, but aluminum wire also has all the advantages of this material, the work with which is identical to working with copper, with the exception, perhaps, of the impossibility of soldering connections. Aluminum wire has a brilliant gray tint, which outwardly makes it similar to noble silver: because of this similarity, many DIY wire jewelry people prefer to make from aluminum wire; this is worth taking into account in your creativity.
If you have never made crafts from wire before, we recommend starting with copper material, since, firstly, it is soft and pliable even for children’s and women’s hands, and, secondly, unlike aluminum wire, it can be bent many times. different sides without breaking after two or three bends like aluminum, which gives more room for correcting mistakes.
Contour (flat) crafts
Contour crafts made from copper wire are available even for children’s creativity: children like to tinker with such a favorite “wire”, while their imagination and spatial thinking develop very well, as well as fine motor skills, which, among other things, perfectly develops intelligence and strengthens mental health. And how much joy there is from the first successes!
When starting to assemble a flat craft, they adhere to a simple algorithm: starting from the outline, move on to the internal parts, which are manufactured separately, and then carefully screwed to the outline and to each other with thin wire; in the right places they make (if necessary) a tight winding, filling the space.
Typically, children strive to complicate the design of their crafts, and there is no need to interfere with this by artificially restraining the creative impulse. Having felt the creative powers within himself, the child, looking at pictures with examples of crafts, wants to do something more complex, and often these are three-dimensional figures.
Volumetric crafts
Three-dimensional structures are called three-dimensional, which usually have a more complex structure. In addition to purely decorative ones, there are many examples of crafts for applied purposes such as baskets, lanterns, various stands, etc. Often the objects of attention are figures of people, animals, cars, and flowers.
When composing complex compositions, you most likely cannot do without a soldering iron. In principle, any will do - a regular 25-watt one will suffice. The main thing is to first clean the soldering areas from the insulating varnish coating (if any), clean them and carefully tin them using tin and rosin: the areas prepared in this way are then easily and reliably soldered, creating a strong connection.
Read also DIY crafts for Valentine's Day, photos, examples
Algorithm of actions
Detailed instructions for creating crafts from threads will help you quickly and easily create beautiful products. The algorithm is as follows:
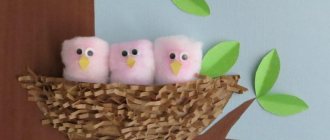
You need to inflate the balloon to the desired size. There is no need to blow too big, let it be the size of a chicken egg or a little larger. The size of the ball determines the size of the future chicken.
Now pour the glue into a bowl and place it in it. To make it more convenient to work, the glue can be diluted with a little water so that it is not particularly thick.
Now you can proceed to the next stage. Apply the thread in skeins onto the inflated balloon. Skein by skein, make the basis for the future chicken. It is not necessary that the ball be tightly wrapped with thread; it is enough to make a base so that when the thread dries, the ball of thread holds its shape.
Now leave your product to dry completely. Once the glue has dried, you can move on to the next step. Carefully pierce the balloon with scissors or a needle and pull the already deflated balloon out of the thread body.
Note!
- DIY airplane craft: the best options for creating an airplane from paper, cardboard and plastic. 120 photo ideas
- DIY crafts for March 8 step by step - a review of the most beautiful crafts for International Women's Day (120 photo ideas)
Diaper cake for a girl - 180 photos of ideas for original diaper cakes + DIY instructions with examples of finished products
Now there's just a little bit left to do. You already have a yellow base, decorate it with eyes, don’t forget to make a beak from colored paper, legs, and you can also make a hat.
As a result of these simple steps, you can create real Easter cuteness.
Before you start
Before you begin to master handicraft techniques and materials that are new to you, you should first stock up on a sufficient amount of materials:
- copper and aluminum wire of different thicknesses;
- colored threads, paper, foil, shreds;
- multi-colored beads, beads, sequins;
- plasticine of different colors;
- dry twigs and roots of interesting shapes;
- chenille (fluffy) wire of different colors.
Of course, making wire crafts without tools is, if not a pointless undertaking, then certainly unpromising: once you pick up this material, you will soon realize that you can’t do much with just your fingers. What tool do you need?
- First of all, wire cutters for biting off wire, pliers and round nose pliers for bending material.
- Soldering iron - many crafts, especially large ones made of thick copper wire, require soldering at least at key points: you will need known skills in handling a soldering iron, which are easy to acquire by practicing on unnecessary scraps, soldering them using rosin and tin. To work with a soldering iron, you will need tweezers (medical or special), since you will not be able to hold the heated wire in your hands. And for completely novice handicraftsmen, let us remind you that only copper wire is soldered; for aluminum there are other connection methods.
- Small Hammer and Anvil - As you will see, some crafts have flattened parts. A suitable massive metal object with a flat surface is most often used as an anvil.
- Fine-grained flat file, a piece of sandpaper.
- Scissors - cut out the necessary elements from paper and scraps.
- Scotch tape or electrical tape - for temporarily connecting individual parts.
These are just the most necessary tools, which in any case will be useful when creating most crafts. As creativity progresses, the need may arise for other, special tools.
Read also DIY pasta crafts photo
Toys - balls
If you have leftover yarn or want to create something interesting with pompoms, then you should try an interesting creative technique. On the Internet it is not difficult to find patterns for making crafts from threads wound into pompoms.
Pompoms can be made from leftover yarn or new yarn. And from them to construct unusual fakes.
Home decor
Hand-knitted decor is original and stylish. It both decorates the house and shows that “skillful hands” live here.
Cushion cover
You can use yarn of any color for the cover. If there are a lot of multi-colored leftovers, the pillow will come out motley.
The simplest option that a child can handle is a square or rectangle knitted with double crochets. Rows of multi-colored yarn can be alternated as desired. If there is not much yarn, then you can knit only one side, and use fabric to decorate the second.
A more complex option is to use the patchwork technique. From the remaining yarn, squares of different colors of the same size are knitted, then connected using a hook or needle and thread. The result should be a canvas the size of the pillow. The cover needs to leave one entrance open (on the short side) in order to sew in a zipper or design the entrance as an overlapping flap.
Pincushion
Knitting a pincushion in the shape of a sun is a great way to spend time together with your child. The result will be something both funny and practical. For the craft, use soft yellow yarn, a hook, padding polyester, and decor (beads, sequins).
Instructions:
- Cast on three air loops, close and knit two identical circles with a diameter of 9 cm using single crochets. The knitting should be tight. One circle can be knitted by a child, and the second by an adult.
- Connect the two halves with single crochets, leaving a small hole, without breaking the thread.
- Fill the needle bed with padding polyester or other synthetic filler and close the hole.
- Continue knitting in the round: in each loop of the previous row, knit three double crochets - you will get a wavy edge, symbolizing rays.
- Decorate the pincushion with beads or sequins around the circumference along the base of the rays.
- On the reverse side, crochet a loop at the base of the wavy pattern for hanging the craft.
A pincushion made by a child will be a wonderful, practical decor for your home. The craft can be used simply as a toy and hung in the nursery.
Do-it-yourself yarn crafts bring special joy - they are individual, made to your liking, and when making them you can put leftover material to good use. Handicrafts develop imagination and help children fall in love with creativity.
https://youtu.be/XzxqAGTBJxEhttps://youtu.be/KYAT-cDd-t4
_
Necessary materials
In order to use this creative technique, you need to prepare the following materials:
Cardboard. Glue and scissors. Felt or colored paper. Several beads.
Having prepared the listed materials, you can begin the stage of creating toys.
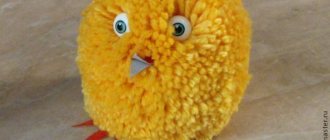
Algorithm for making toys from pompoms
To begin, you will need to cut out two equal-sized circles from cardboard and make the same size holes inside. It turns out that in front of you there should be two exactly identical circles with a hole in the middle. Two circles should be cut in one place; you will wind the thread through this hole.
Now take the thread and wind it over the cardboard base. It must be wound tightly. Carefully holding the thread turns, cut along the top of the cardboard base with scissors.
To do this, move the cardboard circles slightly apart. Using a piece of thread, pull the pompom together in the middle. To do this, lay the thread between the cardboard circles and wrap the skeins of thread.
Now you have a pom-pom in front of you, with which you can create further. You will have to make several of these, depending on your idea. You can attach eyes, ears, and a tail to one pom-pom to create an animal.
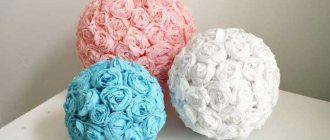
Necessary materials
In order to make a vase, you will need to prepare the following materials:
A glass bottle or jar of a suitable size will be your future vase. Yarn of the desired color and composition. Glue. Ribbons, beads, various decor, choose here at your discretion.
Most likely, everyone has these materials in their home. Then all that remains is the desire to do something unusual with your own efforts.
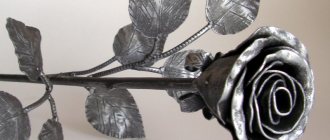
Crafts made from wire and thread
In our opinion, interesting crafts are made when using ordinary copper or aluminum wire and colored floss. The most common are all kinds of flowers and funny little animals made using this technique.
Most of these crafts are voluminous: as can be seen in the photos presented, the threads play the role of winding on a wire frame of the desired shape. For example, a flower petal is made from wire twisted into a spring on a rod of a suitable diameter (from a fountain pen, a long nail, a knitting needle, an even piece of solid steel wire, etc.), then a thread of the desired color is pulled between the wire coils, laid in a dense layer .
The body of the animal, its legs and tail, as well as the head are formed from multi-layered thread wound around the frame. Eyes, nose - made of beads or suitable beads, small buttons; whiskers (for a cat) - from pieces of fishing line or thin elastic wire.
Read also Flowers made of polymer clay: examples and tips for making
Algorithm for making a vase
In order to have a beautiful vase in your home, you can make it yourself. Let's look at the algorithm for how to make a craft:
The edge of the thread must be glued to the bottom of the bottle. To do this, you can use glue or a hot glue gun, whichever is more convenient for you. Next, gradually wind the thread around the base of the bottle.
Please note that there should be no gaps between the turns of the thread; apply the thread tightly.
When your future vase, and for now the bottle, is completely covered with thread, carefully glue the end of the thread at the finishing stage. Let's start decorating your vase. There is no need to limit yourself here. Use any suitable decorative elements.
Such a homemade vase can decorate not only your home, but will also be an excellent gift for a loved one.