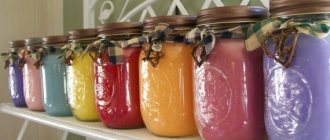
Shiny vases
You will need: glass jar, super tape, glitter.
Master Class
- Cover the jar with strips of tape.
- Take them off.
- Sprinkle with glitter.
- Make a whole collection of shiny vases by placing strips of tape in horizontal, vertical, and diagonal directions.
Shiny jar vases are ready! I recommend watching this video!
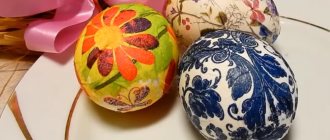
Vase using decoupage technique
You will need: glass jar, acetone, cotton pad, sponge, decoupage napkins, brush, PVA glue, acrylic paints, twine, scissors, water-based acrylic varnish.
Master Class
- Degrease the surface of the jar using a cotton pad and acetone.
- Cover the jar with white paint and wait until it dries.
- Wrap the twine under the lid.
- Cut out flowers or other design fragments from napkins, then glue them on.
- Cover the jar with paint of various colors and wait until dry.
- Cover the vase with acrylic varnish.
- This master class was provided by the talented craftswoman Liliya Frolova.
A vase made from a jar using the decoupage technique is ready!
Making the vase body
The next day the epoxy hardened. Both jars and saucer were tightly glued to each other. Now it was possible to cover its surface with a mass prepared from soaked pallets.
I wrung out the moisture from the trays soaked in water, then began to gradually pour PVA glue into them and immediately stir the mass with my hands until it turned out to be a homogeneous thick porridge.
"Dad is offended." Agata Muceniece about her relationship with Priluchny after the divorce
Why French children behave well: eight ways to raise them
“We are still friends”: Derevianko commented on the breakup with his wife
I applied this paste in an even layer on the outer surface of the jars. I also covered the dish with the slurry, which now became the bottom of the vase.
The base had to dry well before decorative elements were applied to its surface. And after this happened, I covered the surface of the future vase with alabaster putty and carefully leveled it. Now we could start decorating it.
Original vase
You will need: a small glass jar or glass, nuts of sizes M5 and M8, superglue for metal work, paper, pencil, gloves, scissors.
Master Class
- Trace the bottom of the jar on paper, then cut it out.
- Glue the M5 size nuts together using the template, then leave to dry. It is worth noting that along the edges you need to glue the nuts that extend beyond the template so that the lid will hold on in the future.
- Glue 4 M8 size nuts to the bottom of the jar and leave to dry.
- Fill the vase with water and insert flowers through the lid.
The original vase is ready! I recommend watching this video!
DIY glass bottle vase: master class (painting and stained glass techniques)
One of the simplest methods that gives spectacular results is the use of paint. Gold, silver or any other will do. Metallic or pearlescent shades will look more impressive.
The easiest way to apply pigment is from a spray can, however, you can use the composition from a jar or tube. It is not always convenient to do this with a brush, as it can result in streaks and unevenness. It is better to use a sponge or a regular sponge. Suitable for work. You can apply several layers with the previous one drying first.
Varnish is perfect as a finishing touch. It creates a moisture-resistant glossy surface. Shine increases with each additional application. It is better to use more layers than to increase the thickness of each.
If you are good with a brush and have a set of several flowers, you can make a vase with patterns. If you use acrylic, the paint layer will be opaque. The pigments in them are quite bright and after application they retain the transparency of the surface, however, it is not always good to work with them on a colored bottle. It is worth remembering that a special contour is usually sold along with stained glass paints, which can be used to outline parts of the pattern so that the paint does not spread beyond the boundaries of the form.
Multicolored vase
You will need: glass jar, newspaper, acrylic paints of 3 colors.
Master Class
- Spread the newspaper on the table.
- Turn the jar upside down.
- Slowly pour paint into the bottom of the can so that it drips down the sides.
- Leave for two days to dry completely.
A multi-colored glass jar vase is ready!
Decorative elements
For decoration I made angels, leaves and roses.
So, I diluted a little alabaster (I used alabaster putty) to a thick sour cream, poured the composition into the mold and left it to harden. The degree of hardening can be checked with a fingernail (if the surface is hard, you can remove it). The frozen figurine was taken out of the mold, diluted with a new solution and poured into the next figurine. I got 4 alabaster angels and leaves.
A student at the Vietnam Police Academy shared how she takes care of her facial skin.
Lost weight: what Sofia Tarasova sacrificed for the sake of “VIA Gra” (new photos)
The money tree pleases with lush flowering: my secret is in caring for the leaves
I powdered the bodies and faces of the angels with dark powder, tinted their hair, and made eyes and lips. As a result, they began to look almost lifelike.
I made roses from the pulp left over from covering the body of the vase. After they were completely dry, I painted them with white, pink and blue acrylic paint.
Once the paint was dry, I sponged some gold acrylic paint on them. By the way, I decorated the angels on the leaves in the same color.
Wall vases
You will need: glass baby food jars, a board, clamps for clamping the jars, a hammer, screws, a drill, a punch or a screwdriver, 2 hooks for hanging, a brush with iron bristles, a marker, a rope.
Master Class
- Clean the board with a wire brush.
- Make a hole in the clamps using a hammer and punch. It should be on the opposite side of the clamp.
- Mark the places where the jars will be attached with a marker on the board, then drill them.
- Place the jars into the clamps, then insert the screws into the drilled holes in the clamps and secure them tightly.
- Drill holes for hooks (further fastening).
- Insert the hooks and tie a rope to them.
Wall vases made from glass jars are ready!
Vase made from a jar and corrugated paper
You will need: a glass jar, corrugated paper of different colors, scissors, glue, ruler.
Master Class
- Cut the corrugated paper into strips of equal sizes.
- Make a small fringe on each stripe.
- Cover the jar with stripes, starting from the bottom and gradually working your way up.
The vase made from a jar and corrugated paper is ready! I recommend watching this video!
How to decorate a jar for a vase
To decorate the jar, you can use absolutely any available materials. The product is well enhanced by original ribbons, jars made from them, and beautiful lace elements. Miniature flowers made from ribbons and polymer clay are suitable for decorating vases. Burlap and twine can also be used to create unusual vases from three-liter jars and containers of any size. To work with such materials, it is necessary to choose an assembly adhesive that is resistant to moisture.
Vintage style vase
You will need: a glass jar, a glue gun, white and dark beige burlap, scissors, twine, lace and beads.
Master Class
- Cut a rectangle of dark beige burlap and cover the jar with it.
- Cut a strip of white burlap and cover the jar with it.
- Make twine flowers this way: take the end of the twine, start twisting, secure with glue and make several flowers of different sizes in the same way.
- Glue flowers onto the jar.
- Glue beads and lace.
The vintage style vase is ready!
Source
Decorating the finished product
Decorating a finished accessory will require knowledge of basic stylistic skills, without which it is difficult to make it appropriate in a particular interior. Today, fashion trends are aimed at a combination of conciseness and functionality. The decor should be minimal; it is important that, despite its apparent simplicity, the product looks status, impressive and professional, as if it had been purchased in an expensive store. Therefore, you need to approach the issue of decoration especially carefully.
Depending on the type of material used and the technique for making a floor vase, you can use the following to decorate it:
- mosaics, including homemade ones made from multi-colored tiles and mirrors;
- flat buttons of different sizes and shapes;
- coins;
- coarse salt;
- cereals, sunflower and pumpkin seeds;
- dry branches of different lengths and curvature;
- cuttings of branches;
- twine;
- tree bark;
- newspaper tubes;
- stationery erasers;
- bracelets made of beads on a rubber thread;
Useful tips
If you want to decorate your interior, start with a simple craft, such as a vase, which can be made from old plastic or glass bottles
using paper, twigs, tubes,
newspapers and magazines
, and many other materials.
There are a huge number of master classes on making vases with your own hands.
Some of the most interesting
and at the same time quite simple vases you can find here.