PROGRESS OF THE CLASS
Organization of the workplace.
Guys, let's get acquainted with the objects that are on your table (plasticine, stack, backing, napkin).
Plasticine is a soft, plastic material, and colored, which, under the influence of our skillful hands, quickly changes shape, which is what we will do today.
Stack - it looks like a knife, a stick, it also has different shapes. We need it for modeling; with its help you can remove excess plasticine, cut out shapes, and apply reliefs. There are rules for it and they are called “Safety Rules”.
Let's repeat the rules and follow them with you:
1. Do not swing or throw stacks at each other. 2. You cannot turn sharply towards your neighbor at your workplace if you have a stack in your hands. 3. Do not pick your teeth, ears, or eyes with the glass. 4. Don't bring it close to your eyes. Be careful with the stacks, they have sharp tips and can hurt you. 5. Plasticine should not be put into the mouth. 6. After modeling, you need to clean your work areas and wipe your hands, especially each finger. 7. Place the plasticine in the box so that it closes well.
So, you know these simple rules, you can begin your journey into the amazingly flowery world of plasticine country.
Working with plasticine.
We need to prepare the plasticine for work. Let's take the entire piece of plasticine and grab it with both hands (demonstration), turn our hands as if we were squeezing a napkin. This is how we divide the plasticine.
Now we have taken as much plasticine in our hand as can fit, and we will warm it up. This is how I show you, do it to me. We take the plasticine in our right hand, and with the other we press on the hand with the plasticine, then we transfer the plasticine to the other hand and repeat. We do it according to the count. (Children learn to count from 1 to 10 and back).
Now we squeeze the plasticine tightly with one hand and extend our hand to the left, now into the right hand, hand to the right, and continue to squeeze the plasticine in our fist. You can repeat the names of the months and days of the week.
And now hand with plasticine up and down. Let's remember the days of the week (maybe months, then children learn and remember the order better).
So they softened the plasticine. And our plasticine is magical: from this shapeless, soft piece I will roll a ball, and from the ball I will make a carrot (cone). If you don't believe me, come with me. We took the plasticine in our hands and rolled it in a circular motion. The result is a ball. Now let's make a cone out of the ball. We place our hands in a boat position, press the edges of our palms and move our hands back and forth. Take your ball in your hands and name which objects resemble or have the shape of a ball: Ball, apple, watermelon, ball.
While the children are naming objects, we make a boat with our hands and make a cone with return movements. I have carrots. And you?
Well done! Tap the blunt end on the backing, and you have a cone. What objects look like a cone? (Carrot, pyramid). Let’s roll the ball again - after all, it’s magical and can transform. Place it on the board, and the other on top and make return movements back and forth, tap the ends on the board. What did you get? What does it look like? On a jar, pipe, mug.
This is a cylinder. And if we roll it longer, it will turn out to be a long sausage, a rope. Now press lightly with the board to create a strip. Again, roll the ball, place it on the board, press harder with your hand, you get a flat cake (Disk).
Roll the ball again, squeezing it simultaneously with your fingers from above and below, and from the sides. Now place it on the board, and press the other one lightly on top, turn it to the other side and repeat. So we got a cube. Name objects that are similar to a cube.
Children roll the ball themselves and flatten it, turning it into a disk. Guys, tell me what flowers do you know?
Now we will turn our disk into a flower; to do this, we will press evenly along the edge of the disk with our fingers. Let's roll a small ball and place it in the middle of our flower, now attach the flower to a stick, collect all the flowers into one bouquet. Look how beautiful the bouquet turned out, name the flowers you know.
Reflection : Tell me, what did you learn new in class today? What did you like to sculpt? What geometric shapes do you know? Now let's name what we sculpted today in class?
We clean our workplaces and wipe our hands. Thanks for the activity!
The publication uses photographs of Elena Nikolaeva.
In order not to forget the page address and share with friends, add it to your social network:
More interesting:
Tags: Modeling, Publications of teachers
modeling from plasticine for children 3-4 years old
I’ll tell you briefly about several types of plasticine that we were able to try.
Alice now enjoys sculpting; she (and I too) mastered the basic principles of sculpting with the help of the book “Secrets of Plasticine.”
The book can be viewed in the Labyrinth, in Ozone, in My-Shop.
The point is that it very clearly shows step by step what needs to be molded, what size and how to attach it to get what you wanted. Once you understand the basics, you can sculpt anyone.
Often Alice and I sculpt together. I have already said that any joint business really helps to spur interest. I enthusiastically sculpt my own, and Alice - hers.
This is what we do according to the book (here, of course, it’s mostly my work), Alice’s is not so neat:
I usually try to show her different types of modeling to stimulate her imagination and teach her to think outside the box through the expression of forms.
Therefore, I try to show not only that plasticine can be molded into any shape, but also the different ways in which this can be done. Often I show her how to beautifully incorporate the most unexpected foreign objects into a craft. For example, make a beautiful long tail and fins for a goldfish from plastic film, spikes for a dinosaur from maple helicopters, decorate a plasticine cake with beaded sprinkles, etc.
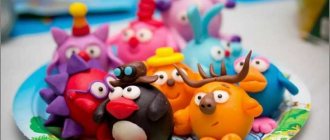
Of the latter, plasticine printing on a sheet of paper—actually a plasticine bas-relief—is particularly successful. We sculpt both animals and objects, as well as landscapes for them. Most often, everyone sculpts something of their own, and we watch each other with interest. You can sculpt with one color, you can make colored crafts, you can take colored cardboard as a basis, apply plasticine, smearing it on the paper with your finger, or sculpt thin sausages and lay out the image in stripes. And you can even decorate all this with third-party objects: cellophane, beads, sequins, beads and natural materials.
In the image below, I showed in one composition (the house on the right is my work, don’t be alarmed))), how you can combine different types of modeling in one picture. Alice liked it and decided to make her own from sausage logs.
This house is entirely her idea and execution.
I don’t have a goal to make Alice blind the same way as I do. All I do is show my interest in the process and every time I try to come up with some radically new way of expressing myself with the help of plasticine. Sooner or later, I almost always see the result of my activities in Alice’s works. She accumulates passive experience and begins to apply new techniques in her work.
Most recently, I created a bazaar based on our painting, which we brought from Indonesia. I decided to use colored cardboard as a basis and made a simple appliqué, which I later toned down a little with white paint and made the ground separately:
Process:
Only half is ready so far. And here I showed not only how to mix cardboard, paints and plasticine in one work, but also how to imitate different surfaces: orange peel, wood, fringe, wicker, etc.
And by the evening, Alice, who was minimally involved in the process of sculpting my painting, showed me a painting called “Wardrobe”, where on colored cardboard she first drew various things on a hanger for her doll, and then covered them with plasticine, somewhere there were even attempts to imitate fringe and patterns. True, Alice immediately gave the painting to her grandmother, so I didn’t have time to photograph it.
And this plasticine madness on the table, if I’m not mistaken, had something to do with the circus. Over there on the left is a rope for tightrope walkers, and then there are finger paths along which you need to walk)
In general, I won’t show you all our crafts. I think every home has enough of this goodness even without my photos. Now it’s time to talk about plasticine.
I believe that when choosing plasticine you need to maintain a balance. At a very early age, give the softest possible plasticine, or even better, modeling clay to test the material. At a slightly older age, when the child has learned to work with modeling mass, and it no longer allows him to make all his fantasies come true due to the fact that it does not hold its shape well enough and the parts do not stick together well, it is worth switching from mass to plasticine. First on the softest one, and then, as the fingers become stronger, on harder “grades” in order to develop hand muscles and fine motor skills. As a result, it is necessary to maintain such a balance so that it is not too difficult for the child to knead the plasticine and work with it, so as not to discourage the desire to create, but at the same time create a feasible load for small fingers.
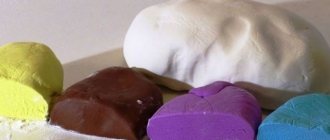
As for the plasticine itself, we didn’t have any. I'll tell you my impressions before I forget))
I rank them in order of softness from softest to firmest.
1. Play Doh
(in the Labyrinth, in Ozone, in My-shop)
Our very first clay, of course, was Play Doh. In fact, it’s not even plasticine, but a salty mass for modeling, like salt dough. It is very soft, suitable for the fragile fingers of the smallest children, does not stick to furniture, almost does not stain upholstery and carpets, and does not leave oily marks. If it suddenly gets on the fabric, just wait until it dries and then remove the crumbs. And yes, this plasticine has an expiration date: it gradually dries out. For adult children and complex shapes with small parts, this plasticine is no longer very suitable, since it does not have the necessary viscosity for the parts to stick “tightly”, but as a first test of materials it is ideal.
Alice still has jars of Play Doh - it's convenient for playing, say, baker. When fine detailing is not required, but you just need to roll out pies for the dolls or stick dumplings, because it is sold in separate jars, and there is quite a lot of it in each jar, about 160g. It is also very pleasant to the touch and has a soft, unobtrusive aroma.
In addition, Play Doh produces a wide variety of kits with molds for creating culinary and other sculpted masterpieces.
2.Jovi
(in the Labyrinth, in Ozone, in My-shop)
Spanish plant-based plasticine Jovi. Excellent plasticine for both small and older children! It is no longer as soft as Play Doh mass, but very easy to work with, suitable as the first plasticine after Play Doh, and unlike mass, it does not dry out over time, but retains its properties.
Dark colors may stain hands or surfaces slightly, but it washes off easily with soap, and overall, if I didn't write about it, you might not even notice because it's a problem with all soft clays. It doesn’t stick to your hands, but it sticks well to the paper and sticks together, no need to knead. Plasticine is very soft and pliable. The set contains 10 colors of 50g each (that is, the total weight is 500g, it will last for a long time), and there are also sets of 150g for those who have already tried and sculpt a lot. The colors are rich and rich, but the palette is a little strange: there is no purple, the brown is very light, but there are two different green and blue shades. Although there may be something in this, the developers probably know better what colors the little ones wear. The plus point is that there is no black color, it is used very little in crafts, and a whole briquette would be too much. We are very pleased with this plasticine, we give it to all our younger friends and periodically sculpt it ourselves. And, by the way, it’s a pleasure to draw with this plasticine; it’s not for nothing that it’s used to create cartoons. I think it is great for children from 2 years old.
3. Beam Tiny
(in the Labyrinth, in My-Shop)
Another very soft plasticine that rolls out easily. It is a little tighter than the previous Jovi, but just so slightly that you can call them the same. It glues perfectly both to each other and to paper, almost does not stain hands and surfaces, although after work there is a slight greasy feeling on your hands and you want to wash them. Well, the colors in the set are very nice. Total weight 200g, set of 10 colors. In general, the combination of price and quality is simply excellent plasticine! Suitable for children from 2 years old.
4. Idigo
(in Ozone)
Italian plant-based plasticine Idigo. One of the best plasticines in consistency that we have purchased. It is more resilient than the previous Jovi and Luch. Warms up in two clicks. Plasticine is very pleasant, does not leave a greasy feeling on your hands, is great for crafts, and at the same time makes you work on fine motor skills and pump up your already strong fingers due to a certain elasticity. Plasticine gives a slight load on the fingers, but is not too dense, so the child will not lose interest already in the process of kneading. A large palette of 12 colors with a total weight of 720g - lasts a long time. Unfortunately, it is rarely found on sale anywhere.
Giotto Pongo
(in the Labyrinth, in Ozone, in My-Shop)
This is wax plasticine, although the manufacturer also has plant-based plasticine. Probably the best available plasticine for children over 4-5 years old who sculpt quite a lot and have fairly strong fingers. It is dense, which allows you to fashion complex designs from it and realize your most unexpected fantasies. At the same time, it kneads easily, holds its shape well, and does not leave a greasy feeling on the hands. In stores there are sets with different colors, so you can buy several different ones and get a rich palette of shades. I would say that this set makes sense to buy if the child loves to sculpt and sculpts with pleasure. If a child has just begun to learn the basics of modeling, then it is better to start with softer plasticine so as not to discourage the desire to sculpt. The most common sets weighing 500g (10 colors, 50g each).
Silwerhof
(in the Labyrinth, in My-Shop)
Anniversary collection of the Russian manufacturer Silwerhof. The hardest plasticine of all presented in this review. Requires preliminary kneading. The set contains 18 colors of 20g each (total weight 400g) plus a stack as a gift.
All the works in the next photo are made from this plasticine. And although I suggested that Alice take softer plasticine, remembering the hatred of plasticine from my childhood due to the fact that kneading sometimes lasted longer than modeling. But Alice stubbornly did not want to, because the sausages made from this are the most durable and do not tear. In general, plasticine is tight, but for someone as stubborn and enthusiastic as my daughter, it is suitable, especially since it has very good colors, and there are so many of them. It does not stain your hands or surfaces, and you can hardly feel the greasy content.
Finally, I want to say that not a single clay in this review disappointed me. All of them are non-toxic and have the right properties, do not have a strong odor, and all have successful and rich color palettes. In general, they are all worthy, and you can safely take them based on the age of your child and his willingness to create. Well, if you still don’t understand where to start, start with the softest ones - they are good for any age from 2 to 99.
I hope our little experience was useful. Happy sculpting everyone!
Making treats for toys
You can start the lesson with something like this: the bear came to visit the hare, they gathered to drink tea, but there was nothing to drink it with. The baby will have to help the toys and make treats for them. You should not make more than 1-2 types of treats at a time, otherwise the child will get tired of the protracted activity.
- Bagel and pretzel . First we roll the sausage. To make a bagel, we connect the ends of the sausage to each other, in the case of a pretzel, we slightly cross the ends.
- Candies . Roll out a small plasticine sausage and attach small balls to the edges.
- Pie . First we roll a large bun, then flatten it. Fold the resulting flatbread in half and pinch the edges.
- Eggs on a plate . Roll a large bun, flatten it, level it with your fingers - you get a plate. Then we roll small balls and put them on a plate - these are eggs.
- Apples . We roll the balls and make small indentations in them with our fingers. Then we attach small leaf cakes to the recesses.
- Mushrooms . We roll the bun and flatten it - this is the mushroom cap, we roll the column - this is the stem. Mushrooms can be put in a basket, “collected in the forest.”
Candies with candy wrappers . We roll small sausages or balls, and then wrap them in prepared pieces of colored paper or foil, like in a candy wrapper. Most likely, you will have to help the baby wrap the candy, because... this task is not easy. Just be careful that your baby doesn’t eat this candy, it looks too much like the real thing!
- Pie/cake/pizza . First, we make a large bun and flatten it into a not too thin flat cake - we get the base for a cake or pizza, whichever you prefer. Then we decorate with everything we have on hand: beans, pasta, peas, buckwheat or any other cereal.