Before you start: materials and tools for felting
Felting wool requires preparation. The basis for any crafts is natural wool, which is not difficult to buy. This handicraft has already become so popular that the material for it can be bought at any handicraft store.
For felting, sheep or camel wool is usually used, which is specially prepared by manufacturers for sale: combed, bleached and dyed. The material is sold in combed strips or carded strips.
Combed tape is a strip of neatly laid fiber
The ribbons are usually so well combed that the material must be deliberately tangled before felting. But there is no need to confuse the carding - it already looks like cotton wool, in which all the fibers are tangled, but not felted.
How much wool will be required for the product? During operation, the volume of material decreases by about a third, so you need to take it with a reserve.
Advice! If you are going to make fluffy toys or souvenirs, then for the base and decoration you should use fiber of the same quality and thickness.
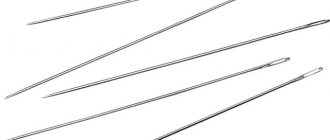
To work using the dry method, you will need special needles, the ends of which have serrations; they cling to the fibers and tangle them. Needles can be thick or thin. Thick ones (No. 30-36) are used for preparing the base and rougher work, and needles of a smaller diameter (No. 38-42) are useful for fine finishing.
In addition to thickness, needles differ in cross-section
A novice craftsman should recommend a three-beam tool. Difficult work is performed by stellates.
Advice! Experienced craftsmen recommend purchasing needles from European manufacturers. Chinese and domestic products are inferior in quality.
To make fluffy wool on toys, you will need reverse needles; they stick well and pull the fibers out. To avoid tearing the workpiece, use thin models of this tool.
To avoid damaging the skin of your hands and the surface of the table when working with a needle, craftsmen use a stiff brush or a special mat.
For the first job, it is enough to use ordinary dense foam rubber.
If you use a brush for felting, its surface should be covered with a piece of loose fabric so as not to damage the workpiece of your product with bristles.
A novice master can be advised to use soft finger thimbles made of silicone or leather. Out of habit, it is the fingers that suffer the most from the needle.
How to decorate finished products is a matter of your taste. But if you take on toys, it makes sense to buy ready-made eyes.
Lace, beads and seed beads, satin ribbons, plastic and metal parts are also used for decoration.
Sanding the finished product
Any dry felting master class for beginners ends with sanding and tinting the finished product. Sanding will make the surface of the toy uniform, dense and lint-free. You need to separate several fibers from the main skein of wool, separate them (fluff them) and roll the resulting “cloud” onto the main part with the thinnest needle. So you should work the entire surface of the toy until it becomes smooth. This is very labor-intensive and painstaking work, but the result is worth it.
Dry felting method
To make products using the dry method, you will need coarse or semi-fine fiber. Wool that is too fine breaks under the needle, and this process results in felting that is too dense and cannot be remade.
To felt wool using the dry method, you first need to rub it a little in your palms, then roll it up and then process it with a needle. The needle is inserted into the workpiece and turned slightly. As you gain experience, you can use two needles at the same time, this will significantly speed up the process.
First, the work is carried out with a thick needle, and then it is changed to a thinner one.
The workpiece will become denser, acquiring the desired shape. The work continues until, after pressing, the figure stops changing its shape. To create irregularities, a needle is often stuck into the place where you need to make a depression.
Rules
The technique of dry felting toys is quite simple, but you still need to take into account certain rules. You should always felt only on a substrate. This is a safety requirement. Otherwise, you can prick your fingers (and barbed needles seriously damage the skin) or damage the surface of the table.
Work should always start with a thicker needle, gradually moving to thinner ones. The tool must be stuck into the material at a right angle, movements must be frequent and quite fast. The part must be constantly turned over, simultaneously processing the entire surface of the product.
At the initial stages of work, you need to stick the needle quite deeply in order to properly felt the core of the toy. As long as six is soft enough, the material can be shaped into the desired shape with your fingers. The part is considered ready when it acquires noticeable density. There should be no voids inside, and the toy should not be deformed when pressed.
Wet felting wool
Wet felting is considered a classic method, in contrast to dry felting. This is how felt boots have been made for a long time. To make a product, wool is laid out on a template, moistened with a hot solution of water and soap, and then ironed and rubbed in different directions: first lightly and carefully, then with force and pressure. It's so good to make pictures and things to wear, like scarves.
Wet felting allows you to create real masterpieces
To mechanize the process, you can use a vibration grinder or even a hand massager. The result of the work is a felt cloth. With this method, the shrinkage of the starting material reaches 40%.
Mixed felting technique
Opinions differ on this issue. Some craftswomen recommend using a mixed technique to first make a piece using the wet method, and then finish it with a needle, while some claim that a better result can be achieved by working in the reverse order.
Try it yourself and decide which is better.
Each master has his own secret and his own experience. You can only find out which is better through experience.
Felting wool for beginners: master classes
The most popular products made from felted wool are toys. They turn out to be very pleasant to the touch and so cute that no one remains indifferent. This can be called real art.
Bear toy
An option for creating a teddy bear toy with your own hands, consider a master class:
| Illustration | Description of action |
| Prepare a piece of white wool, roll it and roll it on a foam sponge to shape it | |
| The finished result should look like an egg - with a pointed tip on one side and a flat area for easy landing on the other. | |
| Prepare a neck from a thinner roll, roll it to the body | |
| The next detail is the head. It should be oblong | |
| To avoid seeing the joints of the parts, place thin pieces of wool on these places and roll them down | |
| Each leg is made of three parts: an oblong base, a rounded hip and a small round heel. | |
| The legs are pressed against the main workpiece | |
| Handles of the bear - two oblong parts | |
| Ears – small and round, with a seal in the center to give shape | |
| Felt the ears to the head, carefully hiding the joints | |
| Use colored wool to make your nose, eyes and smile | |
| The fish is made of two parts - an oblong body and a rounded tail. | |
| Imitation of fish scales and eyes - made of contrasting wool | |
| Place the fish on the bear as if he were holding it in his paws | |
| The final touch is pink heels | |
| This adorable bear is a great toy: environmentally friendly and safe |
Keychain – book made of wool
Here is an interesting version of a wool book keychain:
| Illustration | Description of action |
| To make a book, take bright wool | |
| Felt a flat piece and cut out an even rectangle from it. This will be the cover | |
| Pages can be felted from white wool in the same way | |
| Fold the pages in half and secure them with string | |
| Sew the pages to the cover, threading the needle through and leaving a stitch with contrasting thread. | |
| The result is a small book like this. Make a couple of these with different colored covers. | |
| Prepare a ring and chain for your keychain | |
| Decorate books with decorations using hot glue | |
| Attach books to rings and a chain | |
| This keychain will be a nice gift for a loved one. |
Painting as a gift: poppy made of wool
You can create a masterpiece to decorate your living room or bedroom. For example, create a picture.
| Illustration | Description of action |
| To make a picture you will need a frame with glass, wool of different shades of red, black, green and white wool for the background. | |
| Apply a layer of white wool to the base of the picture | |
| Mix red and orange fiber for petals | |
| Cut petals from wool and place them on the background | |
| Place several black or dark brown fibers in the center of the flower | |
| For bright highlights, add pieces of orange wool, this is convenient to do with tweezers | |
| Now form those petals that are closer to you using the same cutting method | |
| Trim and give the workpiece a freer shape | |
| Use highlights again. They are made very well from silk fiber, it shines a little, which gives an excellent effect. | |
| Form a stem from a thin strip of black and green wool | |
| Bright stamens will be obtained from pieces of purple and white wool | |
| Be sure to add highlights on the outer petals, and sparse dark-colored fibers from the bottom of the flower to add volume. | |
| When all the details are in place, cover the picture with glass. | |
| Frame the finished work - you will get a very original wool drawing |
Wool brooch in the shape of acorns
The procedure for creating jewelry from wool for those who are interested in this technique.
| Illustration | Description |
| For acorns you will need green, brown and beige wool. | |
| Felt the oblong base of the acorn from beige fiber | |
| Felt the brown hat. Make two of these acorns | |
| Make a flat piece of green wool for the leaf. Add some red fiber | |
| Use scissors to cut out an oak leaf | |
| Secure a thin wire through the acorn caps | |
| Mask the wire with green wool | |
| Secure the leaf and tint it with pastel crayons for contrast. | |
| The caps of acorns can also be shaded with bright chalk | |
| Decorate your brooch with bright original beads | |
| Secure the clasp on the back side with hot glue | |
| This brooch can be used as a hair decoration or for a composition for the New Year |
Connecting parts together
The head and body or other large parts are usually thrown together, but small elements (nose, paws, tail, ears) need to be made separately. If you plan to join parts in the future, you should leave loose wool fibers at the joints. To reliably connect the parts of the toy, the free ends must be well rolled to the base.