This classic, incredibly feminine, and at the same time elegant accessory will never go out of style. It would seem, what is so special about a simple decoration? But it is precisely this that gives airiness and lightness to the entire image of a beautiful lady.
It’s interesting, but not only the fair half of humanity is indifferent to the bow. In the Baroque era, gentlemen decorated their frills, hats and even shoes with a bow. And today a classic tuxedo or tailcoat of a true gentleman cannot be imagined without a bow tie.
A little history
Bows appeared in ancient times. In Ancient Greece and Rome, respectable matrons decorated their hairstyles with them. However, bows came into fashion during the time of Louis XV, thanks to his favorite Madame de Pompadour. A bow can be seen in almost all portraits of the king's official mistress.
True, in fairness, it should be noted that bows were also in use under the Sun King Louis XIV, but then they acted as an original form of jewelry.
In the 20th century, recognized as a style icon, actress Audrey Hepburn loved to decorate herself with the most exquisite bows. So, as you can see, the bow has been and remains one of the most popular elements of decorating a person’s toilet.
Bow for beginners
Rep tape is very easy to work with. The material is ideal for beginner needlewomen. For example, let's consider making a simple bow from a thin grosgrain ribbon.
Materials for production:
- grosgrain ribbon in 7 colors. Ribbon width 0.6 cm and length 60 cm in each color (for one bow);
- scissors;
- ruler or measuring tape;
- lighter or candle;
- felt square 8 cm by 8 cm;
- glue gun or Moment glue;
- rubber.
Let's start manufacturing.
We cut the rep ribbons into strips of 7 cm. For one bow there should be from 50 to 60 cuts.
Now you need to make loops from the blanks. We connect the ends of the blanks and process them with a lighter.
We repeat the procedure for all petals.
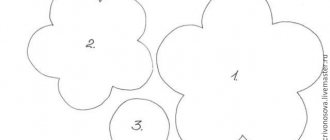
We cut out 2 circles with a diameter of 4 cm from felt - this will be the basis of the bow. We attach the petals with glue to the felt, as shown in the photo. Colors are taken randomly or in the desired sequence. The first tier produces about 22 petals.
Related article: DIY keychains for a girl made of clay with photos and videos
Using the same principle, we glue in the second tier of petals - there will be about 16 of them.
Glue in the petals of the third row. There will be about 10 of them. Glue the remaining petals in a bunch into the middle.
Turn the workpiece over, wrong side forward. Using a heat gun, glue the rubber band.
The bow is ready. We make the second bow in exactly the same way.
Hair ornament
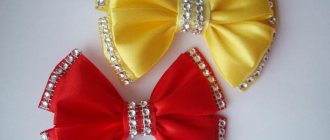
When preparing the little girl for school, stocking up on the necessary school supplies, uniform, shoes, knee socks, parents do not forget about one more decoration - a bow. It makes sense to make a school bow from satin ribbons with your own hands, because... purchasing the materials needed for the job will cost five times less than purchasing a finished product.
Materials
To work, you will need to buy three types of tapes:
- white satin, with a width of five centimeters and a length of one meter forty;
- red (dark blue, blue, green, etc.) three centimeters wide and half as long as the first;
- narrow (one centimeter) lurex, ten centimeters long.
Well, such things as a ruler, pins, a lighter, threads and a needle, and a hair tie can be found in any home.
Preparation of blanks
First, the white tape is cut into pieces of ten, 11.5 and thirteen centimeters (each piece is four pieces).
The red ribbon is cut into three pieces of 22 centimeters each. The lurex piece remains unchanged.
Step-by-step instruction
We start with a tape of 13 centimeters:
- We take two pieces, fold them at right angles, and then put one on top of the other.
- We carry out a similar operation with segments of 11.5 centimeters.
- We perform the same actions with ten-meter segments.
- We place the blanks one on top of the other, equal at a right angle, and the upper and lower parts are shaped like a Christmas tree.
- We secure the blanks with a pin.
- The corners of the bottom row are bent, turned back and secured with a pin.
- The same operation is carried out with the top row of the workpiece and as a result we get a figure similar to a square.
- Using a ruler, measure two and a half centimeters from the lower right angle and draw a line with a pencil.
- Using a double thread, we make a basting along the drawn line, trying to keep the stitches symmetrical.
- We take out the pins, but don’t touch the thread!
- Stepping back from the stitches a few millimeters, we cut off the excess material.
- We bring a lighter to the cut and melt the edge so that the tape does not crumble.
- We tighten the thread tightly and get a workpiece in the form of a bud.
- With the remaining pieces of white tape, we carry out the operations described and get a second bud.
- We sew the buds together and the white part of the bow is ready.
Jewelry based on a pattern
Bows can be made using different devices that will help you get even and identical crafts. These are both factory templates and those made independently. The last option is convenient in that the size of the finished products can be varied depending on the task, the width of the ribbon and the size of the base: bows for click-clack hairpins will obviously be smaller than the decoration for the headband.
Types of patterns
As the craftswoman works, she gradually acquires sets of stencils, for example, circles of different diameters, intended for cutting out bases from felt.
These bases cover the back of the product and help secure the clip or elastic band. The same applies to templates for bows. So, the simplest option is a U-shaped design. To make it, mark a rectangle about 20 cm long and 8 cm wide on a piece of cardboard or thick plastic. In the center, parallel to the long side, make a slot about 1 cm wide, leaving 4–5 cm to the top edge. By changing the sizes, templates for bows are obtained from ribbons of very different widths.
A more complex stencil is designed for tying single bows and one replaces several patterns at once. Exact dimensions and instructions for use can be found online. To make it, it is preferable to take a fairly durable material: cardboard or even plywood up to 2 mm thick.
Very interesting products are obtained if you work with star-shaped templates. By varying the size and number of rays, you can create voluminous bows. As a rule, in this case a narrow ribbon (6 mm), grosgrain or satin, is used. These rubber bands look especially beautiful if you make them from 2-3 layers of different sizes. It is better to prefer dense but flexible plastic as a material for the stencil.
Multi-colored "stars"
It's easy to learn how to make bows from grosgrain ribbon using templates. Both an adult craftswoman and a schoolgirl can master the master class if she is shown the sequence of actions. To work you will need:
- narrow tape;
- lighter, scissors, thread and needle, glue;
- seven-ray stencil in 3 sizes.
The difference in the diameter of the templates should be 1-1.5 cm. The tape is suitable both plain and with a pattern. You can take three shades from dark to light, related colors - red, orange and yellow - or, for example, make the top and bottom row blue and the central row white. The so-called “lids” are good as a center - they have a suitable diameter and a large selection of colors, as well as patterns inside.
Having prepared everything necessary, they begin to work. One end of a narrow tape is singed, applied to the center of the template and they begin to wrap it sequentially. It is necessary to ensure that the intersecting ribbons are only on one side of the pattern, and on the other there are only strips covering the base of the beam. When the template is filled, the tape is cut, the tip is singed and all layers are secured with a few stitches through the hole in the center. All that remains is to remove the resulting star, carefully bending the template so that the ribbon loops easily slide off the rays.
In the same way, make two more layers using smaller patterns. All three blanks are placed on top of each other, fastened in turn with glue, and the base is fixed from the inside - an elastic band or a small clip. , and wonderful bows are ready.
An equally interesting option will be obtained if you use stencils not only of different diameters, but also with different numbers of rays, for example 7, 5 and 3 or 8, 6 and 3. You can also experiment by adding brocade, satin or nylon ribbon.
Beautiful bows
This option is more similar to traditional bows, but is also not particularly difficult.
You will need a U-shaped template and a tape 2.5 cm wide. The tape is applied at a slight angle to the cardboard and wraps it 2.5 turns. The “tails” should be on different sides. They are cut obliquely or in the form of a dovetail and singed so that they do not bloom. A bow is sewn through the slot, capturing all layers of the ribbon. Carefully remove the workpiece from the template and tighten the thread, forming folds. Further decoration is left to the discretion of the craftswoman: you can place a second smaller layer on top, make a beautiful middle or decorate the edges with rhinestones. If desired, add “spirals” from a narrow ribbon.
Colored ribbon
First, we singe the edges of the tape. Then:
- Fold the pieces in half, marking the middle.
- We bend the edges of the tapes towards the center of the workpiece and fasten them with pins.
- We place two blanks side by side, and the third on top of them in the center.
- We take out the pins and use double thread to make a basting with large stitches.
- We tighten the thread, getting a colored bow.
- We put a white bow on the colored one and fasten them with thread.
- Attach a hair tie to the bow.
- Cover the junction of the two colors and the elastic with lurex.
- We sew up the edges of the silver ribbon.
The two-color bow is ready. If desired, you can decorate it with rhinestones, beads or some unusually shaped button.
If the description of the steps for making the decoration is not sufficient for the job, you should find instructions on the Internet with step-by-step photographs of making a ribbon bow with your own hands.
Decorative items
Miniature bows are perfect for the role of elastic bands, barrettes or other hair decorations. Similar products can be woven into braids or used to decorate postcards with congratulations for some significant event.
To create an original souvenir, you will need two pieces of thin satin ribbon up to 15 centimeters long.
The manufacturing work will take place in only five stages.
- A bend is made at a distance of 5-6 centimeters from the edge of the tape.
- The tape is folded at a right angle so that its end points down.
- The same operation is performed with the second end.
- The second blank is made according to the same principle, only if in the first tape the bottom edge was bent first, then here you should start from the top.
- Both blanks are stitched and secured to a hair elastic.
A miniature decoration for a gift box, postcard or hairpin is ready.
Finery
You can make small voluminous bows from satin ribbon. To make one thing you will need four pieces 10-12 centimeters long.
And here the work progress consists of just a few steps:
- The segment is folded in half.
- The edges bend down, forming a kind of house with a triangular roof.
- The triangle is folded down and secured with a pin.
- The sides are brought to the center of the workpiece.
- The resulting workpiece in the form of a rose is secured with threads.
- The same actions are carried out with the three remaining segments.
All that remains is to connect all four “buds” together and the voluminous trinket is ready.
How to make a bow brooch
This elegant item will look great as a brooch. It can also be attached to a hairpin or headband. And if you make it from a wide ribbon, you will get a chic belt buckle!
What you will need:
- 2.5 cm ribbon of the desired shade (we took pale blue);
- the middle for kanzashi to match the ribbon;
- a small piece of felt for closing on the back side;
- scissors;
- ruler;
- universal glue or glue gun;
- clothespins;
- lighter;
- thread and needle
.
Step 1 Cut 8 pieces from the 2.5 cm ribbon, each 20 cm long. Melt their edges with a candle or lighter. Place one of the segments in front of you.
Fold it exactly in the middle with the right side up. Smooth the fold line well with your fingers. Move the line segment to a vertical position. Place a drop of universal glue on the left side above the fold line.
Fold the top half of the piece to the left along the fold line, right side up. Fold the top of the craft down along the fold line. Make sure that the left side of the triangle formed at the top coincides with the left side of the bottom segment.
Now turn the lower flap to the left. Adjust the top and bottom so that they are symmetrical.
Fold the right corner to the left side so that a little space is captured behind the corner line. Now fold the left side under the corner all the way so that the end of the top corner is flush with the left edge of the piece. If this is not observed, slightly straighten the part and adjust it to the specified requirements.
The part is ready! Secure it with a clothespin.
In the same mode, make parts from the remaining segments.
Step 2 Thread the needle. Tie a knot. Take one of the parts and remove the clothespin. Sew along the left side, starting from the corner at the top.
Now take the second piece. Insert it with the corner into the inner pocket on the top part. Place the second piece so that its top is along the horizontal line of the middle of the first element. Sew the second piece to the first. Arrange the next two elements in the same way. Leave about 5-6 centimeters of thread free. Using the same technique, connect the remaining 4 elements to each other.
Now pull the thread towards you.
Tighten everything as much as possible and connect it into a ring. Tie a knot.
Step 3 Now you need to hide the hole in the middle of the craft. Cover it at the back with a small circle of felt.
Carefully glue a cute center on the front.
To complete the work, attach accessories - a brooch - to the reverse side. Or any other desired accessories.
Below are videos from which you can learn how to make a ribbon bow in other ways.
Classic version
To create a traditional bow you will need:
- wide satin ribbon;
- translucent tape twice as narrow as the first, but in the same color scheme;
- lighter or candle;
- lace and artificial flowers, threads;
- beads and beads, etc.
Satin ribbons tend to “scatter” along the cut line, so they need to be set on fire.
Progress
Creating a classic bow requires just a few simple steps:
- you need to cut three pieces 20-22 centimeters long and three more 18-20 centimeters long;
- a narrow tape is superimposed on a wider one;
- “secure” the edges of the workpiece with a lighter;
- two long fragments are folded in half and rewound with thread in the center, thus making a double bow;
- similar actions are carried out with shorter pieces of tape;
- a smaller bow is placed on top of the larger one;
- both workpieces are secured with threads.
Decorative elements - lace, beads and beads - are attached to the center and edges of a handmade item made from satin ribbons.
How to make a “Spring” bow
This craft can be created either in one color or in two colors. You can attach it to a hairpin, headband, bracelet, etc. You can also make it from a St. George ribbon for May 9th. It will turn out simply amazing!
What you will need:
- silk ribbons of pink and olive shades 2.5 cm wide;
- a small piece of brocade ribbon 0.6 cm wide;
- threads, needle;
- universal glue or glue gun;
- ruler;
- pins;
- scissors.
Step 1 Cut 50cm from a 2.5cm wide roll of pink ribbon.
Fold this piece in half, wrong side up. Iron the fold line well.
Also, squeeze both ends of the tape with your fingers in the middle, wrong side up.
Fold one end of the ribbon with the wrong side up towards the center line, exactly along the previously formed folds. Pin it with a pin.
In the same way, fold the second edge of the tape towards the middle. Pin it with a pin.
Fold the craft in half. Iron the tops well.
Turn back. Turn it over.
Fold the left edge toward the center. Position it so that the intersection of the two bottom strips is level with the top point of the ironed line. Pin it with a pin.
Repeat on the other side. Now take a needle and thread. Tie a knot. Sew the central part of the craft with small stitches. Don't cut the thread.
Pull the thread towards you and tighten the center of the craft. Additionally, wrap it with several turns. Secure the thread and cut. You've done the top part.
Step 2 Cut 3 pieces, each 12cm long, from a 2.5cm wide olive satin ribbon.
Take one piece and fold either edge in half, wrong side up.
Stepping back 1.5 cm from the top, cut a corner diagonally. Start from the middle, moving to the extreme points.
Repeat on the other side. Follow these directions closely and your ribbons will be neatly and symmetrically cut.
Trim the remaining pieces in the same way.
Now place all 3 pieces exactly on top of each other.
Take a needle and thread. Tie a knot. Sew the center portion of the pieces with one stitch, securing them all together. Cut the thread. Now unwrap the pieces. Arrange them so that their sides form rays, like a drawn star.
Secure the central part of the figure with a pin. Sew it with a needle and thread.
Pull the thread towards you. Pull the center section. Additionally, wrap it with several turns of thread.
You have made the lower part.
Step 3 Place the top piece on the bottom piece. Connect them together using several turns of thread.
Cut a small piece of golden-colored brocade ribbon, 0.6 cm wide. Melt its ends with a lighter.
Wrap this piece around the central part, periodically coating it with glue on the back side. Secure the end to the back of the craft. Ready!
And if you make this bow from a ribbon of the same color, it will turn out something like this.
Contrast bow
The combination of white and black is a classic option for any decorative decoration. The traditional headdress for girls is no exception.
For production you will need:
- white tape;
- ribbon with black stripes or polka dots;
- black lace;
- scissors;
- rhinestones or beads.
Stages of work
- Stage No. 1. The variegated ribbon is cut into three pieces about 25 centimeters long.
- Stage No. 2. The white base is cut into shorter pieces - approximately a couple of centimeters less than the first.
- Stage No. 3. The simplest bow-loop is formed from ribbons and stitched in the center.
- Stage No. 4. A piece of black lace is sewn onto one of the white bows.
- Stage No. 5. The two remaining white bows are placed crosswise on top of each other.
- Stage No. 6. The colorful bows are folded like a snowflake and also secured in the center.
All that remains is to connect both blanks and a contrasting decoration can take its place on the girl’s head.
https://youtu.be/1iaDFXyy0Rchttps://youtu.be/mAODDH-Yzto
_
How to make a bow from a satin ribbon
This craft is perfect as a decoration for a hairpin, headband or bracelet. It can also be attached to the chest as a brooch or to the belt as an elegant buckle.
Materials and tools:
- 2.5 cm ribbons in light pink and soft blue (you can use any colors that harmoniously combine with each other);
- ribbon 1-1.2 cm fuchsia color - a small piece;
- silver rhinestone ribbon – about 15 cm;
- pearls with a diameter of 0.6 cm - 3 pieces;
- universal glue;
- tweezers;
- candle or lighter;
- ruler.
Step 1 Cut 4 pieces of 10 cm long from a light pink ribbon 2.5 cm wide.
Take 2 pieces and place them on top of each other, right side up. Using fire, melt their ends on one side. Seal the melted edges with tweezers or your fingers. Repeat on the other side. In the same way, connect the remaining 2 segments together.
Take one piece fastened into 2 ribbons. Place both ends towards you with the bottom left corner facing the bottom right corner.
Align the upper part of the segments and iron them with your fingers so that they form a regular triangle.
Fold the top part into an arc with the top of the triangle towards the corners joined together.
Insert thread into the needle. Sew the bottom of the work using as small stitches as possible.
When finished sewing, pull the thread towards you and pull everything together. After this, tie a knot. Additionally, sew the end of the piece with a few stitches to make it hold tighter. Repeat these steps with the remaining doubled section.
Using all-purpose glue, attach the ends of both parts together. Leave them for a while until the glue dries. This will be the top of the bow.
Step 2 Cut 4 pieces 10 cm long from blue and pink ribbons 2.5 cm wide. Melt their edges with a candle or lighter.
Place the pink pieces on top of the blue pieces, back to back. Insert thread into the needle. Fold the two connected pieces with their ends facing each other. Sew along their bottom edge.
Next, fold the next two pieces in half. Using the same needle, sew them along the bottom. Pull the parts together. Add the remaining double segments in the same way. Pull the thread towards you and pull all the elements together. Additionally, sew a few stitches around the middle of the piece to make it more durable. You have made the lower part.
Step 3 Place the top element on the bottom. Align them nicely. Cut a piece of 1-1.2 cm fuchsia ribbon approximately 7-8 cm long. Wrap this piece, wrong side up, around the middle of the craft. Cut off the excess. Using fire, melt the ends of this piece and squeeze them with your fingers. Turn the resulting ring inside out and move the seam line to the back side. This way your center will be neat on both sides.
Separate 2 pieces from the rhinestone ribbon along the length of the middle. Glue them around the edges.
Attach a few pearls on top. Ready!
Bow on a fork
An interesting and popular method of tying a bow is the method of forming a bow on a fork. The bows are small, but very neat and cute. They can be used to make elastic bobby pins, crab clips, clips and poppers. In addition, this bow can be a good decoration for a card or a gift, decorate, for example, a kitchen towel, or add zest to a girl’s or woman’s everyday outfit. It's very easy to do. Below we will provide a detailed step-by-step mini-master class.
Article on the topic: All popular patterns of floss baubles for weaving
Now you need to carefully remove the bow from the fork, but before doing this, secure it with an additional knot for strength. Remove and straighten the bow. If the ends are long, cut them off and process them. The tips can be shaped differently depending on who you like. The bow is ready.
To make larger bows this way, you can use a cardboard stencil. We provide a stencil template below.
Don’t be afraid to experiment, try it, everything will definitely work out!
Varieties of bows
It’s possible to create an exclusive bow yourself even without experience in needlework. For a girl to receive an unusual beautiful bow from her mother as a gift is great joy and delight.
Purpose of bows:
- small, made on a fork - an excellent souvenir;
- satin bow - ideal for hairpins, headbands;
- nylon fluffy - for a child for a matinee or celebration;
- paper bows - decorate gift packaging;
- graceful - on a dress;
- original - for home interior decoration;
- for a car - for a wedding.
Multilayer bow made of colored satin ribbons
Before purchasing, you need to choose a shade of ribbon that matches the color of the dress (hat). Let's try to create a multi-layered bow.
To work, you need 3-4 colors of material, the wide ribbon is the longest. Immediately cut the ends at an angle to prevent the material from fraying.
Make bows, but do not tie them. Below is the largest of the wide ribbon, put the smaller one on top. So 4 layers, in the middle we pull all 4 multi-colored bows together with a narrow strip. The product is ready.
Satin bow with lace
Take a wide satin ribbon 4 cm and the same piece of lace, braid or organza, but twice as thin. Cut two identical fragments 20-22 cm long and place the lace on top of a wide ribbon. Sew the edges together to make two rings and melt them from the inside with a lighter. Place one loop on top of the other, straighten the folds and secure the bow in the center with a bead or button.
Star bow
It is best to choose the basis for such a bow in the form of an elastic band rather than a hairpin, it will be more convenient and beautiful.
Manufacturing process:
- To begin, cut out a star of two sizes from thin cardboard. We make a round hole in the middle of the template and thread a ribbon through it. It is better to take an openwork ribbon so that the future bow looks richer.
- Then wrap the ribbon around our star blank, as shown in the photo. Follow the instructions carefully, otherwise the star may not work. When you finish, you need to stitch the middle with threads so that the star does not fall apart.
- Then we move on to the grosgrain ribbon, having previously singed its ends so that the ribbon does not unravel during work and use. We wind our ribbon onto the workpiece according to the same principle as with the openwork ribbon. Sew the middle.
- Then we make another star from the openwork ribbon, smaller in shape. To do this, we use a second blank star of a smaller size. We sew any decor into the middle of our openwork star and sew a star from grosgrain ribbon at the bottom.
- Then we sew the grosgrain star under the bottom, the openwork star that we made very first. And then we sew on the base of the elastic, securing it with a flat tape for reliability.
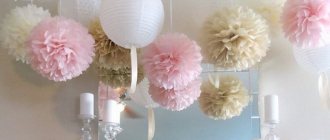
Small fluffy bows
If you need voluminous, lush, but at the same time small and not very bulky bows, you can make them yourself from a thin satin ribbon. One bow requires four pieces of 10-11 cm each, but you can add more petals for volume. They also make, for example, beautiful decorative flowers.
Fold each piece in half and fold the edges down to create a kind of “house”. Bend over the triangle, secure it with pins and carefully use tweezers to fold the sides towards the middle. Fold it, roll it into a “rose” and sew two parts together - this will be one side of the bow. All that remains is to connect both together!
Classic bow
A very simple but beautiful little bow that you can make in minimal time.
Manufacturing process:
- Take a small silk ribbon of any color. Make small loops on different sides and place the loops over your index fingers.
- Then insert one loop into the other and tighten the ribbon.
- Wonderful, cute decor is ready!