What can you store in a chest out of a box?
The chest, made from a cardboard box, is essentially the original version of a casket - that is, ideal for storing small items. Which ones? Traditionally, boxes are used to store:
- costume jewelry;
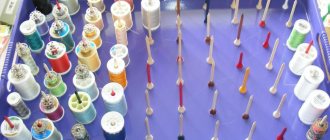
- sewing supplies;
- Memorabilia - small gifts and souvenirs;
- postcards;
- stationery;
- Photos not yet sorted into albums.
You can store in the chest small items related to your hobby - yours or the one to whom it is intended as a gift.
Benefits of a boxed chest
The boxed chest has a number of advantages:
- this is not only a beautiful, but also a useful thing;
- will perfectly play the role of an original gift (including a themed one, it can be a wedding gift, created for a specific date or event, or match the hobbies of the gift recipient);
- a wonderful craft to make with children (today it is no longer an ordinary household item, but a historical or fairy-tale item; the idea of creating it is wonderful for developing children’s imagination, joint creativity in a playful way, and at the same time for the development of fine motor skills);
- it’s easy to make with your own hands;
- materials for manufacturing are quite budget-friendly - to create the simplest chest out of a box, you can find everything you need at home;
- it takes relatively little time to make (compared to other handmade products).
Have you decided to make your first chest? Go ahead, start by looking for materials and tools for the job.
Master Class
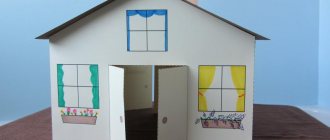
Let's learn how to make a wedding chest with your own hands from a shoe box.
1. First you need to cut out the lid from a cardboard shoe box.
2. After the first step is completed, you need to make a dome out of the shoe box lid. To do this, you need to glue the cardboard to a pre-cut box. The resulting composition should resemble an arch; cardboard is also added to the side, and everything is secured with double-sided tape. If for some reason you think that adhesive tape alone will not be enough, then you can resort to using paper clips and a stapler.
3. The third step will be lining our future wedding chest. The first step is to measure the parameters of the box itself and the lid. Then you need to cut off the required piece of fabric for the upper part. After that, we begin to carefully sheathe it. The entire box is sheathed in the same way. Everything needs to be done slowly, with maximum care, so that the end result is a beautiful and flawless result.
4. The fourth step is considered to be one of the easiest, but also the most crucial stages. Using a stationery knife, cut a hole for money and check whether the bills fit into it. Carefully, so as not to burn the entire finished box, hold a burning match in this area - this will avoid the appearance of arrows on the fabric.
5. The most interesting and latest step in making a cardboard money chest with your own hands is considered to be colorful and original decoration. Here you can give free rein to your imagination. The side panels and contours of the product can be decorated with openwork lace or satin ribbons. The festive look of the box is successfully emphasized by bows, beads and rhinestones, so you shouldn’t skimp on them. You can decorate the side panels of the chest with stylish photographs of a young married couple.
What you need
What is needed to create a chest from a box? Depending on the creative concept, literally anything can be needed! But the basic list of materials is:
- cardboard for the base;
- paper - colored and white (for office);
- scissors;
- stationery cutter;
- a set of paints (preferably acrylic or gouache);
- brushes of different thicknesses;
- a simple pencil for marking;
- glue (stronger - PVA, Moment);
- ruler (preferably metal, plastic);
- double-sided tape;
- knitting needle, dull pencil or out of pen;
- brads in the shape of carnations;
- fabric (what kind and whether you will need it depends on your idea);
- small decorative elements (also selected according to the design).
IMPORTANT. The optimal solution is to use beer cardboard for the base. Ordinary corrugated cardboard is easily deformed, forming unsightly breaks, and it has unsightly ends. The binding is “oak”, it bends too tightly - it’s not for nothing that covers of large albums are made from it. Cardstock (designer cardboard) is a bit thin for the base, but a sheet of silver cardstock is very useful for decoration.
Please note: beer cardboard is much easier to cut with a utility knife than with scissors!
Step-by-step description of the process
Let's consider two options for a cardboard chest: a simple one and a more complex pirate one.
Option 1, base assembly:
- We create a “pattern” - first we cut out a strip of 90*30 cm from cardboard. We make markings on it: cover (30 cm), back side (20), bottom (20), front side (also 20).
- Cut out the sides (20*20).
- We cut out the sides of the lid: they will be semicircular - we bend a strip of cardboard (40*9) exactly in half and use scissors to make the upper part semicircular, cut it at the bottom - and the sidewalls are ready.
- We bend the first piece as the diagram is drawn and glue the sides. We glue them with paper ribbons bent in half lengthwise (they need to be cut 2-3 cm wide).
- We subject the lid to the creasing process - this means that we press parallel lines on it at regular intervals with a blunt pencil, knitting needle or non-writing pen - it is better to draw them along a ruler in advance. We bend the lid in an arc and glue the sides using paper strips bent lengthwise and cut into teeth on one side (the cut is necessary so that they do not wrinkle).
- Glue the lid.
The base of the simplest chest is ready.
IMPORTANT. There is an even simpler option - take a ready-made cardboard box and separately make a chest lid for it in the manner described above.
Option 2, basis for a pirate chest:
- We create blanks - we will need two front walls (18 * 8 cm), two side walls (11.7 * 8), two bottoms (18 * 12), a lid (18 * 19.5 cm), sides - we make them in the same way , which is in the first option, but the lower, straight side is supposed to be 11.7 cm - you need to draw a circle with this diameter and cut it in half. Be sure to estimate - the corners of the semicircular sides should coincide with the corners of the lid, it’s easier to fix everything in advance, then it will be too late.
- We crease the blank for the lid using a metal ruler - draw lines at intervals of 2 cm (the outermost fragment will be wider, almost 3 cm), fold it into a semicircle so that it bends and “gets used to” holding its shape.
- We cut 2 strips of 4 cm wide from office paper, bend them lengthwise and cut one half of both in the shape of cloves. Using these strips we glue the lid and its side parts.
- We connect the parts of the base using paper strips 3 cm wide, also folded in half.
We have the frame of a pirate chest. How to make it exactly pirate?
IMPORTANT . As in the first case, for this option you can use a ready-made box and make the lid yourself. You can not put it on glue, but come up with wire or leather loops for it - this way it will be easier to open and will stay in place longer.
Manufacturing instructions
Before you start making, you need to decide what kind of chest lid you will make. It can simply be flat - this is a simpler and faster option, or you can make it rounded. As we are used to seeing with real chests.
To create such a lid, you need to conditionally divide the box into three thirds; draw the rounded end of the chest on the section of the upper third of the section. It is recommended to use a template for marking; in this case, you will get a neat and even part.
Next, you will need to cut out the round ends, as well as part of the walls. Cut a rectangle out of thin cardboard and glue it on top. So, in fact, you have assembled the lid of the chest. For strength, the seams of the structure can be covered on both sides with tape, or they can also be glued with paper.
The base is simply rectangular. All that remains is to prime the product. This can be done with PVA glue. Next, paint the chest in the desired color or lining if using colored paper.
Decor: what can you use to paste it over?
The first chest can be pasted over if desired:
- colored paper;
- cloth;
- wallpaper imitating wood texture;
- worn leatherette or old leather;
- fragments of a wooden napkin.
When choosing a material for gluing, consider the intended purpose of the product: the design must correspond to it.
Use your limitless imagination! For example, even a wedding chest for collecting money can be designed in completely different ways, depending on the purpose of the collection:
- just cash gifts for newlyweds - the chest from the box is decorated in a traditional “wedding” style or in the style of a wedding (nowadays thematic ones are popular - in a single color scheme, in a certain surroundings);
- packing for a honeymoon - the chest should be bright and festive. If you already know where the newlyweds will go, you can use something from the style of the country chosen for the trip.
If the product was created together with a child, let him figure out how he wants to see it and try to cover it with whatever he wants.
IMPORTANT. When cutting out parts for gluing, do not forget to leave allowances for bends.
The second option is declared to be pirated - therefore it will be made from “rotten boards”. How to achieve this effect?
- We cut strips of cardboard 2-3 cm wide (you can deliberately make them unequal for greater naturalness). The “covering” for the bottom and sides is true to size in length, for the lid, front and back walls - 1 cm longer, this spare centimeter is necessary for bevel. Now on the front side, using a stationery knife, we slightly “plane” the strips from the edges so that the “boards” appear unevenly planed and rotten.
- We make the “boards” for the lid strictly 2 cm wide - the same as the scoring lines, otherwise they will give the finished lid an unsightly bend. The last strip (there is more than 2 cm, remember?) must be carefully adjusted to size.
- We glue the “skin” onto the body and cover.
- Glue the second blank for the bottom to hide the strips of paper connecting the bottom to the side walls.
- We paint the workpiece with brown paint, trying to create the tone of wood, and wait for it to dry.
- Using a thin brush, apply black paint to the edges and cuts of the “boards”: this is how they become “old and rotten”.
We ended up with a well-deserved sea chest, perhaps even lying at the bottom of the sea.
How to decorate
The decor for the first version of the chest from the box is selected according to its main color and style. It can be:
- multi-colored ribbons;
- braid;
- lace;
- beads;
- appliqués made of fabric and paper;
- fragments of photographs (photos of the newlyweds are suitable for a wedding);
- natural materials (like “stuck” dried flowers, very small pebbles and shells),
- thematic collages from various clippings;
- elements of the same styles that are accepted in scrapbooking (shabby, vintage, Provence, steampunk, journaling, etc.).
For the second, marine version, we will need a “wrapping” - a sheet of silver cardstock is suitable for this.
We cut out two strips for the lid (19.5*2 cm) and two for the base (we adjust these so that there is enough for three sides - the front wall, the bottom, the back). Using brown and black paints (you can mix them for a more natural look) with a brush, “paint” them over the stripes, imitating the effect of rust. At equal intervals we insert brads - an imitation of nails - into the “forged” strips. Then we glue the strips on both sides over the lid, and the lid to the box. We glue the strips for the body so that their edges coincide with the stripes on the lid.
Both chests are clearly missing something, right? Of course, the castle!
The easiest way is to buy a decorative lock for scrapbooking - they cost a pittance. For the first version, the castle can be made from cardboard or anything - and not necessarily in the shape of a castle, it depends on the style.
For a pirate look, a decorative furniture handle with a ring of the appropriate color is suitable - black, steel, bronze or brass; you can use a figured one or in the form of a lion's head. A couple of the same handles can be glued to the sides - supposedly “for carrying” a heavy treasure box.
DIY decorative chest. Step-by-step instructions with photos
Assemble a frame from boards measuring 40x50 cm. To make the sides, you need to step back 10 cm from the edges of the two boards and cut the material in a semicircle. The sides are glued to the bottom or fastened with self-tapping screws.
DIY decorative chest. Photos step by step
Cover the walls with boards. The first blanks are attached in the upper part under the semicircular cuts. After them, marks are made with a pencil on the sides, 20 cm away from the top - they are needed to indicate the future cutting of the lid. Then the boards are fastened on both sides to the very bottom.
Cover the lid . Narrower blanks are attached to semicircular sections to form a lid.
Saw the sides with a jigsaw along the marked lines. After completion of the work, it is recommended to cover the wood with stain or varnish.
Attach the hinges . With their help, the sawn-off lid is attached to the base. On the other side, screw a loop on which you can hang a lock.
old chest with your own hands. Photo
Attach handles , for example, bronze. They need to match the style of the hinges and lock.
Decorate the chest with your own hands. For example, fill the bottom with iron corners. Leather strips nailed with nails with large heads look interesting on a decorative chest. Finally, the legs are attached to the bottom.
DIY wooden chest. Photo instructions
Decorate the inside . To do this, cover the entire space with velvet, choosing the color to your taste.
How to decorate a chest from the inside
Depending on the overall style, you can cover it with paper, leather, any suitable fabric (plain, colored, emphatically luxurious - for example, velvet), or even faux fur.
Photo collages inside such chests look original. For our pirate chest, matting, burlap, worn leather, canvas, brown or black leatherette are ideal. You can simply paint the inside a dull black color, but everything stored in it will look bright and impressive against such a background.
Subscribe to our Social networks
DIY chests
It is not necessary to stop at the design options described - a DIY chest can be anything! Here are some examples:
A do-it-yourself wooden chest, made in the style of a log house from rounded bars, decorated with metal handles, hinges and a lock. The surface is covered with stain.
Carved chest with massive metal handles and a ring for a lock. There is an ornament carved on the sides, weaving from thin boards on the lid, the bottom protrudes slightly beyond the walls of the product.
Stylish black chest, lined with leatherette and decorated with leatherette belts. Bronze hinges, locks and handles are perfect for it, as well as decorative nails with large heads.
A laconic wooden product suitable as a place to store things. A regular hinge and metal handles are used, the lid is flat with rounded edges, and the chest is painted in a discreet color.
The product is rectangular in shape, reminiscent of a flirty box. A do-it-yourself decorative chest is covered with plain leatherette or paper, decorated with vintage locks and a patterned metal flower.
A bright chest with a flat lid for a children's room, decorated with images of cartoon characters. The handles are cut out on the sides, and a recess is also made under the lid on one side for ease of opening.