Essential elements
Typically, a standard model of a decorative tree consists of certain parts.
The crown, which is an important part of the composition.
A ball that serves as the basis for attaching the crown. The base ball can be purchased at a specialized store or made independently from scrap materials
Paper, fabric and even construction foam are suitable for these purposes.
Trunk. To make a trunk, elastic wire, a curved branch, an ordinary sushi stick or a pencil can be used. When choosing a trunk for a future craft, it is important to take into account the size and volume of the future model, so special attention should be paid to the strength of the material.
Pot for topiary. This could be an ordinary flower pot, an old cup or teapot, a disposable glass, or any convenient container.
The main elements, without which the creation of crafts cannot be done, include a variety of decor. Having studied the work of experienced craftsmen or being guided by their own preferences and imagination, everyone, even a novice craftsman, can create an amazingly beautiful tree. For decoration you can use pieces of fabric or felt, lace and sisal, napkins and coins. Additions in the form of beads, artificial flowers, ribbons and natural decorative elements will successfully complement the picture and allow you to create an extremely interesting and original designer mini-tree.
DIY artificial flower topiary: materials
There is no need to limit your flight of fancy, so any materials lying around in your chest of drawers will be suitable for bringing your idea to life. It's easy to create topiary that imitates real plants. At the same time, no one forbids placing absolutely fantastic options in the house. The master has complete freedom of action in terms of dimensions.
While some people prefer a small composition, the size of which is no different from a bonsai, others prefer images of human-sized artificial flowers.
Regardless of the dimensions, the following materials will be needed for work:
- Crown ball - it is made from a piece of polystyrene foam or purchased ready-made at a craft store. It is highly recommended to choose a ball that matches the color of the future composition;
- Stick for the barrel - here you need to follow two recommendations. On the one hand, the stick must be strong enough to withstand the crown and decorative materials. On the other hand, it should not be too dissonant in terms of dimensions with the main composition;
- The flower arrangement is fixed in “cement”. It is used as traditional plaster or alabaster;
- The pot for the composition is selected taking into account the stylistic features of topiary.
Related article: How to make a wood splitter
Almost any materials will help you create a stylish and original topiary
Designers pay special attention to the choice of glue, because only a durable and inconspicuous option is suitable for applying small decorative materials. It would be best to pick up a glue gun. The list of required materials is completed by the accessories required for the base of the tree and crown within the framework of the approved project. As an additional option, you can decorate the pot itself, for example, with paint and twine.
Classic topiary
Creating such beauty yourself is a rather labor-intensive process and requires a lot of patience, but the end result invariably pleases all gardeners. Trees and bushes, as well as evergreens with slow growth and a dense crown, are best suited for this. The most popular plants for shaping shapes with haircuts are evergreens - boxwood, thuja, juniper. Deciduous plants are also used - cotoneaster, barberry, spirea.
Classic topiary
When forming shapes, do not cut off most of the plant at once, as this can lead to its wilting. Start with simple shapes such as balls or cones to gain experience. Trim only a few centimeters each time to encourage the plant to compact more. Do the first haircut soon after planting, in the spring.
A haircut
You can also think about buying ready-made topiaries, which just need to be properly maintained. These can be thujas, trimmed in the form of a cone or spiral, or boxwood bushes in the form of a ball and other shapes.
Topiary for sale
Autumn topiary
You need to acquire materials such as plaster, glue (or a glue gun), a small cardboard box, polystyrene foam, twine, paper napkins, a stick, old newspapers, decorative fabric. A ball is made from newspapers. It is rewound with threads and covered with napkins on top. You need to wait a few hours for the workpiece to dry.
The role of the trunk will be performed by a long stick. In order to improve aesthetics, it is wrapped with twine. The lower part, the stand, is made from a small square box. It would be better if it was a box of chocolates. A container with hard walls must be placed inside. It is filled with plaster, after which the trunk is fixed. Then the ball is put on a rod and covered with acorns, chestnuts, etc. The free space between the walls of the container and the box is filled with decorative elements.
The main materials for finishing the crown should be:
- chestnuts,
- acorns,
- yellowed leaves,
- lionfish.
Ideas for decorative trees on the wall
The easiest way to create decor in the form of a tree is to use available materials. In everyday life, as they say, all means are good. Even sometimes the remnants of technical waste can be useful and help in decoration.
Using available materials you can create beautiful decor in your room.
How and from what to create?
- Drawing is the most original method; it does not require serious expenses. In this case, it is not necessary to contact an artist, just be patient, buy paints and go ahead. Don’t be upset if the outline of the drawing is not the smoothest, nature is diverse and there are no perfectly straight trees. For greater confidence, you can use a stencil.
- Applique is also an excellent option for applying a design. You can use various papers, preferably thicker ones (wallpaper, cardboard). Sometimes there are a lot of boxes left over from things, or several rolls of wallpaper after renovation, all of which can be used.
- The idea can also be implemented using more rigid materials, such as gypsum, polystyrene foam, various wooden coverings (fibreboard, chipboard). This will require ingenuity and the ability to work with material.
- You can use natural tree branches. For this you will need good technical glue, and the tree branches themselves. Before fastening, it is necessary to treat the tree branches so that they can last longer. This technique enhances the natural effect in the room. It can be combined with patterns and appliques.
- Sgraffito is a more complex decoration option; it can be used when the apartment is being renovated. It involves applying several layers of paint or other coating to the surface, followed by cutting out the design. The result is very attractive, it gives volume to the room and a unique visual effect. It can be applied to rooms that do not use wallpaper.
- How to imitate a decorative tree? Various fabrics can be used. Any covering will be useful - burlap, linen fabric. This technique is popular and will add unusualness to the picture.
Involve your child to create home comfort.
Step-by-step master class with photos - topiary made from artificial flowers
Making flowers
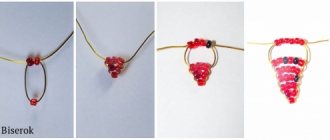
Stage 1. Cutting out flowers. We cut out strips from cardboard trays so that there are whole recesses left for the eggs - it is from them that the flowers are formed. We cut the strip into separate cells, cut off all the excess on top (do not throw away the waste: we use it to make a ball for the purple topiary).
From cardboard blanks, cut out symmetrical round flowers crosswise into 4 petals (daisy-shaped):
Stage 2. Painting flowers. Having previously prepared the painting area (taking into account the large number of blanks), we proceed to painting the inside of the buds white.
Mix white and purple paint to get 2-3 shades of lilac, paint the rest of the flowers for the topiary.
The bud is formed from 3 white and 2 lilac flowers. Calculate the required number of cardboard blanks of each color before painting.
Stage 3. Formation of finished buds. We glue 3 white flowers together, add 2 lilac flowers inside and a bead in the very heart of the bud.
We make leaves - we cut out the standard shape of a fish of different sizes from felt. For each bud you will need 3 leaves, with which we will decorate about half of the flowers.
We decorate the remaining buds with organza or tulle.
An identical technique for making flowers was also used for the wedding white topiary “Scent of Spring”. With the exception of the backing: instead of felt, organza and tulle, artificial green leaves were used.
Making a ball and decorating the crown
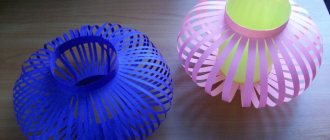
Stage 4. Ball. Did you save the scraps from the egg trays? Great, it is from these that we will compress the ball for the flower topiary, and with tape we will give it the correct round shape and secure it firmly. A final wrap of gauze or fabric will ensure better adhesion of the ball surface to the glue.
Using scissors, cut a deep hole in the ball, slightly smaller in diameter than the barrel.
You can make a ball while the flowers are drying after painting. For a specific flower topiary, it is appropriate to use just this option (from cardboard scraps), however, there are many ways to make a ball with your own hands, as well as ready-made solutions, which are discussed in detail in a separate article.
Stage 5. Crown formation. We seal the surface of the ball tightly with buds, trying not to leave any gaps. Evenly, especially where there are visible gaps between the buds, glue pre-prepared felt leaves and satin ribbons bent in half to the ball.
Preparing pots for topiary
Stage 6. External design of the flowerpot. Approximately in the center of the flowerpot we glue the lace and immediately on top - a lilac satin ribbon. In a chaotic order, distribute all the glue half-beads over the surface - 20 pcs. On one of the planes of the flowerpot we glue a bow made of satin ribbon and a foamiran rose.
It is no coincidence that a white square pot was chosen for the lilac topiary made of flowers and sisal “Charm”: it fits perfectly with the crown - both in shape and color.
Stage 7. Attaching the barrel. We place crushed stone tightly on the bottom of the flowerpot, coat the lower end of the trunk with glue and fasten it to the stone; Continue filling the pots until about half full. We glue each layer of crushed stone generously so that the flower tree stands motionless.
Instead of crushed stone, you can use any other method of fastening, but taking into account the impressive weight of the flower crown: the trunk must be fixed motionless. Read more about the rules and methods of filling a topiary pot.
Stage 8. Designing the base of the tree of happiness. Cover the crushed stone or filling with white sisal so as to completely hide the filling. Instead of sisal, you can take padding polyester, tow or similar material.
At the base of the tree of happiness we create a composition from various decorative elements. On the proposed topiary made of flowers and sisal, 2 foamiran roses, a shell, beads, and pebbles are glued. Use materials that are available and compatible with each other.
Wood assembly
We generously coat the free end of the barrel with silicone from a heat gun to the full depth, strengthen the crown, hold the ball in the correct position for 2-3 minutes for reliable fixation.
The final touch in making a lilac flower topiary with your own hands: approximately in the middle of the trunk, glue 2 large and 2 small felt leaves, complement the composition with a white bead.
How to make topiary from artificial flowers
If you don’t want to spend a lot of time making decor to decorate the crown, you can use ready-made artificial flowers. This guide tells you exactly how to do it. We skipped the process of making the base for the tree because you already know how to make it and focused directly on the decoration itself.
For work we will need:
- Artificial flowers;
- Artificial greenery;
- Glue gun;
- Base for topiary (you can make it using the method described in any of the master classes we reviewed earlier);
- Satin ribbons for decoration;
- Sisal.
Subsequence:
We glue sisal at the base of the tree. Let's use a hot gun for this.
We begin to decorate the crown of the tree with artificial flowers.
You can alternate flowers of different shades - it will be even more interesting.
We continue working until the entire surface of the base is covered with flowers.
Now for the finishing touches. We make a bow from a satin ribbon.
We do not tie, but glue the ribbons to each other.
And we decorate the trunk of our topiary.
At this point, the tree of happiness can be considered ready.
What you get depends on what materials you use.
As you can see, the options can be very different.
What it is?
“Tree of Happiness” - this name is synonymous with the word topiary. What is topiary art? Decorative models in the form of a mini-tree placed in a pot are called topiaries. It is worth noting that such products do not necessarily have to look like the original wood. Usually these are models decorated with unusual materials or having a non-standard shape.
The crown of the tree most often looks like a ball, but often craftsmen choose other shapes, for example, in the form of a cone, heart or polygon. The final result will depend directly on the master’s imagination
Such an original tree will immediately attract everyone's attention. The dimensions of such products allow them to be installed on the floor, placed on a shelf, table or placed on a windowsill
The main types of such products include the following.
- Indoor topiary. Such handmade products are used to create original interior decorations.
- Street models. They are artificial trees that serve as an original garden decoration in a country house or country house.
There are various options for crafts. Indoor topiaries are especially popular. Decorative models with an original crown, made by craftswomen, will be a wonderful gift for a holiday or other celebration. So, you can make a mini-tree of happiness, create a topiary for the New Year, or make a money tree. In recent years, such crafts are often used as wedding decor.
To prevent dust from collecting on the products, they should be regularly maintained, that is, dust should be removed. For these purposes, a regular hairdryer is suitable; use a cold stream to blow on the model. It is not recommended to place topiaries in places where they will be exposed to direct sunlight, otherwise the crafts may soon fade and lose their attractiveness.
Creating a tree of happiness
The history of the appearance of this type of art goes back to the times of Ancient Egypt. To create an original tree, you can use various materials. Before you start work, you need to draw a sketch of the future craft made from artificial flowers. You need to prepare all the materials and tools, only then start working.
Materials and tools
A DIY topiary made from artificial flowers will be an original and simple decoration for your room. If you use ready-made jewelry, the process of making crafts will not take much time.
To work you will need the following materials and tools:
- glue gun or all-purpose glue;
- wooden sticks, wire for the trunk or a finished decorative block;
- artificial flowers, leaves and grass;
- decorative or regular flower pot;
- plaster or alabaster;
- foam ball of the desired size (you can use newspaper and tape);
- adhesive tape;
- decorative insects (butterflies, ladybugs), various decorations (beads, rhinestones).
Operating procedure
Floral topiary looks great in combination with a decorative bicycle. There is no need to use a pot for this craft. The cost of such a masterpiece is approximately 1500-2000 rubles. The bicycle can be purchased in an online store or a specialized place that sells small items for handicrafts.
Where to place it?
Typically, topiary is used to decorate a room. It doesn't have to be small crafts. There are many options for such products, which are large in size, so they are installed on the floor. More often, such trees can be seen in public institutions, offices, and beauty salons.
Mini models are more suitable for home decoration. This is ideal for placement in the kitchen, bedroom, living room or children's room. Such an original craft will take its rightful place in any interior.
A miniature copy of a tree can be decorated in different themes, dedicated to a specific event or holiday. You can hang a small topiary magnet on the refrigerator or find a suitable place for the classic model on the windowsill.
Topiary Basics
Topiary art is the art of creating a crown. It can be of various shapes: round, rectangular, cone-shaped, made of several balls of different diameters, etc.
The best material for the crown is a foam blank. Sold in art and craft stores. You can use a floral sponge, cutting out the base of the required shape and size.
A tree consists of a crown, trunk and base
It is very important to maintain proportions. Ideally, the diameter of the crown is several centimeters wider than the pot.
This topiary looks more aesthetically pleasing.
If you are planning to make a composition from several elements (for example, from 3 balls), then you can choose a container with a larger diameter. Height also matters. Very low (less than 5 cm) and narrow high are not the best option. The pot must be stable.
A nondescript bucket is dressed in fabric or burlap. Decorate with ribbons, lace, buttons, beads and other decor. Decoupage or paint with acrylic paints. And they receive a flower pot made by the author.
Create a topiary from artificial grass
Large, medium and small – this is the size range of compositions that are unusual in all respects. In the last few years, 3D landscape sculptures have become widespread due to their versatility. They are made exclusively from artificial grass, which optimizes the process of caring for them. Thanks to the versatility of the material, it is easy to implement various shapes and sizes in practice.
Artificial grass topiary is popular because it is characterized by durability and beautiful appearance.
Reasons for popularity
- Durability - the material withstands the vagaries of nature, so it does not need to be protected from rain or snow;
- Dimensions are adjusted depending on the parameters of the site;
- If desired, compositions can be moved from place to place;
- The cost of producing even a large composition remains within reason.
Related article: Nobo convector: review and expert opinion
Topiary with artificial flowers
Heavenly Harmony
At the base there are sisal balls, a pot with lace, satin ribbons and flowers. The composition is completed by a double satin bow tied under the crown on the trunk.
The master class is presented in photo and video format with subtitles, tips and recommendations from the author.
We offer step-by-step master classes in video (FullHD 1080p) and text format with photos.
The scent of spring
An elegant thin trunk of a curved shape is a branch of Corilus. The decorative tree is planted on plaster in a low ceramic cup. The main elements are painted rich white - in Provence style. The master class is available in photo and video format with detailed step-by-step instructions.
Orange mix
We offer a detailed master class in video, photo and text format with step-by-step instructions for making topiary yourself.
We attend a topiary master class made from artificial flowers
Beginners are recommended to start by viewing thematic photos and videos. Professionals will talk about various manufacturing technologies and some secrets of craftsmanship. Experience shows that this reduces the number of potential errors. For example, when it comes to a pot for planting, you can use a cut plastic bottle or a wooden box. The main thing is to decorate it correctly.
During the actual creation of a flower arrangement, it is recommended to always keep the completed project with you. This is done in order not to miss important details.
This educational master class will tell you how to quickly make a beautiful topiary from artificial flowers with your own hands.
Other recommendations that attending the master class will help you get include:
- The color scheme of the pot should not be discordant with the main composition in terms of color. It is allowed that “top” and “bottom” differ by no more than 1-2 tones;
- It is better to abandon the idea of buying a ready-made flowerpot in a store. Otherwise, you will have to adapt the entire composition to it;
- To decorate an artificial trunk, foil, paint or wire are used;
- The maximum diameter of the pot should not exceed the diameter of the crown;
- It is not recommended to use an artificial ball as a crown;
- When making a flower arrangement with your own hands, it is not recommended to rely on the excessive use of decorative elements. Healthy minimalism will only be beneficial;
- To fix small parts on the tree, it is recommended to use a glue gun. In this case, it is possible to avoid leaks.
Article on the topic: Combining wallpaper: photos of two colors, how to combine each other, combination in the interior, different ones in the same room, options, pairs, video
History of origin
The art of unusual curly pruning of trees and shrubs was known back in ancient times. Quite often, trees of unusual shapes grew in the gardens of the Roman rich. Gardeners trimmed plants, giving them intricate shapes and original appearance. In Ancient Rome there was a position - topiary. Skilled topiary artists were able to cut out any images from plants in the form of animals, columns, boats, etc. Special slaves were instructed to keep the decorative areas of the topia well-groomed and unusually trimmed.
Later, the art of topiaries was somewhat forgotten and was revived during the Middle Ages. The Italian Renaissance gave another impetus to its development, and the fashion for topiary became universal. In Russia, the fashion for topiary art began at the beginning of the 18th century. Skilled gardeners carved not only figures of animals, but even famous personalities from trees or bushes. This hobby did not last long. After some oblivion, the fashion for making decorative trees has revived again.
Collection and preparation of autumn material for topiary
You can start collecting material for seasonal crafts from mid-summer. During this period, most fruit trees produce a harvest, fruits appear on chestnuts, oaks and spruces. You can get a sufficient number of seeds, seeds, and shells by simply wandering through a forest plantation, a park, or in your own garden.
To create a topiary, only whole materials that are not affected by pests and rot are suitable. In order for the collected components to deteriorate as slowly as possible, they must be prepared before use. Each type of natural element has its own rules:
- Chestnuts. After collection, they should lie for at least 3 weeks in a cool place. Drying is necessary so that they do not puff up and lie flat on the base. During this time, their top layer will strengthen and the shape will become flattened.
- Fruit seeds. The material must be washed well and cleared of any remaining pulp. If necessary, boil cherry or plum pits for 5 minutes. Then they need to be fried in a frying pan, in the oven, or left in the sun for the whole day.
- Acorns. Single-seeded oak fruits must be washed and dirt, leaves, and larvae removed with a brush. Then they are thrown on a towel, allowed to absorb water and fried in the oven over low heat for 1 hour.
- Walnuts. Half shells are suitable for topiary. To split the nut into even pieces, you need to insert a knife between the halves and lightly hit it with a hammer. We remove the core, clean the inner sides of the shells from the veins, and leave to dry for several hours.
- Cones. To prevent unopened coniferous fruits from changing their appearance after drying and starting to open, they must be treated with wood glue. The material is dipped into the mixture several times, the glue is allowed to drain and laid out on oilcloth to dry.
Easter topiary
The crown of such a product is decorated with artificial flowers, multi-colored eggs, greenery, butterflies, and balls of thread. The base for the top can be made in different ways: from newspapers, polyurethane foam, polystyrene foam; use a floral sponge. The first step is to prepare the base for the entire structure. It could be an empty tin can. A piece of foam plastic is placed in it so that the walls can withstand the pressure of the composite, which will be poured later. To create a trunk, wooden skewers or a more original blank - salex - will be useful. If you go with the first option, you will need twine and a hot glue gun to fasten the sticks into one stand. Before filling the jar with plaster, the lower end of the finished barrel is lubricated with glue and pressed into a piece of foam plastic. After filling the vessel with composite material, proceed to installing the crown.
Decorative tree made from branches
To decorate the interior of your home, you can make large artificial trees with flowers.
Necessary materials:
- Hot glue gun;
- Twigs;
- Moss;
- Sea pebbles;
- Square flowerpot;
- Decorative flowers (can be paper);
- A piece of foam.
How to make a decorative tree yourself from ordinary branches:
- We fill the bottom of the flowerpot with sea pebbles and put polystyrene foam on them, and insert the prepared branch into it;
- Sprinkle it again with sea stones for good stability, insert moss on top;
- Now we decorate the branch. To do this, we glue decorative flowers randomly to a branch using a glue gun;
- After completing this procedure, such a decorative craft will rightfully serve as a decoration for your home or apartment.
On the Internet you can find many photos of trees made by yourself, choose the option that suits you and create your own masterpiece based on it. For another interesting idea for creating an artificial tree, watch the video below.
Topiary for March 8th from napkins for beginners
Many people mistakenly believe that in order to make a beautiful topiary, you must buy expensive materials. In fact, you can get by with completely improvised means - for example, such as ordinary napkins. Let's see what beauty can be made from a seemingly ordinary thing.
We will need:
- Stapler;
- The basis for the topiary is a foam ball;
- Wooden stick;
- Napkins (any color);
- Pot;
- Beads for decoration;
- Wire;
- Glue gun;
- Scissors.
Subsequence:
Take a napkin and fold it to make a square. Pierce it in the middle with a stapler.
After this, use scissors to cut a circle out of the napkin. We will make it multi-layered.
Each circle needs to be slightly crumpled so that you get a voluminous flower. If you look at the photo, you will understand how this is done. You will need several such blanks to cover the entire surface of the base.
Instead of a foam ball, you can make a ball from papier-mâché or using another technology.
The main thing is that it is strong enough and has a round shape.
Using a glue gun, we plant our flowers on the base. We can fill the gaps between them with leaves made from green napkins using the same principle.
Finally, we add beads for decoration - they imitate drops of dew on delicate flower petals.
Thus, just by choosing the color of the napkins, you can make many variations of the same tree. We plant the resulting craft in a pot. If you wish, you can attach it to a wooden stick. Or you can leave it like that.
Let's see what else can be made from ordinary napkins. How do you like this option?
Very gentle, don't you agree?
Topiary, by the way, does not necessarily have to have a stem. The main thing is the foundation. You can simply plant it in a pot, as, for example, the author of this work did:
This is also a very nice tree.
As you can see, everyone makes flowers differently. You can come up with your own completely new way.
Autumn topiary
Magic Glade
The composition is complemented by a decorative dragonfly and a snail shell. A dense meadow with well-arranged gifts of autumn, a tree of happiness in orange-brown tones.
Notes of autumn
At the base of the autumn tree there is a composition on decorative moss. The clay pot is decorated with wooden sticks and coffee beans, and the rim is painted with yellow acrylic to tie in with the napkin roses on the crown.
Autumn mood
We offer a step-by-step master class on the natural tree of happiness: text version, photos and full video MK in FullHD quality with subtitles. Choose the format that is convenient for you!
Seasons
Each topiary is planted on a plaster cast in a metal bucket, the trunk is 2 curved branches of corilus (salex). A foam Christmas tree toy with a diameter of 4 cm was used as a ball.
Topiary pot made of artificial flowers
You can decorate the pot yourself if it doesn’t seem elegant enough to you. You can get inspired using the examples in the photo - there is decor with ribbons, and button decor, and beads, and twine, and braid.
You can also decorate the pot with your own hands like this:
- Fragment of canvas with embroidery . On the canvas you embroider something in tune with the flower crown - the same roses, or maybe birds or insects to match the theme, or maybe even some kind of statement. But the embroidery should be in the same style; if the roses are vintage, then the font should be vintage.
- You can paint a pot using acrylic paints, a stencil, a little diligence and you’ll get another hand-made item.
- The pot can be wrapped in coarse burlap , then tied with twine and decorated with another small rose, also made from paper with your own hands.
You can also decorate the pot with textiles or decorate with twine
You can, of course, find a video and photo master class that will help you decorate the pot.
As for the shabby chic style, just paint the pot with white paint with your own hands, specially allowing for areas of scuffs and underpainting. Sandpaper will help with this.
How to decorate a topiary pot: creative ideas (video)
Napkin miracle
There are many variations in the execution of this amazing souvenir. Let's look at how to make topiary from napkins with your own hands.
You can involve children in creating crafts. So you will show by your own example that expensive gifts do not always please the one for whom they are intended.
It is enough to make an effort to create a unique souvenir that is not sold in more than one store. Everyone loves exclusives!
Prepare napkins of three colors, beads, a stapler, a satin ribbon, scissors, glue, plaster, a pot, and an even twig. Let’s start solving the problem of how to make a topiary tree with your own hands that will decorate your home.
To make the twig look attractive, it must be smeared with glue and wrapped with thread or ribbon. While everything is drying, prepare the flowers.
To do this, you need to fold the napkin in half twice (you should get a square), fasten it crosswise with a stapler. There should be 45 such blanks. Next, cut out a circle from the squares, begin to collect the petals, peeling the napkin towards the center.
Let's start decorating the sphere. Glue flowers on it in the order you like. Glue beads and butterflies on top of the created beauty. We cover the plaster with flowers or any other decor.
What can you make your own topiary from? Yes, from anything, it all depends on your imagination!
Video: master classes on creating topiary
DIY topiary Simple master class
Autumn topiary. Master Class
Outdoor topiary
New Year's topiary on a glass
Fruit topiary for beginners
Money topiary
Topiary - heart
Topiary gift heart for Valentine's Day
Possible breakdowns of a gas boiler
There is such a problem: after you release the start button, the igniter goes out. This malfunction is associated with a breakdown of the gas boiler automation system. But under no circumstances should you use the boiler with the automation switched off. This is due to the fact that if the flame goes out due to a strong air flow or if the gas supply is unexpectedly stopped, the gas supply may begin to flow into the room.
Thus, the igniter flame begins to come into contact with the thermocouple. The thermocouple heats up in 30-40 s, and an emf appears at its terminals. It is enough to trigger the electromagnet. Thus, the rod is fixed in the lower position. After this, you can release the start button.
The draft sensor is located in the upper part of the gas boiler, next to the pipe for discharging combustion products into the environment. Such a device consists of a contact and a bimetallic plate.
If a pipe becomes clogged, its temperature rises sharply. The bimetallic plate begins to heat up and the voltage supply circuit to the electromagnet breaks. Thus, the stem cannot be held by the electromagnet and the valve closes. This means the gas supply will stop.