Acorn topiary: do-it-yourself master class, photo, video
Original do-it-yourself topiary from acorns
Nature gives us a lot of available materials, for example, acorns are perfect for topiary. Autumn is the time of year when you can make a huge variety of crafts from natural materials.
An acorn, a chestnut, a pine cone - everything can be useful for creating a masterpiece with your own hands. Making topiary from acorns is not at all difficult. At the same time, the craft can become a wonderful element of room decor and decorate it. During the Holy Roman Empire, topiaries were slave gardeners who tended their master's garden.
Replanting oak from the forest
If you don’t have time to grow a seedling from an acorn, but you want to plant an oak tree on your plot right now, there are two options: buy a seedling at a garden center, or transplant a young tree from the forest.
Replanting a young oak can only be done in the fall, after cool weather sets in. It will be easier for a tree that has slowed down its metabolic processes to take root in a new place.
Before going to the forest, you need to prepare a place for planting a tree, take with you a shovel and material in which the root system will be wrapped during transportation.
So. They came to the grove and looked at the oak tree. Do not take specimens above the knee, since the older the tree, the less likely it is that it will take root well; in addition, the volume of the root system is larger, and it must be dug up without damage and transported to the planting site.
To determine the diameter of the root system, you need to measure the circumference of the trunk and multiply this number by 10. At this distance you can dig without the risk of damaging the roots.
At the new place of residence, the earthen lump is immersed in a prepared hole so that it is 5-6 cm above ground level. In the spring, the soil will settle and the difference will go away. The diameter of the planting hole should be 40 cm larger than the root ball. Provide the oak with supports; they can be removed next summer.
What you need for topiary
Contemporaries used the term “topiary” to mean landscape decoration, crafts, and compositions. That is, objects created from natural materials. The shape of a topiary is a ball or cone on a base that is “planted” in a decorative pot.
The crown can be formed from any natural components - grains (coffee, beans), shells, felt flowers, paper.
Materials and tools:
- Container (pot of the future tree);
- Rope (jute);
- Glue gun, PA;
- The trunk of the future tree (you can use a tree branch);
- Acorns;
- Toilet paper or cardboard egg trays;
- Balloon;
- Gypsum;
- Sisal, you can use a bast sponge;
- Clear varnish;
- Bronze paint (optional).
You can use acorns to form a topiary crown, but other materials are also suitable for this purpose.
Stones, beads, and multi-colored ribbons are used for decoration, depending on the style of the composition.
Master class 2. Christmas tree made of cones
In addition to the traditional round topiary from cones, chestnuts and acorns, you can make a Christmas tree topiary. You can place such a New Year's decoration on the holiday table, on the mantelpiece or at the entrance to the house.
Here's what you need:
- Pine cones come in different sizes, from large to small.
- The base is in the shape of a cone made of polystyrene foam or floral foam. If you don’t have a ready-made base, then you can make it yourself from paper, newspaper lumps and cardboard.
- Hot glue gun.
- PVA glue.
- Dark brown acrylic paint or brown paper.
- Glitter (optional).
- Brush.
Master Class:
Step 1. Skip this step if you have a ready-made tree base. If there is no base, then we suggest making it yourself. Roll a piece of paper (eg A3 size) into a cone of the desired size. Secure the cone with tape and cut off the excess paper at the base and top (that's where the cone will sit). Now “stuff” the workpiece tightly with balls of crumpled sheets of newspaper.
Next, cut out a circle from cardboard, the diameter of which is 2-3 cm larger than the diameter of the base of the resulting cone. Glue the cone onto the circle using tape as shown in the following photo. Woo-ala! The basis for winter topiary is ready.
Step 2. To disguise the original color of the base, you can paint it with dark brown paint or simply wrap it in brown paper, such as kraft paper.
Step 3. Once the paint on the cone is dry or it is completely wrapped in paper, start gluing the cones. First glue the first row of the largest pine cones to the bottom of the base.
Autumn is the time of year when you can make a huge variety of crafts from natural materials. An acorn, a chestnut, a pine cone - everything can be useful for creating a masterpiece with your own hands. Making topiary from acorns is not at all difficult. At the same time, the craft can become a wonderful element of room decor and decorate it. During the Holy Roman Empire, topiaries were slave gardeners who tended their master's garden.
Contemporaries used the term “topiary” to mean landscape decoration, crafts, and compositions. That is, objects created from natural materials. The shape of a topiary is a ball or cone on a base that is “planted” in a decorative pot.
The crown can be formed from any natural components - grains (coffee, beans), shells, felt flowers, paper.
Materials and tools
:
- Container (pot of the future tree);
- Rope (jute);
- Glue gun, PA;
- The trunk of the future tree (you can use a tree branch);
- Acorns;
- Toilet paper or cardboard egg trays;
- Balloon;
- Gypsum;
- Sisal, you can use a bast sponge;
- Clear varnish;
- Bronze paint (optional).
Stones, beads, and multi-colored ribbons are used for decoration, depending on the style of the composition.
DIY acorn topiary: master class
Wrap a container for a tree (you can take a regular yogurt glass) and a tree branch with sisal. Choose its color as desired. Gypsum is scattered into a container and diluted with cold water. It should have the consistency of sour cream.
The composition may heat up (a chemical reaction occurs), but there is no need to be alarmed. It will cool quickly after it hardens.
Plaster is used to secure the trunk in the container.
Gypsum is a material that hardens very quickly, so before hardening you need to insert a tree branch into the gypsum mixture and wait a few minutes.
The crown of the tree, which will later be covered with acorns, must be solid. Therefore, you will have to use the papier mache technique. Inflate the balloon to medium size.
The papier mache adhesive is prepared as follows::
- Toilet paper is soaked in water.
- The composition should be infused for 3 hours, so it is better to do this procedure in advance.
- After the required time has passed, the water is wrung out, PVA glue is added to the soaked paper (can be replaced with paste or wallpaper glue).
- The mixture is mixed until smooth, preferably using a construction mixer. The consistency is similar to plaster with water.
The adhesive mixture is applied to the surface of the balloon. First, one half, after drying, which is removed. Then the other side is processed. It is clear that the ball should have a round shape, and not be elongated like an egg. When the two halves are dry, they need to be glued together with PVA.
The base for the topiary crown is made using the papier-mâché technique
A small hole is made in the dried crown so that the ball can be placed on a tree branch.
The crown is attached to the branch with a glue gun. You can later paint it with watercolors, or use PVA to glue sisal, for example, golden, brown or yellow.
In this case, the craft will acquire a “zest”. The acorns will not be able to cover the entire surface of the ball; some gaps will remain in any case, and then the craft will look unfinished.
Next stage:
- Apply PVA glue to the crown in a thick layer and glue the sisal. Let dry.
- The caps and acorns are connected to each other with a glue gun. You should choose acorns of different sizes, but make sure they are not deformed.
- Acorns are also glued to the crown using a glue gun.
- The sisal hairs that will peek out from the gaps between the acorns will add special beauty.
- Then glue the sisal to the plaster surface in the pot in the same way.
Step-by-step master class
Making such a decorative element is quite simple. However, it is worth thinking through the idea in advance, choosing materials and decorative elements. Mentally create an image of the product.
So, how to make topiary from natural materials yourself:
The first step is to prepare the base of the tree. As a rule, it is a sphere or an ellipse. You can always purchase a foam template at craft stores. But you can also use other objects as a base, for example, a rubber or plastic ball. You can also make a ball using the papier-mâché technique.- The base is placed on the trunk of the future tree. Any stick is used as a trunk. This could be a specially cut tree branch of an irregular shape with bizarre bends. And also a straight barrel, for example, made from a pencil or holder. A hole is made in the base using a knife or scissors. It is important that the hole is slightly smaller than the diameter of the barrel so that it fits tightly. It is better to secure the parts with glue, for example, from the “Dragon” series or using a glue gun.
- The next stage is “planting” the tree in a pot. The choice of container in which the artificial chestnut tree will grow depends on the author’s idea. However, the color and texture of the container must be combined with the overall composition. You can purchase a ready-made flowerpot or make it yourself from scrap materials. The tree is “planted” in plaster. Gypsum powder is diluted with water until the consistency of liquid dough is obtained. The trunk is fixed in a pot and filled with a mixture of gypsum. You should work carefully with the gypsum base, since the solution hardens quickly.
- Decorating the pot and trunk. As a rule, the composition should have a main focus. Its placement depends on the creative idea. For example, placing emphasis on a pot, saturating it with decorative elements, it is worth decorating the “crown” itself in a minimalist style. And vice versa, if the ball is conceived as a bright, saturated spot, then the pot should have a calm and unpretentious design so as not to distract the eye from the main composition. The trunk is usually wrapped with braid, rope or painted with acrylic paint, following the compositional color scheme.
- The decor of the ball base depends directly on the final result, be it a chestnut tree or a DIY walnut topiary. If everything is clear with nuts and acorns, then it’s worth choosing the right chestnuts to create a composition. The fact is that the chestnut is smooth and heavy, it may not stick to the adhesive base, so it is recommended to use flattened chestnuts. The size of the elements should be approximately the same so that some elements do not stand out from the total mass.
- Nuts and chestnuts are round in shape. Therefore, it will not be possible to stick them tightly. In these cases, it is recommended to fill the space between elements. If you plan to color chestnuts, then the task is simple: you can fill the gaps with beads and seed beads, decorative shavings and other small objects. But if it is necessary to preserve the natural color and texture of nuts, chestnuts or acorns, then for filling it is necessary to use something that matches them in color and character. You can use tea or sisal to match the color of the composition. By the way, tea can become an aromatic element; it can also be placed as an imitation of soil in a pot of gypsum.
- Additional decor can be presented in the form of beads. decorative flowers or insects. If the composition is conceived as a natural element, then dried flowers and other natural materials (seeds, twigs, oddly shaped seed pods) can be used.
- The principle of creating topiary: movement from more to less. That is, first of all, large elements are attached to the base and only after that the small items.
The design of a composition is the work of a master. When creating, you can use tandems of materials, that is, combine several types of elements with each other. For example, you can use chestnuts in tandem with hazelnuts or acorns.
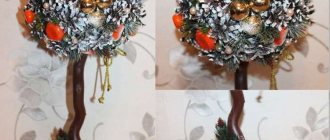
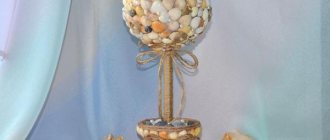
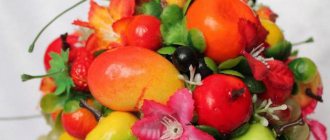
Topiary of acorns, pine cones and rowan berries
In principle, the technique for creating this type of topiary is similar to that described above. The only thing is that in this case you will need a foam ball, since cones and acorns have a certain load. In order for the tree to withstand it, it is better to opt for such material. Instead of a pot, you can take a plastic water or milk bottle, cutting off its upper part.
What you need to know:
- The pot is decorated with a bamboo mat, a ribbon is attached to the upper edge of the container and a bow is tied.
- You can decorate the pot with burlap or completely wrap it in satin.
- You can even put artificial soil or small stones on the plaster that will hold the tree branch.
- Topiary looks very beautiful not with a straight branch, but with a curved one.
- It is better to use small cones. In the New Year's version, they are covered with white acrylic, or applied with a PVA sponge and their surface is covered with coarse salt, which will resemble snow.
The combination of acorns, cones and rowan looks very attractive
To create a regular composition, golden and silver paints are useful. You need to glue cones and acorns to the base in a chaotic manner. Then paint, for example, several acorns with one paint, leaving the cones untouched, or paint the cones and several acorns. You don't need too much paint. Everything should be harmonious. The rowan is glued using a glue gun. The berry may dry out, so it must first be varnished so that the berries retain their shape.
Forest wonders
Forest materials are arranged very beautifully among themselves. You can decorate pots with small twigs, like a small fence, and acorns instead of beads. Small master classes on topiary from cones and acorns of various variations.
1) Cones, rowan berries and juniper branches, a straight stick for the trunk, acorns, moss.
The basics we have are a foam ball and a mayonnaise bucket, plaster and glue. Small branches are collected in a fence. We line the bucket with it. Glue the acorns on top with hot glue. We attach all our natural ingredients with glue or insert them into a foam ball. We attach the ball to the trunk and send it to the pot. Pour the gypsum mixture and wait for it to harden, then put the moss in the pot and plant acorns on the glue.
2) Cones, acorns, chestnuts, nuts can be coated with paint, and tree berries can be coated with transparent varnish.
The shelf life of such topiary will be extended, the appearance is not so natural, but in some interiors, in modern design styles, it is sometimes appropriate to use imitations of living nature.
3) Topiary made from forest materials can be combined with spices; such trees retain their aroma and I feel nature next to them. It will create a very warm atmosphere not only in the kitchen at home, but also in restaurants and cafes. This is an excellent gift for lovers of nature and environmentally friendly materials, complemented with natural fabrics in confirmation of pure intentions.
4) It is important to decorate a house with such a tree at the beginning of autumn, as a symbol of productivity, fertility, adding berries and leaves. And decorated with bright glossy boxes and balls, it will become a replacement for a bulky Christmas tree.
Related article: Processing a patch pocket on a coat: master class with video
DIY topiary for beginners
Making topiary with your own hands for novice decorators will not be particularly difficult.
You can show your own imagination and create a unique work of art from objects at hand. The height of topiary varies between 15-50 cm, depending on the location of the decorative tree and the wishes of its creator. In the design process, you can use completely different materials:
Funny caterpillars
The craft is somewhat more complicated, so it is suitable for older children. But no one canceled the help of adults. First you need to remove the caps from the acorns and connect several pieces together. You can use a needle and wire for this. But decorating the caterpillars can easily be done by a child. With the help of leaves, caps and raisins you can make them truly alive.
How to make your own cloud directly in a jar: step-by-step instructions
A nutritionist explains how to plan nutrition and workouts for weight gain
The tattoo looks completely ordinary, but everything changes when the wearer bends his arm
Topiary made from coffee beans
We suggest making your own topiary for beginners using coffee beans. This accessory will transform any room and fill it with positive energy. It is necessary to prepare in advance:
- old paper;
- corrugated paper in brown shades;
- threads;
- stick for applying glue;
- coffee beans;
- cup;
- a few pebbles;
- fake banknotes;
- a little plasticine;
- dry but strong branch.
Making topiary from pine cones
The next master class will teach you how to make topiary from acorns and cones. The most convenient time to work on decorating such a tree of happiness is with the onset of autumn, when finding natural materials for topiary is not difficult. Before making topiary, you need to prepare:
- straight branch;
- a piece of twine;
- beads;
- glue gun;
- acorns with caps;
- cones;
- stands;
- acrylic paint in bronze shades.
In popular videos, the crown of the tree of happiness is created from polystyrene foam or several sheets of newspaper. If you choose newspaper, it is advisable to use 4-5 sheets. To get a trunk, a straight branch without knots is carefully wrapped with twine so that each subsequent turn is as close as possible to the previous one.
Similar to the previous product, step-by-step instructions for creating a topiary from pine cones involve connecting the leaf and crown of the tree using a reliable adhesive composition. After this, you can mount the finished product on the stand. Most often, a glass or jar serves as a stand. The barrel is fixed to the stand with glue. The composition is carefully distributed over the surface with a stick.
To decorate the crown, it is preferable to use large, neat cones and acorns.
Keep in mind that dried acorns may begin to crack during processing. This will negatively affect the appearance of the decorative tree. To make topiary the most attractive, it is more convenient to work with freshly picked acorns. Each cone and acorn is attached to the crown using a reliable adhesive. When the composition is completely dry, the crown is covered with bronze acrylic paint. Make sure to paint every millimeter of the product. This is important so that the topiary turns out neat.
After gluing the acorns, you may find that there are gaps between them. There should not be any, so we cover all free space with corrugated paper. Using this material you need to trim the product and paste it over. After watching a professional topiary master class, you will be able to make an excellent thing. For this purpose, decorators recommend using beads that are attached to the crown of the tree of happiness. Beads can be replaced with sparkles.
Original eco-wood
Let's give a short guide on how to make topiary from cones with your own hands using one of the examples.
Cones are collected in the forest or in the park under the spruce trees. If you collect closed cones, they have one peculiarity - when warm, they open with a bang.
We will need cones, a plastic ball for a children's pool, paint, preferably brown acrylic, a glass, a stick for the barrel, plaster, PVA glue, a hot glue gun, burlap, beads and ribbons for decoration, scissors, a brush.
Let's get to work.
Stage 1. Make a hole in the ball for the stick, process the edges with a glue gun and insert the stick. The glue dries quickly. We cover the ball with pieces of newspaper using PVA glue so that we can easily paint it. Cover the barrel and ball with paint and wait for it to dry.
Stage 2. Glue the cones one by one onto the ball using glue from a hot-melt gun. The process of creating a crown is simple. So we move on to our potty. We cut out a piece of burlap so that it disguises the walls from the outside and, lowering it a little inside the glass, seal it with hot glue, insert the crown with the trunk into our resulting pot and fill it with gypsum solution. We are waiting for it to harden.
Related article: Patent knitting patterns: with description, diagrams and video
Stage 3. The topiary is generally ready, now all that remains is to decorate it with beads and ribbons. Pour PVA glue into a glass and decorate with a mound of bright beads; using a heat gun, you can also decorate the crown of the tree, between the cones.
We tie a ribbon with a bow to the pot and also add beads. This topiary looks very aesthetically pleasing and amazingly beautiful; you can use it to decorate your home during the New Year holidays.