Features of the patchwork style
The once practical way to preserve the integrity of an item and extend its life has now become a fashionable style. Patchwork is another name for patchwork, and traditionally this activity is a type of needlework. Since ancient times, housewives have turned small unnecessary scraps into original household items - blankets, pillowcases, carpets, various accessories and even clothes.
- Today this technique is used to create a stylish look. Patchwork clothing is characterized by simple styles and bright colors. Things in this style are sewn from fabric, which consists of interconnected flaps. Patchwork elements must necessarily differ in color or pattern, texture or density of the fabric. Most often, various capes, tunics, and bags are made using this technique.
- One way or another, every girl tries to follow fashion. Making patchwork clothes yourself will require a lot of patience and perseverance, but the result will be fashionable, exclusive clothes. Stores offer a more convenient option - ready-made special fabrics that imitate patchwork. This allows you to significantly save personal time and effort.
Where would a patchwork style be appropriate and what to wear it with?
Patchwork belongs to an extraordinary, extravagant fashion, so it would be inappropriate in the office or at celebrations. Clothing made in this style is perfect for home, unobtrusive walks or for relaxation. Due to the use of bright colors, the style is appropriate mainly in youth circles.
You can effectively complement the image with the following elements:
- decorations – patchwork does not involve bright decorations, it is combined with wooden jewelry that matches the color scheme;
- shoes – not bright and discreet shoes or sandals;
- bags - can be used in the same technique.
About patchwork clothes
The unusual execution of wardrobe items gives a wonderful mood, a feeling of originality and uniqueness. The following summer patchwork items look great:
- dresses;
- skirts;
- trousers;
- shorts;
- baby clothes.
Knitted clothes also look interesting in the patchwork style (the elements are knitted from different textures and colors):
- sweatshirts;
- sleeveless vests;
- jumpers;
- pullovers;
- dresses.
Short models of home clothes using the patchwork technique are also popular.
There is no need to be afraid to be bright and noticeable. The main thing is to follow the basic rules of combining details in clothing.
Master classes on patchwork sewing, techniques for beginners using scraps
Patchwork can be called a very popular direction in needlework. In the modern world you can find another name for this sewing technique, and it sounds like patchwork. But the more familiar name, of course, remains the old name, which our grandparents came up with.
Contents of the material
The technical side of sewing from scraps and scraps of fabric
At first glance, products made using this sewing technique seem interesting and simple to make. But if you delve into the essence of the issue, the manufacturing process itself will not seem very simple to you. Sewing from scraps is also a very exciting activity for needlewomen, even despite the complexity of the process.
The whole difficulty will be in choosing the right material for making things and correctly calculating everything when cutting and sewing. All preparation for such a process should take place in several stages:
- The embodiment of the author’s idea on paper, or more precisely, the development of a sketch.
- Selection of fabric.
- Connecting parts using any of the patchwork techniques.
To start sewing something from scraps you will need a set of patchwork tools.
Gallery: patchwork from fabric scraps (25 photos)
Set of tools for patchwork sewing
Of course, you will need many varieties of fabric, as well as threads for joining scraps and scraps, but in addition to these basic components, you also need to stock up on:
- Specialized scissors for cutting flaps, or preferably a roller knife.
- Set of needles and pins.
- A small piece of soap, you can buy tailor's chalk.
- You need to make templates from thick paper; cardboard, of course, is best.
- Set of crochet hooks of different diameters.
- Sewing machine for stitching parts.
Once you have prepared the necessary tools, you can safely begin to sew together items from scraps. You can find all the tools in sewing stores; it is also worth noting that such ready-made kits are sold. They are very easy to use, some of them are equipped with different patterns for beginner needlewomen.
Selection of fabrics for patches
The whole variety of textile stores with fabrics is suitable for this type of handicraft. Very often fabrics that have already been used are used. Of course, there are some nuances when working with complex fabrics, so the easiest choice would be a cotton-based fabric. It is easy to use and sews perfectly on sewing machines without any fancy settings.
In any case, we carefully wash all new fabrics before we start cutting out. The new fabric must be shrinked before it is cut and sewn into the rag product. Not everyone likes to wash fabric before cutting, so there is another way to process the material. Use a soaked terry towel. Spread it out and put the material inside, then twist it and leave it for about two hours. Then remove the fabric and iron with a heated iron.
We also recommend reading:
Fabrics can be combined and patches of different materials can be mixed with each other. This is what makes such a technique as patchwork so wonderful. There are no restrictions on the choice of fabrics and colors, take it, try it and enjoy your result, and we will help you thanks to several master classes in this article.
Patchwork products for the kitchen
Since you are just starting to do needlework using this technique, choose a cotton-based fabric that is more pliable and non-capricious. Take a lot of old things and cut them into shreds, let's try to make an oven mitt out of them. In general, such a place in the apartment as the kitchen is very appropriate for such products. The product is made according to the selected pattern with a pattern, they can be as follows:
- Squares.
- Star.
- Mill.
- Carousel.
- Hourglass.
- House.
- Star of Solomon.
- Vortex.
- Russian style.
Master class on sewing potholders using the rag sewing technique
- Developing a sketch of a potholder on a sheet of paper, according to the chosen pattern, it is best for beginners to choose a square pattern for the first time.
- Since such a pattern can be called ordinary, we will make inserts with embroidered patches, this will add originality to the product.
- Decide on the choice of material for making potholders.
- We choose the color scheme for the product, for example, if we take the main material in a red shade, then it is best to complement it with colors such as yellow or gold, as well as blue or green.
- After all the washing preparations and ironing of the material, she begins to create templates for patterns. Let's make it out of thicker cardboard. Draw a square without overlapping seams. We add about one centimeter to the outside and draw another larger square, so that the smaller one is inside. We carefully cut out this template. You can sew only one side from scraps to begin with, and then in the process of training you can make double-sided potholders.
- We take the material and mark the flaps according to the template. Next, cut out four different squares.
- We cut the squares on the triangle. Look at the photo to better understand what needs to be done.
- We attach different triangles to each other and stitch them. We produce such firmware with all triangles.
- Next, we sew the resulting blanks together into squares so that the sides are different everywhere.
- We prepare a loop from the material that will serve as the edging.
- Cut out a whole square of the back side from the material.
- We put cut batting on a solid piece of potholder to seal it from the inside, and cover it with patchwork squares. We start stitching by rounding the corners, inserting a loop, and leaving a little space to turn the potholder out.
- That's all, a potholder made from patches with a square pattern is ready for use, all that remains is to carefully sew up the space through which we turned the potholder inside out and sew on a edging on top for beauty.
Such potholders will become a very beautiful decoration in your kitchen, and most importantly, with a little practice, you will be able to make them with different patterns. They will be a wonderful gift for any housewife.
Master class on how to sew a pillow with applique from scraps
This master class can also be used by beginning needlewomen. With step-by-step instructions you can complete this task. First, decide on the size of the pillow; the parameters of the prepared squares for the pattern will depend on this.
- Draw a rough sketch on a piece of paper to get an idea of how many squares you will need. Prepare them according to templates.
- Take the fabric and draw a circle, spread padding polyester and cotton wool, sew it with a sewing machine so that it does not bunch up during the use of the pillow. We fasten it in a circle, stitching it on a typewriter. Thus, we already have a formed middle of the pillow.
- Fold each piece diagonally and sew 5 pieces to the middle.
- The next circle is sewn with slightly larger pieces of fabric, and so on for two rows.
- Using scissors, we cut the ends of the petals, twisting them into a semicircle.
- The rose is sewn on a machine so that it is firmly sewn. Spread it beautifully, it should look impressive, because this is an applique on a pillow.
- Next, we sew the front blank and the back side and stuff the pillow with filler.
- Perform the second one using the same technique.
Here are several master classes on making things from scraps and scraps of fabric. The process is painstaking, but very exciting.
Attention, TODAY only!
1igolka.com
Women's dresses - patchwork style clothing
- interesting selection on knitka.ru!!!
- A selection of patterns and descriptions for knitting booties and boots
- … And
Patchwork outerwear
Women's clothing in patchwork style
Let's knit clothes in patchwork style
Knitted vest using patchwork technique
Patterns knitted using the patchwork technique usually consist of geometric shapes of different shapes. In this case, these are long stripes. They are knitted separately from each other and joined together during the assembly process of the vest. Patchwork – original
Read more…
Poncho in patchwork technique
The original patchwork poncho can be worn in two ways. Size 101*101 cm. You will need: Novita Wool yarn (100% wool, 50 g/135 m): 300 g burgundy (No. 572), 200 g red (No. 549) and 100 g gray {No.
Read more…
Knitted stole using patchwork technique
Featuring expressive patterns and seven colors, this extravagant stole is sure to make you the center of attention. The size of the knitted stole is 57*188 cm. You will need: 250 g black, 100 g each brown and camel wool, 50 each
Read more…
Patchwork mittens – Irina’s work
Good afternoon My name is Irina. When I saw the mittens, I really wanted to knit them. Now I knit for everyone only using this technique. They knit easily and quickly, the main thing is to understand the principle. Materials: yarn – 1 skein (100g), sectional yarn makes interesting,
Read more…
Shell pattern knitted using patchwork technique
Knitting is an interesting activity that many people enjoy. Hand knitting has always been one of the most popular types of needlework. And this is understandable: from a ball of thread and knitting needles, you can make many beautiful
Read more…
Patchwork blouse (clothing)
A blouse in the Patchwork style is knitted from leftover threads and a selection of different patterns. Turkish-made yarn “COTONEX EVA” 100% cotton. Hook No. 1.5; I used 150-200 g. Size: 48-50. Alla's work. Schemes and description at the link
Jumper - patchwork style clothing
Valentina's work. Used leftover yarn (acrylic, cashmere) after knitting hats and scarves. The idea is from the Internet, but the model is completely mine. Basically a rectangle with fillet mesh, no pattern. And granny's square. Arranged in any form. Hook No. 4. To connect the motifs, thin acrylic, hook No. 2. Yarn used - I didn’t weigh it, but 300 grams. For diagrams and description, see the link
Crafts from scraps - what you can make from leftover fabric with your own hands
Almost every housewife has a lot of small scraps of unnecessary fabric in her house. Don’t rush to throw them away, because you can create real masterpieces from them with your own hands.
You can combine a variety of materials, but it is advisable to combine a fabric that matches the color and texture. In addition, the patchwork should match the trim, as well as the overall color and style of your home.
Contents of the material
DIY patchwork covers for furniture
Even from small scraps of fabric left over after sewing a large item, you can make a lot of useful and pleasant little things that will decorate the interior of your home, delight you with their beauty and unusualness, and can serve as a toy or educational aid for a child.
Sewing such a craft will not require large economic costs and technical skills, but it can bring a lot of joy.
From scraps you can make not only small cute crafts, but also bedspreads for furniture or even furniture upholstery. Such a patchwork furniture cover will make the interior of a house or apartment unique and will allow you to create your own inimitable and original pattern, emphasizing certain places in the interior. To do this, you can use ready-made color schemes, or you can develop your own - it all depends on your desire, taste and imagination.
Before you start sewing a throw or upholstery on a sofa or chair, you need to consider the following features of this process:
- if you plan to completely replace the upholstery with a new patchwork one, it is advisable to remove the old one and use it as a diagram for your own work;
- To make covers for furniture, it is better to use thick fabrics. In particular, fabrics that are used to upholster furniture in the factory are suitable;
- if you decide to sew a cape from thin scraps, you will need to make a dense lining;
- it is very important to properly process the edges of the canvas to avoid further fraying;
- when choosing colors and patterns, it is important to maintain a single style composition;
- It is better to trust the upholstery of a chair or sofa with the resulting fabric to a master.
You shouldn’t decorate all the furniture in the room in patchwork style; one chair or sofa per room is enough. Otherwise, there will be too many color accents, and the room will look ridiculous.
Gallery: crafts from scraps of fabric (25 photos)
We decorate the nursery with our own hands
We strive to give our children the best. You can decorate your favorite child’s nursery using patchwork crafts and accessories.
We also recommend reading:
The design of a nursery can be decorated using:
- hand-sewn patchwork curtains;
- patchwork multi-colored rugs;
- a variety of colored blankets and bedspreads;
- bed linen and pillows;
- toys of different sizes and shapes;
- children's wallets;
- wall panels that can not only decorate the room, but also carry a functional load.
Of course, for boys and girls the design and nature of scrap crafts will be different. For boys, it is better to decorate the interior elements in blue and beige tones, and for girls - in white and pink.
There should be few bright elements of red or orange, otherwise they will irritate the child. However, in moderation, such bright sewing details will bring an atmosphere of cheerfulness and energy to the room.
Toys made from multi-colored scraps can not only decorate the interior, but also become your child’s favorite for the coming years.
Making knitted rugs: master class
From narrow strips of fabric you can make an original knitted rug with your own hands without sewing. To do this, it is recommended to follow the step-by-step scheme:
- First of all, you need to prepare the material for your rug. To do this, you can use old knitted items, T-shirts and T-shirts;
- the starting material is cut into long narrow strips. It is necessary to cut in a spiral or by folding the fabric in several layers and not reaching the edge when cutting. The result is one continuous long ribbon of fabric that does not have to be sewn;
- You can knit a rug with knitting needles, but crocheting is more convenient. You can knit a rectangular or round rug using simple single crochet stitches.
If you successfully mix several colors, you will get a bright and original element of interior decor.
Small crafts from scraps
From small scraps you can make charming flowers to decorate clothes, bags and interiors.
Below we provide a master class on making several types of such decorative elements.
Country style lace flower
To make such a flower, you will need strips measuring 40x11 cm and 24x5 cm, as well as a lace piece of 31x4 cm. The finished product will need to be 12 cm in diameter.
Each strip of fabric is sewn in the shape of a ring. Fold the resulting rings in half and iron them with a hot iron. The open sections of all rings are gathered using basting stitches. All received parts are sewn on top of each other in layers. A button is sewn on top.
Model of a flower with ribbons
To make this type of flower you will need zigzag scissors. It is necessary to cut out 5 pieces of round fabric with a diameter of 11 cm with these scissors. Next, cut out 3 strips 35 cm long and 1–2 cm wide.
You can slightly fray the edges of the fabric so that excess threads fall off. All the resulting circles are superimposed on each other and folded in four.
The resulting corner is sewn up at a distance of 1 cm from the edge, and the resulting petals are straightened. Strips of fabric are sewn from the back to the center of the flower. They need to be folded in such a way that the ends of different lengths are obtained.
This charming flower can be used to decorate a bag or sofa cushion.
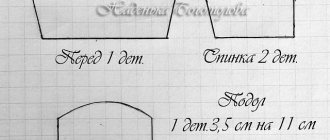
air rose
To make a vintage decoration in the form of a rose, you will need 2 strips of fabric 50 cm long and 6 and 3.5 cm wide. Both strips along one side are sewn with basting stitches and gathered together. A narrow strip is collected into a dense bud, and wrapped on top with a wider strip. All parts are fixed at the base.
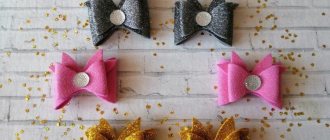
From such a flower you can make a charming hair band. To do this, you will need an elastic band and a piece of thick felt with a diameter of 2–3 cm. 2 small holes are made in the felt circle, like a button.
The ends of the elastic are inserted into these holes and tied. The knot is applied to the folds of the fabric and fixed. The edges of the felt circle are tightly sewn on top.
Volumetric rose
To make this decoration you will need a strip of fabric 60 cm long and 12 cm wide, as well as a strip of padding polyester with a smaller width.
The fabric strip is sewn in half, and a padding polyester strip is inserted inside. You should not iron the edges of the strip, otherwise you will not get the desired effect.
The open edges of the fabric strip are gathered with basting stitches and gathered slightly. One of the short sides of the strip is folded inward and sewn with a hidden seam. The other side is rolled up into a tight bud. The edge of the fabric is folded to the middle of the rose and hemmed to the base.
Crafts for the kitchen
From leftover fabric you can make original coasters and potholders for hot dishes or cups. These products are not only very useful and functional, but will also serve as a charming decorative element for your kitchen.
It is best to make a stand for a pot or frying pan in a round shape. Small stands for cups and glasses can have a wide variety of shapes - from a simple geometric figure to a heart or leaf.
To make such a craft with your own hands you will need:
- scraps of fabric with a simple pattern or plain, better matching colors;
- a small piece with a bright print for decoration;
- a small piece of braid to match the product;
- any fabric for decorating the back side of the stand;
- padding polyester or other artificial bulk material;
- threads of a suitable tone.
Here is a step-by-step master class:
- to begin with, a blank of the desired shape and size is cut out from the main fabric, padding polyester and backing fabric;
- then the padding polyester is sewn to the fabric from which the back of the stand will be made;
- the next step is to assemble a composition for the front part of the product from pieces of fabric, sew and iron the resulting fabric;
- The front side of the stand is folded with the back side and sewn together with right sides facing each other. It is necessary to leave a small unsewn hole;
- Through the resulting hole, the product is turned outward and ironed. All that remains is to sew up the existing hole.
The stand is ready. Using the same method, you can make small and large double-sided napkins, insulating caps for a kettle or pots, baskets and other charming little things for the kitchen.
Attention, TODAY only!
1igolka.com