Macrame bags look very stylish and original
A bag is an integral part of every woman's wardrobe. It not only serves as a place to store useful and necessary items, but is also a stylish addition to the look. Having your own handbag for each pair of shoes is the dream of most of the fair half of humanity, but it is difficult to find something in the store that matches the style, color and price. To solve this problem, you can make your own bag. You can use material with the desired texture and suitable color for these purposes.
What to wear with macrame bags
Bags woven from threads immediately attract attention, because in our area they are not very common. This is due to the fact that their production takes a lot of time, and finished handmade products are quite expensive. Even a beginner can handle knitting a simple bag without intricate patterns, but to learn how to weave elegant and delicate things, in the style of Svetlana Shchepkina, you need to watch or attend special lessons that are abundantly available on the Internet.
Macrame bags go well with a set of clothes consisting of shorts and a T-shirt
In addition to a bag that complements your look, you can weave a string bag from threads, where you can put bread, milk and other products. Such a device for going to the store, unlike a bag, will not tear at the most inopportune moment under the weight of groceries.
Lightweight summer bags woven from threads will not go with a business suit or a luxurious dress, but they will perfectly complement an ensemble of shorts, a top and sandals or a dress in a rustic style. A large knitted beach bag will go well with a pareo and a swimsuit. Such products are not suitable for wet and snowy weather as they easily allow water to pass through, but if you use dark-colored synthetic threads and dense weaving for their manufacture, then they can be worn in late autumn with a coat.
DIY macrame bag: materials and tools
Macrame is a handicraft whose main components are threads, laces and twines. For each type of product you need to use your own type of thread. The second most important element of macrame bags is the handles; they need to be prepared in advance.
A handle for a handmade bag can be bought at a craft store or woven from thread yourself.
To make a macrame bag, you should choose high-quality threads that do not fade or fade in the sun
When choosing threads, remember - the thicker they are, the coarser the knots will be and the faster the product will be woven. If you want to make an openwork handbag, then silk threads are perfect for you. For a hippie-style summer shoulder bag, it is better to use thick threads made from natural materials, such as cotton or linen. String bags can be knitted from thick synthetic laces.
What materials and tools are needed for a macrame bag:
- Threads;
- A pen or two (optional);
- Tailor's pins;
- Macrame pillow;
- Fastening, such as a zipper, magnet or wooden button;
- Scissors;
- Beads for decoration.
In addition to the accessories described above, you will need diagrams with clear master classes. It will be difficult for novice craftswomen to weave a craft, relying only on their knowledge and imagination.
Video with a step-by-step master class on weaving macrame for beginners
- A macramé owl in the form of a keychain can become your friend, and a simple weaving pattern will help you weave it in one evening. For the owl's eyes you will need several large beads. Look at other ideas - bead crafts - and perhaps you will find new ideas for inspiration.
- The technique of weaving a glamorous leash and collar for your favorite dog from macrame is shown in a detailed master class. This is how you can please your four-legged friend with your skills.
- The video shows a detailed master class on weaving a bag using the macrame technique using a simple pattern. A detailed story about the choice of material and additional tools that you may need during the work process.
Write how you liked the idea of weaving original macrame jewelry? We welcome any comments.
Diagram and description of a bag made using macrame technique
Summer shoulder bags woven using the macrame technique look best on young girls. They are small in size, but you can fit all the necessary items in them, such as a phone, money, powder compact and lip gloss, and you can also make an additional compartment for combs in such a bag.
Many patterns for making a bag using the macrame technique can be found on the Internet.
Master class on weaving a summer bag:
- Cut eighteen threads 400 cm long. Fasten seventeen threads folded in half to the eighteenth thread. You should have 36 threads.
- Take the first four strands on the left and weave them into a square knot. Weave square knots to the end of the entire row.
- Pull aside the first two and last two threads. Using the remaining threads, weave a row of square knots.
- Start the third row with the first four threads (including the threads allocated in the second row) immediately under the second row, weave the row to the end. You will see that the square nodes of the rows are staggered.
- We weave rows with such a checkerboard pattern until the length of the bag’s fabric reaches 60 cm.
- After this, you need to knit the final row with rep horizontal knots on a double base, and trim off the excess threads, leaving a fringe if desired. Fold the finished fabric in half.
- Attach two threads on each side in the middle of the fold, which need to be folded in half. The length of these threads should be 400 cm.
- Next, at the edges, fasten two threads 750 cm long. The thread must be folded so that one end is 200 cm and the other 550 cm).
- Tie a square knot on the central four strands, pulling it tight. Then add two threads from the edges of the fabric to the central threads and weave from them a row of two square rows.
- In the next row, one knot is again woven from the central threads.
- Before the fourth row, you need to pass two outer threads on each side, through the edges of the bag canvas.
- Weave fifteen centimeters of the bag wall on each side, following the description outlined in steps 10 and 11. Do not trim the remaining threads.
The main part of the bag is ready, all you have to do is add the handle. Also, if you wish, you can sew a magnetic lock or a button with a loop to the lid and base.
Twine bag
A small handbag designed for long summer walks. A comfortable long strap allows you to wear this accessory over your shoulder.
Dimensions of the finished product: width – 15 cm, height – 14 cm, handle length – 100 cm.
What you need to prepare for work:
- jute twine, twisted into two strands - 100 m (1 skein);
- pillow for working with macrame;
- tailor's pins.
1 strand of twine 4 meters long is cut and fixed to the pillow in a straight line. The cord is pinned in the center. The threads will be hung to the left and right from the middle.
Next, 19 threads of 4 m are cut. Using the extended fastening technique, the threads are fixed to the main cord.
This results in 40 pieces of twine (2 ends from each hanging thread plus 2 ends from the main thread).
If the thread is thin (1 mm), it is recommended to use more pieces in the work or hang the first row using simple flat knots to avoid large gaps in the woven mesh.
Starting from the left side, a series of rep knots are formed.
All subsequent rows are woven with a square knot in a checkerboard pattern.
Related article: Origami paper star: how to make a three-dimensional figure with diagrams and videos
At a distance of 36 cm from the start of work, the formation of a diamond begins. Brides are woven from the middle in both directions using a rep knot. 10 ends of the cord are used to create a diamond.
The center of the diamond is formed by square knots, where on the left side the knots are knitted starting from the left thread, and on the right side - square knots starting from the right thread.
How to make the center of a rhombus: take two threads from three knots in order from the right and left sides, starting from the second. Between them there are 4 central segments.
All collected threads, except the central ones, are tied in a square knot around four cords located in the middle.
Starting from the large common knot inside the diamond, left-hand and right-hand square knots are performed. The diamond is closed with a row of rep knots, as shown in the photo.
A common knot is tied at the top of the bottom corner, and then an additional knot is made on the right side. The weaving continues with square knots in a checkerboard pattern at the corner.
After completing two rows on each side, brids are formed using rep knots. To strengthen the fabric, rep knots are repeated in two rows. This is where the weaving ends. All that remains is to form the fringe along the bottom of the bag.
From the end of the weaving, the threads are cut at a distance of 25 cm. Then, starting from the left side, the two outermost threads are taken, the third and fourth are not touched, and the fifth and sixth threads are grabbed.
An Armenian knot is woven using the four threads taken.
Next, the remaining third and fourth threads are taken, the seventh and eighth are skipped, and the next Armenian knot is woven together with the ninth and tenth. In this way the entire bottom of the product is passed.
Then the ends of the threads are distributed in two and tied into a capuchin knot.
Now it’s time to weave the sides of the bag: the woven mesh is folded in half. You should take into account the indentation on the valve of the product - 20 cm. Along the fold of the fabric, using the outer loops, you need to fasten 4 threads, two of which are 4 meters each (they will be central), and two of which are 7.5 m each. The result should be 8 segments .
Related article: Irina Spasskaya: master class on felting an autumn hat
A double flat knot is woven on the central threads. Next, two more similar knots are created in a checkerboard pattern involving the outermost threads. The process is repeated until the length of the braid is 15 cm.
The eight threads remaining from weaving the side part of the product are collected into a bundle. From the two longest of them, a double flat knot is created around the rest. Next, the braiding of the threads continues with a similar knot until the braid reaches a length of 1 meter, this is the handle of the bag.
From the remaining pieces of twine, the second side of the bag is formed: the threads are woven, periodically clinging to the outer loops of the product. Upon completion of work on the side wall of the bag, the threads are removed to the wrong side.
The bag is ready. The natural shades of the twine allow you to combine this accessory with clothes in any color scheme.
Weaving a handle for a macrame bag
Of course, you can buy a ready-made plastic, wooden or metal handle in the store, but it will not be suitable for a summer bag, the weaving of which is described above. You will have to weave the strap yourself. To do this, use the threads remaining after weaving the side parts of the bag.
Handles should be made in the same style as the main part of the bag
To weave a twisted chain, tie a column using only left-handed or right-handed flat knots, and if you start the knots on the right side, the handle will turn to the left and vice versa.
The handle of such a bag can be woven with different knots, the most common are two methods; a twisted chain and a column of square knots. With a twisted strap, the bag will look more unusual and informal, and with a handle made of square knots, it will take on a neat and discreet appearance.
Bag using macrame technique: weaving a string bag
Avoska has been known to us since the times of the USSR; they have always been distinguished by their strength and reliability. In a modern design, such bags look stylish and bright, thanks to which they can easily pass for a beach option.
A string bag made using the macrame technique is an excellent product for grocery shopping.
Description of weaving a string bag:
- Prepare twenty-eight pieces of cord 4 m long. Secure the doubled threads to a hanging collapsible ring, having first wrapped the ring around the main thread, the length of which should be 2 m. You should have 28 groups of 56 laces.
- Divide all the laces into groups, each of which will have four threads. Space the half groups 4cm apart. Tie one square knot from each group.
- In the second row, we take the first two threads to the side, take the next four threads and step down along them 5 cm, weave a square knot at this level, and continue weaving the row to the end. We weave the last two and two first threads together.
- We continue weaving the bag with a checkerboard pattern, maintaining a distance of 5 cm between the rows.
- When the bag reaches a length that suits you, begin to gradually narrow the distance between the groups and rows, do not include some threads in the rows in the process, but leave them hanging freely, after tying them in a strong knot. As a result, you will have a bottom with fringe.
- Remove the bag from the ring so that the thread located on them remains inside the thread loops.
- Weave square knots and attach two handles to the string bag.
Avoska is a bag woven in the form of a mesh with large holes. Thanks to the thickness and strength of the threads used to make it, such a bag can be woven in just one day.
Master classes
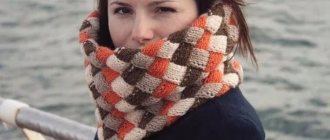
Weaving with threads is fun and interesting. Experience is valuable in any job. These skills will allow you to make elegant wall panels, original crafts, beautiful bedspreads, macrame napkins or curtains.
Original crafts
[Show slideshow]
You can also weave stylish accessories, jewelry, bags and anything that your imagination tells you.
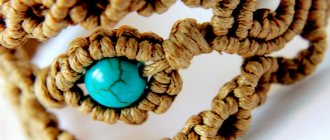
Wicker jewelry
To master macrame for beginners, all you need to do is choose high-quality material, get in a creative mood and get acquainted with detailed master classes from experienced craftsmen.
Original panel "owl"
A panel in the shape of an owl is an original decoration for any interior style that will emphasize the warmth and comfort of the family hearth. Interestingly, the wise bird in the house is the protector of prosperity.
One of the main elements of woven patterns are all kinds of chains
According to the teachings of Feng Shui, owls protect the home from evil. The most popular of all macrame products is a panel in the shape of an owl. To make it, we will need strong and thick threads in a skein 10 meters long, two round sticks, paints and a brush, two beads and PVA glue.
If during the weaving process the thread suddenly runs out, do not despair. We tie a new thread, tying the two ends with a knot on the wrong side of the product.
The weaving algorithm is as follows:
- Divide the length into ten equal segments 1 meter long. We secure them to the stick with a simple loop knot, resulting in 20 working threads.
- We secure the stick on the table with electrical tape to make it easier to weave the pattern. We carry out weaving according to the pattern, starting from the frontal part.
- We weave knots using the simplest checkerboard pattern. The result should be a triangular-shaped canvas.
- Separately we weave the bird's eyes. From the first two threads on the right we knit a right-handed loop knot, repeat the element with two adjacent ropes and continue like this until the end, edging the right eye. We repeat the process in a similar way, but using left-sided loop knots. Sew beads into the middle.
- The bird's beak is woven from four central threads, weaving them alternately into flat double knots.
- We continue weaving with a checkerboard pattern in five rows.
- To tie the wings, we use four components on each side, braiding them with double-sided knots. After this, we return to the “checkerboard” pattern again, connecting it with the wings.
- Next, we place the next stick, which will be a perch, and thread threads numbered 3,4,5,6, as well as from 15 to 18, onto it. We get the bird’s legs.
- Next, we complete the pattern according to the diagram, and at the end we cut the threads diagonally.
An exquisite and original panel, made by the hands of a talented craftsman, will warm you with warmth and decorate your interior.
Weaving the “owl” panel, part 1
Weaving the “owl” panel, part 2