Panties
Clothes for dolls are an important part of the game. The most popular dolls now are Baby Bon and Baby Annabelle. Both dolls are interactive, but they have a different set of functions. For tailoring, sizes are much more important. Baby Bona is 43 cm tall, Anabel is 3 cm taller. Despite the slight difference in height, the clothing patterns for Baby Bon and Annabelle are the same, and the clothes fit both dolls.
There is another important characteristic for tailoring. Baby Bon has a plastic body, so any clothes will do. Anabelle has a soft padded torso, so a bodysuit and simple panties will not suit her. T-shirts also don’t look very good on Anabel, so you should definitely include a blouse or T-shirt under sundresses or overalls with ties.
The pattern of pants for Baby Born dolls is one of the simplest. We cut out 4 identical parts and make all the seams. We insert an elastic band into the upper part; you can insert them along the bottom, in each pant leg.
The basic model can be improved a little. Lengthen the patterns for the front part by 1.5 cm. Due to this, we make a small fold in the area of the knee bend. These pants will look natural and stylish. To turn regular pants into trousers, we sew on pockets and add extra stitching to the side to create the illusion of a thicker fabric.
How to make clothes for monster high dolls, master class
flared skirt
First you need to create a pattern for the future skirt.
In the case of a flared skirt, everything is simple:
- on paper we draw a circle with a radius equal to the desired length of the skirt;
- in the middle of the resulting circle we draw another one, the radius of which is equal to 1/2 the circumference of the doll’s waist;
- cut out circles.
Place the pattern on the wrong side of the fabric. Trace with a pencil or chalk and cut out.
From the center of the skirt downwards we make a 1 cm long cut so that the skirt can be put on the doll.
We make several folds at the waist of the skirt and stitch it.
Cut out a belt measuring 7.5 x 2 cm and sew it face to face to the waist.
We bend the upper part of the belt and the cut, sew them with decorative stitching.
Attach a button for clothes on both sides of the belt.
We turn up the hem of the skirt and run a decorative seam along it. Ready.
leggings
We are creating a pattern for leggings. You can use the one we offer with measurements for original Monster High dolls, or you can build your own according to the measurements of your doll, adding 0.5 cm allowances.
We transfer the pattern to the fabric and cut out 2 such parts.
Place the pieces face to face and sew on the side seams that will form the front and back seams of the leggings.
We fold the top part of the fabric and stitch it.
We bend and sew the lower part of the future leggings.
We fold the blank for the pants so that the front and back seams are opposite each other, and sew each of the legs.
We turn it inside out, put it on the doll and decorate it if desired.
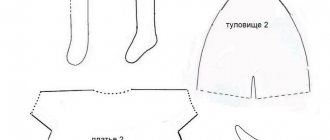
nightie or dress
For sewing you will need:
- knitted fabric;
- tailor's pins;
- scissors;
- pencil;
- paper;
- needle and thread;
- ruler.
1. We trace the doll on paper from the armpits to the knees, as well as the arms to the elbows and shoulders.
2. On the resulting doll silhouette on paper, draw the nightie. This way we will get a pattern.
3. Attach the pattern to the fabric and cut out 2 parts. Important: the V-shaped neckline will only be in the front, it only needs to be slightly rounded at the back.
4. Place the blanks face to face, pin them together, and stitch them together.
5. Cut the fringe 3 mm wide and 1.5 cm long.
We turn the nightie inside out and put it on the doll.
Overalls
The most popular clothing for a baby is a onesie, and, of course, a baby doll can’t do without it either. There is no seam allowance on the pattern, so after transferring it to the fabric, you need to add 1 cm on each side at the place where the fastener will be attached - 15 mm.
To convert the patterns for Baby Bon to life size, you need to take measurements from the doll and enlarge the picture on the screen to the desired size. If you plan to sew a warm overall from very thick or quilted material, the pattern needs to be made a little larger, taking into account the thickness of the material.
First we do all the seams, the last step is sewing on the fastener. It can be anything - zipper, Velcro, buttons, classic buttons. Additionally, you can decorate the product with embroidery, applique, various stripes and ribbons.
How to make clothes for small dolls, master class
t-shirt
To create a T-shirt for a small doll, you will also need to make a pattern. Draw a rectangle on a piece of paper with a length equal to the length of the desired T-shirt and a width equal to 1/2 the circumference of the doll’s chest. Then on both sides of the rectangle we put marks equal to the length of the doll’s shoulder and draw the sleeves. We outline the neck.
Cut out the pattern, fold it in half, apply it to a sheet of paper and trace it. We draw another line for the fastener, 0.5 cm wide. Thus, we will have a back pattern. Cut it out.
Place both patterns on the fabric and cut out 1 front piece and 2 back pieces with a seam allowance of 0.5 cm.
Fold the front piece and 1 back piece face to face and sew. Then we sew the second part in the same way.
Use a backstitch stitch to hem the bottom.
We sew the neckline.
We sew the smallest size tailor's buttons onto the back of the T-shirt.
Decorate with decor.
dress
For the dress you will need 2 pieces of fabric in a suitable color scheme, floss threads to match, a thin needle, lace and a satin ribbon 0.5 cm wide.
We also can’t do without a pattern. You can build your own using the doll’s measurements (following the principle of constructing a T-shirt described above), or you can print the one we proposed on A4 sheet for a doll 12-15 cm high.
Apply the pattern to the fabric, trace and cut out.
Fold the cut piece in half, face down in the middle, and stitch the sides.
We sew lace into a small fold to the bottom of the resulting T-shirt.
On top of the lace we sew a strip of fabric (on the supplied pattern it is indicated as a belt) 25 cm long and 2 cm wide. Sew it into a small fold.
We sew the armholes, the remaining back seam and the neckline with frequent stitches using floss threads.
Sew small buttons and loops for them on the back of the dress.
Decorate with a satin ribbon bow.
skirt
In order to sew any outfit for a doll, you need to know its size. To sew a skirt, you will need to measure the doll's waist and the length of the product itself. After the measurements have been taken, we cut a piece of fabric 3 times longer than the doll’s waist and a width equal to the desired length - 2 cm, and a piece of tulle of the same length, but 2 cm wider in width. We also cut off a piece of fabric equal in length to the doll’s waist and 4 cm in width (depending on the height of the doll), which will serve as a belt in the future.
We take a strip for the belt and run one of the long sides in a zigzag pattern, fold it in half lengthwise and iron it. Then we turn the ends inward and sew them together.
We baste the fabric for the skirt and tulle, and then collect them in a width equal to the belt.
We sew the belt to the fabric blank for the skirt, after which we attach the tulle part to the back side of the future skirt and sew it on.
We sew Velcro on both sides of the belt.
The skirt for the little doll is ready.
Vest-blouse
A vest is one of the simplest elements in a wardrobe. It is enough to sew the side seams and trim the edges, and the product will be ready. Despite its simplicity, there are many options: short sleeves, long sleeves that cover the fingers.
The pattern of the vest is easy to adapt and sew into a blouse or T-shirt. You can use any additional elements and decorations. If you widen the sleeves towards the bottom and insert elastic bands, you get an elegant blouse.
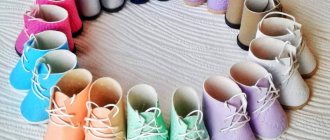
DIY shoes
There is a winter and summer option; for shoes you can consider a semi-closed type.
You might be interested in this Basic rules for forming a chest dart
DIY shoes
Work algorithm:
- selection of material (suede is suitable);
- take scissors, awl, thread;
- using a pattern (consists of three parts);
Shoes pattern
- gluing products;
- formation of seams;
- application of additional elements;
Shoe decoration
- ironing shoes for Baby Born doll;
- adjustment of seams (they need to be turned out);
- excess pieces of fur are cut off;
- preparing the insole taking into account the size of the shoes (wadding pads are used. Fur pads are placed in the shoes and tucked in. If everything is done correctly, you get neat boots).
Finished shoes for the doll
Costume for girls
If only pants and blouses are suitable for a boy, then the wardrobe of a girl doll will be much more diverse. Let's take, for example, a cute suit of a sundress and pantaloons. Patterns for a life-size Baby Bon will help you sew it.
Knickers are sewn in almost the same way as trousers, only shorter and wider. The extra width allows for beautiful gathers. The elastic should be sewn in 12 mm from the edge to create beautiful ruffles. The pantaloons look even nicer with lace around the edge.
To sew a sundress, we first sew the side seams. The bottom and armholes are finished with bias tape. The trim from the neckline is not cut, but stitched further, turning into ties. Not everyone can make bias tape on their own; this work is painstaking and delicate, so it’s easier to buy a ready-made version. The suit can be worn as is or complemented with a blouse under a sundress. So the clothes for Baby Bona girl are ready. Patterns can be supplemented and modified at your discretion.
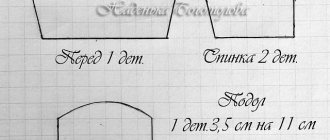
How to make clothes for a doll from felt, master class
felt hat
Step 1. We build a pattern. Since the hat is an individual item of clothing, you will need to measure the circumference of the doll's head. Using a compass, draw a circle on paper with a radius equal to the circumference of the head divided by 6. Draw another circle from the same center. The distance between the 2 circles will be equal to the width of the brim of the hat. We also build a pattern for the crown (rectangle). Its length is equal to the circumference of the doll’s head + 1 cm, and you choose the height by eye. The greater the height, the higher the hat itself will be.
Step 2. Transfer our pattern to felt. We cut out one circle of larger diameter, a circle of smaller diameter and a blank in the form of a rectangle for the crown. From the center of the larger circle to the margins of the smaller circle we make cuts in the form of triangles, and on the workpiece of the smaller circle we make the same cuts-triangles only on the outside.
Step 3. Using matching thread, sew the crown to the brim of the hat, lifting the triangles cut out earlier. Sew the rectangular strip so that you end up with a cylinder. Sew the rest of the strip overlapping.
Step 4. Insert the bottom into the upper part of the crown, tuck the triangles into the middle, and sew on the upper part of the hat.
Step 5. Decorate the hat with a bright ribbon or other decorative elements.
coat
The felt coat option we offer is suitable for Monster High dolls and the like. If you decide to make a coat for dolls of other sizes, create a pattern yourself, based on the one proposed in this master class.
- Transfer the pattern into the cells, as shown in the diagram.
- Transfer the pattern to felt.
- Cut out the details.
- We sew the dart by folding the back piece in half.
- Sew the shoulder seams.
- Sew the sleeves.
- We sew in the side seams without sewing in the sleeves.
- Turn it right side out and sew in the sleeves.
- We cut out a collar with pockets from felt (measurements in the photo) and a height of 2 cm.
- Sew on the collar, starting from the center of the back.
- Sew on the pockets.
- We decorate at our discretion.
Shoes
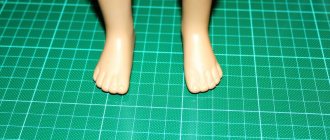
You can sew not only clothes, but also shoes yourself. To make life-size patterns for Baby Bon, you can simply place the foot on the screen and adjust the size of the pattern taking into account the seams.
The main material can be felt, leather or leatherette. On the back side of the top piece we sew the cotton lining using a hidden seam. When the shoes are put on, the lining is practically invisible, but it will be easier to put on, and the shoes look much more aesthetically pleasing on the shelf.
We decorate the nose part with embroidery, beads or appliqué. Satin ribbons, laces, and ribbons can serve as fastenings. The main seam is made straight along the front side. You can replace the ties by creating a one-piece strap on one side, and attach a button or hook on the other.
Ideas for creativity
Material for clothing can be purchased or you can use old children's clothes. There is no point in skimping on quality, because girls have a lot of contact with the toy, and natural fabrics are much nicer. The advantage of cutting from children's clothing is that you can use ready-made pictures, the result is indistinguishable from industrial suits.
If the doll is intended for a little girl, then you should avoid small elements: buttons, beads, rhinestones, sequins. Children often tear off these parts and there is a possibility of swallowing. Such jewelry should not be used before 3 years of age.
To sew clothes for dolls, you can use patterns for children's clothing. They need to be reduced a little, in accordance with the measurements of the baby doll, and even simplified. There is no need to worry about making the doll comfortable, so you can remove additional darts and other small cut elements.
A review of clothing patterns for Baby Bon allows you to create an extensive wardrobe. Basic models can be easily supplemented or slightly changed to create a new cut. Girls always enjoy taking care of their dolls, and beautiful clothes will help instill good taste and add variety to the gameplay.
Panties and T-shirt for a doll
The doll requires a complete set, which means you will have to deal with panties and a T-shirt. Sewing clothes for Baby Bon dolls with your own hands always starts with a pattern. For this purpose, patterns are selected based on personal preferences. It’s easier to make a T-shirt; at the first stage, you need to cut strips 1-2 cm wide, they should be 20 cm in length. Next, the binding is prepared; when working with the pattern, it is recommended to use a regular sheet of paper.
Panties and T-shirt for a doll
Important! When constructing lines, you must adhere to the diagram.
When the markings are applied, you need to bend the workpiece, so you get a perfect strip. Next comes the assembly (it may not work the first time). When the binding is finished, the transition is made to the outside of the T-shirt. The material is cut in half, all excess pieces are cut off. The shirt is ready, which means we should move on to the panties. For a simple option, dense material is suitable.
T-shirt pattern
The master class includes several steps:
- blank 33 by 15 cm;
- tenderloin;
- edge stitching;
- fastening forms;
- using an elastic band;
- markings on the front;
- fitting on a doll;
- modification of forms.
You may be interested in How to sew a beautiful hare from fabrics yourself
Panty elastic
Chic white panties are ready, you can add bows if you wish.
Panties with decorations