Bargello embroidery is one of the simplest forms of embroidery as it consists of one simple straight stitch. This is repeated in different colors and variations on the canvas to create vibrant patterns.
The word Bargello may be unfamiliar to you, but you've probably only seen works under a different name. For example, Florentine embroidery, Hungarian embroidery or flame embroidery.
Florentine bargello embroidery is not a new needlework technique. In fact, Florentine bargello embroidery patterns have been used since the 15th century to make bed and wall hangings, upholstered furniture and table coverings.
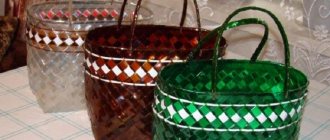
But we don’t necessarily have to take on such large-scale projects. Bargello embroidery patterns on pillows also work well for bags, belts, wallets or even framed pictures.
Bargello embroidery technique
In Bargello, the characteristic patterns are built from rows of straight stitches arranged in a zigzag line and repeated in different shades or colors.
The steepness of the zigzag depends on how many threads are worked in the stitch and on the position of subsequent stitches. The chart below shows that as stitches pass through more threads of the canvas, the peak becomes higher.
Traditionally, all stitches in a design are the same length and are made from top to bottom, or left to right across 4 strands of canvas. A step or step up one square. The larger the step, the sharper the flame embroidery turns out.
There are three main types of patterns: row, patterned or beveled.
The simplest one is a row design. The pattern is established on the first row and then repeated using a different color, tone or shade on subsequent rows.
To create a motif design, part of the row is mirrored and a medallion or motif is formed. The medallion can be filled in repeating rows or each enclosed area can be treated differently. The pattern is mainly formed through the use of color.
This is what bargello embroidery looks like on mesh.
If you are using a large mesh for embroidery, then replace the fine threads in these projects with yarn, wool or acrylic. You can also use the thread in several layers.
The beveled or four-way bargello needlework pattern consists of a triangular piece that is then mirrored in both directions. This way you can process both rows and motifs. Some traditional designs treated in this way are known as tulip, rose and pineapple.
Technique for performing the work
two methods can be used - weaving or darning.
- Weaving . The thread is passed through the cells like a snake - there is an alternation of mesh threads, which appear above and below the working thread. Only every second warp thread is wrapped around both sides with this thread. With this technique, filling the mesh is quite thick, so this method is not used for light, openwork models.
- Darning . This technique involves stitching threads along the mesh cells and then across, leaving longitudinal threads either at the top or at the bottom. As a result, the cells should look similar to darning.
Which method is preferable for a particular pattern is indicated in the embroidery pattern.
Color selection and bargello embroidery for beginners
With Bargello, the pattern depends largely on changes in shade. They can be subtle or bright.
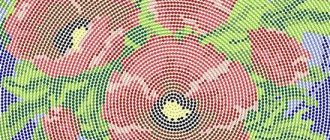
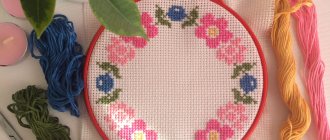
One of the color schemes you can use is monochromatic. Here tones of the same color are used. Taking the color green for example, you can start the sequence with a dark green (a shade made by mixing black with the original color) and then use lighter and lighter shades (mixed with white), ending up with a very pale green, similar to to the one in the photo below. This sequence is then repeated.
I advise you to read: how to embroider on clothes
I don't want to go into technical details, but I will introduce another color term - similar. Basically, this scheme uses related hues that are close to each other on the color wheel. For example red, orange and yellow. Another option is purple, blue and green.
Bargello point can also be used with contrasting or complementary colors. To find the contrast of any color, look opposite it on the color wheel. Yellow is the opposite of violet and therefore its contrast. Same with orange and blue. The trick here is to use much less contrast than the base color. Consider it an accent. If you use equal amounts of each, the effect will not be as dramatic. Think of a predominantly blue room with the occasional orange throw pillow to give it a little 'sparkle'!
Preparing for work
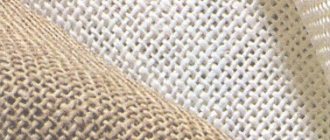
To get started, you need an embroidery grid . It is woven using a special shuttle (classic base) or crocheted. If the first option is quite complicated for a beginning needlewoman, then the second option will be easy to master very quickly. You can also purchase a ready-made mesh in the store. However, it is necessary to evaluate the location of the cells in it and their size. They should go in even rows and be the same size.
For embroidery, prepare cotton threads of the desired colors and a needle . You can’t do without a frame on which the mesh will be stretched. If there is no frame, you can use a rigid sheet of cardboard or plywood. The base is stretched on them using glue or threads that will hold it from the bottom side.
Editorial Voice
Matryona
Fan of embroidery and sewing
Ask a Question
Gelatin is dissolved in water and the mesh is soaked in it until it hardens. This will give it sufficient rigidity and prevent deformation of the cells.
Bargello embroidery patterns for beginners
So, if you want to try this technique, let's try with simple yet effective bargello designs.
We will do this embroidery on a towel, although it can be used on other products. The result is the perfect gift towel. Below you will find detailed instructions for this towel.
What will I need?
I embroidered this pattern on fabric with an even weave like canvas. In addition to the canvas and needle, you will also need gold and silver threads.
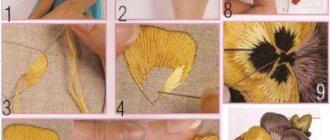
First, secure the thread.
After this, start stitching from top to bottom.
We make 3 stitches through four threads from top to bottom. Lift two squares.
Next we make 2 stitches side by side. Rise 2 squares and 2 more stitches next to each other and rise.
Next we make 3 stitches side by side. Again rise by 2 squares and three more stitches nearby and again rise.
Then we make 4 stitches side by side once and rise. After this, 5 stitches next to each other, rise and again 5 stitches. This turns out to be our peak. Next we will go down.
We also go down through 2 cells.
And we repeat our entire procedure in reverse order.
If the thread runs out, fasten its tip from the wrong side, as shown in the photo. We sew as many peaks as we need.
After this, we begin to sew with silver thread in exactly the same way. Please note that our threads are found in the same cell, that is, we have no gaps.
We repeat all actions exactly the same.
We also go down and up in the cells that are common to the two types of thread.
This is the type of drawing we get.
You can make diamonds like this.
And make small flowers inside.
I advise you to read: How to sew your own bag from gins
Features of mesh embroidery
Embroidery is done on a mesh using a long-length sewing needle. The pattern can be monochrome or color. The classic option is white embroidery on a white mesh base .
Before starting work, the mesh is impregnated with gelatin and, without waiting for it to dry, it is pulled onto the frame, where it is left to dry.
For the pattern template, checkered paper , each cell of which will correspond to a square in the grid. Secure the thread by tying it to one of the corners of the warp cell. In the finished work, all places where the thread starts and ends must be securely hidden.
How will we embroider?
WeaveTarn
Bargello embroidery master class
Another bargello embroidery master class for beginners.
For it we also need fabric with a convo weave. Needle and thread in five different colors.
Since our drawing will be a mirror image, we need to find and mark the middle. Choose white color and start making stitches from top to bottom, moving to the right.
After that we move to the left side. We will make stitches from top to bottom, but we will move from right to left.
Next, we take the brown color of the thread and, starting from the middle, we make stitches first to the right, then to the left. Please note that our stitches will go through one cell.
After this we make stitches in red. Repeating the previous scheme.
Does the same thing with yellow.
We finish with white again.
In the middle we make such a flower.
Depending on the empty space remaining at the edges, we do additional embroidery.
Varieties of methods
There are two main ways to perform such embroidery: darning style and weaving. Using the latter type involves passing threads through the cells of the stacks in the form of a snake. The thread should only remain in the mesh in the position at the bottom or at the top. On both sides you need to wrap only every second thread from the top side.
Machine embroidered flowers on mesh
To make the work more beautiful, high-quality and attractive, it is important not to skip a single cell and fill them out quite often. If the cage is large, you need to use one or two dense threads to give the product strength.
You might be interested in what a tapestry stitch is: how to embroider for beginners
Pillow in bright bargello technique
Important! Using two threads will make the cell smaller by tying it: the pattern will look more aesthetically pleasing, and the fabric will become denser.
The first method is darning, based on stitching patterns with threads along the cells. It serves as the basis of the panel. Then cross stitching is done. In this case, it is necessary to leave the threads along the length, alternating them at the top and bottom. Externally, the cells after such manipulations should resemble the darning technique.
If the warp size is small or when embroidering threads that are thicker than usual are used, filling them should be done in two stitches. In this situation, it is recommended to choose one direction: either vertical or horizontal.
Note! If the craftsman uses a thin thread, then it will take more than two stitches to complete the job.
Very beautiful patterns using the bargello technique on mesh
Embroidery bargello patterns on pillows
Basics of fillet crochet for beginners
Filet crochet for beginners is an easy technique. Russian women have long used it to decorate folk costumes, sundresses, and wedding towels.
The basis of the canvas is a net, similar to a fishing net. Only for knitting it is built from empty and filled cells. They can also be figured, in the shape of rhombuses or hexagons, like on a soccer ball. The combination of such elements allows you to get different pictures that only have enough imagination: with butterflies, animals, stars.
Knowledge of the technology of performing an air loop and double crochet is enough to master fillet crochet for beginners: the tutorial will describe in detail how these elements are performed. The main task of the needlewoman is to obtain an even, dense pattern from them. To do this you need:
- choose a smaller hook than for regular knitting;
- insert it not through the half-loops, but through the middle of the bottom column;
- be very careful, count the number of loops, the slightest mistake will lead to the whole pattern being smudged.
If all the rules are followed, you will get a clear, beautiful ornament.
It’s better to start with small blanks, trying to make different patterns:
- Greek;
- pineapples;
- with flowers.
The easiest way to learn how to knit is a square or rectangular shape with a large pattern. On its basis, tablecloths, curtains, pillowcases are created using simple geometric patterns and patterns. Curtains crocheted in fillet knitting patterns with a scalloped edge will be an excellent decor for the kitchen.
Read
Crochet and knitted openwork scarf: diagrams and description
From this article you will learn how to crochet a fillet border - diagrams with descriptions.
Bargello embroidered pillows
There are so many great ideas in the Bargello technique, varying colors, threads and holes in interesting ways, so you can enjoy embroidering with this technique for the rest of your life.
Step-by-step instruction
So let's get to work. To hone your embroidery skills, it is better to take thicker fabric to learn how to regulate the tension of the thread.
Step 1: draw a sketch
First, you need to draw the future sample on the selected fabric. On light material this can be done using a regular pencil. The lead mark comes off easily after the first wash. On dark material this can be done using an ordinary thin piece of soap.
Remember to use a special embroidery hoop if you are not embroidering on thick fabric. Tensioning the material will help you form neat and beautiful rows.
Step 2: embroider the first row
After the first stripe of the pattern is outlined, we take the beads and begin sewing them on. Sew the needle back with a stitch. That is, we string a couple of beads onto a needle for the first stitch, and send the needle into the fabric at the required distance (so that the beads fit on this segment). Next, we bring the needle between the two beads and send it to the second bead. We string another bead again and send the needle into the fabric. Again we draw it between two beads, and continue sewing the first row in this way.
Step 3: make the second row
We form the second row of the same beads in exactly the same way. We move without sketching, just stick to the line of the first row.
Step 4: sew on the bugles
We form the third row from glass beads. They are easy to sew on - each bead is sewn separately to the fabric. Again, the first two rows of beads serve as guidelines.
Step 5: Add Beads and Beads
The final touch is to add pearl beads and seed beads. First we sew on the first bead, then return the needle to the beginning of the row. And then we sew on the number of beads that is necessary to completely encircle the bead. The principle of sewing beads is the same as we used for the very first rows.
As you can see, bead embroidery is not such a difficult task. In order for everything to work out the first time, it is important to carefully read our master class for beginners and not rush into anything.
We hope everything worked out for you and we suggest you watch a few more ideas for embroidery in the video below.
Curtain loin crochet patterns
Fillet crocheting of a curtain is done in the same way as for a napkin.
The only difference is the size of these things. To save time, you can take tulle fabric and tie it with a wide openwork canvas.
Fillet curtains with birds, fruits, poppies, and cats will look good on a kitchen window.
To create a vintage style, patterns with roses are suitable.
Types of seams for fillet and guipure embroidery
Usually the mesh is embroidered using the following stitches:
Darning stitch
Darning stitch
This is perhaps one of the fastest seams; it is used in cases where it is necessary to fill a large number of cells. If you want to embroider something with this seam, you must simultaneously overlap several fillet cells at once, so that the needle and thread pass either above the partition or vice versa under it. Starting a new row, you will have to go around the partitions from the other side.
Darning seam with facing
Darning seam with facing
It turns out to be quite durable due to the fact that the threads of the flooring in it do not move apart. In order to embroider one cell with such a seam, you need to secure the working thread in the left corner of the cell, which is located at the top, and then pass it under the vertical partition located opposite. Then the thread must be returned back so that it makes a figure eight. In this simple way, using these eights, you can fill the entire cell.
Plain seam
Plain seam
More often found in antique-style works. In order to perform it, you need to fasten the thread in the corner of the cell and then stretch it through the entire cell, making it like the main one. It turns out that the fillet embroidered cell has additional partitions. If the drawing is located on several adjacent cells, then you will have to stretch this kind of base over them. In this case, you will need to either skip or, on the contrary, grab the partitions with a needle. Across this warp you will need to make a darning stitch, with which you will need to grab, passing all the threads of your warp through one. You will need to make plain stitches first in one direction and then in the opposite direction. However, try not to pull the threads too tightly. For a linen seam, it is better to choose not very thick threads, then the resulting patterns will look amazing and will seem incredibly delicate and airy. A guipure napkin with a linen stitch will become one of the best decorations in your home.
Cobweb seam
Perhaps the most common is the “Gossamer” seam; it is made using air loops. In this case, the loops can be placed not only in rows, but also in a circle. Such light guipure embroidery will look charming on any napkin.
Cobweb seam
In order to make such a seam, you need to attach the working thread to the very center of the vertical partition and make a loop, while capturing the center of the horizontal partition. The peculiarity of this seam is that the loops in it are made exclusively from right to left. At the same time, the needle itself must be moved from top to bottom, passing it under the fillet thread, but so that it “lies” on the working thread. You should not pull the thread, leave it hanging freely almost to the middle of the partition.
Having done all of the above, you will need to pass the thread under the partition (located vertically) to the center of the horizontal partition of the adjacent cell located on the right.
Having finished the top row, you will need to make the bottom row in the same way, but at the same time you will need to secure all the loops that hang loosely. In order to move to the bottom row, you must wrap around the vertical partition of the first left cell. Thus, it turns out that your fillet-decorated napkin will have a pattern consisting of small rings.
Voluminous fillet knitting
Volume is created through oblique connections. When the filled cell is knitted, insert the hook into the space after the third column. Regular posts are tied with three inclined ones, and the loops remain on the hook. At the end, make a double crochet according to the pattern, and there are 5 loops on the hook. They are knitted together, and a three-dimensional cell is obtained.
The method is suitable for creating a relief composition on a bag or children's appliqués. So you can decorate the baby’s hat with your favorite knitted character: the bear Valerka or Luntik, and add cats to the girl’s dress.
Basic ornaments
There are several ways to embroider basic patterns using the Florentine bargello technique. Most often, a pattern with pointed ends is used. As a result, making stitches in width, you get an image of a zigzag shape, or, as it is called in Italy, carnation.
The bargello embroidery technique places great importance on the combination of threads of different colors. In particular, you can use the creation of a pattern first with stitches of one shade, and then of another, which are located in the same direction. With this embroidery option, each subsequent seam is placed higher or lower than the previous stitch.