General information
This art form originated in Asia, where it gained the greatest popularity. Nowadays, the best paper-plastic masters live and work in Japan, China, and South Korea. For European lovers of needlework, paperplasty is still a rather exotic activity. However, recently there has been significant progress in this matter. Every year there are more and more European lovers of this art.
Paper plastic is often compared to sculpture. These two types of classes differ from each other only in the material used. Each element of the craft is made separately and then attached to the overall composition using glue, tape or thread.
There are several types of paper-plastic techniques that differ from each other in some characteristics, but still have a lot in common. Among the main types it is worth paying attention to the following:
- Origami is the folding of paper figures from a single sheet.
- Modular origami is the creation of paper compositions from individual parts (modules).
- Trimming is the making of crafts by winding paper onto special sticks.
- Quilling is the art of creating crafts from strips of paper twisted into spirals.
All these techniques allow you to make both simple figures and entire compositions. Finished products are perfect for decorating offices or decorating various rooms. In addition, paperplasty is divided into several types, depending on the method of making crafts. The most popular of them are:
- strip products;
- cut-off and cut-off applique;
- curved and straight folds;
- embossing;
- based on cones, boxes or cylinders;
- relief crafts;
- designs based on layouts.
DIY crafts (paper-plastic) from crumpled paper with diagrams
DIY crafts made using the paper-plastic technique develop imagination and a creative eye. Not only for children, but also for adults, it is very useful to develop perhaps untapped creative potential. Paper crafts can be made by the whole family. This way you will find a common cause that will only make your family stronger. Paper plastic comes in different types: from plain paper, from crumpled paper, crafts of flowers, birds, prototyping, etc. This not only creates interest, but can also become your main hobby.
Children's creativity
The most interesting type of paper-plastic is paper-plastic crafts for children in stages. A developing and interesting phenomenon is children's fantasy. Here are some paper crafts for kids.
Paper hearts:
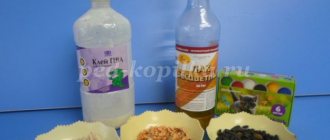
For work we will need: scissors, pencil, colored paper, a cardboard heart model and PVA glue.
- We trace the layout of our heart on colored paper;
- Cut out the heart along the contour;
- We make a small incision at the top of the heart;
- We make bends in the opposite direction of the heart;
- We take glue and apply it to the folds, then glue them together.
Scary ghost:
- Take a small square sheet of paper;
- Bend the sheet diagonally;
- We unfold the square and bend the left and right sides towards the center;
- We unfold the square, turn it over and again bend the left and right sides to the center;
- We unfold the square again and fold it diagonally, but press the outline only along the edges;
- Now let's take the side corners and fold our workpiece into the middle;
- Fold the resulting corners up in the middle, aligning them along the center line;
- We turn our workpiece over and bend the sides to the center line;
- We turn it back over and bend our arms to the angle that you prefer;
- We bend the lower part to the side;
- Bend the top corner back;
- Let's draw a face.
Develop your child, all children are our happiness and our future.
Original products
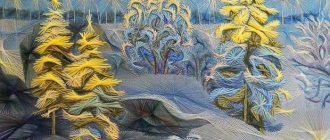
A very interesting type of paper-plastic is crafts made from crumpled paper. In a very unusual and original way, ordinary crumpled paper can be turned into a wonderful craft.
DIY craft patterns:
Paper flower crafts:
Video on the topic of the article
Video tutorials on making crafts from crumpled paper.
Similar articles:
knittochka.ru
Simple ways to make crafts
Craftsmen from around the world have come up with a huge number of ways to create crafts using the paper-plastic technique. They are all quite simple, but require a certain degree of concentration and accuracy. During the creative process, materials and tools are used that can easily be found in any store that sells handicraft supplies.
As a rule, most crafts are easy to learn, so they are accessible not only to beginners, but also to small children. With the help of paper plastic, kids can develop fine motor skills, imagination and show their creative abilities.
Volumetric flowers
There are many plants that can be made using paper plastic. Volumetric flowers are one of them. This is the most popular way that helps children learn the art of creating beautiful paper figures. Most often, one of the options for creating a chrysanthemum is used as the first lesson. It allows you to learn the basics of technology and understand the entire operating principle. In order to make a three-dimensional chrysanthemum, you need to prepare the following materials and tools:
- several sheets of white paper;
- colored paper (green, red, yellow);
- PVA glue;
- brush;
- sharp scissors.
Ball "Bullfinch"
Little children love to make various animals, as well as birds. In the winter season, children are taught to make those birds that can be seen outside the window. So, for example, it could be a bullfinch, a sparrow and others. For beginners, this type of art may seem complicated at first, but the presented diagrams will help even those who are just starting to learn how to work in this style to understand. This master class will teach you how to make a New Year's toy - a ball with a bullfinch. If done together with a child, then the child will undoubtedly like such creative work and, as a result, the process will be remembered for a long time.
What you need to prepare:
- scissors;
- colored paper or you can paint white paper in the desired colors;
- glue;
- stationery knife;
- embossing tool with ball;
- ruler;
- hole puncher;
- a plastic ball that consists of two parts.
Related article: Knitted coats with patterns and descriptions for women: knitting the 2021 trend from thick yarn using video
First of all we make the bird. To do this, you need to take paper of the colors from which we will make the bullfinch. In our master class, we painted the paper ourselves. Taking into account the diagram, we draw the pattern on paper and cut it out, but make the back with small allowances. Next we need to glue the gray parts together, just leave the wings alone. Let's start making feathers - using a hole punch we cut out the daisies, the petal needs to be narrowed and then we make the feathers. Afterwards, the feathers need to be shaped, where small slits are made on the side of each to create feathers of the desired type. On a soft substrate in the center of the underside of the feather, we roll it with an embossing tool with a large ball, and then, on a hard surface in the center with a small ball, we draw out the middle. When all the feathers are ready, glue them to the wing.
We glue the grooves on the wings and glue them to the bird. The head must be painted black. Next we make eyes, using black beads. The bullfinch is ready, next we need to make the branches. According to the diagram below, cut out from white paper:
When the branches are cut, you need to apply the paste to them. Glue a paper circle into the ball and wait for it to dry. Now you need to assemble parts A and A1. Insert parts B, B1, B2, B3 into subsequent cuts from the center and connect them to each other. Attention, B and B1 must be behind and in front of part A. In the same way we insert the remaining branches C, B, A, B1, C1. Afterwards, to the base - A - we must glue two paper ribbons. Using them we will attach our branches to the circle inside the ball.
When everything is ready, carefully place everything in a ball and plant the bullfinch in the branches. If there is no ball with two parts, then we put the branches into a tube and push them through the neck. Now we must be patient and straighten all the branches using tweezers. Next, you need to glue the branches that come into contact with the ball to it and fill the ball with artificial snow. Glue the bullfinch in the ball and tie it with ribbon. Our craft is ready.
Article on the topic: Jacket - crocheted bolero with pineapple pattern trim
Master class on colors (paper plastic) for children with diagrams and videos
Papermaking is a great activity to do in your free time. Paper crafts can be both your hobby and your job. Be creative, develop attentiveness, perseverance and patience. In this article we will look at a master class on colors (paper plastic is the main technique we will use).
What is paper plastic? This is the skill of paper modeling of figures and compositions on a plane. This art falls between appliqué, origami and quilling.
Creativity for children
Papermaking for children greatly develops the child’s imagination and creativity, instills perseverance in him and arouses interest. Everything you need for creativity can always be found in the “Land of Masters”.
Video master classes for children using the paper-plastic technique:
Crafts schemes
Eight-pointed star:
Cat:
Flowers:
Crane:
Paper ball:
Feathered friends
The most beautiful creatures in the world are birds. They flutter beautifully in the sky, illuminating the whole world with their beauty. Birds come in different types and sizes, also in different plumage and colors. Making birds out of paper is an art. Therefore, to make a bird using the paper-plastic technique, you will need a lot of patience and perseverance so that the final result lives up to your expectations.
To make birds using the paper-and-plastic technique, you only need a template and scissors. And then - your patience and diligence.
We present to your attention basic master classes on making birds from paper.
Rooster:
Peacock:
Parrot:
Pigeon:
Video on the topic of the article
If you have just started to be interested in papermaking, then these video tutorials are just for you. A master class on paper plastic for beginners will inspire you to create new shapes and images from paper with your own hands.
Similar articles:
knittochka.ru