Origami paper tulip
- In order to make an origami tulip we need one square sheet of paper;
- Bend it in half on all sides, as shown in Figure 2;
- Now we need to fold the sheet into a triangle. Bend the square in half, connect the left and right corners inside, as shown in Figure 3;
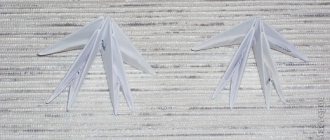
- In front of you is a triangle, you need to bend the corners up, Figure 4;
- The same thing needs to be done from the other side, Figure 5;
- Bend one side of the diamond as shown in Figure 5, 6;
- Connect the right and left corners of the rhombus in the middle, Figure 7.8;
- Turn the figure over and repeat the same movements, Figure 8.9;
- Spread your flower, figure 9;
- Bend the petals to make the flower look more beautiful;
- Ready.
A simple way to make a paper tulip for children
This master class is perfect for children aged 4 years and older.
What you need for the craft:
- colorful stickers.
Sequencing:
Thanks to the stickers, the buds are made from squares that do not need to be cut out.
- Take a sticker of any bright shade you wish. Fold diagonally. A triangle will appear, the middle of which should be conditionally marked.
- Fold the right and left sides so that the corners protrude slightly beyond the border of the triangle.
- Bend the bottom corner of the triangle and carefully hide it inside the bud. The flower is ready.
- After this you need to make a stem. Take a green sticker and fold it diagonally. Expand.
- Bend the corners of the turn towards the fold line to form a cone.
- Fold the resulting workpiece along the center fold line.
- Bend the bottom part of the part upward to form a leaf.
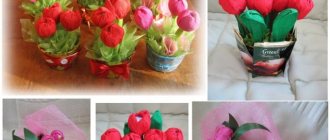
Simple tulip
You will need: two sheets of colored paper, red and green.
- Take a square sheet of colored red paper, bend it into a triangle, Figure 2;
- Bend the triangle in half and put it back, this is how we know where the middle of the triangle is;
- Fold the right and left corners as shown in picture 3;
- Bend the lower acute corner upward, Figure 4.5;
- The flower is ready, now we’ll make a leaf;
- Take a square sheet of colored green paper, place it in front of you in a diamond shape and bend it in half to find out where the middle is, Figure 1;
- Bend the right and left corners to the center, Figure 2;
- Bend the figure in half, bend the protruding tail up, as shown in Figure 3;
- Done, all that remains is to connect the leaf and flower, you can glue them together with glue.
DIY paper tulip
In order to make such a tulip, you will need:
- colored paper in red, green, yellow and black;
- wooden stick;
- glue;
- scissors.
- We need to make blanks, cut out flowers of two different sizes, larger and smaller, and a center for the flower, as shown in Figure 1;
- Glue everything together, figure 2,3;
- When the small flower is ready, place a larger piece on top and, placing the petals overlapping each other, glue the flower, this must be done so that the flower holds its shape well;
- The flower is ready, all that remains is to make a couple of leaves from colored green paper and put the whole craft together;
- Ready.
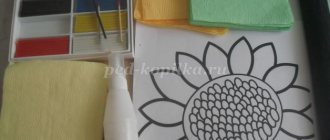
Applique tulips made of colored paper.
Option No. 2
1. To bring the simplest postcard to life you will need:
- Colored paper (5 colors: three different colors for the buds, green for the stems, and one more for the vase)
- White paper: base for applique
- Glue
- Scissors
2. Take colored paper and first cut out the tulip buds. To do this, we suggest folding a colored piece of paper in half and cutting out a semi-oval shape on one side and with three teeth on the other side. From green paper, cut out strips about one centimeter wide (attach the first cut strip to the bud; if the size is good, use it as a template for the other two strips). Just like the buds, we cut out a vase - folding a colored sheet in half to make a proportional vase.
3. Now we’ll make an application with the child. Place a vase in the center of the card. We place stems under it and tulip buds on top of the stems. Then carefully apply glue and glue the applique elements one by one: first the stems, then the vase, then the tulip buds.
Congratulations! A cute card made by a child’s hands is waiting to be solemnly presented!
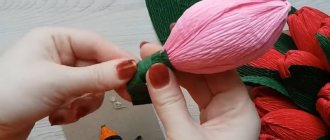
Corrugated paper tulip
To make this flower you will need:
- corrugated paper;
- wire;
- green electrical tape or tape;
- We have a foam ball, you can also use candy;
- glue.
- First, you need to cut out petals from corrugated paper; the more petals there are in 1 flower, the more magnificent it will be.
- When the petals are ready, connect the wire and the foam ball using glue or electrical tape;
- As if we were winding the petals onto the finished base;
- When you have attached all the petals, fasten them together with glue or electrical tape;
- Ready.
Paper tulip applique
In order to make this craft you will need:
- sheets of multi-colored paper;
- cardboard;
- scissors;
- glue.
- Let's make blanks, cut out all the necessary flower petals, green leaves and stems from colored paper.
- For 1 tulip flower we will need 6 blanks (paper balls from our previous article were made using a similar technique);
- For 1 piece you need to cut out a square piece of paper, bend it in half and all you need to cut out of the square is the shape you need. Do not cut the fold line.
- Next, cut out the remaining 5 blanks in the same way;
- Now you need to glue everything together, connect the blanks one by one, gluing them together;
- We have created a kind of accordion; glue the first and last blanks to the cardboard.
- Done, now all that remains is to glue the stem and leaves.
How to make tulips from paper: the best ideas
The bolder the idea, the more spectacular the result. Don’t be afraid to take paper with unusual prints: striped, checkered, diamond... Such crafts will not only make a beautiful gift, but will also serve as an element of interior decor and will delight the eyes of others.
Here is a great example of such a product.
To make it we need designer paper and fluffy wire. And also glue and scissors.
You can print such templates on a printer.
Follow the instructions in the photos. Prepare a stylish vase for these tulips.
Here is another very unusual and delicate tulip.
You can make a lot of things using this technique, including a bouquet of tulips.
Another idea for a very simple but beautiful bouquet.
Please note that each tulip is like a module from which you can assemble beautiful flower arrangements.
Like these, for example.
Here, by the way, is a diagram for creating such tulips. You will need:
- Colored paper of different colors
- Scissors
1. From two sheets of paper of different colors, cut out squares of the same size. One of the colors can be red, pink or purple - whatever you want. This will be a flower. And the second one is always green. It will become a stem with leaves.
2. First, let's deal with the bud. Fold the square in half into a triangle, ironing the fold line.
3. Now we connect the two corners from the closed side together, again getting a triangle. We bend these two adjacent sides halfway back so that the corners are below the border of the figure.
4. Now we open the figure again to a monosyllabic triangle. Fold the corners inward along the fold line. The result is a figure like the one in the photo below.
5. Make 2 more fold lines on each side. First, bend it so that the bottom side forms a straight line up. The second is the angle to the newly formed line.
6. Fold it along these lines and get the following figure.
7. Turn the product over to the other side. We turn the protruding corners halfway, up to the fold line.
8. Bend the bottom corner in the same direction. Turn it over again. The flower is ready.
9. Now take the green square. We also fold it into a triangle. Iron along the fold and unfold. Fold the two sides towards the center, as in the photo below.
10. We apply one side corner to the central fold. Iron the fold. Fold the second corner so that the corner is slightly higher than the first.
11. We bend the second folded fragment so that its upper line intersects with the adjacent one.
12. Along the center line along, bend the figure. We connect the “edge” of the leaf to the side of the “trunk” and iron it.
13. Turn the figure to the other side. Fold one edge to create a straight line. We also bend the bottom edge up to create an even angle. Let's expand.
Now all that remains is to install the flower on the trunk.
The following technique will allow you to make a very realistic bouquet of tulips.
Below in the video we will show you how to make such wonderful flowers.
In the next chapter we will move on to a very nice material - corrugated paper. It is voluminous, flexible and makes flowers well.