When we see an interior where some elements are created with our own hands, we admire it. After all, even a small thing can make such an environment unique by introducing unusual motifs.
In addition, it indicates that a passionate person lives here.
What can be done?
An unusual vase made of colored paper will be a great decoration in the living room, bedroom, or kitchen. Photos of origami vases confirm this.
You can put candy in them, put beautiful flowers (which you can also make yourself) or simply make them the central figure.
Is it difficult to do?
In reality, there is nothing complicated. The assembly process is comparable to meditation. While working, you will be focused, disconnected from the outside world. The result will please not only the craftsman, but also everyone who will admire the created masterpiece.
Once you get the hang of it, you can make simple and modular origami vases. Don’t think that you need to start with simplicity. This is far from true. Some people do complex models right away and they do great. The choice is always yours.
Simple vase
A modular origami vase for beginners is done quite quickly and easily, and the master class will help with this. To make a vase like this, you don’t need a lot of modules and desire.
For such a vase you need to make 192 modules of different colors from paper. The colors can be very different, the main thing is that they are combined with each other.
For this model you will need:
- 42 dark blue modules;
- 54 yellow;
- light blue 54;
- white 42.
The manufacturing process is simple:
- The first row of the vase is made from 12 dark blue modules, and the second row is formed from 12 light blue ones.
Related article: Painting on ceramics - how to paint a jug or clay pot
- The third row is made from 12 yellow triangles, and the fourth from white ones.
- The fifth row is made again from yellow, the sixth from light blue, the seventh from dark blue, the eighth from light blue, the ninth from yellow.
- The tenth row is made of 12 white modules, which are placed with the short part outward.
- The 11th row contains white modules, but their number should increase to 18. The 12th row is made of 18 yellow modules, and 13 of light blue ones.
- Row 14 will be the final one and is made from 18 dark blue modules.
A simple vase like this will be a good decoration for your home.
If the vase doesn’t work out the first time, you can learn and additionally watch a video from the master classes:
After studying these videos, you can learn how to make vases using a variety of techniques and according to various patterns. Such products will become real home decorations and will add a special zest and charm to the interior.
Vases made from modules?
Decorative and applied art consists of combining a large number of pre-prepared elements that are nested within each other, connecting them into a single whole.
If the product is complex, then glue or other fixatives must be used. However, most often the parts hold up on their own, provided that no one twirls the craft in their hands.
For one vase you will have to use several types of identical elements.
Beauty made by you
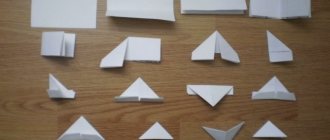
3D origami looks incredibly beautiful. They require rough paper. Its sizes should be different. The sheets should not have white on the folds; they cannot be painted. But initially you can make multi-colored parts.
The rectangle is most often made in size 1 to 16 or 1 to 32 from the A4 sheet. After this, each square must be folded into a triangle. You can see how the modules are made in video lessons.
Check it out here too!
How to make an origami paper butterfly with your own hands: a step-by-step master class on making original crafts with photos and videosOrigami paper machine - instructions on how to make it yourself. The best master class with photos and videos
Tank made of paper using the origami technique (100 photos): a simple master class on creating an unusual craft with your own hands. Instructions + description
Craft options
Now that you are familiar with the theoretical principles, you can try to assemble modular origami yourself. An openwork vase made of white, green and yellow details, which even a novice craftsman can handle, will decorate any living room.
Start by folding 152 white, 64 yellow and 92 green triangles.
Next, follow the manufacturing scheme in rows.
Assemble the first row from white parts, the second and third from yellow ones. Below is a step-by-step master class: just fold the parts as shown in the photo and follow the description.
Start forming an openwork pattern: put a white module on every fourth triangle of the third row - its short side should face up. Close the base of the vase with a ring, then turn it out. The yellow parts should be on the outside.
Fourth row. Place two more white ones on each white triangle, with the short edge facing up. Next, put on three yellow triangles with the long edge up.
Fifth row. Put on alternately white, green and white triangles with a long edge. After that - two yellow ones with a short edge.
Sixth row. Insert a white module with the long edge, two green ones, a white one, then one yellow element with the short edge.
Seventh row. Use the long edge to attach a white, green, yellow, then white element again.
Eighth row. Two green elements and three white, all with the short edge up.
Ninth row. Green and four white triangles in a circle.
The main body of the craft is finished. Now you need to make elegant decorative elements that look like feathers. Collect four lettuce and four white “feathers”, each of seven triangles. If desired, you can use other shades.
Attach the blanks with the short side out: the green elements are on top of the green ones, and place the white ones in the middle between the white parts.
Make eight arches from forty white triangles - five for each, and connect all the “feathers” with these arches.
Form the final row of green triangles - there should be 32 of them. The craft is ready.
If you're looking for options for a modular origami flower vase, check out how to make a flower bouquet that can be placed in any vase you create.
For each flower, prepare three 4x4 cm squares. From each square, fold a “trefoil”, as shown in the diagram.
Apply clear glue to one side of each piece.
Attach the glued petal to the pocket of the second element on the right side.
Also attach the third petal.
Connect the bud with a ring, securing the outer elements with glue. Leave a small gap between the parts at the top.
Make a stem out of wire and crepe paper. Form a thickening under the bud and attach the petals. One flower is ready. You can make any number of such flowers by adding free-standing green leaves to them. Such a homemade bouquet, showing off in your vase, will give it even more charm. There are a lot of ideas for making flowers; you can choose bouquets of any color and varying complexity.
You can put sweets or light decorative twigs in a wide bowl. We present a wonderful example of a modular origami vase - the assembly diagram describes the entire process step by step.
You need a lot of modules: 63 green, 280 white, 480 blue.
Form the first round plane in two rows, each of 28 green triangles.
Complete the third row with white elements.
Complement each new row with triangles of other colors, as in the photo.
Starting from the tenth row, begin to expand the bowl.
Attach an arc to each side, which consists of seven parts and one unifying one.
There should be an arc on each side; attach additional elements of white and blue colors to them.
Make white arcs, each of the four modules, attach two to each side, connecting them together with another white element.
Form beautiful blue arches, following the sequence as in the photo.
Make a stand from 28 blue elements and attach it to the bowl. The result is an interesting wide model of modular origami - the diagram of the vase is simple and clear, the craft, although large, looks elegant.
An extraordinary modular origami vase - the master class in the video below will show you how to assemble a beautiful two-color lotus from more than 3,000 elements.
The main part consists of 42 rows, which slightly narrow at the top and then diverge again, forming an opening bud. Please note that at the moment of forming the neck, you can insert a glass inside the craft so that the shape holds better.
The finished flower must be placed on a kind of stand, made in the form of curved large leaves - another 32 rows. It is better to attach the stand itself to a cardboard base.
You can even make a floor vase out of paper - modular origami can easily cope with this task. Japanese art suggests making this beautiful floor-mounted version of a large flower holder for tall plants. https://girlsschool.ru/napolnaya-vaza-modulnoe-origami-master-klass
You will need a lot of parts: the work will take almost a whole stack of white office paper and quite a lot of colored sheets, as well as several evenings of perseverance and patience.
First assemble the bottom. Hold five to ten triangles in your hand with the diagonal edge with the “fork” inward.
Next, put all the parts on the corners so that the “fork” looks up and the diagonal edge looks out.
Assemble a row of thirty elements (minimum), then the bottom will be round and stable. If you decide to use more elements, the vase will be larger. For our vase with a three-wedge edge, you need to take the number of parts that is a multiple of three, which means use 33 corners.
See what your craft should look like inside. The corners are attached to the parts of the previous row “fork” to “fork” in a checkerboard pattern.
All rows are folded in the same way, you can form the bends the way you want.
The last row is to begin the design of the wedge from the first eleven elements.
In each subsequent row, leave the outer parts of the previous row empty, that is, do not put the following elements on them. This creates a wedge. Make three such wedge-shaped projections.
This bowl is very simple to make and does not require any special skills. If you wish, you can make an ornament on it or make it entirely from paper of some bright color. Another option is to coat the finished product with water-repellent paint, which is sold in cans.
You can also make an unusual flat vase from modular origami, perhaps it will be a candy bowl or a fruit basket, since it is quite wide and roomy. If you plan to use this decorative element at home, be sure to secure the parts with glue so that the basket lasts a long time.
Such models can be additionally decorated with handles so that they look like real baskets, or they can be left open as original dishes. There are also options for the height of the walls of the craft, depending on what you plan to put inside: you can extend the edges of the vase yourself, make them curly, experiment with colors and shapes.
Collecting details
Now it remains to understand how to make a modular origami vase. Once all the elements for the product are ready, you can begin assembling it. For an openwork three-color vase, you will need 152 white modules, 64 yellow, 92 green (the color palette may be different)
Adhering to the diagram, we begin to design. The first row will be white, the second and third yellow. On every fourth triangle of the third row you need to put on a white blank (the short side faces up). We close the base with a ring, which will then need to be unscrewed. The yellow triangles are on the outside.The fourth row consists of white modules, onto which you need to put parts of the same color, with the long edge up. On the fifth row, a white and a green triangle are put on successively with the long side. Then come two yellow ones with a short edge.
The next one consists of a white one, two green ones, the white one attached with a long edge, the yellow one with a short one. The seventh row of white, green, yellow, white, attached with a long edge. Eighth: two green, three white, short side up. Ninth: green, four white in a circle. The body of the workpiece is ready.
Adding decorative elements. To do this, you need to collect four green and white “feathers” (seven triangles for each). We fasten with the short side out. We make eight arches from forty white parts. And finally, we form the final row of green parts. That’s it, the DIY origami vase is ready.
Check it out here too!
Paper rose (origami) - the best master class from the pros! See photos of finished crafts as well as simple instructions with detailed descriptionsDo-it-yourself modular origami - step-by-step instructions on how to make a beautiful modular craft at home (110 photos + master class)
How to make an origami owl - a review of the best ideas for creating exclusive crafts with your own hands. See photos and videos of owls using origami technique
Simple Chinese style vase
Beginning craftsmen should not immediately take on an extremely complex origami vase made from modules. Fine detailing requires skills, without which it will not decorate, but will only ruin the product. While laconic options will look stylish and impressive if you do them carefully, choose high-quality paper and find harmonious color combinations.
An exquisite model in the Chinese style, reminiscent of massive floor accessories, will fit perfectly into a modern interior. Paper decor, known as “papercraft,” is becoming increasingly popular. And origami models are quite consistent with this new fashion trend.
Step-by-step instruction
An origami vase from modules is made in two parts, which are then connected to each other. The “body” of the vessel is decorated with a pattern of yellow and red triangles on a purple background. The main field and neck are white. If desired, you can choose a different scale, working according to the same scheme.
You will need 1166 1/32 triangular modules. Of them:
- 706 white;
- 270 purple;
- 150 red;
- 90 yellow.
Having prepared all the necessary elements, we begin assembling the vase from the colored lower part. We place the triangles with the top down, the type of connection is on the short sides.
Scheme for assembling the “body” of an origami vase:
You should not try to make the entire colored belt of the vessel at once - fragments that are too long begin to curl and fall apart under their own weight. First, we assemble 6 red-yellow triangles attached to a purple inverted trapezoid. And only then we connect these elements together, forming the lower part of the product.
On the 10th row, the vessel begins to bend inward. The rows must be assembled either “clockwise” or “counterclockwise” so that the vase does not lean to one side and remains symmetrical. The parts are connected with the same pressure, then the surface is smooth, without stray “lumps”.
This is what the base of the vessel looks like after assembly:
The neck of the vase is a straight cylinder, which ends in an expanded mouth with an openwork rim. Scheme:
Having assembled the cylindrical neck, it is bent, giving it an “hourglass” shape. After the 13th row, they build up another 2-3 levels and “thin them out”, removing some of the modules until an openwork pattern is formed. In order for the parts to hold more tightly in areas where the integrity of the canvas is compromised, it is better to glue them and leave them overnight until completely dry.
For the top ring you will need approximately 47 - 50 modules. It is also advisable to connect them with glue and put them under a press for several hours, then the structure will not turn in different directions. The ring is attached to the mouth as follows:
Both parts are smeared with glue, with the rim placed on a flat, flat surface (for example, on a table), and the inverted vase placed on top. The structure is pressed with something heavy and left for a day. The procedure is needed if “Moment” or PVA is used. Hot glue doesn't require this kind of manipulation, but it won't hold the paper tightly.
We connect the “body” and the neck of the vessel. Coat the joints of the modules with glue. And again we place a heavy book on top of the vase. This will ensure a perfectly flat top and symmetry of the product relative to the vertical axis.
Perhaps for beginners who have not yet fully mastered the modular technique, it will be more convenient to assemble an origami vase using a video tutorial. Here is a model of a similar shape, also decorated with a geometric pattern.
Beautiful, unusual and fashionable
Today, paper techniques for making a variety of shapes are incredibly in demand. In the interior you can increasingly see unusual handmade products.
And, as practice has shown, after the first successful craft, most often there is a desire to do something else. That is why this exciting activity easily develops into a hobby.Plus, creating a vase that is unique is not that difficult. No special skills are required here. Step-by-step instructions for beginners will help you understand all the intricacies of the work.
In addition, a hobby can bring good income. How? It’s simple, lovers of such decorative design solutions order products from those who make them well.
Other options
A variety of vase assembly patterns will help every craftswoman find something of her own. Vases can be small or huge - floor vases. Vases filled with flowers and fruits made from modules are very popular.
To make a vase like this, you need a lot of patience and 1920 modules. What does it take to assemble the modules all together, not to mention cutting the blanks and bending the required amount.
Modular origami is a very exciting activity that will be appreciated not only by adults, but also by children. With the help of daily activities, children will be able to collect all kinds of figures, equipment, animals, plants and various useful products. Attention, perseverance, creative thinking, imagination - all this develops in a person during modular origami classes.
The design of a fruit bowl is not very complicated, but you need to think about what to fill it with. To do this, you will need to make fruits and vegetables from modules; you can watch the video to see how to do this.
Related article: DIY paracord weaving patterns: instructions with photos
Bananas, strawberries, cherries, oranges, grapes, pineapples, lemons and various vegetables are very easily made from modules. A good master class in origami techniques will help you create various vases for fruits and sweets. You will find some videos below.
Depending on the size of the future product, the number of modules that will be used to create the vase also depends. The larger the vase, the more complex the process of creating it. If you also make a beautiful, multi-colored thing, you will need a lot of bright modules. In addition to multi-colored stripes, such products can also have beautiful patterns.