Recently, interest in decorative and applied arts and folk art has been growing. One of the types of such art is quilling - an innovation in needlework that seems at first glance, but in reality it is an art with a long history, spreading its roots both in the East and in the West. What do we know about quilling except that amazing, unique, unlike anything else creations come from his pen, and that quilling itself develops fine motor skills, lifts the mood, distracts from the hustle and bustle, develops imagination and spatial thinking? Let's get to know him better.
History of Quilling
The history of paper rolling is quite extraordinary. This art traveled from West to East and from East to West, absorbing the national identity and specificity of the cultures of different peoples.
Despite the fact that the origins of quilling are completely unknown, there is a version that this art originated in China following the invention of paper in 105 AD.
According to other sources, paper rolling was practiced in Ancient Egypt.
In Korea, quilling acquired special features characteristic of the East, where creating any creation can require a large amount of time, a huge amount of painstaking work, and the compositions themselves stand out for their sophistication and can contain hundreds of tiny elements that form one whole.
It is worth noting that paper rolling in Korea, as a national art form, is officially taught in school.
Quilling. History of origin and fundamentals of technology.
Lesson topic
: History of origin and fundamentals of technology.
Lesson objectives:
introduce the quilling technique, introduce the history of the quilling technique, give ideas about the use of the technique in decorative and aesthetic design; introduce and teach how to perform the basic elements of quilling;
Lesson objectives:
develop fine motor skills of fingers, develop creative thinking, develop logic of thinking and memory;
to cultivate interest in studying paper plastic techniques, to cultivate an aesthetic perception of the world around us, and a creative attitude towards ordinary things.
Equipment:
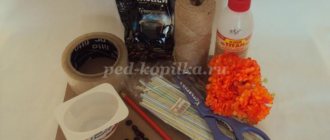
computer, quilling strips, scissors, skewers, glue, colored cardboard.
Progress of the lesson.
I. Introductory part.
The teacher welcomes the group. Readiness for class and organization of the workplace are checked, materials (pre-cut strips of white paper) are distributed. Adjusts the emotional state of children for work.
Today in class you will get acquainted with the technique of paper plastic art - quilling. This is a unique way to create delicate, delicate, voluminous products that look like lace. We will learn the history of the origin and spread of this type of needlework, and learn how to perform the basic elements of quilling. By the end of the lesson, you should have a collection of elements of various shapes, which will be used to make a three-dimensional figure in the next lesson.
II. Main part.
1. Lecture on the history of the quilling technique.
Quilling , paper rolling, paper filigree
- the art of twisting long and narrow strips of paper into spirals, modifying their shape and composing the resulting parts into three-dimensional or planar compositions.
In English, this craft is called “quilling” - from the word “quill” or “bird feather”. The art of paper rolling arose in Europe at the end of the 14th and beginning of the 15th centuries. In medieval Europe, nuns created elegant medallions by twisting paper with gilded edges onto the tip of a bird's feather. When viewed closely, these miniature paper masterpieces created the complete illusion that they were made of thin gold strips. Unfortunately, paper is a short-lived material and little has survived from medieval masterpieces.
Paper rolling quickly spread in Europe, but because paper, especially colored and high-quality paper, was a very expensive material, paper plastic art became an art for ladies from wealthy sections of society.
However, this ancient technique has survived to this day and is very popular in many countries around the world. In the 15th century it was considered art, in the 19th century it was considered ladies' entertainment, and for most of the 20th century it was forgotten. And only at the end of the last century quilling began to turn into an art again.
Nowadays, paper rolling is widely known and popular as a hobby in Western European countries, especially in England and Germany. In England, Princess Elizabeth was seriously interested in the art of quilling, and many of her creations are kept in the Victoria and Albert Museum in London.
But this art became most widespread when it “moved” to the East. The richest traditions of the finest graphics and plastic arts, papermaking and working with it have given the art of paper sculpture a new life. In South Korea, there is an entire Association of Paper Art Lovers, uniting followers of various areas of paper art.
It should be noted that the Korean school of quilling (they call it paper rolling) is somewhat different from the European one. European works, as a rule, consist of a small number of parts; they are laconic, reminiscent of mosaics, and decorate postcards and frames. Europe is always in a hurry, so it loves fast technology. Eastern masters create works that resemble masterpieces of jewelry. The finest voluminous lace is woven from hundreds of small details.
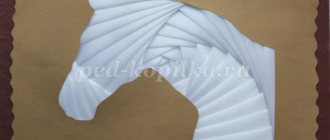
We associate paper with the idea of fragility and fragility, but quilling refutes this statement - you can put, for example, a cup or put a heavy book on a filigree volumetric stand, and not a single curl of paper lace will be harmed. You can assemble a candy vase from paper elements and safely use it for its intended purpose - it will not fall apart or break. In general, quilling is an opportunity to see the unusual possibilities of ordinary paper.
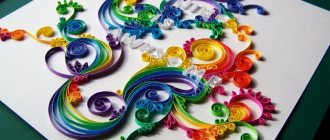
Display of products created using the quilling technique (demonstration from the Internet)
You will learn what quilling looks like today, what kind of work children do using this technique, from the presentation (showing slides using a laptop and screen or printed out as pictures).
Introduction to the basic elements of quilling
In order to create works using the quilling technique, you need to learn how to make the main elements from which, with the help of your imagination,
create any openwork compositions.
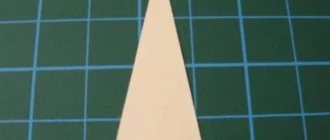
All quilling elements start with a basic round shape. Look at the technological map
shows how to make a round mold.
( The technological map is shown on the screen gradually in slides, accompanied by comments from the teacher and reading of the stages of making a round mold by the students themselves).
Practical exercise on making a basic round element.
Now we will practice making a basic round element. For this
1. Take a strip. Using your fingernail, pull it slightly and round the end. Place a skewer on it. Wind the strip, trying to make the first turns tighter.
2. When the paper “grabs” the stick, you can only rotate the stick until the very end of the strip.
3. Twist the flat washer to remove it, slightly move the stick.
4. Now unravel the workpiece to make a ring with a twisted spiral. The diameter should be 12-14 mm. Sometimes this is enough to simply release the workpiece. If it was twisted very tightly, then you need to lightly squeeze it with your fingers to open it. Glue the tip with a small drop of PVA glue.
Introduction to closed and open quilling elements
To complete the intended object, it is necessary to give the round blank various shapes. To get the “Drop” shape, pull the middle of the spiral in one direction, squeeze several layers on the other side to create a sharp end. Thus, any element can be executed. All quilling elements are divided into closed, i.e. made from a glued round shape, and open, i.e. made without glue, just screwing them on.
Look at slide 5, which shows the shapes of closed elements. Read what they are called, think about why they are called that and how to do them, consider what they look like. (The teacher comments on the content of the slide and answers any questions that arise).
Slide 6 – open quilling elements – is worked out in the same way.
Practical work.
We have become acquainted with the basic closed and open elements of quilling, and now we will make a postcard using the learned
elements.
During children's practical work, the teacher provides individual assistance and monitors the correctness of the work.
Consolidation of what has been learned.
You and I learned a lot in this lesson, learned how to make various elements, and to check how attentive you were and what you filled out, answer the quiz questions.
— Where and when did the art of paper rolling originate? (in Europe at the end of the 14th - beginning of the 15th century)
— What else can you call paper rolling? (quilling, paper filigree)
— What products can be made using the quilling technique? (aerial structures, panels, paintings, applications, voluminous souvenirs)
— What is the difference between open and closed elements? (Closed ones are made from a glued round shape, and open ones are made without glue, just screwing them on).
What shapes of open and closed elements do you remember? (Closed - “drop”, “eye”, “square”, “triangle”, “arrow”, “crescent”; open - “heart”, “horns”, “curl”, “twig”.)
III. Final part.
— What did you like most about today’s lesson?
— What new things have you discovered for yourself?
— What emotions did you experience during the lesson?
— What did you succeed and didn’t succeed in the lesson?
At the end of the lesson, I want to wish you a good mood, be open to learning new things and be good at doing what you like.
Literature used: https://rukodeliehobbi.ru/, https://prokvilling.ru/, https://www.tvorim-sami.ru/
Step-by-step instruction
- Take a strip of quilling paper in the color you want and place the tip of it on an awl or toothpick—your quilling tool. Wrap the strip around the tool several times until it is secure enough.
- Twist the entire strip around the tool using medium tension. If everything is done correctly, then you will only need to twist the awl around its axis and hold the paper with your hand.
- Once the roll is ready, you need to spread it to the desired size. To do this, use a stencil. Just select the hole you need (for example, 10 millimeters in diameter) and place the twisted roll in it - it will take the shape of this hole. After which you need to carefully pick it up with another toothpick, remove it from there and secure the end with glue.
- If this element should be made in the shape of a drop, a heart or any other, give it this shape by stretching or squeezing with your fingers from the desired sides.
- Fasten the finished parts together one by one, in accordance with the diagram, also using glue. Do this carefully, remove excess with a napkin. Sometimes it is more convenient to connect several elements together, and then fasten the resulting parts together and, if necessary, glue them to a base (for example, cardboard).
- Also, for ease of work, attach ready-made elements to diagrams printed on paper using safety pins to assemble the composition, and then secure with glue.
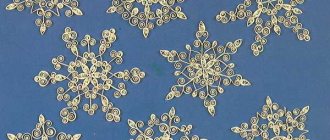
Flowers and plant motifs, birds, butterflies, snowflakes, and hearts are very popular in quilling. Letters or any symbols filled inside with quilling look interesting. They are similar to lace products, only much more colorful and vibrant.
Video master class “Decorating for Easter from paper”:
Interior decor ideas
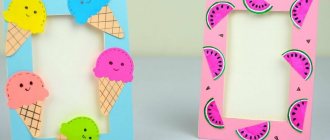
Photos in a frame decorated with paper curls look very beautiful. The frame is made quite wide so that there is enough space to place the picture. Twisted strips are used to make flowers, petals, hearts, blades of grass, and even a nondescript frame acquires originality.
Test: Can you guess these Soviet products?
Decorating boxes and jars using the quilling technique is another interesting idea. There is a place for such unusual crafts in the bedroom, living room and kitchen. Jars decorated with ornate elements will take their rightful place on the desk - you can store writing utensils, rulers in them, and creative materials, jewelry and various small items in decorated boxes.
If you have a lamp with a lampshade at home, spirals using the quilling technique will give it an unusual look. The surface is decorated with paper rolls in the form of flowers, leaves or geometric shapes - triangles, rhombuses, ovals. This lamp fits well into a vintage or oriental style interior.
A suitable place for toys using the quilling technique is a children's room. It’s fun to make crafts with your child, but they don’t necessarily have to serve only a decorative function. So, it’s easy to make three-dimensional letters, numbers, and mathematical symbols from twisted blanks. For better memorization, crafts are placed in plain sight.
On the eve of the holiday, it is worth showing your imagination and making a variety of decorations - garlands, stars, large numbers indicating the date, a panel with the name of the hero of the occasion, and much more . You can twist any Christmas tree decorations from paper - balls, snowmen, snowflakes. For Easter, you should decorate real eggs with small curls or make artificial ones. In the second case, the contents are removed, the shell is pasted over, then taken out piece by piece.