Along with products made from polymer clay, crafts made from salt dough are popular. This is a cheap material that does not require large material costs, is easy to work with and allows you to create flowers, toys and much more. But, most importantly, salted dough is always available and absolutely safe for children. Food or natural dyes are used for coloring. Due to the use of natural raw materials, modeling from this material is called bioceramics.
How to knead salted modeling dough: a classic recipe
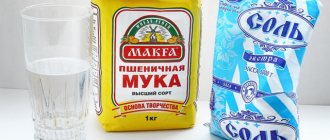
To knead salt dough according to the classic recipe, only three ingredients are used:
- salt – 300 g;
- flour – 300 g;
- water – 200 ml.
If necessary, the number of components can be increased or decreased while maintaining the proportions.
The method for preparing salted play dough is very simple. First you need to mix the bulk ingredients, and then add water portionwise, kneading the dough. Depending on the properties of the flour, more or less liquid may be needed.
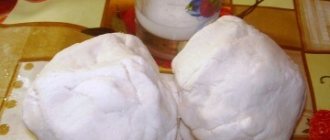
When the dough is completely kneaded, form it into a ball, wrap it in cling film and put it in the refrigerator. After 2-3 hours you can start sculpting.
On a note! To knead salt dough, it is better to use sifted flour.
Using only three ingredients - salt, flour and water - even a child can knead salt dough for modeling.
Methods for coloring salt dough
There are two ways to color salt dough: after creating the finished product and at the kneading stage.
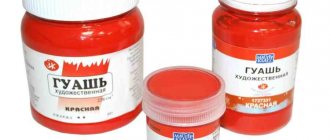
In accordance with the first method, the craft is painted with gouache or acrylic paint is used for this purpose. Colors are selected depending on the type of product. The second method involves diluting food coloring in water, which is subsequently used when kneading the dough.
On a note! The finished craft must be coated with transparent varnish to increase its service life.
Master class 1: DIY salt dough dachshund
To make crafts from salt dough for beginners, you should use a step-by-step master class. A funny dog can be used as a souvenir. Everyone is pleased to receive such a gift, because it is made with their own hands, which means it keeps a piece of the author’s soul.
Tools and materials
Even a child can make a cute dog out of salt dough. You will need the following materials:
- salt dough made according to the classic recipe (salt, water, flour);
- a simple pencil;
- transparent varnish;
- foam sponge;
- glue;
- toothpick;
- rope;
- brush and paint;
- cardboard;
- scissors.
Step-by-step master class
Making crafts from salt dough with your own hands from a photo is a simple and at the same time fascinating process that a child will be happy to join in with. A step-by-step master class will help you implement your plans:
- First of all, you need to print out a drawing of a dachshund dog on paper. Then transfer the contours of the figure onto cardboard and cut it out.
- Roll out the dough. The result should be a layer approximately 5 mm thick. Attach a cardboard blank to it and cut out the shape along the contour. Push the dough scraps to the side.
- Make two balls from the remaining dough that will serve as eyes for the dog. They can be easily attached to the head with a drop of ordinary water. You can also remove unevenness with water. It is enough to dip your finger in it and walk over the surface of the figure. Use a toothpick to draw a mouth.
- Make eyelids from pieces of dough. Glue them to the top of the eyes. Use a toothpick to outline the paws, ears, and nose. A voluminous ear will look much more interesting, so it’s worth making it as a separate part. It's simple: roll the salt dough into an oval and stick it in the right place. Smooth the joints with damp fingers.
- Increase the volume of the back of the body and tail.
- Using a toothpick, draw stripes along the edge of the craft, as in the photo.
- Now it's time to dry the dog figurine in the oven. It should not be too hot, just heat the oven until warm. When the craft is dry, you should paint it with blue paint in the area of the toothpick dents. Wait until the paint dries.
- Using a foam sponge and yellow paint, paint the dog's body. Dents painted blue should not be touched.
- Draw the eyes. Make an inscription at your own discretion.
Glue a rope to the back, and open the craft itself with transparent varnish. The product is ready. Such an unusual and cheerful dog will definitely bring good luck.
Painting a dog from salt dough
Take white gouache and apply a thin layer to all parts of the dog that are not covered by a fur coat. To prevent the paint from cracking after drying, you need to paint with a very wet brush and colored water rather than paint.
Now use yellow and orange to tint some parts of the dog - the upper part of the muzzle, the far paws, the tail. There should be almost no white left, because this breed is very bright due to its color.
When the “wool” has dried, paint the fur coat with a bright color, skipping the edges.
After the previous layer has dried, carefully paint the fur edging of the jacket with white paint. Also, lastly, paint over the eyes and nose with black.
Master class 2: Boletus mushroom made from salt dough
Making a boletus mushroom will take a little more time than mastering the previous master class. However, it's worth it. Having immersed yourself in a fascinating and interesting process with your child, no one will notice how quickly time has flown by. There is no doubt that the baby will be delighted.
Tools and materials
To make boletus mushroom from salt dough, you will need the following set of materials and tools:
- universal salt dough;
- ordinary light bulb;
- foil;
- cardboard;
- acrylic paint (can be replaced with gouache);
- paper napkins;
- Super glue;
- masking tape.
On a note! To make a mushroom stem, you can use a glass instead of a light bulb.
Step-by-step master class
To properly make a craft from salt dough in the form of a boletus mushroom, it is advisable to use the following step-by-step master class with photos:
- Cover the light bulb with tape. Knead salted modeling dough from flour, water and salt according to the classic recipe. Place the light bulb on top of the tape and smooth it out. Place in a warm oven and dry the workpiece. You can also achieve the desired effect at room temperature, but the drying process will take much longer.
- Cut a ring out of cardboard. Place it on the light bulb so that the cardboard blank is held on it. This is the future cap for the boletus mushroom.
- Create a hat for the future mushroom from paper napkins. Using a certain number of napkins, you can control the size of the cap. Then it is possible to secure the resulting workpiece with tape, which will hold the structure and prevent it from falling apart.
- The result will be the following.
- To increase the strength of the finished craft, it is advisable to wrap the hat with regular foil.
- To make a mushroom cap, you can use salt dough of absolutely any color. The dye can be added at the stage of mixing the biomaterial or the finished figurine can be painted. Take a small piece of salt dough and place it on top of the foil.
- Separate the cap from the stem and cover the bottom with dough, as shown in the photo.
- Using a knife (blunt side) or toothpick, press stripes on the bottom of the cap. This will make the mushroom look more like a real one.
- Put the cap back in place and secure it to the stem with glue.
- Now it's time to make the remaining, smaller parts of the craft. Make legs, nose, and handles from salt dough. Make an unusual caterpillar and plant it on a mushroom cap.
- Dry the finished figurine in any convenient way.
All that remains is to paint the mushroom with paints.
The result is an interesting craft that can be used for decoration or as a children's toy.
Plasticine dog
For New Year 2021, you and your children can make a cute dog out of plasticine. You will need: orange, brown, black, white plasticine, a needle.
The main color of the craft will be brown. You need to make blanks from it - two ovals. This will be the torso and head. You don't have to make them the same - it's up to you.
It is necessary to fasten two parts, paying special attention to the place of fastening.
Then you need to mold the paws: two not too thick sausages from brown plasticine.
They are attached to the sides of the body. To give the craft a more interesting look, you need to give the dog a white shirtfront. A thin triangle is made from white plasticine and attached to the dog’s chest.
For the hind legs, you need to roll two balls and flatten them a little, and then attach them to the figure so that it is sessile.
To decorate the muzzle, you will need to make a black nose from a plasticine oval, and for the eyes you need to make two white balls and attach them to the muzzle, and add black pupils to the middle. The eyes should be the same.
For the ears, you need to take orange plasticine and fashion two oval-shaped parts from it, which should be flat.
They are attached to the sides of the dog's head and given shape.
Using a needle, a pattern is applied to the paws - toes and gives texture to the shirtfront on the chest.
Master class 3: Funny elephant made from salt dough
A cute elephant made from salt dough can be used as a souvenir, giving it to a friend, and if you attach a magnet to the back, the craft will decorate the refrigerator door. Regardless of how the product turns out, you can be sure of its uniqueness.
Tools and materials
To make an unusual elephant from salt dough, you will need:
- blue and white salted dough;
- glue;
- magnet;
- stack or toothpick;
- ready-made eyes.
Step-by-step master class
To make an elephant from salt dough, you need to perform the following algorithm:
- Knead the salt dough from salt, flour and water according to the classic recipe. While kneading, add blue dye. But before that, you should pinch off a piece of white dough, putting it aside. It will be used to make eyes. Once the material has been in the refrigerator, you can begin to sculpt. Set aside a small portion of the blue dough for making small parts.
- Flatten the blue dough ball. You will get the head of an elephant. If possible, it is worth making the workpiece more round. To do this, wet your hands in water, shape the product and smooth the edges.
- Pinch off a piece of blue dough from the one that was set aside earlier and fashion a proboscis out of it. Glue with a drop of water. Using a stick or toothpick, make a spout at the end of the trunk.
- Make ears. Glue.
- Make eyes from white dough. Attach them to the required place.
- Insert ready-made decor into the middle of the peephole, as in the photo. You can also paint the pupils with black paint. But they look more believable this way.
All that remains is to dry the salt dough craft and cover it with transparent varnish.
Glue a small magnet on the back of the elephant with superglue.
Modeling a dog
From a small piece of dough we make something like an oval, or more precisely, we form an egg.
Now we make 4 legs of different lengths from sausages of the same thickness. We bend one edge of the sausage slightly to form a paw brush. The paws that are fully visible will be longer than those that are hidden behind them.
We wet the body a little with water and attach the near paws. Use your finger to smooth out the joints and mark it with a curved line using a stack or toothpick.
Now we place short blanks under the front legs so that they protrude slightly forward. Using a sharp object, we separate the phalanges at the ends of the paws.
Roll up a thin sausage and place it approximately in the middle of the dog’s body. Then moisten it well with water and smooth the edges to form a small bump. This will be the edge of the fur coat that the dog is wearing. We do the same on the front legs.
Now we roll the ball and stick it at the top of the body.
From a small ball stuck in the center we will make a protruding part of the muzzle. We make a triangle from a small piece of dough and stick it on top of the head, forming an ear.
We press the ball a little in the center, and moisten the edges with water and smooth it with a glass so that the joints are not clear. We make a nose from a miniature triangle, and use a sharp stack to form the relief and mouth. The eyes are made after imitation wool, from small balls.
To make a hood, you need to roll up a sausage and place it around your head, as seen in the photo.
Now, using a sharp stick, slightly flatten the sausage on the inside of the muzzle, forming folds and the edging of the hood.
We make a pompom from a small ball. Using a toothpick or a sharp glass, we make shallow holes throughout the entire fur coat - we form the relief and the effect of the pile of the fabric.
The Akitu's tail is quite bushy and is always curled in a ring. Make a fairly large short sausage, moisten its edge and stick it to the body. Then roll the sausage and lightly scratch the tail with the stack, imitating wool.
Dry the product outdoors or in the oven at minimum temperature.
Ideas for creativity
When inspiration strikes, ideas for creativity know no bounds. You can make more varied and interesting crafts from salt dough.
We make a dog, a symbol of 2030, with our own hands
Our step-by-step guide in tandem with detailed photos will tell you how to make a dog from salt dough, and then make a magnet from the blank.
At the end of the article you will find a video for the craft.
To make a dog-shaped refrigerator magnet you need:
- flour - 1 cup;
- salt - 1/3 cup;
- vegetable oil - 2 tbsp. spoons;
- water - about 1/3 cup;
- magnet - 3 pcs. (different sizes);
- twine - 30 cm;
- gouache paints, brush;
- scissors, knife;
- clear nail polish;
- for cutting from paper.