Needlework
06.16.2018 Anastasia Prozheva
Knitting is a creative activity with the help of which unique things are created. People of almost all ages can do it. When knitting any product with sleeves, you should pay attention to the style of the sleeves. There are eight styles of sleeves: set-in, sleeve without a line, with a shallow armhole, with shoulder strap, raglan, bat, flashlight, kimono. In this article we will talk about the raglan style. To knit a product with this style, it would be quite useful to have a raglan sleeve pattern. Applying the resulting fabric to the pattern during the knitting process will help avoid many problems and eliminate the need for bandaging. How to sew a raglan sleeve? You will learn about this very soon.
Often in knitting magazines there are models with a raglan style. Below you can learn how to knit a raglan sleeve with knitting needles. It can be knitted both at the top and bottom. Let's consider the first option, when the sleeve is knitted from the bottom. And here there are two possible options: knitting with a seam and seamless.
Raglan with seam
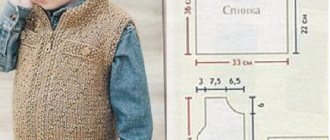
In this case, all parts of the product are knitted separately and then sewn together. First you need to make a pattern . The construction of the pattern of the main parts (front, back) is done similarly to the pattern with a set-in sleeve. The only difference is the armhole and neckline. Below are photos for a visual example.
Style with set-in sleeves
Raglan style
The photo shows that the bottom of the patterns is absolutely identical, only the top changes.
Using it, it will already be possible to calculate the loops. To create a pattern, you will need initial data, that is, measurements. You will need to take the following measurements:
- Back length to waist;
- Length of the product;
- Raglan length;
- Neck circumference;
- Chest circumference;
- The length of the sleeve;
- Sleeve width at the wrist;
- Sleeve width at chest level.
Related article: How to make a stencil from a photograph
The measurements have been taken, now you can draw the pattern.
The construction of a raglan sleeve begins with a drawing of a rectangle ABCD, where AD is the length of the sleeve, and AB is the width.
From point A downwards we set aside a length equal to 1/6 of the chest circumference plus 6 cm for a loose fit. Let's designate point P. This will be the height of the raglan. We do the same on the other side. From point B we measure the required length and designate it as point M. From point P we set aside 2.5 cm to the right, we designate the point as P1, from point M we set aside 2 cm to the left, and we designate the resulting point as M1. Next, divide the segment AB in half and place point O. From point O, set aside 3 cm on both sides. And we put points K and G. From point G, set aside 2.5 cm upward, let’s call it G1. This point is connected to points O and M1. To indicate the bottom line, equal to the width of the wrist, we divide the segment CD in half. Let's denote the resulting point with the letter W. You have measurements for the width of the sleeve, they need to be divided in half. We put the resulting number of centimeters on both sides of point Ш, denoting them D1 and C1. Thus, our raglan sleeve consists of the following points: K, O, G1, M1, M, S1, W, D1, P, P1. You can see it more clearly in the photo below.
The sewn-in raglan sleeve pattern is ready. Now you can safely start knitting a sleeve. To do this, we select the number of stitches corresponding to the width of the wrist and knit the sleeve, regularly applying it to the pattern. To widen the sleeves, we make increases on both sides. Having reached the armhole, you need to close 3-4 loops first, then decrease the loops in every second.
As you can see, using the pattern, knitting raglan sleeves on knitting needles becomes simple and easy.
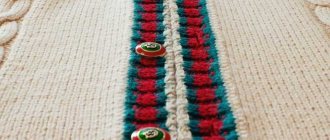
Once all the parts are connected, all that remains is to connect them. This must be done very carefully so as not to spoil the appearance of the finished product. It is best to use a vertical seam for stitching . In this case, the seam is almost invisible. The seam is made as follows: place the parts face up against each other. Since the edges will not be needed, they should be folded inside out so that they do not interfere. From the inside, we insert the needle into the middle of one loop, then bring it out and fasten it to the thread of the opposite side, and return to the first part again.
Related article: How to make a butterfly craft from different materials with video and photo
Calculation of raglan according to the pattern
Let's first look at how to get the technique right. To do this, you will need the diagram shown in the article.
The sleeve armhole is characterized by a bevel that must end at the neckline. You need to calculate the decreases correctly. Only after this can you tie the product with raglan on top. So, let's look at the basic proportions of the pattern that every knitter should follow when knitting a raglan sleeve with knitting needles.
Before starting to form a bevel on the back, first close the number of buttonholes that corresponds to two centimeters, as shown at point A. After this, you can proceed to decreases. Work them through a row, and it doesn’t matter whether it’s a purl row or a knit row, one stitch on each side.
The neckline on the pattern is shown with an even cutout, as at point B. Knit the raglan line of the first front in the same way, only shorter by one or two centimeters, as shown at point C. The shape of the neckline should be rounded, and the bevel is knitted symmetrically to the back and shelf, as point E shows us.
Read
Schemes and patterns for knitting beautiful overalls for newborns
How to knit raglan on top
Knitting raglan on top was known to craftswomen back in the 19th century. At that time, this method of knitting was extremely popular, as it was used in the creation of children's clothing and other everyday items. Thanks to the raglan, the product does not impede movement, and the person feels comfortable in it.
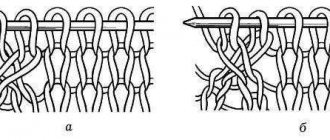
Raglan is a series of loops on which yarn overs are made on both sides to expand the fabric. It can consist of 1 or several buttonholes or even be formed in the form of a pattern. If you are new to knitting, then knit a simple raglan, consisting of 1 purl. P.
To knit a raglan sleeve on top, you need to knit a bevel of the correct shape. To do this, close three loops. After one row, decrease by 1 stitch on both sides. Knit according to this analogy until you complete the pre-made calculation of the links. The important fact is that the shelf should be one centimeter longer than that of the back. As a result, the neckline loops will also decrease.
To determine the correct number of buttonholes that should be on the sleeve at the beginning, you need to add the number of buttonholes in the bevels to an additional six or eight pieces. When decreasing at the beginning of the strip, knit the first two or three stitches, and then two joint ones. The loop should be tilted to the left.
Read
Learn to knit a pullover from mohair yarn
Repeat the same manipulations at the end of the strip and knit until the last 2 or 3 stitches, and knit 2 more joint stitches in the knit method. This concludes the lesson on how to knit a raglan sleeve, and we suggest you supplement the theoretical course by watching a video master class.
Knitting a seamless product with raglan sleeves
Calculation
Unlike products with sewn-in raglan sleeves, a pattern is not required for seamless knitted products; it is enough to take the measurements correctly and make an accurate calculation. This knitting technique has many advantages and is loved by both beginners and experienced knitters. The product is knitted from top to bottom.
The calculation of magnification is simple and is based on the following preliminary measurements (for average fullness):
- neck length (neckline fits tightly to the neck or has a recess); approximately – 50-56 cm;
- shoulder circumference – at the level of 12-14 cm from the first measurement; approximately – 105-115 cm;
- body girth with arms loosely pressed at the armhole level + increase (depending on the model) approximately 140 – 150 cm.
The example shows that the second girth increases from the first by about 2 times, and the third from the second by 1.3 times. Based on this, we make a simple calculation: if for the first measurement we scored 80 points, then their number at the third level should be: (80 x 2) x 1.3 = 210 points, and for products with a raglan line, the resulting number increases even more 1.2 times: 210x1.2=252 p.
We take into account our sizes and knitting density and make a similar calculation.
Description:
- cast on the number of loops according to the neck length calculation, for example 54 sts;
- for 4 raglan lines, mark 4 stitches with contrasting thread;
- distribute the remaining 50 stitches as follows: 1/6 loops - sleeves (50 - 8x2 = 34 stitches, 8 stitches for each), 1/3 loops - back (16 stitches), the rest - on the front (18 stitches) .);
- we knit the fabric in the round using any knitting pattern;
- adding loops is done by yarn overs; we expand the details of the product by adding 2 stitches before and after the raglan lines; in the purl row, the loops are knitted according to the pattern, as usual;
- So we gradually go through all the rows to the calculated girth;
- Next we knit the back, front and sleeves separately according to the model according to the preliminary calculation.
Using this description, you can knit a blouse with a front placket. To do this, leave half of the loops for the shelf for the left shelf, the other half for the right. We knit in the same way, but not in circles, but in straight and reverse rows.
Knowing the basic rules for decreasing and adding stitches along the raglan line, you can start knitting patterns of any complexity, even for a novice needlewoman. This technique of knitting children's clothing is especially popular. You can use your own knitting patterns, proven in practice, or take ready-made ones with step-by-step descriptions.
LiveInternetLiveInternet
1. Draw a vertical line through the middle of the sheet - the line of the middle of the sleeve; 2. At a distance of 4 cm from the top cut of the sheet, draw a horizontal line - the neck line. The intersection point of the vertical and horizontal lines is denoted by the letter A; 3. From point A downwards we lay off a segment AH equal to the length of the sleeve: AH = 68 cm; 4. Through point H we draw a horizontal line - the bottom line; 5. From point A downwards we lay down a segment AG equal to the segment AG in the drawing of the back: AG = 23 cm; 6. Through point G we draw a horizontal line - the armhole line; 7. From point G to the left and right we lay off segments GG1 and GG2 equal to half the width of the sleeve along the armhole line. To determine what the sleeve width along the armhole line will be, add 6-8 cm to the arm circumference at the shoulder, and when knitting sportswear, jackets, coats, etc. - 9-10 cm. In our example, GG1 = GG2 = (30 cm + 8 cm) : 2 = 19 cm; 8. From point G, to the right, we lay off the segment G1G3, equal to the segment G5G6 in the front drawing: G1G3 = G5G6 = 2.5 cm; 9. From point G2 to the left we lay off the segment G2G4, equal to the segment G2G4 in the drawing of the back: G2G4 = G1G2 = 2 cm; 10. From point A to the left and right we put aside 1/12 of the neck circumference, we get points A and A; AA = AA2 = 36 cm: 12 = 3 cm; 11. From point A2 upward we lay off segment A2a, equal to the size of segment aax in the drawing of the back: A2a = aax = 2.5 cm; 12. We obtain the raglan sleeve line from the front side by connecting points A1 and G3; 13. We obtain the raglan line of the sleeve from the back side by connecting points A2 and G4 or points a and G4 (corresponding to line a1G2 in the back drawing); 14. Use a smooth concave line to connect points A1 and a. Line A 1a is the line of the sleeve notch, which is part of the neck circumference; 15. From points G, and G2 downwards we lay down vertical segments G1G6 and G2G6, equal to 3-4 cm (constant value). In our construction, G1G5 = G2G6 = 3 cm; 16. From point H to the left and right we set aside 1/2 the size of the wrist circumference plus 1-2 cm on each side (constant value): HH1 = HH2 = 16 cm 2 + 2 cm = 10 cm; 17. By connecting points G5 and I, and then points G6 and H2, we obtain the lines of the side bevel of the sleeve. With this construction, we obtain a sleeve slightly wider than when constructing a drawing in which points G1 H1 and G2, H2 are connected (dashed lines). This type of sleeve design is recommended for use when knitting summer items, when the main item does not have a large allowance for a loose fit. Using the given method of constructing patterns, you can make men's, women's and children's products with raglan sleeves.
https://www.knit-x.ru/postroenie_chertejey/zhaket-s-rukavami-reglan/postroenie-chertezha-rukav/
Raglan sleeve modeling
Raglan is very popular, and its modeling and sewing are easier than other types. During the work process, fewer stitches are required, which significantly reduces the time to create the entire product. However, it is worth approaching the construction of the pattern thoroughly so that when sewing the product does not lose its shape.
flickr.com
- On the wrong side of the base fragments, draw two lines: the line of the armpits and the line of the middle of the arm.
- Divide the neck halves into three equal parts.
- Draw a curved line on the back for the cut (from the point where the mid-arm line ends (C, G) to the first notch on the neckline).
- Do the same for the shelf.
- If each step is completed correctly, cut off the excess pattern pieces for the front and back.
- On the basic fragment of the sleeve drawing, draw an armpit line and a vertical center line.
- Draw a horizontal line 1 cm above the top of the fragment.
- To make marks for joining the base, take a measuring tape and measure the CD and GH curves on the back and shelf.
- Add marks according to the diagram: C1D1 = CD + 0.5 cm G1H1 = GH + 0.5 cm
- Place both pieces of base onto the sleeve, starting with the marks you drew.
- Points C and G should overlap C1 and G1 respectively.
- Position the shelf and back so that points B and F lie on the horizontal line (1 cm above) that you drew earlier.
- Extend the lines AB and EF by bending them slightly. They should connect at point P on the vertical midline. Make sure AP = PE.
- The raglan sleeve pattern is ready.
flickr.com
flickr.com
flickr.com
flickr.com
Thanks to the invention of a tailor and the desire of a person to hide imperfections in appearance, the raglan sleeve was invented and created.
Raglan sleeves have the universal ability to shape your figure. The line of inclination of the raglan sleeve determines whether this sleeve will visually expand the line of the shoulders or, on the contrary, narrow them as much as possible.
Agree, for many women this is simply a “lifesaver”!
Today we’ll look at creating a raglan sleeve pattern in the simplest way.
First of all, what is a raglan sleeve? This is a type of sleeve that is cut out together with the shoulder part of the back and front of the product.
The construction of a raglan sleeve in different sources, although it has a similar basis, is often given in such terrifying diagrams and calculations that just looking at the raglan drawing makes you feel bad.
We will assume that the tailor who created the raglan sleeve at the beginning of the 19th century could not have known such complex constructions and probably did it using the layout method.
So why do we need to “reinvent the wheel”?
Let's use the dummy or layout method - this is the shortest path to mastery in sewing and cutting.
What is the advantage of the fake method of constructing a raglan sleeve pattern? The fact is that you can actually see on a person or mannequin what a sleeve will look like on a particular figure, you can even simply “draw” different lines of inclination of the raglan sleeve directly on the figure and observe how this is reflected on the silhouette as a whole. Well, isn't it brilliant?
In addition, working with fabric is much more pleasant than with rustling paper and the letters “a, b, c,” on the drawing.
Now I will try to explain to you in a letter as simply as possible the principle of constructing a raglan sleeve, and pictures will help us with this (without clarity, nowhere!).
What details should not be forgotten when constructing: the important thing is that the line of the middle of the shoulder should be slightly shifted forward, i.e. on the product shelf. This is usually an offset
do it by 1 cm. It is advisable to raise the “sprout” of the back a little by 0.5, i.e. back neck line.
Before drawing the piping line of the raglan sleeve, you need to ensure that the darts on the front and back are closed. After combining the cut-off parts from the front and back with the edge of the set-in sleeve, we complete the outline of the raglan sleeve with smooth transitional lines. You will get an offset center of the sleeve; by extending this line to the bottom of the sleeve, you will divide the raglan sleeve into 2 parts (see picture).
Quite simple and clear.
We have looked at the construction of a classic or standard raglan sleeve, but you need to know that there are several more varieties:
- semi-raglan, this is a type of raglan sleeve in which a small section of the shoulder section of the product remains, i.e. raglan does not reach the neckline;
— raglan “zero”, this is a sleeve option when the raglan sleeve armhole line begins at the top of the back and front neckline, and smoothly descends down the sides;
- raglan “epaulet”, imitation of shoulder strap, i.e. the armhole line runs from the neckline parallel to the shoulder cut line and smoothly transitions into the armhole line of a regular set-in sleeve, resulting in a “highlighted” shoulder area;
- “fancy” raglan, as the name suggests, can be of any shape at the top, and the bottom of the armhole is the same as that of a set-in sleeve.
Well, that’s all about the raglan sleeve, in the future we will consider interesting models of dresses, blouses, jackets, jackets with this type of sleeve cut.
[pt_view id=”a9d11c4d5i”]