The benefits of homemade bouquets
For the hero of the day or other gift recipient, such a gift will be very pleasant. For the master there are a number of other advantages:
- Possibility of adjusting financial investments as a gift.
- The master has the opportunity to independently determine the composition of the sweet bouquet.
- The choice of decorating part also belongs entirely to the owner of the original gift.
- A large assortment of models, as well as step-by-step instructions for creating a bouquet of sweets with your own hands for beginners.
- There is no need to study in special courses - a little dexterity and skill, improvised materials, office supplies.
Bouquets made independently will be appreciated by any birthday person.
Necessary and practical
Socks, panties and shaving accessories have long become traditional gifts, but they do not please men. To really surprise, you need to do something special. Everyone has a mobile phone, but not everyone has cases for them. You can also make a wallet with your own hands, a belt or a watch strap. Purses, key holders, business card holders - any of these accessories will bring joy to your loved one.
Article on the topic: Sleeveless vest for a boy with knitting needles: how to knit a sweater for babies up to one year, 1 year and 7 years old with photo
Materials for work
It is better to carry out the work in a well-organized place where there is a source of high-quality lighting. You also need to prepare:
- Metal wire.
- Wooden skewers.
- Corrugated paper of various colors for decorative purposes.
- Adhesive tape.
- Wrapping paper.
- Cardboard or felt for making a flower pillow.
Candies, chocolates, lollipops - this component is chosen directly by the master, depending on the wishes of the hero of the occasion.
Practical tips for creating a bouquet
The decorative part of the gift bouquet got its name for a reason. There is no need to strictly observe the proportions and ornament of the flower bud. The most important principles to work with are to firmly secure the sweet surprises in the packaging, and also to give the bouquet a compact and stylish look.
You can use any material for decoration, but crepe is the most popular and accessible. Corrugated paper makes realistic buds, petals and inflorescences.
Alternative option
Do you want to know how to quickly make a lily from corrugated paper with your own hands? Then this master class is just for you. The step-by-step process of making several flowers takes no more than five minutes. So, for work we will need: thick paper or a template for cardboard, corrugated paper, pencil, wire for stamens, glue, scissors, felt-tip pens and pencils.
We would like to note that you can choose the number of stamens, size and color of the flower according to your taste; the lily can be five-pointed or six-pointed. To begin, cut out a boat-shaped petal template from thick paper or cardboard. You can draw it by hand or print it ready-made.
Related article: Crochet an amigurumi doll
Then we apply the template to corrugated paper and cut out the required number of petals from it. We bend the petals slightly in the middle, then you can press them, but very lightly, and unfold the workpiece. To give the petal shape, you need to stretch it a little. To do this, in the middle, also very carefully, pull the petal in each direction. We color the petals with felt-tip pens or pencils as desired.
Next you need to make the stamens. We wrap the wire with white corrugated paper, lubricating it with glue. We are waiting for it to dry. Cut it into small pieces of the required length. We string a bead onto a wire and twist it. We wrap the bead with corrugated paper and glue. Then this edge needs to be painted brown, and the stem itself green. Glue the petals asymmetrically around the stamens.
Note! You can make a different flower assembly. To do this, you need to make small cones. Now take one, cut off the bottom and insert three symmetrically placed petals on the glue. Then insert another cone with three petals, and insert the stamens at the end.
Methods for assembling sweet buds
Working with crepe has a number of advantages, and one of them is the ease of assembling parts. There are several options for the master:
- Using a topstitch stitch. A long strip of paper is prepared from the crepe and a stitch is laid in the center. The blank is wrapped around the candy, forming a bud.
- Stitching petals around the surprise.
- Sewing the petals to the base (in the form of a cardboard circle or felt pillow) to which the candy is glued.
Sometimes in practice there are other methods: mounting on foam plastic, screeding with adhesive tape.
Master classes on making bouquets
Any birthday person dreams of receiving an original gift, and the master has the opportunity to realize this dream using his creative potential. For those whose needlework experience is limited, there are detailed instructions and video tutorials on how to form bouquets with sweets.
Note!
DIY fruit bouquets - TOP-200 photos with instructions for creating a bouquet of fruits with your own hands. Unconventional ideas with simple diagrams and work overviews
- Crocheted flowers: TOP-160 photos and step-by-step knitting pattern, review of finished products with your own hands. Crochet master class for beginners
- Paper lily - TOP 100 photos of the best product options. Master class with step-by-step diagrams and drawings for creating an origami lily with your own hands
The most famous models of gift items are:
- Bouquet of lollipops.
- Chocolates in packaging.
- Bright pineapple on the bottle.
- DIY gift bouquet of sweets and tea in a basket.
- Bouquet of roses with Raffaello.
- Tulips with truffles.
Each presented bouquet is beautiful in its own way, and delights the owners with bright colors and unexpected surprises inside the bud. Instructions for pleasant and high-quality work can be found freely available on various web resources.
We create a flower-sweet box for March 8
On the eve of the women's holiday itself, we want to share with you a short review video in which we will clearly show how to create a flower box with chocolate letters with your own hands.
So, we will need:
- A gift box made of thick cardboard (we used a box 15 cm wide and 7 cm high, it is most convenient if it is square, but if this is not your first time collecting a flower box, you can safely use a round shape or even a heart);
- Flowers (florist shops often have broken buds - it is best to use them, but if there are none, take a couple of sprigs of spray roses of different shades and, for example, a sprig of spray chrysanthemum. A little trick - the smaller the flowers, the more harmonious the composition will look);
- Floral sponge (also called foam or “oasis” - sold in the same flower shops - a kind of sponge for flowers, green (not gray! - this is important) color);
- A thick plastic bag or a small piece of stretch film;
- Ribbon approximately 1.5 cm wide;
- Small postcard;
- Sweet component (our video uses chocolate with letters, but Rafaelka, berries, Ferrero, macaroons or other girly delights are also suitable);
- For work you will need: scissors, a stationery knife, pruning shears (if you have them, if not, then scissors can easily replace it);
Some examples:
Let's get started:
- We take the flower “oasis” in our hands, cut it lengthwise (like a sandwich bun) in a dry form, put it on the table, put our box on top of it, bottom up, and press lightly. This way we get a print of the required shape and size. We cut it out with a stationery knife.
- Next, take a small basin or bucket, fill it with cold water and place our floral sponge on the surface of the water. Important: the sponge should not be pressed down or immersed in water by force. It should “drown” on its own, thus absorbing the required amount of liquid.
- While the oasis is “soaking”, let’s take the remaining dry piece of it in our hands and make a podium out of it for the letters (by the way, you can make chocolate letters yourself by melting the chocolate, pouring it into a square mold, freezing it and writing the ones we need on top with a pastry marker). Cut a rectangle the width of the box and wrap it in stretch.
- We take out the wet oasis (it should be in the water for about 10 minutes) and wrap it in a stretch or transparent bag. We do this in such a way that only the bottom and sides are closed, and the top should remain open (this is necessary so that in the future the flowers in the box can be watered, thereby preserving their freshness for a long time).
- We put the foam in the box, insert our “podium” for the letters on top (it’s better to move it a little to the right, as in the video, or to the left relative to the center - this way the composition will look more elegant). If we decide to use berries or other sweets, then we don’t put a podium, but separate a third of the box with a small cardboard insert. In the resulting “compartment”, on the sponge, place a small piece of stretch so that the sweets do not touch the wet surface.
- Now let's get to the fun part - cut off the flowers 1 cm less than the height of our box, and, starting from its edge, insert them into a wet sponge. Important: the flowers must be inserted not chaotically, but gradually, pressing one against the other. The remaining “holes” can be filled with small buds that have not opened, or by taking it out and blowing lightly into an already inserted flower - so it will fluff up and cover all the “gaps”. The flower “field” should not be visible, that is, the oasis between the buds should not be visible.
- Now we lay out our sweets. We take the chocolate letters carefully, it is advisable to do this with gloves so that it does not melt upon contact with warm hands.
- Finally, add a card by simply placing it on the flowers. Close the lid without pressing down!, and tie a ribbon on top.
LITTLE Trick:
If you plan to give the box not immediately, but, for example, the next day, put it in the refrigerator without covering it (so that the flowers can breathe), and put one sachet of silica gel in the compartment with sweets (balls that are usually placed in a box with shoes) - so that the sweets do not absorb the evaporation of water from the oasis. Don’t forget to take out the silica gel before you give your gift. Now our gift is ready and we can present it, making sure to emphasize that this is a handmade job
Have a great holiday!
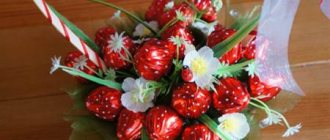
Bouquet of lollipops
Everyone loves small delicious lollipops - from a child in kindergarten to an adult in the office. Giving a box of chocolates is too simple and does not have a festive spirit.
It’s a completely different matter to present a lush bouquet with a whole collection of fragrant candies. To work you need to prepare:
- Wrapping paper.
- Satin ribbon.
- A piece of foam.
Step-by-step guide on how to make a candy bouquet:
- The foam acts as a support in which the candy sticks are located.
- Plastic sticks are dipped into a small piece of foam, placing the elements of the bouquet close to each other.
- The sweets are wrapped in wrapping paper and tied with a satin ribbon with a bow.
In practice, another method is used - plastic sticks are tied with adhesive tape without using foam.
Note!
Crochet rose - diagrams and descriptions of how to crochet a rose with your own hands. Crochet technology + interesting craft ideas
DIY edible bouquets - TOP 130 photos with instructions for creating a bouquet with your own hands. Creative ideas with simple diagrams and photos of finished works
Craft primroses - simple instructions for creating crafts from scrap materials. Schemes of beautiful DIY products + photo reviews
Simple basket
When creating a basket of sweets, you want to surprise and not repeat yourself by making the same composition and materials used. Therefore, the composition may differ for each individual basket. To create most baskets you need:
- objects created in the form of elongated sticks (skewers, toothpicks, straws, etc.);
- scissors;
- adhesive base (PVA glue, tape, stapler, etc.);
- packaging or corrugated paper;
- candies;
- basket base (basket, plastic cup, flower pot, plastic bottle, etc.);
- other decorative elements (ribbons, mesh, sequins, etc.).
The sequence of actions. A base for a basket is created from a plastic bottle. To do this, the container is cut in half, and the lower part with the bottom is taken for work. The decorative paper used is cut into blanks of figures of any desired composition and pasted onto the cut plastic blank.
Note! After pasting with paper, there should be no empty spaces left.
Two holes are made in the plastic base, located on opposite sides in a straight line. They hold wire or other material for the handle of the basket. The handle is covered with tape or corrugated paper.
Using double-sided tape, long candies arranged in the form of a fence are glued to the inside of the basket.
Now you can place candy flowers in the container. If you are creating a New Year's composition, you can add pine branches, New Year's balls and bells for decoration.
Related article: Cockerels and hens made from hay and straw
To attach flowers from candies using a cutting, one triangle is cut out of paper and glued into a cone. This shape serves as a place to find candy. The cone is twisted around the skewer and wrapped with tape.
To attach candy flowers in a cylinder, a rectangle is cut out of wrapping paper and rolled into the cylinder. Place the candy in this form, twist the paper around the skewer and secure everything with tape.
Bouquet of chocolates
Birthday people with a sweet tooth will be very pleased to receive a real bouquet made from candy bars or chocolate bars. Instructions on how to make a beautiful bouquet of sweets with your own hands:
- Place a sheet of wrapping paper in the shape of a diamond on the table.
- Chocolate bars are placed on the bottom corner of the paper sheet.
- Wrap the bouquet, securing the edges of the package with a glue gun or tape.
For strength, you can wrap another sheet of crepe or illustrated paper over this base.
What else can you add to the bouquet?
Sweets can be combined with anything. You just need to ask the recipient what exactly he loves. The most popular options are listed below. But you can create bouquets from sweets, photos, money and everything that you would like to give to a loved one.
Fruits and candies
The same principle is used for design. The stick is inserted to the middle of the fruit or berry. When adding dried fruits, it is better to wrap them in transparent film, as they collect a lot of dust. A bouquet of fruits and sweets is most often given to children, but it will please anyone. It is advisable to eat such a bouquet in the near future.
Tea, coffee, shall we dance?
Sweets are usually served with tea, so you can add this noble drink to the bouquet. Both whole boxes and individual bags are used - preferably in individual packaging. A bouquet of tea and sweets, as well as coffee or chicory, is prepared depending on the preferences of the recipient.
Are sweets compatible with alcohol?
Not only is it compatible, it also looks very impressive. Most often, champagne and wine are added to candy compositions, but any other options are possible. The only thing that complicates the work process is that the bottles are very heavy, and you should think in advance about how to secure them so that the finished product does not fall apart under its own weight. Usually two options are used:
- Alcohol is placed in a basket or box, and sweets are placed around. It is advisable to tie the bottle with a beautiful ribbon to such a base.
- The candies are attached to the bottle using double-sided tape.
Men love these gift set options.
Stuffed Toys
It is better to tie the toys in a bouquet to wooden skewers with regular thread or ribbon. Scotch tape or glue will ruin the item, but what if the recipient wants to use it for its intended purpose?
Tip for Beginners
Additionally, you can use any decorations and accessories in the bouquet; the main thing in this choice is the gift idea. It can be:
- plastic stamens, fruits, berries;
- feathers;
- flavored sticks (preferably natural ones, such as cinnamon - artificial ones can ruin the sweet);
- rattan balls and twigs;
- natural materials - cones, leaves, acorns, twigs, etc.
Advice! It is advisable to collect flowers from sweets with your own hands in such a way that it is possible to get and eat the sweetness without damaging the composition. Then she will delight her owner for a very long time.
A carefully thought out and high-quality do-it-yourself bouquet of sweets will bring pleasure not only to the recipient, but will also allow its creator to feel the joy of creativity. Such a gift is universal, only its content and shape may vary slightly depending on the gender, age and preferences of the person to whom it is intended.
Bright pineapple on a bottle
To create this masterpiece you will need a more extensive list of materials:
- Old glass bottle made of durable glass.
- Decorative mesh for attaching candies.
- Glue gun.
- Satin ribbons for decoration.
- A sheet of green corrugated paper.
- Scissors, needle, thread.
As a sweet part, Ferrero candies are perfect, the packaging of which is quite bright and suitable in color. Operating instructions:
- A circle of cardboard should be glued to the bottom of the bottle, slightly larger in diameter than the circumference of the bottle.
- Place the candies in rows around the glass base, attaching them using a glue gun.
- Place a decorative mesh over the candy rows. Its color and diameter of the elastic thread will not stand out against the background of yellow candy wrappers.
- For pineapple leaves, templates are prepared in the form of a narrow, long layout.
- Leaves are cut out from green crepe using templates.
- Using thread and a needle, sew the leaves into a small bundle.
- Place a bunch of leaves in the area of the bottle neck (on the cork or directly at the mouth of the bottle neck).
The pineapple can be complemented in an original way with a beautiful ribbon with a curly bow.
Male example
You need to cut out the base for the bouquet from penoplex. Moreover, it should freely enter and exit the mug. Because After receiving the gift, you will need to use the mug for its intended purpose, and I don’t think boys will admire such a gift for a long time, so it is necessary that they can easily use it.
To make an imitation of a white shirt, you will need a piece of white corrugation measuring 5 cm * 7.5 cm. We glue it to a drop of hot-melt glue.
The glue should not be too hot so that the paper on the porcelain does not leave its marks when disassembling the composition.
For a tailcoat you will need a blue strip of corrugated paper 25 cm long and 11 cm high. On top you need to make an 8 cm cut for the collar.
We glue the blue “tailcoat”, starting from the place where the handle is attached.
Using nail scissors, cut holes the width of the handle to make the job neater.
Connect the beginning and end of the tailcoat.
Please note that the blue jacket should be approximately 1 cm higher than the height of the mug.
Now it's time for the candy flowers. I hope you have already made the required number of roses with Ferrero Rocher? You only need 7 of them and you can make them using this simple tutorial, also with me, which I will publish soon. Do not miss.
We insert roses into the foam base one by one: first yellow, then blue between them.
Be sure to secure each flower with hot glue so that it holds firmly to the base.
Let's decorate.
We make a “butterfly” from a narrow polka dot ribbon and glue it to the shirt.
We make loops from green ribbon and decorate our bouquet with them. Artificial leaves are also suitable for a more realistic composition.
This is what we get. Like?
Here we have such an unusual mug.
I hope this example was interesting for both beginning craftswomen and experienced needlewomen.
In a similar way, you can create any bouquets in a cup for a man.
Look at these examples for inspiration.
Bouquet of roses with Raffaello
A lush bouquet of crepe roses will delight any girl as a present. To work, you will need red or pink crepe, wire to create a stem, glue, thread, needles, and candy.
Instructions for making a simple bouquet of sweets with your own hands:
- For rose petals, you can use the bud rolling technique.
- A long strip 5-6 cm wide is cut out of red or white crepe.
- Line stitches are laid in the center of the paper tape and a free thread is left.
- Pulling the thread gives the tape a corrugated appearance.
A strip of crepe is wrapped around the prepared candy. The finished buds are placed on a wire stem. The bouquet is collected together, the lower contours are wrapped with adhesive tape. The last step is to wrap the bouquet in beautiful paper.
Tulips with truffles
The principle of making a sweet bouquet of sweets with your own hands is similar to the technique of creating a present of roses.
The method of assembling the bud is significantly different: instead of a single ribbon, parts for the inflorescence are prepared. The lower edges of the petals are sewn together with a thin thread, and the upper edges are glued together after attaching the candy.