Aster from foamiran has long won the hearts of many fashionistas and lovers of needlework. This product will look great on a headband, or as a wrist bracelet. Such flowers can also complement the interior of the room, adding brightness and comfort. Foamiran is a material made of plastic suede, used in creating various types of decor - postcards, magnets, flowers.
This master class will definitely be useful to those who want to have a good time doing needlework and make a beautiful thing with their own hands that will last for many years.
Lush pink flower
To create such an elegant head decoration you will need:
- foamiran leaves of the desired color;
- sharp scissors;
- toothpicks;
- glue gun;
- iron.
At the beginning of work, take foamiran and cut it into strips. From yellow foamiran, cut a strip 1.5 centimeters wide by 24 cm and 2 cm wide by the same length. From pink cut strips 2.5 cm by 32 cm, and 3.5 cm by 32 cm long.
Read this: Making Fabric Flowers: A Hot Tutorial for Beginners
Then take the strips one by one and cut the strips on them very finely; you cannot cut to the edges.
Apply the strips one by one to the hot iron. You have to wait for them to curl up and fall off on their own.
This is what the finished pieces look like.
Next, you need to take a toothpick, apply a little glue to it and screw on all the blanks one by one. Twist the first strip so that it bends outward.
Take the second strip and continue winding. In this case, the petals should already be facing inward.
Then take the third strip in pink and continue to wind it inward.
Wind the remaining strips with the petals facing outwards.
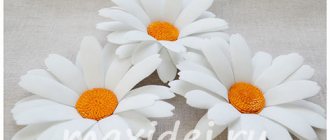
This is what an aster should look like. Cut off the toothpick from the bottom.
Using glue you can make the aster more realistic. To do this, take a gun and pull out the glue from it. Wipe the tip of the heat gun dry and push the petals apart in different directions.
- The aster with a diameter of 8 centimeters is ready!
- For the rim, make two more asters, but smaller in size.
Now it's time to start working on the leaves. The photo shows how you can easily cut foamiran.
Asters are ready! All that remains is to secure them to the rim.
Exotic plant
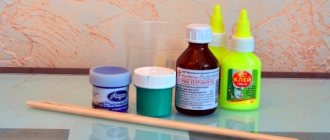
In order to make such an original aster from foamiran, the following tools will be useful:
- clematis foamiran, lilac, green;
- Super glue;
- scissors;
- tweezers;
- iron;
- oil paints;
- wire;
- base for roses, diameter 10 mm;
- clean sponge.
Use the smallest petal to make prints in a circle. Cut out three parts from purple foamiran.
- Tint the petals with a purple color with a sponge.
- Cut each petal into two parts with scissors.
- Place the flower on the iron until the petals are rounded.
- Twist each petal with your fingers.
- This is how the petal will look different after ironing.
- Next, paint the base with purple oil paint.
- Using super glue, glue the first part without fixing the petals too much.
- Secure the remaining two parts.
- Then cut out 15 petals and tint part of the petal, then apply it to the iron.
Note. While the petal is still hot, be sure to fold the colored edge over and roll it between your fingers.
- Place the lower part of the petal on the iron to give it a bend.
- Make four different sizes of approximately 20-25 pieces, it all depends on the desired splendor of the flower.
- Glue the petals in ascending order.
- Cut 3 leaves from foamiran.
- Tint the sheet on both sides with oil paint No. 11.
- Fold the leaf in half and place it on the iron.
- Glue the wire into the curved area in the center.
- Carefully glue the leaves to the center of the aster.
- The product is ready!
Video on the topic of the article
Source: https://knittochka.ru/cvety/astra-iz-foamirana.html
Do-it-yourself small bouquet of asters from foamiran
In the presented examples, the production of one flower was considered. You can make as many of these as you like, but a real work of art will be a composition of several flowers that are combined into a bouquet. It will delight a creative housewife and surprise guests for a long time, up to 5-10 years, and with proper care, even longer.
To create a bouquet you will need several flowers of different sizes. To create them, you just need to play with the size of the rectangular stripes, proportionally changing their length and width.
A bouquet of asters made from foamiran is an excellent gift for any occasion.
A bouquet of asters is made in 2 options:
- Several flowers are placed on a large green sheet of foamiran. They stick together. This composition would fit perfectly into a greeting card.
- Each of the flowers is formed onto an individual wire stem. A juice straw is placed on it, which is wrapped with a thin strip of green foamiran. The stems are decorated with leaves. The composition is placed in a flowerpot or pot.
The stems can be supplemented with other elements of the plant world: foliage, other plants. To create leaves, it is advisable to use a cardboard template.
Aster from foamiran
Foamiran is a new type of material for needlework, which is foam rubber. It is very plastic and has a velvety surface, for which it received its second name - plastic suede.
Although this material appeared not so long ago, it has already gained great popularity among needlewomen. You can make a lot of things from it, for example, flowers, cards, brooches and so on.
In this article we will tell you how to make an aster.
There are 2 types of this material: Iranian and Chinese. In principle, they do not differ in their properties. This material is very good for making flowers because it is flexible and thanks to this you get smooth lines and transitions.
Particular attention should be paid to asters made using this technique. Aster made from foamiran looks very natural and alive. You can make a brooch or hairpin from such a flower. We bring to your attention a master class on making this wonderful flower from foamiran.
Necessary materials
- Foamiran in two colors: yellow for the middle - 2 pieces, the width of the strip should be 2 centimeters, and three stripes of bright red, purple or delicate pink, their width should be 3 and 4 centimeters.
- Toothpick.
- Transparent glue (for example, some kind of construction glue) or a heat gun, other types of glue will not work, since when it dries it can be visible between the leaves.
- Iron.
- Scissors.
- Ruler.
Pencils and pens are not needed, all lines are made with a toothpick so that the drawn stripes are not visible on the finished product.
Description of work
You should start by preparing foamiran strips for use. To do this, you need to take strips of yellow and purple material, the length of which can be any.
It depends on how large and fluffy the finished flower should be. Using scissors, you need to make frequent cuts - fringe.
The cut should be more than half the width of the strip, but not to the end, as in this case the strips can easily tear.
After all the strips have been prepared in this way, we proceed to heat treatment. This will give them a more natural look. In order for them to become curled, we apply all the strips one by one to a heated iron. Now all the components are ready for further work.
Let's start assembling, to do this we take a toothpick and drop a drop of glue on it. We begin to wrap one yellow strip on the toothpick so that the petals curl outward. Coat the strip at the base with glue while winding it around the toothpick.
Beautiful asters from foamiran with your own hands: step-by-step description
The presented option is the simplest. It is useful for beginners to start with. Features of the project: simple and straightforward production of a flower, which consists of a core, petals and sepals. There is no unnecessary decor. The task at this stage is to learn how to create one flower with your own hands without outside help. The finished flower can decorate any surface or object. If you like it, you can complicate the flower by adding additional decorative elements.
To work you will need:
- The tools mentioned in the previous section.
- Foamiran. Colors: green, yellow and light yellow.
Before you start making aster from foamiran, you should watch a video with a master class and study the recommendations of experts
To give the fringe more volume, you can rub it between your fingers and pull it up. Movements should be light and soft.
A step-by-step guide to creating blanks for an aster from foamiran with your own hands:
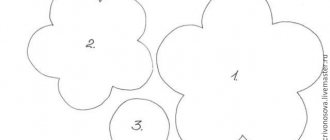
- The flower blanks are rectangular strips of different sizes. First of all, they need to be drawn out on foamiran using a ruler and a toothpick. To form an inflorescence, you will need 2 rectangular parts.
- The middle of the flower will consist of a light yellow Foma strip measuring 8 by 1.5 cm. To form petals on a yellow Foma leaf, you need to cut 2 strips: 8 by 2 cm and 20 by 2.5 cm. The main parameter is the width. The final size of the flower will depend on it.
- The top edge of all 3 pieces does not need to be cut in a straight line. For greater aesthetics, the stripe should be made wavy but smooth. It is desirable that the pitch of the wave is not uniform.
- Next, a fringe is cut on each of the blanks. To do this, you need to make a lot of transverse cuts in small increments - from 1 to 1.5 mm.
- To level the workpieces, they should be placed on the hot surface of the iron. The temperature regime for him is wool. As soon as the fringe begins to wrap, it must be immediately removed from the hot surface. Just turn the iron over.
Astra master class from foamiran
Foamiran is a plastic suede, it is used to create various types of decor: cards, magnets, flowers, etc. Today we will make an aster from foamiran as a hair decoration. This autumn beauty has won the love of many people thanks to its varied flower colors. The author of this master class, Yulia Balagurova, was captivated by her beauty.
For work we will need: Scissors. Toothpicks. Foam of the desired color. Thermal gun.
Iron.
Method of making aster. To create this luxurious flower, we need everything written above. Then we take the for and cut it into strips. From yellow fom we cut out a strip of 1.5 cm by 24 cm and 2 cm by 24 cm. Take a pink fom and cut out strips of 2.5 cm by 32 cm, 3 cm by 32 cm and 3.5 cm by 32 cm.
Now we take the strips one by one and cut the strips on them very finely, but we can’t cut to the edges.
Then, one by one, we apply the strips to a heated iron and wait until they begin to curl and fall off.
This is how the blanks should look like.
We take a toothpick and drip a little glue on it and begin to wind our blanks one by one. The first strip needs to be wound so that it bends outward.
Next, take the second strip and continue winding. But here the petals should look inward.
We take the third strip of pink color and also continue to wind it, the petals should look inward.
We wind the remaining strips with the petals outward
This is such a cute aster from their foamiran that Yulia turned out to be. The bottom of the toothpick needs to be cut off.
Julia also shared her secret and talked about how to revive an aster. We take a heat gun and pull out the glue from it. Then we wipe the tip of the heat gun dry and with it hot we begin to push apart the petals of the aster. We slightly lift them in different directions.
- That’s it, the aster is ready, the diameter of this aster is 8 cm.
Astra from foamiran: master class and collection of finished parts
The finished pieces just need to be connected to each other. To do this, you will need to find a base on which the flower will form. The choice of it depends on the further use of the decoration: it can be an ordinary toothpick or a piece of wire - then there is a reserve for further improvement. If you attach a flower to a brooch pin, you can immediately use it as a decoration on clothes or hair.
Petals for aster made from foamiran can be made both long and short
Step-by-step description of collecting an aster pattern into a flower:
- The light blank, which serves as the center of the flower, twists around itself. The fringe should be directed inside the flower - as if it is not fully open. To prevent the structure from becoming wrinkled at the very beginning, it is advisable to stick the workpiece onto a pea-sized sphere of foil. It should not be large and should be hidden by fringe. The foil is fixed to a supporting element - wire, hairpin.
- The second strip, 8 cm long, is glued next. An important point is that the lower edges of all strips must be at the same level. The fringe should also be folded inside the flower.
- In the 3rd stripe, the fringe that forms the petals should face outward. Then the flower takes on a complete and natural shape. As if it was about to bloom.
- To refine the lower part of the flower from green fom, you need to cut out the sepals. The diameter is selected according to the size of the flower. The same steps are repeated with this material as with the flower blanks. The shape of the leaf is teardrop-shaped. For realism, they can be carefully plucked.
As a result, you end up with a beautiful aster flower, made by yourself.
You should be careful when working with glue: you cannot smear it on the fringe, otherwise the workpiece will deteriorate. Tip: apply a thin layer, only to the lower part of the workpieces.
Aster from foamiran: a bright DIY decoration
Aster from foamiran can be made in different colors: white, purple, red, yellow Aster is not only an interesting late summer flower, but also an ancient symbol. In Ancient Greece, asters served as decoration for altars in temples. They were worn as decoration on clothes and hairstyles, and garlands were made from them at home. The flower served as protection from harm. A do-it-yourself foamiran aster will be a bright decoration in the house or on clothes. Your imagination and your own skill will help you make such a flower.
How to make an aster from foamiran: preparation for work
The main component is foamiran. This is suede, which has plastic properties and is used to form any type of decor: handicrafts, postcards, refrigerator magnets.
The peculiarity of the material is that objects created from it have realistic properties. When skillfully made, it can be difficult to distinguish an artificial thing from a real one even from a short distance.
But for this you need to have experience working with the material and have a competent approach to the matter.
Asters are most often given to teachers on September 1st, since they are a traditional autumn flower. However, fresh flowers will not last long or may suffer from unpredictable late summer weather. Therefore, an artificial flower is a good replacement for a real one - it will delight the teacher’s eye for a long time, reminding him of the love of the students and their devotion.
To make an aster, you need to purchase foamiran at a craft store or order it online
To create your own aster you will need:
- scissors;
- ruler
- toothpick – 2-3 pieces, or wire;
- glue, preferably a heat gun;
- iron;
- foamiran.
The set of tools is required and cannot be changed. The tool used should not cause discomfort.
The color of the foamiran is chosen at your own request. Asters have a lot of color options. It is advisable to use at least 3 colors: green for the flower bowl, dark and bright to create the center of the flower and its petals. Options can be combined.
Beautiful asters from foamiran with your own hands: step-by-step description
The presented option is the simplest. It is useful for beginners to start with. Features of the project: simple and straightforward production of a flower, which consists of a core, petals and sepals. There is no unnecessary decor.
The task at this stage is to learn how to create one flower with your own hands without outside help. The finished flower can decorate any surface or object. If you like it, you can complicate the flower by adding additional decorative elements.
To work you will need:
- The tools mentioned in the previous section.
- Foamiran. Colors: green, yellow and light yellow.
Before you start making aster from foamiran, you should watch a video with a master class and study the recommendations of experts
To give the fringe more volume, you can rub it between your fingers and pull it up. Movements should be light and soft.
A step-by-step guide to creating blanks for an aster from foamiran with your own hands:
- The flower blanks are rectangular strips of different sizes. First of all, they need to be drawn out on foamiran using a ruler and a toothpick. To form an inflorescence, you will need 2 rectangular parts.
- The middle of the flower will consist of a light yellow Foma strip measuring 8 by 1.5 cm. To form petals on a yellow Foma leaf, you need to cut 2 strips: 8 by 2 cm and 20 by 2.5 cm. The main parameter is the width. The final size of the flower will depend on it.
- The top edge of all 3 pieces does not need to be cut in a straight line. For greater aesthetics, the stripe should be made wavy but smooth. It is desirable that the pitch of the wave is not uniform.
- Next, a fringe is cut on each of the blanks. To do this, you need to make a lot of transverse cuts in small increments - from 1 to 1.5 mm.
- To level the workpieces, they should be placed on the hot surface of the iron. The temperature regime for him is wool. As soon as the fringe begins to wrap, it must be immediately removed from the hot surface. Just turn the iron over.
Astra from foamiran: master class and collection of finished parts
The finished pieces just need to be connected to each other. To do this, you will need to find a base on which the flower will form.
The choice of it depends on the further use of the decoration: it can be an ordinary toothpick or a piece of wire - then there is a reserve for further improvement.
If you attach a flower to a brooch pin, you can immediately use it as a decoration on clothes or hair.
Petals for aster made from foamiran can be made both long and short
Step-by-step description of collecting an aster pattern into a flower:
- The light blank, which serves as the center of the flower, twists around itself. The fringe should be directed inside the flower - as if it is not fully open. To prevent the structure from becoming wrinkled at the very beginning, it is advisable to stick the workpiece onto a pea-sized sphere of foil. It should not be large and should be hidden by fringe. The foil is fixed to a supporting element - wire, hairpin.
- The second strip, 8 cm long, is glued next. An important point is that the lower edges of all strips must be at the same level. The fringe should also be folded inside the flower.
- In the 3rd stripe, the fringe that forms the petals should face outward. Then the flower takes on a complete and natural shape. As if it was about to bloom.
- To refine the lower part of the flower from green fom, you need to cut out the sepals. The diameter is selected according to the size of the flower. The same steps are repeated with this material as with the flower blanks. The shape of the leaf is teardrop-shaped. For realism, they can be carefully plucked.
How to make an aster from foamiran: preparation for work
The main component is foamiran. This is suede, which has plastic properties and is used to form any type of decor: handicrafts, postcards, refrigerator magnets. The peculiarity of the material is that objects created from it have realistic properties. When skillfully made, it can be difficult to distinguish an artificial thing from a real one even from a short distance. But for this you need to have experience working with the material and have a competent approach to the matter.
Asters are most often given to teachers on September 1st, since they are a traditional autumn flower. However, fresh flowers will not last long or may suffer from unpredictable late summer weather. Therefore, an artificial flower is a good replacement for a real one - it will delight the teacher’s eye for a long time, reminding him of the love of the students and their devotion.
To make an aster, you need to purchase foamiran at a craft store or order it online
To create your own aster you will need:
- scissors;
- ruler
- toothpick – 2-3 pieces, or wire;
- glue, preferably a heat gun;
- iron;
- foamiran.
The set of tools is required and cannot be changed. The tool used should not cause discomfort.
The color of the foamiran is chosen at your own request. Asters have a lot of color options. It is advisable to use at least 3 colors: green for the flower bowl, dark and bright to create the center of the flower and its petals. Options can be combined.
Aster from foamiran Master Class / Foam DIY
| My name is Nastya, and I am glad to welcome you to my channel, which presents a master class on kanzashi, video lessons on making exclusive flowers from chiffon, as well as videos on creating beautiful jewelry. In this video tutorial I continue the topic of making flowers from foam material. I have a production in Iran, 1 mm thick. To make an aster, we need four shades of foam: white, pink, purple and green. I will also use a universal leaf mold Link to petal sketches https://kanzashimk.com/kanzashi/astra.jpg Cut out 15 petals for each size flower and two green leaves. Enjoy viewing and creative inspiration. If you liked the lesson, share it with your friends. If you have any questions while watching the video, write them in x, I will try to answer them. My name is Nastya and I am glad to welcome you on his channel, which presents a master class for kanzashi, video lessons in exclusive colors of chiffon and a video dedicated to creating beautiful jewelry. Me llamo Anastasia, y me complace en darle la bienvenida en su canal, en el que presenta el asistente para la clase de kanzashi, tutoriales en vdeo sobre la fabricacin de colores exclusivos de gasa, as como un vdeo sobre la creacin de la hermosa bisutera .Date: 2019-04-25Rating: 4.0 out of 5 Votes: 1 Video reviews1. Alla Konysheva Dear Anastasia. What a great guy you are. You inspire a sea of people. Many live in the outback and there is no opportunity to go to paid MKs, but you give people the opportunity to create. Big bow. 2. Natalya****Nastya, thank you for your MKs, they are wonderful. Is it possible to use such flowers in candy bouquets? If it doesn’t bother you, please make such a MK. 3. Valya Sidorenkov All your products from Thomas are very beautiful, but this is absolutely lovely. and your chiffon roses are simply stunning. I admire you. thanks for mk. 4. Ekaterina Nadeina Anastasia, could you make micro roses from foamiran with tinting. I would be very grateful to you. 5. Olesya LaikovaAnastasia THANK YOU SO MUCH for MK As always, very beautiful and neat. Are you planning on MK ROSE? 6. Vika Velenets, if you can, show me roses from foma, in different ways, it’s unlikely that anyone can do it better than you 7. Vika Velenets Thank you very much, Anastasia, I was just looking for what can be made from foma, very beautiful | New channel videosUnpacking New Year's materials from FRO Autumn Kanzashi Flowers from Narrow Ribbon DIY from Irina Osinina AUTUMN HEADLAND FROM REPS Ribbons Nastya DoRoFUSION hairpin: organza + velvet + chain Designer FROPOPULAR BROOCH-TIE School for girls MK from DoRo |
Source: https://kids-tube.ru/kulikova/video-236
Needle aster from foamiran: master class with step-by-step instructions
The needle aster flower differs from the usual one in that it has long and thin petals. This beautiful flower is difficult to replicate exactly when made from foamiran yourself.
The needle aster master class is distinguished by the creation of a different fringe. This element should be given maximum attention and care.
To diversify the aster from foamiran, when making it it is worth using petals of different shades
Needle aster and the process of its creation from foamiran:
- Take a standard tool for making crafts. Cut out strips of foma. Yellow: 24 by 1.5 cm and 24 by 2 cm. From pink: 3 strips 32 cm long and 2.5 wide, the second 3, and 3.5 cm, respectively.
- Fringe should be cut on the cut strips. You need to cut into the thinnest pieces possible. It is better to do this with thin scissors.
- The cut fringe is fired on an iron and then glued around it. The blanks are pasted over in stages, as in the previous example.
- The petals of the first 3 stripes look inside the flower. The rest have their petals facing outwards.
A heat gun will help to give more naturalness. The glue is removed from it, the tip should be dry. You need to run a hot gun over the petals of the aster flower.
The second option for making aster from foamiran
We are preparing the following materials:
- Foamiran pink and green colors.
- 4 sizes of metal stencils for petals, which can be purchased at any craft store.
- Glue.
- Scissors.
- Tweezers.
- Iron.
- Base for roses, 10 mm in diameter.
- Wire.
On pink material we press 3 circles of petals with the smallest stencil and cut them out. Cut each petal of all three circles in half, without cutting all the way through. Using tweezers, bring the workpieces to the heated iron. Then we twist all the petals with our fingers.
We glue the first blanks to the base for the roses (it must be painted in advance in burgundy color) using transparent glue.
Now we cut out 15 separate leaves of the same size as the first ones, and put them on the iron, while they are still warm, roll one end with your fingers. For the splendor of the flower, make 20–25 petals of all 4 sizes and heat treat them.
Now we will glue the individual elements of the flower, starting with the smallest and ending with the largest in size.
After all the petals are glued, we begin making green leaves. Cut out 3 leaves according to any template. We take the sheet and bend it in half, and then bring it to the iron. After warming up, glue the wire to the bend, then give the sheet a natural bend using an iron.
Now glue the leaves from the bottom to the middle of the flower. They must be positioned with the wire down. Astra is ready.
Astra master class from foamiran
Foamiran is a plastic suede, it is used to create various types of decor: cards, magnets, flowers, etc. Today we will make an aster from foamiran as a hair decoration. This autumn beauty has won the love of many people thanks to its varied flower colors. The author of this master class, Yulia Balagurova, was captivated by her beauty.
For work we will need: Scissors. Toothpicks. Foam of the desired color. Thermal gun. Iron.
Method of making aster. To create this luxurious flower, we need everything written above. Then we take the for and cut it into strips. From yellow fom we cut out a strip of 1.5 cm by 24 cm and 2 cm by 24 cm. Take a pink fom and cut out strips of 2.5 cm by 32 cm, 3 cm by 32 cm and 3.5 cm by 32 cm.
Now we take the strips one by one and cut the strips on them very finely, but we can’t cut to the edges.
Then, one by one, we apply the strips to a heated iron and wait until they begin to curl and fall off.
This is how the blanks should look like.
We take a toothpick and drip a little glue on it and begin to wind our blanks one by one. The first strip needs to be wound so that it bends outward.
Next, take the second strip and continue winding. But here the petals should look inward.
We take the third strip of pink color and also continue to wind it, the petals should look inward.
We wind the remaining strips with the petals outward
This is such a cute aster from their foamiran that Yulia turned out to be. The bottom of the toothpick needs to be cut off.
Julia also shared her secret and talked about how to revive an aster. We take a heat gun and pull out the glue from it. Then we wipe the tip of the heat gun dry and with it hot we begin to push apart the petals of the aster. We slightly lift them in different directions.
That’s it, the aster is ready, the diameter of this aster is 8 cm.
You can make beautiful hair decorations from it. Julia decided to make a headband decoration out of asters. Therefore, she made two more asters using the same principle, only a little smaller.
Now you need to make the leaves. More details on how to make leaves can be found here.
All that remains is to assemble our asters and secure them to the rim.
Thanks to the author for the master class on making aster.
Aster is considered an autumn flower, which is usually given to teachers on the first of September. In this master class we will prove that an aster made of foamiran can serve as an excellent addition to interior bouquets and, in addition, be a hair decoration, for example, we will make small asters with an elastic band. In bouquets, asters will look beautiful with foamiran dahlias or small gerberas.
In this MK I will show you how to make different asters with your own hands from different foamiran: dense Chinese, classic Iranian and delicate marshmallow foam.
Content:
Learn how to make a beautiful aster from foamiran in a step-by-step tutorial
Iron, hot glue or moment, ruler, scissors large and small (they are convenient for cutting the narrowest strip for the middle), toothpick, paints for tinting, a piece of sponge and a shaper of any color (optional).
We make preparations:
- To make an aster, you need to cut 3 strips of foamiran at least 30 cm long (more is possible). The width of one strip should be 2.5 cm, the second - 3 cm and the third - 5 cm.
- We draw the lines along the revolver using a toothpick along a ruler, then cut them out with scissors. The narrowest strip will be the middle; for flowers with narrow petals it is usually done the same way.
- To obtain a more natural color with halftones, we tint the edge of the ribbons, which will be at the top of the flower. To make this more convenient, fold the strip several times. Then, dipping a dry sponge in paint, we pass it along the end of the workpiece. Paint well, slightly capturing the edge of the strip. After this, we unfold the strip and tint it in those places where the paint did not get in, so that the coloring is uniform on both sides. We tint each strip with a slightly different tone to create a smooth transition of color from the middle to the outer petals.
- Before you start working with scissors, turn on the iron to the second setting to heat up.
- Next, we take scissors and cut each strip from the dyeing side into very thin tails (the thinner they turn out, the fluffier the stitching will be), not reaching the edge by about 7 mm. It is more convenient to cut the thinnest strip for the middle with small scissors.
- While we were cutting, the iron reached the desired temperature. We apply the ribbons to the iron in parts and heat until the ends begin to curl a little. Thus, we process all three strips. Foamiran from different manufacturers behaves differently when heated, and when working you need to rely only on your own feelings.
Collecting a flower:
- We begin assembly with the thinnest strip. We cut it in half and begin to twist it so that the tails point to the center of the flower. Don't forget to coat the bottom of the strip with glue before twisting. We roll it carefully so that the bottom part is even. For convenience, you can use a toothpick when winding and after it becomes unnecessary, simply cut off the excess.
- After half of the narrow strip is wound, take the second part and begin to wind it, gluing the edge so that the tails point from the center of the flower.
- We roll the second ribbon, 3 cm wide (it can also be cut if desired, but you don’t have to cut it, it depends on the size of the flower we want to get), around the central part, also with the petals facing outward. If we cut a strip, then we can use only one part, setting aside the other for a new flower.
- We also glue the widest ribbon with petals from the center of the aster. Coat the edge well with glue; if the petals from the previously glued strip are in the way, carefully move them aside.
- These flowers can be attached to a decoration or hair clip, or you can make a bouquet and let a piece of summer settle in your home.
Let's make a leaf without mold.
To do this, we will need the leaves of real plants. In winter, you can use bay leaves or indoor plants.
- Place a prepared plant leaf on a prepared sheet of foamiran of the selected color and cover it with a sheet of office paper.
- Then, with a well-heated iron, iron it over the paper backing and then roll it well with any flat object, a rolling pin, a glass with a flat bottom, or any other.
- After all the manipulations, we remove the paper and peel off the leaf, then cut it out along the contour (it imprints well on the shape) or the desired shape and, if desired, tint it to show the veins on the leaf even better.
- To give the leaf a more realistic shape, the edges can be processed using a lighter.
- When the leaf is ready, we make a stem from wire and floral tape and glue it to the leaf.
After the flowers and leaves have been collected, you can begin assembling the composition. It can be either in the form of a bouquet, or simply by gluing the leaves to the bottom of the flower to form a brooch or hair clip.
Circle work “Astra from foamiran”
ASTRA FROM KOREAN FOAMIRANtarget:
get acquainted with the material and make a flower from foamiran with your own hands.
Tasks:
•introduce the technique and technology of making flowers from foamiran; •strengthen the skills and abilities of working with scissors; •teach how to use a glue gun and glue flower parts from foamiran; •develop fine motor skills of the hands and eye; •develop artistic and aesthetic taste; •develop creativity, fantasy, imagination.
Move
What is foamiran, you ask? Who can answer this question? Maybe some of you have come across this material.
Foamiran (plastic suede) is a modern soft synthetic material. The masters call him briefly - Fom. This material is a real find for needlewomen; you can grow a masterpiece of creative imagination before your eyes.
The main feature of foamiran is its ability to slightly stretch. This stretching is often enough for the material to take on any new shape. Foamiran is well shaped when exposed to the heat of human hands or a heating device (iron, curling iron), so it is very easy and pleasant to work with. The heated part on the iron is easily given different shapes using your fingers, twisting, stretching, pressing, crushing, making all kinds of creases and folds. This is done to give the product a more realistic look.
.
Foamiran is non-toxic, not exposed to sunlight, moisture resistant, and the smell of new foamiran quickly disappears.
Foamiran can be used with children, making simple applications, flat and three-dimensional toys, flowers. For flowers it is better to use foamiran 1 mm thick.
For work we will need tools and materials:
Materials are given based on the production of 7 colors
You will need thin foamiran 1 millimeter thick
Ready-made cardboard templates for petals, leaves and sepals. Pink color, 17.5 centimeters long and 11.5 centimeters wide for the centers of the flowers. Light green, 20 centimeters long and 12 centimeters wide for leaflets Light green, 12 centimeters long and 12 centimeters wide for sepals Cotton swabs for stamens, 5 centimeters long and 2 millimeters in head Medium scissors for cutting out flower details Glue gun for gluing petals and leaves flowers Bottom part of the sheet mold. A pen for outlining template details on foamiran.
Fold, for the core
.
When manufacturing our product, we must follow safety precautions.
Safety precautions when working with scissors Scissors must be well adjusted and sharpened.
2. Store scissors in a specific place (box or stand). 3. When using scissors, be as careful and disciplined as possible. 4. When passing scissors, hold them by the closed blades. 5 Place the scissors on the right with the blades closed, pointing away from you. 6 When cutting, the narrow blade of the scissors should be down.
P Practical part