Candy weights
Share the link to this article with your friends on social networks.
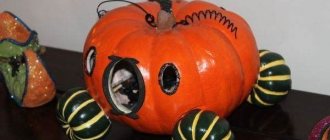
What to give to the man who has everything? This question often plagues many women as February 23 approaches. We offer to make a sweet gift in the form of a weight. “Sweet weight” sounds, of course, strange at first glance, but it really is so. It will look like an elegant golden weight made of candies. If you are interested, then go ahead! Let's start creating an unusual gift for a man.
For the sweet weight we will need:
- ball;
- paper towel or napkins;
- PVA glue ;
- threads;
- glue Moment Installation;
- floral organza;
- glue gun and rods;
- scissors, brush;
- disposable bag;
- cloth napkins (sold in a package);
- gold ribbon bow;
- gold ribbon;
- medal for 1st place;
- thick cardboard;
- glue paper;
- scotch;
- yellow corrugated paper;
- a little over a kilogram of sweets.
DIY sweet gift
I would like to start right away with some advice: think about the size (diameter) of the finished weight in advance so that in the end it does not turn out to be too huge. Keep in mind that when sticking candies, the weight will increase in diameter by two times the height of the candy.
How to make a weight from candy
We put a bag on it so that the glue does not “eat” the ball. We wrap it with threads to remove any unevenness. We make a loop of thread on the “tail” of the ball. We will use this loop to hang the ball to dry.
Tear the paper towel into pieces and dilute the PVA glue a little. We cover the ball.
Pasting the ball occurs in several stages. You need to stick up to 7 layers. At the very “tail” of the ball, you don’t have to try with layers. When the ball is pasted over and has acquired the required rigidity, carefully cut off the threads at the “tail” and remove the ball.
In our weights, the diameter of the bottom is 7 cm.
Divide 7 in half, we get 3.5 cm. We measure this value with a compass.
Draw a circle on cardboard.
We cut it out and apply Moment Installation glue around the circumference.
Cover the bottom with paper napkins. We pay special attention to the junction of the bottom and the ball - we apply layers with an overlap of about 2 - 3 cm over the ball. In this way, we securely fix the bottom to the ball. Leave to dry.
To understand the length of the handle and its bend, we choose its ideal location in our opinion. We glue a strip of flexible material, such as cardboard, with tape.
We make a sausage out of a paper towel and soak it in PVA glue. Place the handle on a disposable bag.
We apply a weight with a glued “handle”. The curve of the sausage must be repeated exactly.
Set aside to dry. After about a day, the sausage will dry out. We cut disposable fabric napkins into strips, wrap the handle, and soak it in PVA glue. We dry it for a day. If you are sure that the winding will not unwind and the handle’s hardness is not needed, then you don’t need to soak it with glue.
The ends of the handle should be flat.
We wind the gold ribbon in a spiral. We glue it in places.
We remove the mock-up handle from the weights and glue the finished golden handle onto Moment Installation glue. This glue is very reliable, you can be sure that the handle will not come off the weight.
Just in case, let's be on the safe side and glue the junction of the handle and the weight.
Cover the weight with corrugated yellow paper, having previously cut it into strips. It is better to glue the paper in several places.
How to make a sweet gift for a man
The most pleasant moment has come - covering the weights with candies.
It is advisable to choose sweets with a flat bottom. We start gluing the candies from the top, but first we do the fitting.
Turn on the glue gun and cover the entire weight with candy.
We cut out 5x5 cm squares from organza.
How to calculate the size? We measure the height of the candy and add 3 - 5 mm. Fold the square diagonally to form a triangle. We bend the two ends towards the center. We repeat all this, but only with an offset so that the corners do not coincide. Apply glue to the tip and press with your finger. Cut off the very end with glue, leaving a thin gluing.
Candy gift ideas
A homemade cake made from sweets and chocolates will be a wonderful and amazing gift. A sweet surprise can be made not only in the form of a cake and a bouquet; you can also show your imagination and make a souvenir that represents a person’s hobby or occupation. For example, you can make a gift in the form of a tooth and a toothbrush for a dentist, a sweet camera for a photographer, and a grand piano or a piano for a musician.
When choosing a gift for the New Year, you can make New Year's compositions. For example, it could be Santa Claus's sleigh, a clock, a cone of candy, or a pyramid in the shape of a Christmas tree, covered with sweets, beads and garlands.
For a man who loves to drive a car, you can make a steering wheel out of cardboard filled with sweets. You can also make dumbbells, a weight, a tank, or a candy machine. A sweet guitar and a billiard table made of candy look interesting.
You can give a woman, for example, a basket of sweet flowers with small gifts, a cake beautifully decorated with flowers, or the Eiffel Tower.
For a child, you can make sweet gifts in the form of toys, a kinder cake, a steam locomotive, a car, a helicopter, a house, and also in the form of a basket of sweets in which you can put toys and other gifts.
Car steering wheel
The owner of a car and any boy will definitely be happy with an unusual surprise in the form of a steering wheel made of candies . You can admire such a sweet gift for more than one day, and when interest disappears, the sweets will be eaten with pleasure.
You will need:
- Sheets of thick cardboard;
- PVA glue or glue gun;
- foam rubber or laminate backing;
- multi-colored foil;
- scissors;
- pencil;
- about a kilogram of wrapped sweets.
- To make a car steering wheel, you first need to decide on its shape, which depends on the make of the car. You will need to draw it on a sheet of thick cardboard. Then you need to cut out the drawn steering wheel using scissors, and also draw the logo of the selected car brand. If you have difficulty trying to draw it yourself, you can make a printout from the Internet or buy one of the special logo stickers for motorists.
- Now you need to wrap the cardboard blank with a layer of foam rubber or soft backing under the laminate. This will add volume and softness. The soft layer must be fixed using a glue gun or PVA glue. Then you need to wait for the structure to dry completely.
- Now you need to fix the foil using hot glue. This will give the gift a more festive and elegant look.
- Then you need to stick the car logo on the central part of the steering wheel and start sticking sweets.
If desired, you can decorate the opposite side of the steering wheel with sweets. To give the gift a more festive look, you can add some beads, rhinestones or flowers to the design.
Before creating a machine, you need to figure out exactly what shape it will be. You can make a modern passenger car, or you can create a retro car or a large car with a body.
In this master class we will talk about an ordinary modern passenger car. To create it you will need small chocolates. Nowadays you can find many types of chocolate on sale. You need to choose a chocolate bar whose slices are wrapped in a wrapper. You can also use small chocolate bars.
You will need:
- Mini chocolates;
- cardboard;
- paper of golden color and selected color for the machine;
- round candies, two or four pieces;
- glue gun;
- PVA glue;
- double sided tape;
- scissors;
- ruler;
- pencil;
- cup.
- First you need to figure out the size of the machine. By laying out the sweets on cardboard, you can decide on the approximate size.
- Now you need to draw a car on cardboard and cut out its two main parts.
- Then you need to cut out three additional components for the middle of the car. To do this, you need to use those places on the cardboard where the box was folded. It’s better to measure as you go.
- Next, you need to glue all the parts together with tape.
- Now we cut out a strip of corrugated paper of the selected color for all the parts that need to be glued with a fold.
- Then from golden corrugated paper you need to cut out a part for the front glass, as well as for the back. And for all other windows.
- Carefully glue the chocolates with a glue gun. On the roof of the car, on the hood and doors of the car.
- Now you need to cut out eight circles using a mug or glass. You also need to cut out eight circles from gold-colored corrugated paper. They must have a larger diameter for hemming.
- Glue the gold circles onto the cardboard circles and fold them in.
- Next, you need to glue the circles together to make four golden wheels.
- Now you need to seal the bottom of the car. Why do you need to cut cardboard and corrugated paper to size? The paper needs to be glued onto cardboard and glued to the car.
- Then you need to glue the wheels to the car.
You can glue candy headlights to the front. You can also write the license plate number of the car - this way it will look more realistic and interesting.
A pool table
For those who love billiards, you can make an original tabletop billiards from candies. Such a gift will be a real decoration for any interior and holiday table.
Required:
- Styrofoam base or large candy box;
- small squares of foam that will serve as table legs;
- green paper;
- glue gun and tape;
- floral mesh;
- ribbon for decoration;
- scissors;
- small flat-shaped sweets in the form of tiles, candies in the form of balls, a long lollipop for a cue.
- For the base you will need a rectangular candy box or polystyrene foam, which must be wrapped in green corrugated paper. Next, you need to wrap the foam squares in paper and glue them to the bottom of the box.
- Then you need to make billiard holes from floral film and wire, which need to be secured on the sides with wire or tape, and also decorated with floral tape.
- Along the edges of the table base, flat tiles of candy or chocolate need to be fixed in the form of sides.
- You need to place candies in the shape of balls in the middle of the billiard table. A long lollipop that will serve as a cue should be decorated with ribbon.
The most difficult part of creating a pool table may seem to be creating the holes from the mesh. However, the holes can simply be made of chocolate medals. In this case, the sides of the candy table itself are laid out with tiles along the entire perimeter.
Dumbbells or barbell
Dumbbells can be made using sweets of any shape. For example, round candies can be glued to the wheels of a dumbbell, and elongated bars and small chocolates can be glued to the tube base.
- Cardboard;
- Snickers candies;
- chocolate medal;
- dark paper;
- thin satin ribbon;
- any CD, DVD;
- double sided tape;
- glue gun;
- lighter;
- satin ribbon.
- First you need to prepare the base of the dumbbell, for which you need to twist dark-colored cardboard into a double tube and secure it with glue and tape.
- Now you need to trace the disk on the cardboard with a pencil, making another small circle in the center for a horizontal tube, and cut it out.
- All parts must be connected and strengthened with double-sided tape.
- Then you need to cover the discs with corrugated paper.
- After this, you need to decorate the base of the craft, for which you need to glue the sweets to the workpiece with double-sided tape.
Next, you can attach a ribbon to the dumbbell, onto which you want to glue the chocolate medal.
A candy weight will be a good gift for a man for any occasion. Such an unusual approach to creating a surprise will definitely cause delight and will be highly appreciated.
Required:
- Chocolate sweets - about a kilogram;
- polystyrene foam to form the base of the weight;
- paper matching the color of the candies to hide the gaps between the sweets;
- stationery sharp knife;
- scissors;
- cardboard;
- toothpicks;
- Double-sided tape;
- glue;
- scotch;
- cardboard.
- First of all, you need to make a blank for the base of the weights. To do this, you need thick foam plastic, from which you need to cut three identical circles, which then need to be fastened together with toothpicks, and also use a knife to give this structure the shape of a ball.
- The finished workpiece must be tightly wrapped with tape to make it secure.
- Next, you should cover the finished ball with paper that matches the color of the sweets.
- If the sweets have tails, they need to be folded back and sealed. A square of double-sided tape should be attached to each candy so that you can later attach them to the weight.
- It is necessary to attach the candies to the blank in the form of a ball. You need to spread the candies tightly.
- Then you should cut out a blank for the handle of the weight from cardboard and then cover it with corrugated paper.
- Using glue and toothpicks, you need to connect the handle to the candy ball.
Beer mug made from candy
This gift will make a beer lover smile. And if he also has a sweet tooth, then his delight will know no bounds.
Materials
For work, collect the following materials:
- long chocolates;
- double sided tape;
- scissors;
- a tin of olives or olives;
- some light sisal;
- heat gun;
- a piece of thick cardboard;
- wrapping paper;
- starfish;
- greeting card.
Step-by-step job description
Take oblong chocolate candies, scissors and double-sided tape.
Place 2 pieces of tape on the edges of each candy package. Glue the tails of the wrappers to the tape.
Choose a tall, thin tin jar. The ideal option is containers for olives or olives.
Glue a strip of double-sided tape onto the container.
Remove the protective film from the adhesive strip and fix the previously prepared candies on it. The sweets are placed in a vertical position, close to each other.
The bottom row required 13 candies.
Above the jar, glue another strip of double-sided tape and secure the chocolate bars on it too.
This is what a jar looks like, completely decorated with candies.
The capacity has noticeably increased in size.
To make a handle for the mug, you need to connect 2 candies together and secure the free ends to the edges of the jar.
Place some other sweets in the middle of the mug.
Take a piece of light sisal. Use a hot glue gun to glue it along the top edge of the tin can.
It turns out to be a beer mug with foam.
To make a stand, take a rectangular piece of thick cardboard and some wrapping paper. Cover the rectangle with paper. It makes a beautiful stand for a mug.
Glue the mug on it with a heat gun, slightly moving the container from the center.
Place the appetizer in the foreground. It could be dried fish, nuts for beer, or just a beautiful starfish, as in the photo.
The craft is ready! A mug made of candy will look great!
All that remains is to place a greeting card next to the gift for February 23rd.
Your man will be surprised and delighted by your resourcefulness. And you can eat the sweet component of the gift together after the festive dinner.
Cup of candy for a true champion:
We assemble a dumbbell from candies with our own hands: a good gift for men
This master class will help you make such a dumbbell yourself.
Such a gift is very good to give on the twenty-third of February - Defender of the Fatherland Day. And so, before we start making such a chocolate dumbbell, we will make a list of the materials we need. It will include:
- Black cardboard, A4 sheets - three pieces.
- The Snickers themselves. Example11111111but fifteen pieces should definitely be enough.
- Dark blue paper
- Two regular discs for recording music or video
- Glue, maybe “Super Glue”, or something similar, the main thing is that it glues securely.
- A lighter or matches, but it’s more difficult to do with them.
Having compiled and obtained the necessary materials, we begin to create our delicious dumbbell.
We start by making the base of the dumbbell out of black cardboard. To do this, we twist black cardboard into a double tube and fix it with glue and tape.
We place the disk on the cardboard, trace it with a simple pencil and do not forget to make another circle in the center, a little smaller. Carefully cut out. We cut the circle around the edges - this will give our gift greater stability. We cover the discs with corrugated paper.
After we have finished working on the base of the craft, we begin to decorate it. We carefully carry out its design and appearance. We glue each Snickers to the blank with double-sided tape. After finishing the pasting, we can safely say that most of the work is done. Cover the edges with paper and that’s it! Our dumbbell is ready!
This craft is very easy to do. Even a beginner with very little needlework experience can do it. Here you need to have only completely ordinary and practical skills. It doesn’t even require a step-by-step photo, which is often simply necessary when making a variety of knitting or sewing products. In addition, such a gift will probably be remembered for a long time by the person to whom you gave it.
"Weight made from candy." DIY gift for a man on February 23
Necessary materials
1. Jelly candies (or other candies except chocolate, semicircular) – 700 grams. 2. Foil. 3. Hot-melt gun + glue sticks. 4. Plastic ball (for the base) – 1 piece. 5. Silver satin or crepe ribbon (1 cm wide) – 25 centimeters. 6. Chocolate medal (gold) – 1 piece. 7. Blank for an acrylic keychain (square) – 1 piece. 8. Postcards for a keychain with holiday symbols – 2 pieces. 9. If desired, you can prepare festive packaging and a bow.
Master class with step-by-step photographs
So, take some candy. Wrap the edges of the candy wrappers and use a gun to glue them to each other (not to the candy.). We should get a round shape, as in the photo.
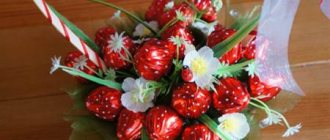
DIY candy bouquets
More tender than tender. Master class with step-by-step photos. Master class for children, both primary and secondary schools. Dumbbell from. This bouquet of candy flowers can be given to both men and women.
for a birthday Step-by-step manufacturing instructions are shown in the video. How to make the New Year's Eve magical for young children. A bouquet of sweets is not only beautiful and original, but also...
To do this, cut large branches into smaller elements, attach each such segment to a toothpick using hot glue and place it organically inside the bouquet. The master class on creating roses from candies and corrugated paper is coming to an end. The finishing touches are to glue decorative beads onto individual elements of the composition, and decorate the box with an elegant bow made of beautiful ribbons.
Master class with step-by-step photos. Sweet candy compositions have been very popular lately. How to make a bouquet of roses from candies and corrugated paper.
Then we proceed to decorating the sepals and stem of the flower. To do this, we cut off the excess paper at the base of the bud so that the transition from flower to stem is smoother. We wrap the calyx of the bud with tape, slightly capturing the beginning of the stem. On one side we cut out long thin triangles with scissors.
With such a composition the bride will be extraordinary and unique. A bouquet made with satin ribbons will not dry out, will not wither, and will delight you with its appearance for many years. The following step-by-step instructions will help you create a unique composition.
Falling bouquets in the shape of a drop are festive, solemn, and look great with lush, silhouette dresses. Such compositions can be strict, classic, emphasizing the bride’s playfulness with their slightly disheveled appearance.
The form itself originated in England and has become very popular among modern brides. The presented video clearly demonstrates the process of creating this version of the bouquet.
It has a slightly loose structure, which makes it look graceful and airy.
The basis of the floral arrangement can be a variety of flowers made using corrugated paper. This material allows you to create a variety of shapes. They look very cute and relevant, suitable for a celebration of any style or trend. A wide selection of corrugated paper in different shades allows you to bring your wildest creative ideas to life.
Their production and design takes a lot of work and time, but the result will certainly please you. Such flowers look very festive, bright, impressive and, most importantly, unique.
This is a colored film or mesh rolled into a bundle; it is attached to the rod in the same way as a flower with candy (the master class will tell you more about this later). Pounds are needed to thicken the bouquet so that the flowers do not look lonely.
For this you will need: candy; corrugated paper of the same color for the petals of the bud and green for the sepals; artificial rose leaves; wire; tape; scissors; glue gun Let's look at how to make a rose with candy inside step by step: Cut out a rectangle from corrugated paper, fold it in half and round the edges on one side.
We wrap this element around the candy chosen to fill the bouquet. To do this beautifully, you need to slightly stretch the paper in the center, then it will not bulge and fit evenly around the sweetness. We secure one edge with an elastic band and trim it so that it is as even as possible. For the stem, you need to glue the wire to the base of the flower using a silicone gun.
Do everything as carefully as possible.
To make it beautiful, use your imagination, place flowers on toothpicks in front, and tall ones behind, or combine them. Watch the video for another option on how to make a charming candy bouquet: How to make a rose from corrugated paper for a candy bouquet.
The rose is the favorite flower of many girls; it attracts with its grace and majestic beauty, so they are often used in unique flower arrangements, combining the charm of the plant and the pleasant taste of chocolate candy.
The girl will be delighted with such a gift, receiving both aesthetic and taste pleasure. Roses look beautiful in sweet floral arrangements, which can be arranged on a frame, in a basket, or often diluted with other flowers.
By learning how to make roses from corrugated paper with candy in the middle, you can create a gorgeous bouquet.
Watch the video with another example of a beautiful rose with candy inside: Check out the master classes on how to make it.
To create you will need: candies; corrugated paper - green for the petals and bright colors for the flower; scissors - ordinary and curly, for edge decoration; foil; skewers for stems; scotch; organza, decorative mesh for decoration.
Instructions for creating a sweet bouquet with tulips: Making flower blanks: cutting long strips of bright colored corrugated paper. We trim one edge with curly scissors and cut the other evenly.
Perhaps this method will seem easier to someone. Watch a video with a detailed description of this version of a sweet flower arrangement: Video lessons for beginners on creating bouquets of candy. Their prices are inflated, and the sweets inside turn out to be the cheapest and most tasteless.
To make a perfect, beautiful bouquet with a delicious treat, you need to do the work yourself. This is not as difficult as it might seem at first glance, and video lessons with detailed descriptions of the actions can help. Lesson on making a base for a candy bouquet.
Just flowers and a box of chocolate will be both beautiful and tasty, but a bouquet of chocolates will be an original and unexpected gift.
Here it is worth noting that this is also economical, but you need to put your whole soul into such a thing, show imagination, which means truly love, do not spare your free time and think about the one for whom the sweet flowers are intended. And making a unique thing yourself is always interesting and pleasant.
It’s a good idea to lightly sprinkle the bouquet with the girl’s favorite perfume or place a couple of drops of aromatic oil on the cardboard stem of the bouquet - be careful not to overdo it, otherwise the recipient will have to eat perfume-flavored candies.
We wrap the resulting part with a satin ribbon or variegated braid. If the tube is made of ordinary gray cardboard, then it must be wrapped in corrugated paper. Now the circle of cardboard is glued to the foam head - it should sit tightly, since the entire structure will rest on it.
All girls, young and old, love flowers and cannot live without sweets. When going to a birthday, date, wedding celebration, or just wanting to pamper a friend, daughter, girlfriend or spouse, and cheer her up on a weekday, you should definitely give bouquets and sweets.
Creating unusual holiday accessories is a whole science. Brides are working on inventing new decorative elements, trying to do everything to make their celebration unforgettable.
As a rule, preparations are already in full swing several months before the holiday: representatives of the fair sex meticulously select the ideal outfit and jewelry, and plan the ceremony. Not a single detail should be missed.
And when it comes to a symbol of bloom and happiness, collected from flowers, newlyweds show real miracles of ingenuity.
Sweet samples have gained particular popularity, which become a pleasant and tasty surprise, reminiscent of the childish spontaneity of the chosen one and seem to hint: life together will be a gourmet treat with a luxurious chocolate or caramel filling.
Girls who never want to part with a sweet bouquet are perplexed: how to preserve this delicious surprise, bypassing the well-known ritual designed to make one of the girlfriends of the hero of the occasion happy.
A beautiful delicacy will remain with you and will remind you of pleasant moments until it is empty.
Cannon made from a bottle and candy
Materials and tools
To make a cannon from a bottle and candy, prepare:
- sandwich panel 30*17 cm,
- decorative braid and sequins on gold threads,
- thick cardboard,
- glue,
- scissors and stationery knife,
- a sheet of blue crepe paper,
- a small bottle of wine,
- a bar of your favorite chocolate,
- several Ferrero Rocher sweets.
Manufacturing in stages
First of all, we glue the base for our gun.
We decorate the edges with sequins.
Cover the bottom with cardboard.
For the base of the cannon, we cut out the following parts (see photo), select the size individually for the bottle.
We cover them with paper on both sides.
We decorate the wheels.
We assemble the base parts together.
We decorate the ends with braid.
We connect the box and wheels.
Glue the base and the box together.
The kernels will be Ferrero Rocher candies. We glue them with double-sided tape.
We tie the bottle with a bow, place it in its rightful place, the gun is ready:
This is how you can present simple things in a rather original way!
If you need a lot of small gifts, you can give men the following shoulder straps:
Other sweet gift options for men
On our website there are also master classes in the sweet design technique on how to make gifts from sweets that can please men and boys.
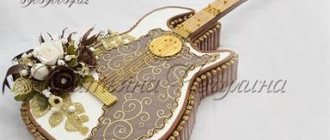
You can make a guitar, a motorcycle or a car:
Send us your master classes and photos of candy gifts, we will be happy to publish them!
DIY candy dumbbell: master class with step-by-step photos
A do-it-yourself candy dumbbell is a very original gift that will definitely please your sweet tooth and delight your sweet tooth. This gift can be given to your favorite defender on February 23, his birthday, as well as to an athletic and hardy girl who loves to spend time in the gym. Everyone knows that the best gift is the one made with your own hands, and this one is also edible! This master class will definitely come in handy for those who want to congratulate a dear person in a creative and sweet way.
DIY gift for a man made from sweets
Gifts for Boyfriends Birthday Gifts Gifts for Men from DIY candy. DIY candy gifts, how to make bouquets of candy with your own hands. and men. Sweet gift. Snickers dumbbell. Master Class. How to make and decorate a candy gift for a man with your own hands: sweet options. · How to make gifts from candy. Birthday preparation for a girl. Craft for a boy.3/5(3).
Gallery: DIY candy gifts (25 photos)
Hello, dear guests of my blog. We continue the holiday theme, and today I will tell you how to make a gift from sweets with your own hands for various events. It's no secret that chocolate in small quantities is one of the sources of joy in our body and is the most favorite treat for children.
Is it possible for an individual to buy commercial real estate with a mortgage?
And souvenirs are something that both adults and children love. Today we will combine this into a single whole and prepare delicious souvenirs. We will need certain skills and simple supplies.
Representatives of the stronger half of humanity always radiate confidence and steadfastness, but they, like children, rejoice at even insignificant souvenirs. And their bright presentation evokes genuine delight.
This is a symbol of the greatness and uniqueness of a creative person. By making such a souvenir, you are not just making a gift, but giving him a talisman.
It helps brilliant ideas emerge and bring their plans to life.
The manufacturing process is simple. You will need:. I offer you a step-by-step photo of the creative process. All candies will need to be glued with pieces of double-sided tape on one side or later use a glue gun.
Such a surprise will delight any man, no matter whether he has anything to do with hunting or military affairs or not. Guys love war games. And having fun with toy machines or sticks instead is their childhood. In addition, it is in a man’s genes that he is a hunter and breadwinner, which means that such a gift would be appropriate. Such a sweet surprise is suitable for a man - a husband.
And that's why. Even in Ancient Egypt, the anchor was considered a symbol of the universe. This is a mast, a boat and a snake.
The mast symbolizes the masculine principle, the boat - the feminine. And both of these elements are entwined with the snake of life, which is the sacrament of marriage.
Later, the anchor began to be considered simply a sign of a calm family life. By preparing such a surprise for your husband, you will emphasize your reverent attitude towards the union of your hearts. And this video will help you create this masterpiece: Incredibly, this toy captivates male representatives, even if the boy is well over thirty.
And your man will be happy to eat the sweet dance. By the way, this idea can be used as a surprise on February 23rd. How to beautifully decorate this gift is shown in detail in the video:.
- Do-it-yourself flat wooden balusters photo
- How to download movies in English for beginners
If you don’t have a car yet, don’t worry, because in any case, he’s a cool guy who steers through life. I offer you a video of this master class:. This craft is suitable for both beer lovers and kvass fans.
And the result of your work is essentially perfect for tea drinking. After all, it consists of tea and sweets.
So, to create a glass you will need:. Using hot glue, attach them to the jar in two rows vertically. Attach a handle to the resulting base of the glass. The glass is ready. We decorate the top with threads to create the illusion of foam.
Sweet golden dumbbell
To make such a delicious product, you will need the following materials:
- cardboard, boxes of candies and marshmallows will do;
- cardboard tube (foil tube for baking);
- Double-sided tape;
- satin ribbon (2 and 2.5 cm wide);
- sharp scissors;
- lighter;
- candies in gold packaging.
First you need to make blanks from cardboard for the so-called pancakes on the bar. You need to cut out 8 circles of different diameters. Half will be 18 cm in diameter, and the other half of the circles will be 14 centimeters. In the middle of the circles, cut a hole the same size as the cardboard tube so that the circles can thread through freely.
All actions to connect and strengthen the dumbbell will be performed using double-sided tape.
Next, wrap the circles with satin ribbon. But before that, connect them to each other. To do this, you need to cover the circles on one side with double-sided tape. Take one small circle and one large one, glue the paper folded into a tube onto the tape on the circles. This is done in order to give volume to the pancakes. The resulting parts can already be wrapped with tape.
How to make dumbbells from candy with your own hands
To make a dumbbell you will need the following:
- cardboard, you can take candy boxes,
- a cardboard tube left over from baking foil can be made from cardboard,
- Double-sided tape,
- satin ribbon two and two and a half centimeters wide,
- scissors, lighter,
- candies.
Dumbbell blanks
First of all, it is necessary to make blanks from cardboard for improvised pancakes for our barbell. For this purpose, you need to cut out eight circles of different diameters. More precisely, four of them will be eighteen centimeters in diameter. And the remaining four circles must be made with a diameter of fourteen centimeters.
In the middle of these circles we cut a hole the diameter of the cardboard tube so that they fit freely onto it. All operations to connect and strengthen the parts of this structure will be performed using double-sided tape.
First we need to make weights for the barbell that will be not only functional, but also beautiful. Because this is a product that will be given as a gift. So, beauty must also be taken into account.
DIY candy dumbbell decoration with satin ribbon
To do this, you need to wrap the circles with satin ribbon. But before that they need to be connected to each other. For this purpose, the circles are covered with double-sided tape on one side. Take one small circle and one large one, and glue the paper, rolled into a tube, onto the tape glued to them. This is done in order to give volume to the improvised pancakes, since the remaining circles are glued on top of the paper. The resulting products can begin to be wrapped with tape.
You can take the ribbon in any color, it all depends on your imagination. You can match the color of the ribbon to the candies that will decorate the dumbbell. You can choose any colors, even contrasting ones, it doesn’t matter, just like the shape of the candies.
To ensure that the tape does not move when wrapping it around the pancakes, the end must be secured with tape. To prevent the threads from fraying when the tape is cut, you need to treat the edge with fire. After this, you can start wrapping, gradually securing it to the cardboard with tape. After all this is done, the edge of the tape is also secured with tape.
After wrapping the circles, you can start wrapping the cardboard tube, which acts as a rod. This is done using a wider tape. First, the side holes of the tube are masked, and then a tape is wound along its entire length, which, like everything else, is attached with tape.
After this is done, you need to check how well the tape is attached and whether it moves. Then you can assemble the dumbbell or barbell. To do this, carefully place the circles on the barbell. It turns out to be a beautiful and elegant dumbbell that needs to be decorated with sweets.
To decorate the dumbbell, you need to cover it with candies. To do this, you need to stick a piece of tape to each candy. And then attach the candies to the circles. This way you will get a beautiful and original gift dumbbell that can be presented as a gift.
Candy weight for those with a sweet tooth
Necessary materials for such an impressive gift:
- candies;
- Double-sided tape;
- sharp small scissors;
- stationery knife;
- a piece of foam;
- regular tape;
- corrugated paper (yellow);
- toothpicks.
The process of making a kettlebell begins with assembling the base. The base will consist of a piece of foam. Take this piece and try to make it an oval shape. From the remains of a large piece, cut out small circles and connect them with toothpicks. Carefully wrap the entire workpiece with simple tape and cover everything with paper. Step by step photo:
Now you can start making candies. To do this, glue all their tails to the back of the candy, that is, hide them. When all the tails are wrapped and bent, you can start gluing the candies onto the weight.
You need to try to glue them very carefully, with as little space as possible between the candies.
Make a handle for a weight from cardboard, cut out a “U”-shaped blank from it. This is what the handle should look like:
Glue it to the main part of the weight and cover it with candies with fewer spaces. To make the craft look brighter, you can use candies with different types of foil.
Sweet weight done!
We make a sweet weight as a gift: a delicious surprise for everyone
This is another no less original gift for men. It looks just as impressive as the previous dumbbell.
So, first, let's see what we need:
- Sweets, truffles are best
- Double-sided tape on which the candies will be attached
- Scissors – small ones are better
- A stationery knife, but you can also use a kitchen knife, but make sure it is sharp
- A piece of foam
- Scotch
- Corrugated paper (yellow)
- Toothpicks
We begin the process of making our weights by making the base for it. The base will be made from a piece of polystyrene foam. To do this, we take a piece of foam plastic that we have prepared and try to give it a shape that is most similar to an oval.
From the remains of a large piece, cut out small circles, which we connect with toothpicks.
We correct small defects and try to bring our workpiece closer in shape to a soccer ball.
We carefully wrap the entire workpiece with tape and cover it all with paper. It should look something like this:
We are preparing sweets. To do this, you need to glue all their tails to the back of the candy. That is, they should not be visible after they “stick” to our ball.
After all the tails are wrapped and bent, we can start gluing candies onto our weight. We try to glue as carefully as possible, with as few spaces between the candies as possible.
We make the handle of the weight from cardboard. We cut out a “U”-shaped blank from cardboard. We got a handle like this.
We glue our handle to the main part of the weight and also cover it with candies with the least amount of space between the candies.
These videos will show you how to make very interesting and original crafts from candies. Which will be an unforgettable and universal gift for a loved one.
Sweet bouquets are no longer exotic, but sweet design is a much broader concept than flowers with candies inside. This direction of needlework considers the possibility of creating entire compositions using candies and other materials - thematic or reflecting the flight of thought of the author. This article is dedicated specifically to it – suite design in the broadest sense of the word.