Anyone who is familiar with the art of origami would probably like to make a swan figurine. After all, this majestic bird is not just the most beautiful creature of nature, but also the personification of fidelity and devotion to loved ones.
A paper swan will be a real gift for connoisseurs of this art and simply for people who love such souvenirs.
Our master class will help you understand the intricacies of the art of working with paper when making a swan, and even a beginner will be able to boast of a completed bird figurine.
Working with modules
The essence of modular origami is, in principle, the use of parts from which a figurine is ultimately assembled. So, triangle modules are made from a sheet of A4 paper. The first step is to complete the blanks; for this, the sheet is divided into 8 parts.
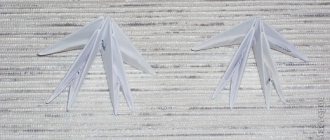
In order to assemble the module itself, you need to follow a few simple steps shown in the photo:
Once the required number of modules is ready, you can start working.
Making a double origami swan from modules
To assemble this model, you will need 1502 white modules, or you can use 1322 white and 180 pink modules (you don’t have to use this color, you can choose the one you like). The size of the modules will be 1/32.
The modules must be connected like this:
First you need to connect 30 modules. They are arranged in a circle.
Next, he performs 10 rows; by the way, there is no need to turn over the workpiece of this swan at this stage.
Next, we continue assembling the modules up to row 15, here you can stretch the workpiece, then the swan will be more voluminous.
Next, you should divide it into the neck, wings and tail, put 10 modules on the wings, 6 on the neck, and 4 on the tail.
https://stranamasterov.ru/img/i1002/07y75.jpg
The neck is assembled like this:
Next is the tail:
- The wings begin to be made like this:
- Both wings should be raised at the same time. After 10 rows have been erected, the following structure will be obtained:
- In the 10th row it is worth reducing the number of modules to 1.
- At this stage the swan looks like this:
Let's make a stand. We place the modules on glue, we try to make them evenly, so that our swan will stand firmly on its feet.
- After the first row has dried, you can start gluing the second:
- The inner wings are made with the expectation that 1 row requires 20 modules.
- The structure rises 7 rows and is further divided into 2 wings.
- The next three rows are built like this:
- Raised by 3 rows, we begin to reduce the wings to one module.
- This is what the finished inner wings look like:
- Now the insertion is done.
- And another one.
- These are the blanks you should get according to the scheme: “Origami swan from modules for beginners”:
- Connects all structures into one:
- All that remains is to add the neck, and the swan is ready.
- If some subtleties are not clear, it is better to watch the video tutorial, and then the work will definitely succeed.
Video on the topic of the article
Source: https://webdiana.ru/dom-i-semya/rukodelie/2758-lebed-iz-moduley.html
Graceful origami swan from many modules
Using the modular origami technique, you can create amazing three-dimensional figures. As a rule, classic triangular modules are used for this, although this is not necessary. Folding origami paper modules must follow certain rules so that the resulting triangles can be folded into a strong but flexible structure. The detailed process of creating modules is captured on video. The swan from the modules turns out incredibly alive and beautiful. Using multi-colored paper, you can get beautiful transitions of shades and colors. You can start with a simple MK to get comfortable with the technique of modular paper origami.
Required for work:
- 459 small triangle modules (one red, the rest white);
- a large supply of patience and perseverance.
The long corner-ears of the modules are inserted into special pockets of the previous tier. The following two parts are added to the resulting structure. Then two more paper modules. After this, the origami craft becomes shaky and easily crumbles. To strengthen it, they work with three rows at once.
To add a third row, an additional triangle is positioned as shown in the photo. Then the modules of the upper and lower rows are connected.
Following this pattern, fold 3 rows of 30 triangles each, and then close them into a circle. Using the same template, 2 more levels are assembled. The next step is to turn the product inside out. To do this, carefully take it from both sides and use the tips of your thumbs to press the core of the “skirt” inward.
The result of these actions is a figurine that looks like a saucer.
The outermost row is carefully folded upward to obtain this shape. This is what the craft looks like at this stage:
After this, row 6 is arranged, placing the parts in a checkerboard pattern. In row 7, the formation of wings begins. To do this, 12 modules are attached, two are skipped and the next 12 pieces are inserted. It turns out two passes - one narrow, the other wider. These will later be used to form the neck and tail of a swan.
In the eighth row, for each wing, one less module is inserted (11 for each wing). This continues until the wings are ready. As you assemble, the wings can be bent to give them the correct shape. The tail is assembled in the same way, reducing the number of parts by one with each tier.
Now you can fold the neck and head. You will need 20 triangles (scarlet will be the beak, the rest will be white). To prevent the beak from looking forked, the corners of the red module can be glued together in advance. To make the neck, two modules are placed one above the other. The corners of the top one are tucked into the pockets of the bottom one:
This continues until the parts allocated for the neck are exhausted. During the work, the neck is bent to give the desired shape. The last thing to put on is the red beak triangle.
All that remains is to attach the neck to the body using the left corners and the paper swan made using the modular origami technique is ready.
Video: Assembling a modular origami swan
Modular origami: Swan assembly diagram
Greetings, today I have prepared for you great instructions, a master class on assembling a modular origami swan . In order to make such a black beauty we will need 1479 modules. Want to try your hand at it? Then go ahead!
The swan can safely be called a symbol of modular origami, because it is what thousands of people are most often looking for on the Internet. True, many people immediately become cowardly as soon as they find out the number of triangular modules that have to be assembled. If you are not one of “those”, then I suggest you read the further instructions.
As terms: module and triangle, the concept of a triangular origami module is used, which you can assemble using our detailed instructions.
You will need:
- first you will have to collect 1479 modules (+-5 pieces);
- you will also need glue (preferably a hot glue gun);
- black aerosol alkyd enamel (for painting);
- and three bags of patience.
- As terms: module and triangle, the concept of a modular origami triangle is used, which you can assemble using our detailed instructions.
- First we will make the body for our bird. We assemble a chain of modules, as shown in the photographs below:
- Now we close the resulting chain into a circle. Thus we get 2 rows (43 modules in each)
- Let's make the third row. We chain the modules in a checkerboard pattern:
- In total there are 12 rows in the body of our big swan, we continue to put
- Now we move on and make the breast for our bird, the base is marked with a black felt-tip pen for convenience.
- We begin to lay rows of breasts, in each subsequent row there is one less module!
- We finish when there are three modules left on the top
- Now we move on to the wing, the module from which our assembly begins - marked in black (to the right).
- We turn the triangles over to the other side and begin to put them on in a checkerboard pattern. (total 12 triangular modules)
- A row of wing modules goes from the chest in descending order, at the end of each row we increase 1 module, put it on the last element with one left pocket (the right one remains empty).
- Internally our model looks like this:
- In the same spirit, we lay out 12 rows (each row has 12 modules) and we get this:
- From the next 13th row we will have a decrease on both sides
- inside:
- We finish assembling the wing (one module remains at the top)
- Now we repeat the same thing for the second wing
- Now we can say that our modular origami swan is half finished and there is very little left!
- Let's move on to the tail:
At the base of the tail there are 6 triangles, which are turned upside down. We increase the rows, in each subsequent row there is 1 less module. We finish the tail section with 1 module
- The inside looks like this:
- Now let's move on to the neck:
Our neck ended with three modules. We begin to build up, alternating rows (2 modules, 3 modules, 2 modules, etc.)
- Only 19 rows and the neck is ready!
Now we make the head for our bird: we turn the triangles over and put them on in a checkerboard pattern. Row 3 modules, then 2 modules.
Now we put 3 modules, and in the next row 2. That’s it, the head of our modular origami swan is assembled and the work remains.
Now we assemble the back separately. There are 15 modules in the first row. Each next level is one triangle less. At the end there is one module left.
We make a chain of modules as a stand. Each row contains 61 modules.
Now let's move on to painting. In principle, it is not necessary to use black. You can choose the paint at your discretion. Before painting, be sure to make the desired shape for the neck and wings. Be sure to use a respirator while painting!
Now we complete the decoration of our swan and give it white plumage. To do this, we put on a white module that meets between the breast and the wing.
- We build up by connecting white and black modules
- We also make plumage for the chest and tail
The beak is made of two modules: white and red. Using glue, we attach the wide part of the back to the swan’s chest from the inside. We make eyes and put our swan on a stand (glue it on).
Photos and materials © Galina Tikhova
That's all. Our large master class on assembling this wonderful and beautiful modular origami swan is over. I hope you liked our instructions! See other schemes in the sections of our cozy blog.
- Sergey
Source: https://planetaorigami.ru/2011/05/modulnoe-origami-lebed-sxema-sborki/
For newbies
Beginners will definitely need detailed step-by-step instructions for assembling a paper swan using the modular origami technique. Such instructions and step-by-step explanations can be seen in video master classes by recognized origami experts.
There are many groups that share a love for this type of creativity, and where you can get advice on how to make an origami swan from modules with your own hands.
For beginners, specialized stores offer a huge number of kits for working in the modular origami technique - swan figurines and step-by-step assembly diagrams.
Before you start assembling such an elegant figure as the modular origami of a beautiful double swan, you should practice on lighter models. Simple models can be assembled by a preschooler with the help of teachers in kindergartens or with the help of his mother.
The most tedious thing for a child is creating triangular modules. Fine motor skills have not yet developed properly, and the baby has difficulty assembling small parts. That is why for children's crafts it is better to assemble modules of large and medium sizes. Preschool children quickly get tired of monotonous, boring work, so the mother’s task is to help make blanks for crafts.
It is better to set aside a special time and day when all family members will work together to assemble an openwork air composition. The elements necessary to create a three-dimensional figure must be prepared in advance. The child will be interested in engaging in the creative process with his parents. Adults will be able to tell you how to assemble modular figures correctly.
An easy craft that does not require much time or pre-assembled materials to assemble is a figurine of a small swan. To create a modular origami “little swan” you need to make 70 triangular modules, 69 pink or blue elements and 1 red for the beak.
Let's look at the step-by-step assembly of a small swan.
Step 1.
Assembling the body. The basis is 3 rows of assembled elements. There are 12 triangular blanks in each row. The resulting strip is connected into a circle. It is necessary to give the resulting part the shape of a bowl.
Step 2.
First wing – 4 modules are put on. The following rows are in decreasing order: 3 triangles, then 2. The tip of the wing is two elements, placed one on top of the other.
Step 3.
Breast - immediately after the wing, 2 modules are put on. 1 piece is attached on top with the short side. The breast is ready.
Step 4.
Second wing. Immediately after the breast, the process of assembling the second wing begins. Both wings are assembled according to the same scheme: 4 parts, 3 elements on top, then 2 triangles. The tip of the wing is two rows of one triangle.
Step 5.
Tail. First row - 2 parts. 1 more piece is attached to the top.
Step 6.
Neck, beak. For the neck we connect 5 elements vertically, the 6th row is completed by a red triangle - the beak. Carefully give the neck a slight bend.
Step 7
Connect the neck to the last breast module, which was assembled with the short side.
Assembling such a small figurine will not take more than 10 minutes. You can create a whole family of beautiful birds. To make it more convenient for a child to hold the modules in his hand, the parts can be made large. A child can make such a craft as a gift to his grandmother or mother. The size of the small swan can be changed by adding additional pieces.
How to make a swan from modules?
Modular origami is a technique that allows you to make amazingly beautiful three-dimensional figures from paper. The difference between this technique and classic origami is that to create crafts, not one, but several sheets of paper are used, from which modules are made, which, in turn, are folded to form the desired shape.
One of the striking examples of the technique is a swan made of triangular modules. As a result of simple but rather painstaking work, you can get a beautiful bird. Depending on what color paper you have at your disposal, you can make a white or colored rainbow swan from modules.
Looking at the photographs of the finished figures, it is even theoretically difficult to imagine how to make a swan from modules - it seems to be very difficult and intricate. In fact, there is nothing complicated in making figurines; you just need to study in detail the master class on making a swan from modules with an assembly diagram and consistently follow the steps described there.
We bring to your attention a detailed guide consisting of two stages - manufacturing the components and assembling the finished product.
How to make a swan from modules?
First you need to make modules. To do this, you will only need sheets of regular xerox paper, white or colored, depending on what you want to get as a result.
Progress:
- Fold a sheet of A4 paper in half widthwise.
- Fold it in half again.
- And fold it in half again.
- Unfold and turn over so that the fold lines are vertical.
- Fold the sheet in half again, but in a different direction.
- And fold it in half again.
- Unfold and cut or tear the sheet along the fold lines so that you get 32 rectangles.
- We take one of the rectangles and start making the module.
- Bend in half.
- Now we bend across the first fold line.
- Unfold and fold the bottom corners inward towards each other.
- Fold the top corners as shown in the photo.
- Now bend the top part down so that you end up with a triangle.
- Fold the resulting triangle in half.
- We repeat similar steps with other paper rectangles.
- We got a triangular module with a pocket so that we could insert another one into it.
Master class on modular origami: Wedding swans
Published: December 10, 2012 3:00
- Galiy Nikita
- Author's blog
- So, since mom and dad’s wedding day is coming soon, I decided to make wedding swans and share them with you.
- We put on the modules like this, 38 models in each row
raise by 12 rows
make a ponytail (4-3-2-1)
from the tail we pass 12 modules in each direction and make the breast (10-9-8-7-6-5-4-3-2)
We put on 12 modules (which we missed in advance)
we continue to make wings: (12-11-12-11-12-11-12-11-12-11 (we go to decrease 10-9-8-7-6-5-4-3-2-1)
We also do the second wing. the wings are ready!
Making the neck (3-2-3-2-3... and so on)
- making the back (14-13-14-13-12-11-10-9-8-7)
- glue it
ready! We are also making a boy.
- You can make rings from the modules (I painted them with gold spray paint)
- added golden roses
- and simple
- ready!
Source: https://www.mastera-rukodeliya.ru/svadebnye-lebedi
Modular origami Swan
Like, for example, the Basket or the Vase, the Swan is a classic origami of modules. However, it cannot be called a model for beginners, since the amount of work here is significantly greater, but the result is worth it.
So, the festive portal Bubuka presents to your attention instructions and a diagram for assembling a modular origami Swan, made by yourself.
Since the model is quite large, the bulk of the work will be reduced to the production of paper modules, and then everything will go faster, more fun and more interesting. Our example uses white and pink paper, as well as some black and red.
In fact, not counting the head and neck, the modular origami Swan diagram consists of three large parts, each of which we will assemble separately. After that, we’ll simply combine them into a single whole.
Let's start with the biggest part. Let's assemble a ring of 2 rows of 30 modules, connecting them with the long side outward. Just as it is shown in the pictures.
When the ring is completed, we simply begin to build it up, attaching modules of 30 pieces in a row. As the number of rows increases, we slightly bend the corners of the modules upward - we form the figure of the Swan’s body. So we need to collect 15 rows.
Now we need to assemble the neck, tail and wings. The base of the neck will take 6 modules, the tail - 4, and each wing - 10 modules.
We increase the neck, starting with 6 modules and reducing the number of modules by 1 in each subsequent row until there are 2.
The tail is collected strictly opposite the neck, and is done in the same way, but at the base of the tail there are 4 modules and we reduce the rows to 1 module. The tail will be sharp.
A modular origami Swan (diagram in the photo) can be an excellent decoration at a wedding banquet, because this bird has been a symbol of fidelity since ancient times.
The first row of each wing consists of 10 modules, but on the second row from the tail side you need to put on one module as shown in the figure. After that, we simply increase the row on each wing. We do this at the same time to ensure the same height of the wings.
In total, for now you need to collect 10 rows in each wing, 10 modules per row.
Now you need to sharpen the wings. To do this, starting from the 11th row, we begin to reduce the number of modules with each row by 1, bringing the wings to the tip.
The first part is ready and in the end it should look like this beauty. Let us remind you that this is the largest part and it will be simpler further.
It is worth noting that the modular origami Swan is far from the only representative of the bird world in this section. Here you can also find Penguin, Parrot and Peacock.
Since the structure is quite voluminous, it needs to be strengthened and given stability. Let's glue a number of modules around the perimeter of the base of this part, as shown in the figure. They will act as a support. First we glue one row, and then we add another one on top of it.
Next up is the second component of the modular origami Swan - the inner wings.
We begin its production, just like the production of the first one. We assemble a ring of 20 modules in a row with the long side facing out. We assemble 7 rows, while pulling the corners of the modules up.
Now it's time to form the wings themselves. The base of each consists of 10 modules. We raise them by 3 rows, but now without connecting them into a solid ring, as shown in the figure.
Then we simply begin to reduce the number of modules by 1 with each row until we get a point. See the picture for the result.
The third, almost final, component for assembling the modular origami Swan begins by making a standard ring, but with 12 modules per row.
We collect a total of 6 rows and, starting from the 7th, reduce the number of modules by 1 in each subsequent row. It turns out that the ring is built up and extended with the tip upward on only one side. And the third part is ready!
- But actually all three parts are together, but not yet collected together.
The assembly stage has arrived. Carefully insert the second part into the first.
If this is difficult to do (there is not enough space), the inner part can be slightly compressed and the outer part can be moved apart. Modular design allows this to be done, but should be done with caution.
Similarly, insert the third part into the hole of the second. To better secure the parts, you can use glue.
But that is not all. All that remains is to make the neck and head.
At the base of the neck that we made, we begin to build a chain of alternating 3-4 modules (see picture). When the neck has grown enough, make a bend. At the end, we reduce the number of modules to 1 and complete the head with red and black modules.
To make the modular origami Swan more like a real bird, all that remains is to cut out and glue the eyes.
The craft is ready! The path to the result was not easy, but it was worth it. A sea of positivity and aesthetic pleasure is guaranteed to you.
Friends, we will contact you all with ratings and suggestions for new topics. Write in x about your successes and share your success in mastering this technique and this craft. Click on the links on social networks and share this post with the modular origami Swan pattern with your friends - moving art to the masses together!
Swan made of triangular modules. Scheme. Stage I.
1. As usual, start connecting the 2 modules as shown in the picture.
2. Now connect another 60 (i.e. 2 rows of 30) modules that go in a circle. You should end up with a design like this.
3. Make a few more rows so that their number reaches 15. During the assembly process, you need to bend the structure inward once and continue adding modules, gradually bending and stretching the entire structure.
4. Assemble the tail and wings. A total of 6 modules are needed for the neck (in the figure, 6 modules are divided into 2 pink and 4 white) and 4 for the tail. The tail is located opposite the neck.
To assemble the neck, simply remove 1 module at a time, i.e. the next row of the neck will have 5 modules, then 4, 3 and stop at 2 modules.
To assemble the tail in the same style, we assemble modules, starting with 4 and reaching one at the top.
5. Assembling the wings. For the first row of wings you will need 10 modules.
When you start making the second row of wings, you need to insert the module from the tail side as shown in the picture.
6. Continue attaching the modules, using 10 pieces for each row. You need to get to the 10th row.
7. After 10 rows, you need to continue making wings, but this time reduce them one module at a time, i.e. each subsequent row will have 1 less module. Make sure that the rows of the wing on the right are equal in height to the rows of the left wing.
8. You should have a design like this from 770 parts.
9. To make your structure more stable, add modules to the base as shown in the picture to create a stand. You can attach these modules with glue. At this stage, you also need to attach all the modules evenly so that the swan stands well. Make another row like this (there are two in total).
Double swan master class
In response to numerous questions about making a double swan, I prepared a MK, which is based on Elena’s MK.
To assemble the swan, we need to make such a bunch of modules. If you want to make it white, you will need 1502 white modules; for color, like mine, 1322 white and 180 pink. Module size A432.
We assemble the modules this way.
30 modules in a circle.
We made 5 rows; there is no need to turn the pieces inside out like in a rainbow swan.
10 rows were collected.
15 rows have been assembled, it’s time to stop; during the assembly process we stretch the workpiece a little if we want our swan to be more plump