Features of the material
Before making crafts from pine cones with your own hands, you need to familiarize yourself with their features:
- they can be of different degrees of maturation, that is, the scales are in different states of openness;
- in a warm place they can change their shape, so you need to immediately soak them in glue for several hours and then dry them.
- If necessary, the shape can be changed by soaking in water, rewinding and drying.
Crafts from fir cones
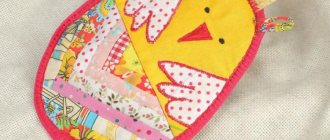
Spruce cones have a classic elongated shape with two ends - sharper and rounded. Therefore, they can be taken as a basis when making any figures, for example, a pig, which is a symbol of the New Year 2021.
Pig craft - symbol of the New Year 2019
2019 is the Year of the Yellow Earth Pig according to the Eastern calendar. Despite the fact that we usually associate this animal with not the most pleasant images, in fact the pig’s horoscope is very favorable.
This animal personifies caring for the family, the desire for a comfortable life, patience and calm confidence. The pig is peaceful and creates a warm, cozy atmosphere for us all days of the year.
That's why the first craft we'll look at is a cute pink pig. In general, it can be painted yellow in order to fully comply with the ideas of the eastern horoscope. But in general this is a matter of taste.
To make this cute creature that will perfectly decorate the New Year's table and is guaranteed to create a festive mood, we will need:
- 2 spruce or cedar cones - one larger, the other smaller;
- plasticine;
- glue;
- wire;
- paint your favorite color.
We will act like this:
- Take a larger cone and paint it pink or another color you like, let it dry.
- Next, remove the largest scales from another cone, take 2 identical ones and glue them to the narrow end - these will be the piglet’s ears.
- We will make the eyes and snout from plasticine.
- We also mold the hooves from plasticine.
- But we will make the tail from wire - it is desirable that it also matches in color. If we couldn’t find such a wire, we’ll paint it or first cover it with plasticine.
This craft made from pine cones will look more impressive if you paint all the component elements in contrasting shades - for example, like this.
You can clearly see the entire manufacturing process here.
Christmas tree garland
If the main symbol of the New Year is, of course, a Christmas tree, then its main decoration is a garland, which can be made from any cones - pine, spruce, cedar, etc. To make it, it is enough to take thick twine or even cut strips from burlap - a very interesting a la country style.
The cones are attached to the rope using a glue gun. They can be pre-painted or applied with glitter and other decorations. Although even if the scales remain in their original form, it will turn out no less beautiful, and maybe even more.
By the way, one of the most interesting ways to decorate scales is to put a little “snow” on them. And you can get it from ordinary... salt. The surface is lightly lubricated with glue, and a small pinch is poured onto it: the grains settle, and as a result, a truly fabulous effect can be achieved.
You can clearly see one of the options for making a New Year's garland from pine cones in this video.
Related materials
Each pine cone craft, depending on its type, requires the use of additional materials and some tools:
- paints;
- plasticine;
- glue;
- tape, rope, thread;
- cardboard, paper;
- scissors, knife.
Taking the cone as a basis, other materials and tools can be selected as you go. It also all depends on the idea itself. If these are crafts made from pine cones for children, then you can get by with a minimal set of available tools. If it is something serious, there will be appropriate materials and tools.
How to make a basket of pine cones
To make an unusual basket of pine cones, use our tips.
Materials for creating a basket of pine cones:
- cones;
- wire, fishing line;
- glue;
- cardboard.
You need to start tying the bottom from the central cone, and so connect 8-16 in a circle, wrapping it with wire or fishing line.
For the second row of pine cones, make a circle of smaller diameter. For a tall basket, make 3 circles.
Connect 2 circles of cones together using glue and wire. Make the handle of the basket from wire and decorate it with pine cones. Weave the handle one at a time, turning the cones over.
Crafts from leaves: new photo ideas, tips, instructions
Crafts from cotton pads for adults and children, new photo ideas
Hedgehog
The simplest craft made from a pine cone and plasticine is a hedgehog. You will need brown and black plasticine and, of course, a cone. The work process itself will take no more than 20 minutes. Even a preschool child can make this craft. Need to:
- Make a head in the form of a drop from brown plasticine;
- Make paws from the same material;
- From black plasticine, roll two small balls and one slightly larger one (eyes and nose), stick them to the head;
- Attach the head and paws to the cone. The hedgehog is ready!
You can also make apples and mushrooms from plasticine of other colors and place them on the hedgehog’s needles.
Hedgehog made of cones and plasticine
The cones themselves are quite a convenient material, but they need to be attached to something. Some people use glue for this, but it hardens quickly and is not always suitable for creating the desired composition. Therefore, for some crafts, it would be best to choose plasticine in order to create a high-quality and convenient fastening.
It is these components that are needed to make the autumn craft “Hedgehog” from pine cones. In addition to plasticine and a pine cone, you will also need a small amount of pine needles.
This will make the hedgehog really prickly and more interesting.
First you need to make blanks: brown plasticine should be divided into small balls. There should be 5-6 needles sticking out from each piece. Next, you need to take a neat cone and secure the balls with needles on it. Plasticine should not be only on the nose.
Now you can trim the needles using sharp scissors. You can also paint the needles gray or brown if you wish. The hedgehog's nose can be made from black plasticine, which is also suitable for the eyes.
On a note! If desired, you can add plasticine paws and a tail to the figurine.
So in just 10 minutes you can make an interesting autumn craft from pine cones and plasticine for children in kindergarten. The main thing is that even a child can handle making such a hedgehog. An adult can only help in working with scissors.
Container for small items
From the cones you can make a bowl, vase or other container for storing various small things. There are many options for execution, but the general principle is similar:
- Select a suitable form of future “storage”;
- Select the required number of cones;
- Take three glued cones for the base and gradually increase the bottom with additional cones to the desired size;
- Next, glue the cones vertically to the bottom, forming walls;
- Paint the finished container and decorate it with beads or ribbons.
The design can be done with anything, according to your taste and the availability of decorative elements.
Animals
Lovers of cute things can surround themselves with handmade animal crafts made from pine cones. These could be: hedgehogs, foxes, squirrels, etc.
The process of making such crafts is the same:
- Take a medium-sized cone, preferably a larger one;
- Process it and dry it;
- Select an image of an animal from any source;
- Cut out the necessary elements (tail, nose, paws) from felt with scissors;
- Attach the cut out elements to the pine cone using glue;
- Draw or make eyes from plasticine.
Topiary made of pine cones
A good idea for creating an unusual interior is topiary trees. Sometimes they are called trees of happiness and good luck.
To implement the idea you will need:
- cones;
- plaster or sponge;
- clay or plastic pot;
- tree branch;
- a ball of newspaper or a flower sponge;
- threads;
- spray paint.
Step-by-step instruction:
- Form a ball out of newspaper and wrap it with thread.
- Apply glue to the base of the cone and glue it onto the ball as tightly as possible.
- Glue the remaining pine cones onto the ball. Try to choose buds of a similar size.
- Point the end of a pine branch and make a hole in the bottom of the ball.
- Secure the branch in the ball with glue.
- Paint the resulting ball with paint. The ball is decorated with dried leaves, branches, beads, and colored ribbons.
- Prepare the plaster for work: spread it in a pot, making an indent of 3-5 cm from the edge.
- Insert the branch with the ball into the plaster solution and fix until dry.
- Disguise the plaster with small pine cones or moss.
Decorative ball
A ball made of pine cones will be a wonderful decorative element. It can be placed on a coffee table or hung from the ceiling. In order to make this craft, you need to cover a white foam ball with painted pine cones.
You need to start gluing from the middle to the edges. Afterwards, decorate the craft at your discretion.
Bird feeder
This craft, in addition to being beautiful, is also useful, as it will serve as a good outdoor bird feeder. To make it you need:
- Choose a larger cone;
- Spread the zest with condensed milk or honey;
- Mix different types of cereals in a suitable container;
- Roll sweet sticky cone in cereal mixture;
- Attach a cord to it and hang it outside.
Spruce night light
If you have an unnecessary glass jar and a working garland on your household, you can make a wonderful night light for your room.
Moreover, the process of work itself is quite simple, you just need to carefully place a ribbon with autonomous light bulbs or LEDs and pine cones in the jar, and close the container with a lid. If the garland is powered by electricity, then you can make a neat slot in the lid for the cord.
Tiered candle holder
This accessory can be made as follows:
- Prepare processed cones, candles and a wooden box;
- Carefully separate several layers of scales from one of the largest cones, attach a candle to the base and glue the previously removed scales onto it;
- Completely remove the scales from the next cone, stick the removed elements onto the second candle in a checkerboard pattern;
- In this way you can make several candlesticks, different in height, size and design;
- Glue the sides of the cones together to form a circle-shaped frame;
- Place the resulting composition on a wooden box and paint or decorate it according to personal preference and the availability of decorative elements.
There are many more ideas that can be realized from forest material such as cones. Experiment, take samples, get acquainted with master classes on crafts made from pine cones and realize wonderful ideas for useful and beautiful products.
https://youtu.be/DuxEO4Nya0Qhttps://youtu.be/8jK_TsO3FYY
_
DIY crafts from cedar cones
Compared to Christmas tree cones, cedar cones are denser, rounder, and also have rather large scales. Therefore, they are useful both for independent crafts and as additional decoration elements for ready-made models.
Christmas wreath
The “fruits” of cedar will make a rather large wreath, which can be placed in the center of the New Year’s table or hung on the front door, as is done in many countries. True, people often buy a ready-made wreath, but if you have free time, why not devote it to a creative, exciting business?
Moreover, a wreath of pine cones is easily made with your own hands, without any additional equipment.
We will need the following tools:
- glue gun,
- brown paint,
- stapler,
- decorations,
- and also... an old newspaper.
We will act like this:
- The base of the wreath is an old newspaper, which is first rolled up into a tube, and then bent into a ring and the ends are secured with a stapler or fairly strong glue.
- The next step is to color the newspaper brown or golden.
- To give the workpiece a shape, you can cover it with tape on top. All the same, this surface will be mostly hidden from view - besides, the tape creates a pleasant gloss.
- Now glue the pine cones to the wreath in even rows. The easiest way to do this is with a glue gun.
- Decorate with bows, ribbons and beads.
And here is a video instruction that will help you make a Christmas wreath from pine cones with your own hands.
Basket
You can also make a basket from this natural material. Moreover, in addition to the cones, you only need a few wires and decoration elements.
We proceed this way:
- The wire is cut into pieces.
- Then each cone is wrapped with wire, as shown in the photo.
- As a result, a chain is assembled from them.
- And connect the ring together.
- Prepare 2 more rings in the same way.
- And for the basket itself, 3 circles are woven.
- The rings are also connected to each other with wire (it no longer goes horizontally, but vertically) or with fairly strong glue.
- To make the bottom of the basket, 3 cones are connected together - the result is a flower.
- Next, the bottom is glued to the bottom circle.
- Connect the base to the handle - the basket is ready. You can put small gifts or tinsel, Christmas tree decorations, beautiful New Year's figures, a garland in it - in a word, complete freedom for imagination.
You can see the whole process clearly here (using the example of pine cones).
New Year's candlestick
And this original craft needs to be made from cedar or large pine cones. They have a rather lush, rounded shape, which allows you to make a beautiful vase - it will serve as the basis of a candlestick.
For production we will prepare:
- larger cones;
- glass for a candle (you can buy ready-made);
- glue gun;
- paint;
- cardboard;
- decorations to suit your taste.
We will act like this:
- First, we disassemble the cones into scales - this is one of those rare cases when we do not need the entire cone.
- Next, cut out a circle from cardboard. Its diameter should be 2 times larger than the diameter of a pre-prepared glass for a candle, which can be purchased at any souvenir store.
- Then we glue the first row of scales to the base, after which we make new rows. They must go strictly in a checkerboard pattern in relation to the previous ones: each new scale is glued between the two lower ones. All operations are easier to perform using a glue gun.
- We wait until everything dries and paint the scales - we get such a cute souvenir that can be an excellent addition to a gift. By the way, this craft has universal application - after all, you can put candles on the table on Valentine’s Day, and on March 8th - in a word, whenever you want.