Birch bark: harvesting, storage, properties
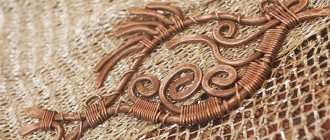
Botanists call birch bark the uppermost layer of the bark of this tree, the most elastic. It consists of many thin layers that easily allow air to pass through and retain heat. The structure of birch bark is such that when moistened, the material becomes very soft, bends and weaves easily. This is one of the most accessible natural materials, easy to process.
Birch bark has another useful quality: bacteria and microbes do not live on it. Therefore, boxes and containers made of birch bark have always been used for storing food. This same property has helped preserve priceless artifacts - ancient birch bark letters - to this day.
What else were made from birch bark? Almost everything. Wide tarred plates were sewn onto the frames of light boats, and shoes were woven from ribbons. Thin flexible ribbons were used to create jewelry from beads to belts, bracelets and headbands. Babies were raised in birch bark cradles. And there were caskets, boxes, dishes, tees and chests made of birch bark in any home.
Today, craftsmen have found a new use for the ancient craft: they use birch bark to make luxurious and stylish interior items, create bouquets, braid books and create frames with portraits, and make original souvenirs.
This is a very beneficial material for teaching children. DIY birch bark crafts develop children’s imagination and fine motor skills and introduce them to traditional folk art. Touching children's souvenirs warm hearts, because birch bark keeps little hands warm.
The harvesting of birch bark for crafts is carried out in June. Real craftsmen will never remove raw materials from living, especially young birch trees. Trees that have been freshly cut or blown down by the wind are used. To do this, an incision is made around the trunk up to 1 cm deep. The birch bark is cut vertically to 40-80 cm and a circular cut is made again. All that remains is to carefully pick up the corner. Thin strips are prepared in a similar way, but in a spiral. The removed layer is cleaned, slightly moistened and straightened. It is best to store such blanks in cardboard boxes, lined with paper so that the birch bark does not burn out, dry out or deteriorate. Birch bark ribbons are twisted with the white side out.
Harvesting birch bark for crafts
If you are fired up with ideas for crafts made from birch bark, you need to learn how to properly prepare it for creativity.
First of all, you should remember that the procurement of material should not harm nature. It is better to collect birch bark from fallen or cut down trees. Calculate the approximate amount of raw materials, because unused bark may deteriorate and go to waste.
The collection takes place in June. This period varies depending on where you live.
The easiest way to collect birch bark is in sheets. An incision is made on the bark along the trunk, 40 to 70 cm long. Then carefully separate the bark from the trunk; in a good season, peeling occurs easily on its own.
For some crafts that involve weaving, birch bark needs to be collected with ribbons. Then make a cut along the trunk 3-4 cm long, carefully peel off the bark and remove it in a spiral.
You just have to start
To model from birch bark you will need very little:
- PVA glue;
- punches of various shapes;
- wood burning device;
- markers;
- sharp knife.
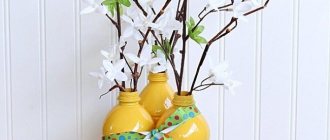
To begin with, you should try your hand at simple projects. For example, make a flower from birch bark. A bouquet of these flowers will be an excellent gift or decoration for any room. You can create a whole panel from flowers. Making this craft is quite suitable for children. Procedure:
- The birch bark plate is cleaned with fine sandpaper and soaked in salt brine. Then they are separated into two parts - yellow and white.
- A cardboard petal template is drawn 5-7 times on a yellow bark sheet.
- A 3x7 cm rectangle is cut out from the birch bark part. A fringe is cut along one edge, screwed onto a pencil, fixed with glue, and fluffed up. This is the middle of the flower.
- The petals are bent in an arc, face up. Then the narrow part is smeared with glue and glued to the middle. This is how the whole flower is assembled.
- You can use a skewer or twig as a stem, but thin wire wrapped in a spiral with thin birch bark ribbons is ideal. This allows you to give the flower any bend.
- Leaves are cut out from the remains of birch bark and glued to the stem. The flower is ready.
Children can be encouraged to do birch bark appliqué. Teenagers will appreciate the ability to burn pictures onto bark. Girls will love weaving weightless original bracelets. Tightly twisted thin strips of bark make excellent beads.
Birch bark products
When learning to work with new material, not only your hands, but also your soul must get used to it. The main advice for making birch bark crafts with your own hands for beginners is to be patient. It is also worth finding a specific tool:
- Wood chisels.
- Hole puncher.
- Electric burner.
- Stationery knife.
In order for birch bark products to last a long time, they must be lubricated with vegetable oil after production. After one or two days, excess oil is removed .
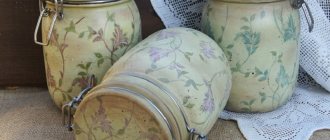
Making a box
This item can be used to store sweets, jewelry or needles and threads.
First you need to make a template for the future paper product. To work, you will need a circle with a diameter of 6 cm, as well as two strips 5 and 2 cm wide, and their length will be 35 cm. Then you have to cut out these parts from birch bark, and you need to make 4 circles. They are glued together in pairs and will become the bottom and also the lid of the product. To speed up the gluing process, the parts can be fastened with clothespins. At the next stage, you need to wrap a wide strip of material around a spool of tape, and glue a narrow one onto it. When the walls of the box are ready, you should measure their internal diameter and cut out another bottom from birch bark. It is inserted into the box, but before that its edges need to be treated with glue.
The last step will be to attach the large bottom, consisting of two circles of birch bark. The box is ready and you can start decorating it. In this matter it is necessary to show imagination.
Making a basket
This is a multifunctional product in which you can store various items. The basket can also be a great gift. To make a birch bark box, you must perform the following steps:
- A square of the required size is cut out, for example 20x20 cm.
- Diagonals are drawn on the workpiece, and then cuts are made from each edge along lines about 3 cm long. The height of the birch bark box depends on the size of the cuts.
- The sides of the basket are bent.
- A handle of the required size is cut out and glued to the product.
- Holes are made on the sides of the box and the edges of the handle using a hole punch.
Into the forest for berries and mushrooms
For novice craftsmen, you can entrust the manufacture of a box for a trip to the forest. Although it will take longer than the flower, the result will please the master and his parents. You need to prepare birch bark cloth and tapes for stitching, office clips or clothespins, a screwdriver, a pencil and ruler, an awl, and scissors.
The actions are performed step by step:
- The birch bark sheet is rolled into a cylinder, the edges overlap, and they are secured with clamps.
- Ribbons are cut from birch bark. Their length should be 40-50% greater than the height of the cylinder.
- Holes are made at the joint at equal distances. A birch bark ribbon is pulled through them. A canvas made of white birch bark and yellow ribbons from the lower part of the bark, or vice versa, look impressive. The clamps are removed.
- At the bottom, four high-rise cuts of several centimeters are made, they are folded inward, and sewn together with tape.
- Two narrow horizontal holes are pierced in the upper part, through which a wider ribbon is pulled - this will be the handle of the box.
- If desired, the walls of the box are decorated with applications made of birch bark of a contrasting shade or painted with acrylic paints.
Those who have already mastered simple techniques can try their hand at more complex crafts - multi-layered, perforated, with lids or intricate decorations.
DIY birch bark box
We present to your attention a master class on creating a birch bark body for beginners. It is worth noting that although the product can be created by an inexperienced artisan, this will require several hours.
It is assumed that the material is available and ready for use.
- What does a sword mean to a man?
A variety of engraver attachments for every taste and color
- A still life with roses will delight you longer than fresh flowers
Use the birch bark sheet of the size you need. Let's assume its size is 40x30 cm. Prepare thin ribbons for “sewing” the product. Their length should be enough to connect the edges of the box. Make the thickness approximately 0.5-0.7 cm.
Fold the sheet overlapping the edges and secure them, for example, with paper clips or large paper clips. Make holes on the edges that overlap each other.
Use a utility knife or awl. To make the box beautiful and neat, mark the locations of the holes in advance.
“Sew” the cylinder using the birch bark ribbons prepared earlier. The clamps can now be removed. On the tube, mark the bottom level at 10 cm. Cut the birch bark into 4 parts up to this mark at an equal distance from each other. Fold the bottom pieces over each other and “sew” them together using thin tape.
The body is ready. It can be decorated with pieces of birch bark of a different color and a handle can be attached if necessary. In the photo you see a birch bark craft in finished form.
- Dopp kit. Leather work of art.
- Choosing a brick of your life
- DIY shoes for life
There are many ideas and instructions for birch bark crafts on the Internet. Use them or come up with your own options. Your creativity will definitely not leave anyone indifferent!
The warmth of native nature
Working with birch bark is surprisingly pleasant. It is a living, warm material, flexible and responsive. Under the hands of a master, it takes on any desired shape. Preserving folk traditions, modern craftsmen come up with new techniques and unusual uses of birch bark. Once you try it, it will be very difficult to stop, because birch bark fascinates and inspires you to create beautiful things.
(Visited 127 times, 2 visits today)